Table of Contents
Advertisement
Quick Links
Visit us online at
www.uswatersystems.com
Water Softener with Chlorine and Chloramine
Owners Manual
Models:
087-FNLT-XXX-HY1
REVISION #
4.5
REVISION DATE May 12, 2015
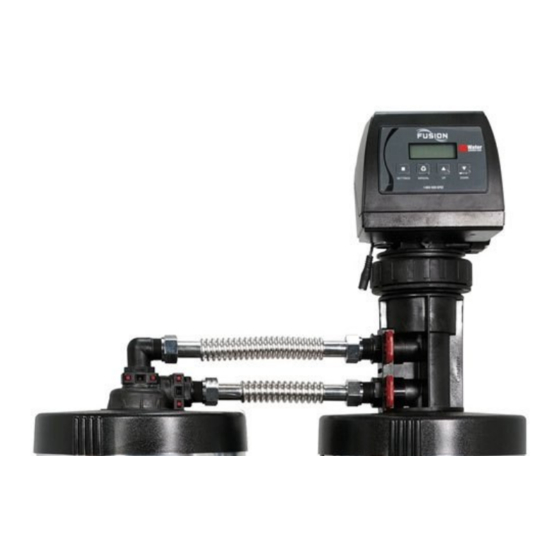
Fusion NLT Hybrid
Removal
US Water Systems Corporate Office
1209 Country Club Road
Indianapolis, IN 46234
1-800-608-8792
info@uswatersystems.com
Advertisement
Table of Contents

Subscribe to Our Youtube Channel
Related Manuals for US Water Systems FNLT-100-HY


Summary of Contents for US Water Systems FNLT-100-HY
- Page 1 Visit us online at www.uswatersystems.com Fusion NLT Hybrid Water Softener with Chlorine and Chloramine Removal Owners Manual Models: 087-FNLT-XXX-HY1 US Water Systems Corporate Office 1209 Country Club Road Indianapolis, IN 46234 1-800-608-8792 REVISION # info@uswatersystems.com REVISION DATE May 12, 2015...
-
Page 2: Table Of Contents
Be sure to check the entire softener for any shipping damage or parts loss. Also note dam- age to the shipping cartons. Contact US Water Systems at 1-800-608-8792 to report any shipping damage within 24 hours of delivery. Claims made after 24 hours may not be hon- ored. -
Page 3: Proper Installation
Properly ground to conform with all gov- er system with a chlorine reducing media. erning codes and ordinances. Contact US Water Systems for Chlorine Use only lead-free solder and flux for all and Chloramine removal equipment. Fu- sweat-solder connections, as required by sion Hybrid Water softeners can remove state and federal codes. - Page 4 System Dimensions Model Tank Size FNLT-100-HY 9” X 48” 61 7/8” 50 7/8” 9” FNLT-150-HY 10” X 54” 67 7/8” 57” 10” FNLT-200-HY 12” X 52” 65 7/8” 55 1/4” 12” FNLT-250-HY 13” X 54” 67 7/8” 57 5/8” 13”...
- Page 5 System Dimensions 15” Brine Tank 17.04...
-
Page 6: Specification
Specifications Continuous operation at flow rates greater than the service flow rate may affect capacity and efficiency performance. The manufacturer reserves the right to make product improvements which may deviate from the specifications and descriptions stated herein, without obligation to change previously manufactured products or to note the change. ... -
Page 7: How Your Water Conditioner Works
How Your Water Conditioner Works The principle behind water softening is simple chemistry. A water softener contains resin beads which hold electrically charged ions. When hard water passes through the softener, calcium and magnesium ions are attracted to the charged resin beads. The result is remov- al of calcium and magnesium ions which produces soft water. -
Page 8: Media Installation
Softener Preparation Fusion NLT Tank Installation Instructions WATER PRESSURE: A minimum of 20 pounds of water pressure is required for regeneration valve to operate effectively. ELECTRICAL FACILITIES: An uninterrupted alternating current (A/C) supply is required. Note: Other voltages are available. Please make sure your voltage supply is compatible with your unit before installation. EXISTING PLUMBING: Condition of existing plumbing should be free from lime and iron buildup. - Page 9 Softener Preparation 3) Place a piece of duct tape over the riser tube of one of the tanks, so no gravel or carbon enters the riser while filling. Both tanks are the same and it does not matter which tank is used for the carbon and which tank is used for the softening resin.
- Page 10 Softener Preparation 7) Remove the hybrid tank inter-connect parts and lay them out. The Primary Tank Valve Adaptor, Control Valve Collar and Control Valve Nut may be assembled when they are re- ceived. Separate these pieces by loosening and removing the Control Valve Nut and pull- ing the Control Valve Collar and Primary Tank Valve Adaptor apart.
- Page 11 Softener Preparation 6) Separate the parts and lay them out like the picture on the previous page. 7) Lubricate the distributor and tank O-ring on the primary tank adaptor. Install an upper basket on the bottom of the primary tank adaptor. Slide the primary tank adaptor upper basket over the distributor tube on the CARBON tank.
- Page 12 Softener Preparation 10) Lubricate the distributor and tank O-ring on the secondary tank adaptor. 11) Install the upper basket on the bottom of the secondary tank adaptor by lining up the slots and turning it clockwise to lock the basket into the adaptor. Then slide the sec- ondary tank adaptor on the SOFTENER RESIN tank, push it down and tighten it hand tight.
- Page 13 Softener Preparation 13) Use the inter-connect tools to tighten the collar on the valve. 14) Lubricate the distributor and tank O-rings on the primary tank valve adaptor. 15) Install the primary tank valve adaptor on the primary tank adaptor. Use the supplied tool to tighten it in the primary tank adaptor.
- Page 14 Softener Preparation 17) Place the valve on the primary tank adaptor and tighten the collar hand tight. DO NOT use tools. Tightening the collar hand tight is sufficient. 18) Connect the tanks together using the stainless steel tubes. If the threaded adaptors were previously installed, remove the red clips and pull the adaptors out.
- Page 15 Softener Preparation 21) Install a threaded adaptor in the secondary tank adaptor lower port. Install the red clip to secure the threaded adaptor in the secondary tank adaptor. Attach the bottom stain- less steel tube from the primary tank adaptor to the secondary tank adaptor. Tighten the tube to the threaded adaptor using channel locks.
- Page 16 Softener Preparation 23) Install the 90 degree angled threaded adaptor on the other end of the longer stainless steel tube. Place the angled threaded adaptor in the top port on the secondary tank adaptor and secure it with a red clip. Now tighten the longer stainless steel tube on the angled threaded adaptor using channel locks.
-
Page 17: Installation Instructions
Installation Instructions 1. If your hot water tank is electric, turn off the power to it to avoid damage to the element in the tank. 2. If you have a private well, turn the power off to the pump and then shut off the main wa- ter shut off valve. - Page 18 Installation Instructions 5. Connect the drain hose to the valve and secure it with a hose clamp. Run the drain hose to the nearest laundry tub or floor drain. This can be ran up overhead or down along the floor. Drain hose should be a minimum of 1/2”. If running the drain line more than 20 ft overhead, it is recommended to increase the hose size to 3/4”.
- Page 19 Installation Instructions 6. Connect the brine line to the control valve by removing the nut on the brine elbow on the control valve and sliding it on the brine line. There is a brass tube stiffener pre- installed in the brine line. Make sure this is in the brine line before installing the line in the control valve elbow.
- Page 20 Installation Instructions Now connect the brine line to the brine tank safety float assembly. Remove the brine tank lid and the brine well cap. Then push the brine line through the brine tank and brine well. Remove the nut from the brine safety valve elbow. BE CAREFUL not to lose the sleeves in the nut.
- Page 21 Installation Instructions Slide the nut and sleeves over the brine line. Be sure to install the sleeves properly (see pictures below).
- Page 22 Installation Instructions Visit us online at www.USWaterSystems.com Give us a call at: 1-800-608-8792...
- Page 23 Installation Instructions Be sure brass stiffener is in the brine tubing, then push the tubing in the elbow. Now tighten the nut by hand. Be sure not to cross thread it. Now tighten it an additional full turn with pli- ers or channel locks.
- Page 24 Installation Instructions 7. Using the Allen Key (included), place the unit in the bypass position (See page 19 for by- pass valve handle placement. Slowly turn on the main water supply. At the nearest cold treated water tap nearby remove the faucet screen, open the faucet and let water run a few minutes or until the system is free of any air or foreign material resulting from the plumbing work.
- Page 25 Installation Overview...
-
Page 26: System Start Up
System Start-Up Key Pad Configuration SET- This function is to enter the basic set up TINGS information required at the time of installa- tion. MANUAL This function is to initiate an immediate or REGEN delayed manual regeneration. DOWN / Increase or decrease the value of the set- tings while in the programming mode. -
Page 27: Programming Instructions
Programming Instructions The factory setting for WATER TYPE is WELL / OTHER. Do not adjust this setting until af- ter start-up is complete. If the setting is changed to MUNICIPAL before start-up, the back wash cycle will be skipped. The Fusion Hybrid Water Softeners will not be changed. CHANGE SETTINGS IF YOU CHOOSE HIGH EFFI- Settings... -
Page 28: About The System
About The System Operation During A Power Failure In the event of a power failure, the valve will keep track of the time and day for 48 hours. The programmed settings are stored in a non-volatile memory and will not be lost during a power failure. -
Page 29: System Configuration
New Sounds You may notice new sounds as your water softener operates. The regeneration cycle lasts up to 180 minutes. During this time, you may hear water running intermittently to the drain. Precision Brining Regeneration Process When the system capacity is near exhausted, a regeneration is necessary to restore the system to full capacity. -
Page 30: Maintenance
Manual Bypass In the case of emergency, such as an overflowing brine tank, you can isolate your water sof- tener from the water supply using the bypass valve located at the back of the control. In nor- mal operation the bypass is open with the on/off knobs in line with the inlet and outlet pipes. To isolate the softener, simply rotate the knobs clockwise (as indicated by the word BY- PASS and arrow) until they lock. - Page 31 Cleaning or Replacing Injectors Sediment, salt and silt will restrict or clog the injector. A clean water supply and pure salt will prevent this from happening. The injector assembly is located on the right side of the control valve. This assembly is easy to clean.
- Page 32 Replacing Brine Line Flow Control (BLFC, COMPLETED BEFORE PURCHASE) TIP: Markings on the BLFC washer should face the direction as shown here. 1. Remove the red clip that secures the brine elbow. 2. Remove the BLFC holder from the elbow fitting. 3.
- Page 33 Care of Your System To retain the attractive appearance of your new water softener, clean occasionally with mild soap solution. Do not use abrasive cleaners, ammonia or solvents. Never subject your sof- tener to freezing or to temperatures above 100°F. Resin Cleaner An approved resin cleaner must be used on a regular basis if your water supply contains iron.
-
Page 34: Sanitizing Procedure
Sanitizing Procedure Care is taken at the factory to keep your water softener clean and sanitary. Materials used to make the softener will not infect or contaminate your water supply, and will not cause bacte- ria to form or grow. However, during shipping, storage, installing and operating, bacteria could get into the softener. -
Page 35: Main Repair Parts
Main Repair Parts... - Page 36 Main Repair Parts - Connectors Replacement Part Number Part Description DWG # Quantity 60010020 3/4" NPT ELBOW Replacement Part Number Part Description DWG # Quantity 60010019 1" NPT STRAIGHT 60010020 Replacement Part Number 3/4" NPT ELBOW Part Description DWG # Quantity 60010023 3/4"...
-
Page 37: Control Valve Exploded View
Control Valve Exploded View VALVE REPAIR PARTS LIST Replacement Replacement Part Description Part Description Part Number Part Number 60010127 INJECTOR SET #0000 BLACK 60010129 UPFLOW PISTON ASSEMBLY 60010126 INJECTTOR SET #000 GREY 60010171 DOWNFLOW PISTON ASSEMBLY 60010035 INJECTOR SET #00 VIOLET 60010130 SEAL &... -
Page 38: Control Valve Parts List
Control Valve Parts List Visit us online at www.USWaterSystems.com Give us a call at: 1-800-608-8792... - Page 39 Power Head Exploded View...
-
Page 40: Power Head Parts List
Power Head Parts List Visit us online at www.USWaterSystems.com Give us a call at: 1-800-608-8792... -
Page 41: Trouble Shooting
Trouble Shooting Issue Possible Cause Possible Solution A. Unit fails to initiate a 1. No power supply. Check electrical service, fuse, etc. regeneration cycle. 2. Defective circuit board. Replace faulty parts. 3. Power failure. Reset time of day. 4. Defective meter. Replace turbine meter. - Page 42 Visit us online at www.USWaterSystems.com Give us a call at: 1-800-608-8792...
-
Page 43: Warranty
Ten Year Valve and Electronics Guarantee US Water Systems will replace any part on the valve or electronics which fails within ten years from date of manufacture, as indicated by the serial number, provided the failure is due to a defect in material or workmanship.
Need help?
Do you have a question about the FNLT-100-HY and is the answer not in the manual?
Questions and answers