Table of Contents
Advertisement
Quick Links
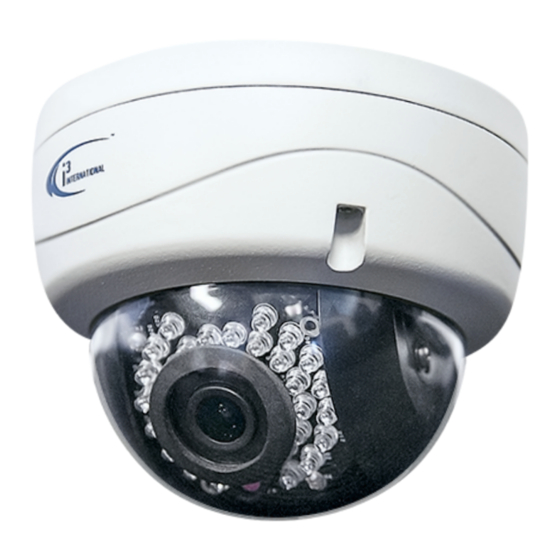
Network IR Dome Camera
SAFETY
When installing your Ax44/66 camera be sure to avoid:
•
excessive heat, such as direct sunlight or heating appliances
•
contaminants such as dust and smoke
•
strong magnetic fields
•
sources of powerful electromagnetic radiation such as radios or TV transmitters
•
moisture and humidity
•
areas with mechanical vibrations
•
fluorescent lamps or objects that reflect light
•
unstable light sources as this may cause flickering
•
temperatures below -10° Celsius or 14° Fahrenheit and above 50° Celsius or 122°
Fahrenheit for Ax46-series cameras, -25° Celsius or -13° Fahrenheit and above 60°
Celsius or 140° Fahrenheit for Ax66-series cameras
For more details on installation and operation, please refer to the CD
•
provided.
POWER SUPPLY
Ensure the supplied voltage meets the power consumption requirements of this camera
before powering the camera on. Incorrect voltage may cause irreparable damage to the
video camera and will effectively void the camera warranty. PoE power is supported by
this camera series.To mount the camera, do the following:
CLEANING
•
For maximum optical clarity, the camera dome or lens must remain clean. Use a soft,
dry cloth to remove finger prints or dust from the dome cover.
•
Use a blower to remove dust from the lens.
•
Clean the body with a soft, dry cloth. If it is very dirty, use a cloth dampened with a
small quantity of neutral detergent, then wipe dry.
•
Do not use volatile solvents such as alcohol, benzene, or thinners, as they may dam-
age the surface finishes.
SERVICING
To avoid electrical shock and to preserve the product warranty, DO NOT disasemble the
camera. Refer servicing to qualified personnel only.
PACKAGE CONTENTS
1.
User Manual CD x1
2.
Guide Pattern sticker x1
3.
Torx key x1
4.
Plastic Anchor x3
5.
Round Head Screw (Tapping Type) x3
Ceiling Mounting
Hole
User Guide
IP Finder
1
i3-TRNG-CAMS-Ax46/66-series-QuickGuide.indd
Hole
Hole
Hole
2
3
4
Quick Start Guide
CAMERA PARTS AND DEFINITIONS
Ø111
Ø79.1
Mounting base
Horizontal stand
Vertical stand
Lower dome
Connect the PoE or DC12V power connector.
PoE (IEEE 802.3af): Connect the RJ-45
connector to a PoE compatible network device
that supplied power through the Ethernet cable.
DC12V: Connect the DC12V power connector to
a DC12V power source.
WARNING! DO NOT connect both PoE and
DC12V power connectors at the same time.
For DC power supply use, make sure the
polarity is correct to avoid malfunction and /
or camera damage.
5
Ax46/66-series
Ø100.4
Unit: mm
Infrared lamp plate
Lens
Black liner
Safety rope
Cables
Power line
Network cable
Rev.
130725
Advertisement
Table of Contents

Subscribe to Our Youtube Channel
Related Manuals for i3 International Ax46 Series


Summary of Contents for i3 International Ax46 Series
-
Page 1: Quick Start Guide
Quick Start Guide Network IR Dome Camera Ax46/66-series CAMERA PARTS AND DEFINITIONS SAFETY When installing your Ax44/66 camera be sure to avoid: • excessive heat, such as direct sunlight or heating appliances Ø111 • contaminants such as dust and smoke Ø100.4 •... - Page 2 You should be able to see the camera image on the screen. Black liner If you do not see the camera image on the screen, call i3 International tech support for troubleshooting tips: 1.877.877.7241 14. Make sure that the latest version of GiPi updater is installed on your SRX-Pro 6.
Need help?
Do you have a question about the Ax46 Series and is the answer not in the manual?
Questions and answers