Table of Contents
Advertisement
Advertisement
Table of Contents

Subscribe to Our Youtube Channel
Related Manuals for ITS Telecom CGW-I


Summary of Contents for ITS Telecom CGW-I
- Page 1 CGW-I Installation and Operation Guide Version 3.18 Release 1 April 2009...
- Page 2 CGW-I Cellular Gateway BRI-GSM Interface Installation and Operation Manual VERSION 3.18 ED. 1 APRIL, 2009...
- Page 3 NOTICE No part of this document may be reproduced or transmitted in any form or by any means (electronic, photocopying, recording, or otherwise) without the prior written permission of ITS. The trademark and service marks of ITS, including the ITS mark and logo, are the exclusive property of ITS, and may not be used without permission.
-
Page 4: Table Of Contents
PBX Trunk Configurations................. 7 Basic PBX / CGW-I without Synchronization .............7 NT1 / CGW-I Synchronization..................7 ISDN Extension / CGW-I Synchronization ..............8 PBX Proprietary Telephone Interface with NT Card for CGW-I Synchronization ..8 PBX NT / CGW......................9 External Synchronization Feature ................10 2.5. - Page 5 Controlling the CGW-I ....................41 3.5. Report Menu.................... 42 Properties .........................42 Statistics ........................43 Reading the CDR (Call Detail Record) ..............45 System Alarms ......................46 System Statuses ......................48 4. Appendix A: Technical Specifications......50 CGW-I Cellular Gateway BRI-GSM : Installation and Operation Manual...
-
Page 6: Overview
This manual describes the installation, setup and operation of your new Cellular GateWay for ISDN (BRI interface), which we will now simply refer to as the CGW-I throughout this manual. It is intended for System Installers and Administrators and should be read before the installation, setup and programming of your device. -
Page 7: Main Features
Incoming and Outgoing Call Features Return up to 1,500 mobile calls directly to the calling Intelligent Routing DDI (Direct Dial-In). CGW-I stores the link between the dialing extension and the dialed cellular number. When a missed mobile call is returned, CGW-I recognizes the Caller ID and routes the caller to the dialer’s extension. - Page 8 CLIP / CLIR Identification Presentation/Restriction setting. Protect each SIM within the CGW-I from unauthorized SIM PIN Functionality use if removed. Configure your CGW-I to work permanently with only a Network Lock specific operator. Allow calls to automatically connect to the strongest Roaming available signal or restrict them to a specific network operator.
-
Page 9: Setting Up Your Cgw-I
2. 1. Setting Up Your CGW-I This section lists the full contents of what you have received with your new CGW-I device, describes how it looks and explains how to physically install it and verify that it is working properly. Subsequent chapters will explain how to configure your device using the CGW-I Manager software. -
Page 10: Cgw-I Physical Description
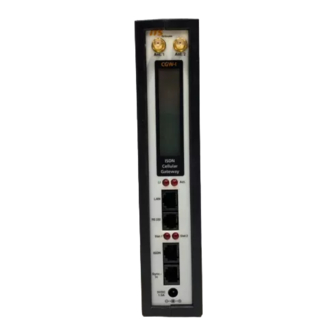
Cellular Engine Indicators ISDN Connector Sync-In Connector Power Supply Connector Figure 2-1: Front View of the CGW-I Box SIM 1 Slot SIM 2 Slot Figure 2-2: Bottom View of the CGW-I Box CGW-I Cellular Gateway BRI-GSM : Installation and Operation Manual... -
Page 11: Pre-Installation
PIN in the Channel Settings screen (see page 33) before you can make changes to the CGW-I and so that it will work after power up and reset. If you enter an incorrect PIN three times in the Channel Settings screen and are locked out by the SIM, you must enter the PUK code to unlock the SIM. -
Page 12: Pbx Trunk Configurations
• If the prefix is landline, it creates a connection for the call to leave via the PSTN interface • If the prefix is cellular, it routes the call to the CGW-I interface and the CGW-I connects the call through a cellular network operator. -
Page 13: Isdn Extension / Cgw-I Synchronization
PBX to the Synch-In interface of the CGW, the CGW-I is able to ensure synchronization of the NT source clock it sends to the PBX by using the source clock that the PSTN sends to the PBX. -
Page 14: Pbx Nt / Cgw
PBX requires a special NT card to create an additional NT interface leaving the PBX which will provide the source clock. By connecting the new PBX NT interface to the Synch-In interface of the CGW, the CGW-I is able to ensure synchronization of the source clock it sends back to the PBX. -
Page 15: External Synchronization Feature
CGW-I time clock becomes a “slave” to the external time clock since it takes the clock it receives from the NT source. When this feature is disabled, the CGW-I becomes the “Master” of the time clock it sends to the PBX. You should also disable External Synchronization when the CGW-I connects to a TE interface. -
Page 16: Sim Card Insertion
SIM Card Insertion CAUTION: To avoid damage to your CGW-I device, you should disconnect the 9V adapter from the electric power-outlet when inserting or removing the SIM card. The figure above can be used as guideline for the following steps: 1. -
Page 17: Connecting To The Cgw-I
If you are only using one SIM card, make sure that the channel number is the same as the antenna connector you are using (i.e., SIM1 uses Ant.1). Connecting the Communication Lines The following diagrams show the different cables that connect to your device. RS-232 Cable CGW-I Cellular Gateway BRI-GSM : Installation and Operation Manual... - Page 18 RJ-45 Cable The following diagram shows how to connect the different cables to your device. 9VDC 1.5A Power Supply CGW-I Cellular Gateway BRI-GSM : Installation and Operation Manual...
-
Page 19: Turning On Your Cgw-I
Turning on Your CGW-I CAUTION: To avoid damage to your CGW-I device, the 9V adapter should be disconnected from the electric power-outlet when inserting or removing the SIM card. After you connect the supplied 9VDC power supply converter cable into the 9VDC port of the CGW-I device plug it into the appropriate power supply. -
Page 20: Lcd Messages
If there is no signal, the number of the Check operator appears with NoSig. antenna location. See Operator Number is displayed when the Reception Number value is selected in LCD Operator Level, pg 48. Display (see page 29). CGW-I Cellular Gateway BRI-GSM : Installation and Operation Manual... - Page 21 When an incorrect PIN is entered and the Call your card is locked, you must call the network network operator to get the correct PUK code to operator to unlock the code. get the PUK code. CGW-I Cellular Gateway BRI-GSM : Installation and Operation Manual...
- Page 22 Number value is selected in LCD Operator Display (see page 29). No SIM Time The credit on the SIM card is finished. Insert a new SIM card or perform Reset Parameters. CGW-I Cellular Gateway BRI-GSM : Installation and Operation Manual...
-
Page 23: Cgw-I Manager
2. At the end of each stage of installation, click the Next button to continue. GUI Requirements CGW-I Manager is designed to run on screens set to 1024 x 768 resolution. Any other setting may not display the program properly. 3.2. General Features... -
Page 24: Status Bar
The Status bar at the bottom of the Main screen displays important messages about the current screen or how to get further Help. Help CGW-I Manager comes with context sensitive Help which describes each field and button. • To view Help for a window, press the screen’s Help button. -
Page 25: View Menu
Select the Toolbar option (i.e., checked) to display the Toolbar at the top of the screen. Status Bar Select the Status Bar option (i.e., checked) to display the Status bar at the bottom of the screen. CGW-I Cellular Gateway BRI-GSM : Installation and Operation Manual... -
Page 26: Communication Menu
The Modem option lets you communicate with your CGW-I from a PC using a modem. Note: E-mail system alarms that you set can only be sent if your CGW-I is connected to a LAN with an IP connection. CGW-I Cellular Gateway BRI-GSM : Installation and Operation Manual... - Page 27 CGW-I device you are connecting to, then click OK to accept your choice and close the Device Selection window. Note: Since you are connecting with a modem, a phone number of the CGW-I must be defined. See the Device Selection section for more details on defining a modem.
-
Page 28: Device Selection
Click the Device button in the Communication Selection window. Note: If you select either Network or Modem to communicate with your CGW-I, the network administrator must add the contact information of the CGW-I unit to the Device Database. Since the Root branch cannot contain a device, you must first create a new folder that you will use to store a device. - Page 29 To add a new device to a folder: 1. Go to the folder you are creating the device then click the New Device button. The Device Details window opens. 2. Define the settings required to communicate with your CGW-I device. Enter the following parameters: Field...
-
Page 30: Network Settings
CGW-I device. It is recommended that you change the password. A gray bar will show the loading progress, followed by a message indicating whether the action was successful or not. If it was, the different CGW-I Manager screens now display all the current parameters of the connected CGW-I. -
Page 31: Setting A Password
CGW-I device before you can upload parameters to it. A gray bar will show the sending progress, followed by a message indicating whether the action was successful or not. Setting a Password A password must be filled in before reading or sending parameters. -
Page 32: System Menu
3.4. System Menu The System menu lists the following options for configuring your CGW-I. • ISDN Setting • System Settings • Channel Settings • System Operation • Prepaid Settings • Control The following sections describe each option and the windows that they open. -
Page 33: System Settings
SIMs are idle. If one SIM is busy, the call is automatically routed to the available card. Note: The CGW-I will not balance calls between channels if Toll Restrictions setting restrict calls to specific SIMs. Alternate Incoming... - Page 34 Defines site of device. Displayed in Customer Details on opening screen. SIM 1 Number of SIM 1. Displayed in Customer Details on opening screen. SIM 2 Number of SIM 2. Displayed in Customer Details on opening screen. CGW-I Cellular Gateway BRI-GSM : Installation and Operation Manual...
-
Page 35: Toll Restrictions
Toll Restrictions The Toll Restriction window defines up to 22 different cellular operator prefixes that will either be permitted or forbidden to go through the CGW-I device and the channel through which they will be routed. Each prefix can be up to 7 digits long. Each Allowed list can hold up to 20 prefixes. The Not Allowed list can hold up to 12 prefixes. - Page 36 1. Click the prefix you want to delete. 2. Click the Delete button to delete. You are asked to verify the delete. 3. Click Yes to approve the delete. The prefix no longer appears on the prefix list. CGW-I Cellular Gateway BRI-GSM : Installation and Operation Manual...
-
Page 37: Channel Settings
Mobile to FIX Gain Displays the volume level (decibels) of the sound stream Control leaving each channel to the fixed telephone extension. Click the Volume Gain button to adjust the level. CGW-I Cellular Gateway BRI-GSM : Installation and Operation Manual... -
Page 38: Adjusting The Volume Gain Level
OK. Operation System Parameters The Operation System Parameters window lets you enable the display of Caller IDs and define call routing options. CGW-I Cellular Gateway BRI-GSM : Installation and Operation Manual... -
Page 39: Operation System Parameters
Sets the Inter Digits Timeout – maximum time interval in seconds between DTMF digit inputs. Exceeding this time interval will execute a call. Default setting – 10. Maximum setting – 45. CGW-I Cellular Gateway BRI-GSM : Installation and Operation Manual... - Page 40 New Dial tone code during conversation using cellular phone’s keypad, which provides the new Dial tone for through calling. It is possible to define the New Dial tone code using CGW-I Manager - configuration PC application. End of Call – Busy...
- Page 41 Database. Links Table Your CGW-I device can store up to 1,500 links between outgoing caller IDs and dialed numbers. When a Direct Dial-In (DDI) calls back, your device recognizes the DDI’s cellular number in the Links Table and can route the call to the extension of the person that last dialed this cellular number.
- Page 42 CGW-I Cellular Gateway BRI-GSM : Installation and Operation Manual...
- Page 43 2. Edit the fields as required. 3. Click OK to confirm. To delete a subscriber: 1. Select a subscriber on the Users List. 2. Click the Delete button. The subscriber is deleted. CGW-I Cellular Gateway BRI-GSM : Installation and Operation Manual...
-
Page 44: Prepaid Settings
Any calls made beyond the 1,000 minutes will cost more. In such a case, you must set the Prepaid Time to 1,000 to alert you must stop using the card and replace it with a new discounted card. CGW-I Cellular Gateway BRI-GSM : Installation and Operation Manual... - Page 45 Prepaid, Free, and Remaining Prepaid) are reset. Range: 1-28 Reset Time The time that your SIM time counters (i.e., Prepaid, Free, and Remaining Prepaid) are reset on the day you have set for the associated SIM card. CGW-I Cellular Gateway BRI-GSM : Installation and Operation Manual...
-
Page 46: Controlling The Cgw-I
Range: 0-99 Controlling the CGW-I The System menu includes a number of options for resetting, clearing and closing your CGW-I device. To choose one of these options, select: System Control. The options are described below: Function Description Reset Device Performs a reset on your device if it stops responding. -
Page 47: Report Menu
3.5. Report Menu The Reports menu lists the following options to monitor how your CGW-I is handling call traffic: • Properties • Statistics • CDR (Read and Clear) • Alarms • Status Each option is described in one of the following sections. -
Page 48: Statistics
The counter is reset to 0. You can check and reset multiple counters at the same time, but CGW-I Manager will only reset the counters that are checked. Note: When you reset checked counters, CGW-I Manager makes a connection to the device. CGW-I Cellular Gateway BRI-GSM : Installation and Operation Manual... - Page 49 Unit value defined in the System Operation screen. Reading the CDR (Call Detail Record) The Read CDR Records window lets you view the current Call Detail Record of both channels or open a previously saved record. CGW-I Cellular Gateway BRI-GSM : Installation and Operation Manual...
-
Page 50: Reading The Cdr (Call Detail Record)
2. Enter the name for the new CDR you want to create and click OK. The file is saved in the default CGW-I directory. To open an existing CDR or to change the path of the new CDR: 1. -
Page 51: System Alarms
You must check the method of notification (i.e., SMS, E-mail) you want for each alarm. Note: Your CGW-I can only send an E-mail system alarm if it is connected to a LAN with an IP connection. CGW-I Cellular Gateway BRI-GSM : Installation and Operation Manual... - Page 52 255. Device Display Name Enter the name of your device that is displayed on E-mail Device E-mail Account Enter the account used to send all notifications for your device. CGW-I Cellular Gateway BRI-GSM : Installation and Operation Manual...
-
Page 53: System Statuses
(Receiving incoming call) • Initialize (After Reset or Power Up) • Stopped (Due to communication error) • HW Reset • No Radio Engine • Disable • Sending SMS • No SIM Time. CGW-I Cellular Gateway BRI-GSM : Installation and Operation Manual... - Page 54 (Receiving an incoming call) • Initializing (After Reset or Power Up) • ISDN Interface Error Layer (ISDN Protocol Layer error) • No Sync (Synchronization error) • No Link (PBX physical link error) CGW-I Cellular Gateway BRI-GSM : Installation and Operation Manual...
-
Page 55: Appendix A: Technical Specifications
ISDN – RJ-45 (2) Internal Backup Battery Lithium battery Power Supply Input: 110VAC, 60Hz 230VAC, 50Hz Power Supply Output: 9VDC, 1.5A Temperature Range 0°C-45ºC /32ºF-113ºF Max. Relative Humidity Dimensions (HxWxD) 215x42x125mm (without connectors) CGW-I Cellular Gateway BRI-GSM : Installation and Operation Manual... - Page 56 CGW-I Cellular Gateway BRI-GSM : Installation and Operation Manual...
Need help?
Do you have a question about the CGW-I and is the answer not in the manual?
Questions and answers