Table of Contents
Advertisement
Quick Links
Advertisement
Table of Contents

Related Manuals for Sunny Health & Fitness SF-E1114


Summary of Contents for Sunny Health & Fitness SF-E1114
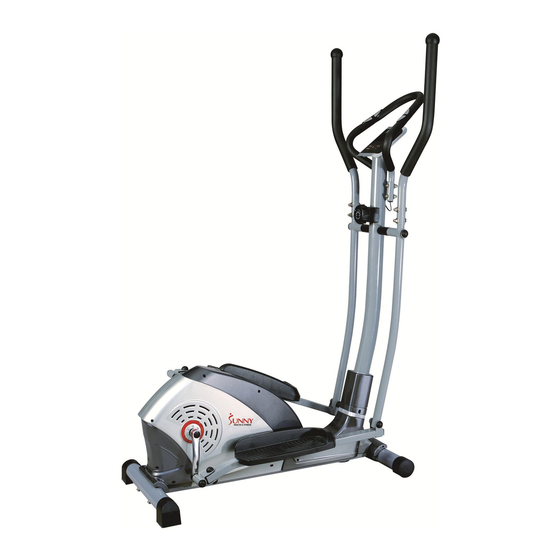
- Page 1 The specifications of this product may vary from this photo and are subject to change without notice. For Customer Service, please contact: support@sunnyhealthfitness.com.
-
Page 2: Important Safety Information
Important Safety Information We thank you for choosing our product. To ensure your safety and health, please use this equipment correctly. Please read the information below carefully before using this equipment. It is important to read this entire manual before assembling and using the equipment. Safe and effective use can only be achieved if the equipment is assembled, maintained and used properly. -
Page 3: Exploded Diagram
EXPLODED DIAGRAM... -
Page 4: Parts List
PARTS LIST DESCRIPTION DESCRIPTION Main frame Square end cap Front bottom tube Screw M8×55 Rear bottom tube Washer d8x1.2 End cap Nylon nut M8 End cap Screw M6×35 Washer Screw ST4.2X18 φ6×φ12×1.2 Bolt M8XL75 Nylon nut M6 Spring washer D8 40L/R Pedal 1pr. -
Page 5: Assembly Instructions
Nut M8 Pulse wire Handlebar grips Screw M8x38 27L/R Handlebar 1pr. Hand Grip 28L/R Swing bar 1pr. Cap S13 Round end cap Screw M8×45X8 Curved washer Connecting pulse Φ20×d8.5×R12.5 wire Wave washer Cap S14 Φ20×Φ28×0.5 Round end cap ASSEMBLY INSTRUCTIONS STEP 1: Fix the front bottom tube (2) and the rear bottom tube (3) to the mainframe (1) with bolts (7), curved washers (9). - Page 6 Step 2: Insert handlebar post (17) through the cover of the handlebar post (14), then connect the sensor wire (12) to the connecting sensor wire (15) securely. Connect tension wire (11) and the tension control wire (16) according to diagram below. Lastly, attach the handlebar post (17) onto the mainframe (1) with screws (13), spring washers (8) and curved washers (9) then slide down the cover of the handlebar post (14).
- Page 7 Step 3: 1. Tighten the swing tubes (28R/L) to handlebar post (17) with wave washers (63), screws (55), spring washer (8) and flat washers (54). *Note: do not screw it too tightly. ★ CAUTION: For next step: Part 43 is labeled L for LEFT and R for RIGHT. Please make sure to turn 43L Counter clockwise and 43R clockwise.
- Page 8 3. Connect the swing tubes (28R/L) to the pedal support tubes (41R/L) with screw (34), flat washer (35), nylon nut (36). Now tighten screw (55) screw (34) and nylon nut (51R/L). Last; install cap (31), cap (48), and cap (60). 4.
- Page 9 Step 4: Firstly, connect the pulse wire (57) with the connecting pulse wire (62) (coming out from the hole on the handlebar post (17)). Then screw the hand grip (59) to the handlebar post (17) with the screw (58), the arc washer (30) and the nut (25).
- Page 10 Step 5: 1. Tighten the L/R handlebars (27L/R) to the L/R swing tube (28L/R) with screws (29), curved washers (30) and nut (25). 2. Connect the connecting pulse wire (62) (coming out from the top of the handlebar post (17)) and connecting sensor wire (15) with the computer (19) relevant wires, Then tighten the computer(19)to the computer bracket of handlebar post (17) with screws (21) and flat washers (20).
-
Page 11: Warm Up And Cool Down Routine
WARM UP AND COOL DOWN ROUTINE A good exercise program consists of a warm-up, aerobic exercise, and a cool down.Do the entire program at least two to three times a week, resting for a day between workouts. After several months you can increase your workouts to four or five times per week. -
Page 12: Warm Up Exercises
Hamstring Stretch Sit with your right leg extended. Rest the sole of your left foot against your right inner thigh. Stretch toward your toe as far as possible. Hold for 15 counts. Relax and then repeat with left leg extended. Head Roll Rotate your head to the right for one count, feeling the stretch up the left side of your neck. - Page 13 Calf-Achilles Stretch Lean against a wall with your left leg in front of the right and your arms forward. Keep your right leg straight and the left foot on the floor; then bend the left leg and lean forward by moving your hips toward the wall.
Need help?
Do you have a question about the SF-E1114 and is the answer not in the manual?
Questions and answers