Advertisement
Quick Links
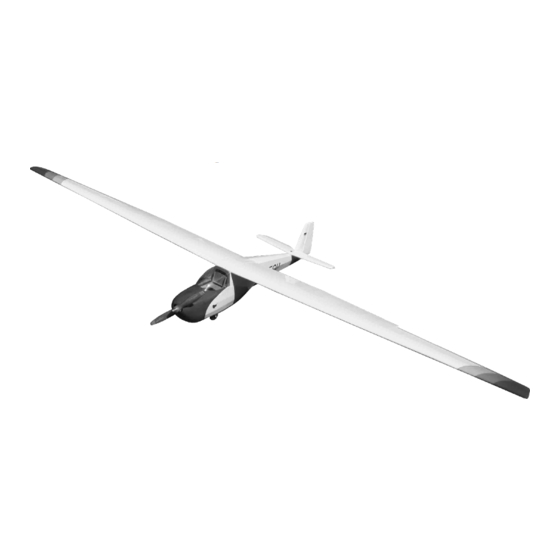
Electric Powered Glider
R/C Motorsegler
INSTRUCTION MANUAL / MONTAGEANLEITUNG
SPECIFICATION
Wing span approx
: 99.2 in.
Length approx
: 44.0 in.
Radio:
4Channel / 4 servos
WARNING! This radio controlled model is NOT a toy. If modified or flown carelessly it could go out of controll and
cause serious human injury or property damage. Before flying your airplane, ensure the air field is spacious enough.
Always fly it outdoors in safe areas and seek professional advice if you are unexperienced.
ACHTUNG! Dieses ferngesteuerte Modell ist KEIN Spielzeug! Es ist für fortgeschrittene Modellflugpiloten bestimmt,
die ausreichende Erfahrung im Umgang mit derartigen Modellen besitzen Bei unsachgemäßer Verwendung kann
hoher Personen- und/oder Sachschaden entstehen. Fragen Sie in einem Modellbauverein in Ihrer Nähe um
professionelle Unterstützung, wenn Sie Hilfe im Bau und Betrieb benötigen. Der Zusammenbau dieses Modells ist
durch die vielen Abbildungen selbsterklärend und ist für fortgeschrittene, erfahrene Modellbauer bestimmt.
TECHNISCHE DATEN
Spannweite
:
Lange
:
Fernsteuerung: 4 Kanal / 4 servo
2520mm
1120mm
ARF BY
Advertisement

Subscribe to Our Youtube Channel
Related Manuals for VQ Model motorspatz 2500


Summary of Contents for VQ Model motorspatz 2500
- Page 1 Electric Powered Glider R/C Motorsegler INSTRUCTION MANUAL / MONTAGEANLEITUNG SPECIFICATION TECHNISCHE DATEN Spannweite 2520mm Wing span approx : 99.2 in. Lange 1120mm Length approx : 44.0 in. Fernsteuerung: 4 Kanal / 4 servo Radio: 4Channel / 4 servos ARF BY WARNING! This radio controlled model is NOT a toy.
-
Page 2: Conversion Table
REQUIRED FOR OPERATION (Purchase separately) BENOTIGTE KOMPONENTEN (Nicht im Lieferumfang enthalten) ECO Adapter 5.0mm Best.Nr. C6062 Klappluftschraube 13x8 Best.Nr C7127 Regler: PULSAR A-50 # C6130 PULSAR 40 Minimum 4 channel radio # C6217 for airplane Minimum 4 Kanal Battery / Flugakku Mini servo DS3012 Extension cord Fernsteuerung... -
Page 3: Top View
4x30mm nylon bolt TOP VIEW ....1 Draufsicht Control horn ...1 MARK Trial fit the elevator half in place, check the alignment of the horizontal stabilizer and the elevator half. Using a pencil, mark on the leading edge of elevator, where the hole is to be drilled. Drill a 1.5mm hole of the mark made in Step 1D Marking sure that you drill the hole perpendicular to the leading edge... -
Page 4: Bottom View
BOTTOM - VIEW Slide the elevator push-rod (in the hard-ware bag) Unteransicht into the white nylon push-rod guider. Insert the Z bend into the control horn. Cut away only the covering Push the foot of control horn into the slot on the elevator as shown. - Page 5 Control horn ...1 Slide the rudder push-rod (in the hard-ware bag)into the white nylon push-rod guider. Insert the Z bend into the control horn. Thin CA Push the foot of control horn into the slot on the rudder as shown. Cut away the covering 4x50mm screw...
- Page 6 BOTTOM - VIEW Unteransicht Linkage Stopper set Control horn...2 Gestängeanschluss ....2 Aileron servo hatch (ply 3mm) Aileron servo hatch (ply 3mm) Cut away the covering Thin CA Fuhren Sie die Verklebungen mit gro ter Sorgfalt aus. 2.5x10mm screw ....4 Magnetic canopy hatch Aluminum wing joiner...
- Page 7 TOP VIEW Draufsicht Aluminum wing joiner 4X20mm 5 min. Epoxy TOP VIEW Draufsicht 20x6mm woden dowel. 4x20mm screw ..2 6x20mm wooden dowel RIGHT WING HALVE ..4 WING HALVES INSTALLATION 1- Pull the magnetic top hatch out of the fuselage. 2- Carefully slide the wing halve to the fuselage as shown (Right picture), ensuring that the wing halve accurately aligned.
- Page 8 Do not try to fly an out-of balance model! Uberprufen Sie vor dem Flug den Schwerpunkt. Note: If necessary, move the battery pack or add weight to either 68 ~ 72mm the tail or nose until the correct balance is achieved. WARNING ! Securely install the receiver and power pack, ensuring they will not come loose or rattle during flight.
Need help?
Do you have a question about the motorspatz 2500 and is the answer not in the manual?
Questions and answers