Table of Contents
Advertisement
Advertisement
Table of Contents

Summary of Contents for SawGear SGTAB04
- Page 1 2017 TigerStop, LLC ® ® ® MANUAL MANUAL...
-
Page 2: Safety First
Safety First! IMPORTANT SAFETY INFORMATION. READ ALL WARNINGS BEFORE OPERATING THIS PRODUCT. WARNING: Installation of your TigerStop Product must be done by a person trained in the safe design and installation of automation products, and in the safe operation of power equipment. Ensure that such installation meets all legally required safety requirements and guidelines, and that proper guarding and safety devices are provided on all sides of the equipment to preclude unintended access during operation. - Page 3 IMPORTANT SAFETY INFORMATION. READ ALL WARNINGS BEFORE OPERATING THIS PRODUCT. Keep the work area clean and well lighted to avoid accidental injury. Do not use TigerStop machines in a dangerous environment. Using power tools in damp or wet locations or in rain can cause shock or electrocution. Do not operate near flammable liquids or in gaseous or explosive atmospheres! Wear proper apparel, no loose clothes, long hair or jewelry which could get pulled into moving machinery or materials.
-
Page 4: Table Of Contents
Table of Contents............................1 SawGear Tables............................1 Trimming SawGear Tables........................3 SawGear Bench Mount Brackets........................3 Secure SawGear in the brackets......................3 Dismounting SawGear from the saw stand.................... 3 Register Your Warranty..........................4 Enable Your SawGear..........................4 Miter Saw Accuracy.............................5 Check Your Pivot Point..........................5 Adjusting the Miter Saw Pivot Point......................6 Using SawGear to Adjust Pivot Point....................6... -
Page 7: Trimming Sawgear Tables
Trimming SawGear Tables Some miter saws have a range of motion that would cause the saw to cut into the SawGear table. It is ok to trim the corner of the SawGear table to accommodate saws with a wider range of motion. -
Page 8: Register Your Warranty
Tighten until the flipaway stop can hold it’s position when flipped up. Register Your Warranty When your new SawGear arrives, you will find a warranty registration sheet in the accessory box. Fill out this form and fax it to TigerStop Customer Service at (360) 260-0755. -
Page 9: Miter Saw Accuracy
Don't settle for less than perfect! Dial in your saw! Check Your Pivot Point This example assumes that SawGear is on the right of the saw, and that the observed pivot point is on the right side of the saw blade. -
Page 10: Adjusting The Miter Saw Pivot Point
Pivot point too far BACK Pivot point too far FORWARD Using SawGear to Adjust Pivot Point If the back fence of the saw cannot be moved, you can adjust the pivot point offset using SawGears pivot point adjustment system. - Page 11 7. Swing your miter saw right to 45 degrees. Cut the piece and then measure the piece from the back edge. Enter this dimension and press [Start] key. SawGear will return to the main screen. Pivot Point is now set.
-
Page 12: Sawgear Control
SawGear Control [Soft Start] switches off power to save energy. [W] Molding Width Entry for cutting 45° miters. [X] Left Stile Inside Length Entry for miters. [Y] Header Inside Length Entry for miters. [Z] Right Stile Inside Length Entry for miters. -
Page 13: Sawgear Lcd Display
1st Power Up The following routine is followed only the first time SawGear is used, or whenever the interface language, measuring system, saw side or working length must be changed. The messages shown below SCROLL across the screen if longer than the LCD's 16 char- acter width. -
Page 14: Repeat A 1St Power Up
Repeat a 1st Power Up If you need to change the interface language, the measurement system, or the saw location, or if you are moving the SawGear power head to a different measuring bar, you must perform a 1st power up. -
Page 15: Start Sawgear
Start SawGear If SawGear is plugged into power but does not display the active screen, start it up using the soft start key: SawGear will automatically power off the display when not in use, unless sleep mode is turned off. -
Page 16: Password Protection
SawGear can be secured by a password to prevent its use by unauthorized persons. The following steps show how to activate password protection. Once a password has been set, SawGear cannot be operated without it, so DON'T LOSE IT! The messages shown below SCROLL across the screen if longer than the LCD's 16 character width. -
Page 17: Deactivate The Password
2. While holding down the [/] key, plug SawGear into AC power. 3. Enter the old password and press [Start]. 4. Enter a new password consisting of 4 to 8 digits, and press [Start]. 5. Re-enter password and press [Start]. -
Page 18: Setting The Distance Between The Stop And The Blade
•The calibration of the X, Y and Z values uses a calculated value based on the value of W (moulding width). •SawGear will use whatever was the last known value of W to calibrate X, Y and Z values. •See also Setting the Value of W. -
Page 19: Calibrate Miter Cut Y Distance
2. Enter the length of the desired increment and press [Start] to return to the ready screen. Straight Cutting SawGear has been set up on a chop saw or miter saw and has been homed and is now ready to run. -
Page 20: Custom Miter Cutting
The most important thing to do in setting up SawGear to miter cut molding and other stock is to correctly enter the width of the material to be cut. The movements that SawGear makes are calculated from the width entered using the [W] key. -
Page 21: Using Crown & Miter Pro
3. Press [X] to set the length of the left stile, enter the interior dimension of the casing, and press [Start]. SawGear moves to a length based on the width of the stock and the 45° angle of the first miter. - Page 22 1. To activate the Crown & Miter Pro feature, Simply press the [W] key twice. 2. Type [0] then the [Start] key. These buttons, located along the top of the SawGear control, are used to set angles once the Crown & Miter Pro feature is turned ON.
- Page 23 The [Y] key sets the part length. Press the [Y] key and the following screen will display; Enter the length of the piece you want to cut. Use the [Increm] key to tell SawGear if you are measuring from the back (B) or the front (F) of the part (back is the recommended setting).
-
Page 24: Increment
The first cut displays with "Empty Cut" to tell you this list is empty. Enter your first dimension. SawGear will move to each new dimension as it is entered, so be sure nothing is in the way. 4. Enter [4] [8] and press [Start]. -
Page 25: Entering Feet, Inches And Fractions
Enter as many as 9 different dimensions into a list. 8. Press [STOP] to exit a list. Entering Feet, Inches and Fractions The following examples show how to enter dimensions into SawGear and how it interprets the data. SawGear is in Foot mode for these examples. -
Page 26: Largest Number Display
The number of feet is related to SawGear working length. Entering Feet and Decimal Inches The following examples show how to enter dimensions into SawGear and how it interprets the data. SawGear is in Foot mode for these examples. 1. Enter [0] [.] [8] [7] [5]. -
Page 27: Largest Number Display
The number of feet is related to SawGear working length. Entering Non-Standard Fractions It is possible to enter a non-standard fraction of an inch and have SawGear move to the exact position. When at position, the display will show the closest standard fractional equivalent. -
Page 28: Entering Millimeters
1. Enter [1] [6] [In] [2] [/] [3]. 2. Press [Start]. SawGear moves to position at 16-2/3 inches, but the display shows the position as 16-21/ It is not recommended to enter dimensions in non-standard fractional inches, but to enter deci- mal inches when working with lengths that must be more precise than 64ths of an inch. -
Page 29: Correcting Entry Errors
Then, it quickly returns to the ready screen and displays the actual position, waiting for your valid input. 2. Enter any dimension that is not MORE than SawGear's maximum limit, and press [Start] to move. “Too Small” Error You cannot enter a dimension at the SawGear control less than the minimum limit. -
Page 30: Home Routine After Impact
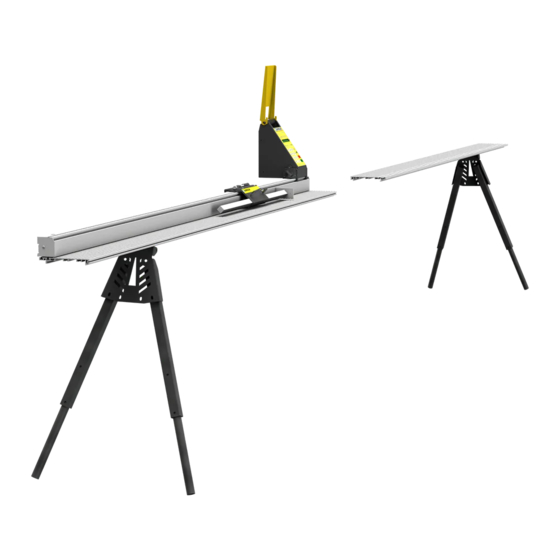
Home Routine after Impact •If material is thrust against SawGear with sufficient force, it can possibly bump the stop off position. •Whether it does or not, a warning message appears to allow you to re-home the machine, or continue working. - Page 31 Each leg snaps into place and is height adjustable using the small handle located at the center of the leg. SawGear table legs are simple to use and functional. The legs are constructed out of thick gauge steel for durability and longevity in any industrial or jobsite environment.
- Page 32 FIND US ONLINE AT www.tigerstop.com 12909 NE 95th Street Vancouver, WA 98682-2426 1.360.254.0661 sales@tigerstop.com TigerStop B.V. Holland 31 546 575 171 info@tigerstop.nl 9/20/2017...
Need help?
Do you have a question about the SGTAB04 and is the answer not in the manual?
Questions and answers