Axxess ASWC-1 Installation Manual
Axxess steering wheel control interface
Hide thumbs
Also See for ASWC-1:
- Installation manual (48 pages) ,
- User manual (7 pages) ,
- Instructions (5 pages)
Table of Contents
Advertisement
Available languages
Available languages
INSTALLATION INSTRUCTIONS ASWC-1
Axxess Steering Wheel Control
Interface Installation Manual
• One Interface does it all - No additional interfaces needed
• Designed to be compatible with all major radio brands
• Auto detects vehicle type, radio connection, and presets controls
• Ability to dual assign steering wheel control buttons
• Can be manually programmed for most vehicles
• Memory retains settings even after battery disconnection
or interface removal
• All connections done at the radio location
• Micro "B" USB updatable
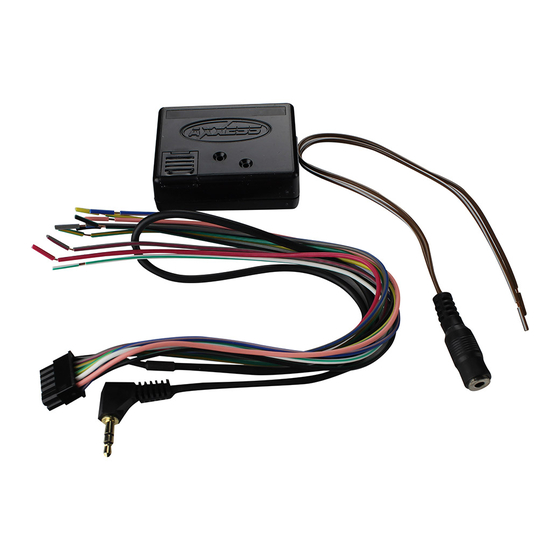
• ASWC-1 Interface • 12-pin harness with male 3.5mm connector
• Female 3.5mm connector with Brown and Brown/White wires
• Cutting tool • Crimping tool • Tape
METRA. THE WORLD'S BEST KITS.
1-800-221-0932
ASWC-1
US. PAT. NOS. 8014920 and 8214105
INTERFACE FEATURES
INTERFACE COMPONENTS
TOOLS REQUIRED
© COPYRIGHT 2017 METRA ELECTRONICS CORPORATION
®
metraonline.com
Advertisement
Chapters
Table of Contents

Related Manuals for Axxess ASWC-1


Summary of Contents for Axxess ASWC-1
- Page 1 • All connections done at the radio location • Micro “B” USB updatable INTERFACE COMPONENTS • ASWC-1 Interface • 12-pin harness with male 3.5mm connector • Female 3.5mm connector with Brown and Brown/White wires TOOLS REQUIRED • Cutting tool • Crimping tool • Tape METRA.
-
Page 2: Table Of Contents
Table of Contents Preface ....................3 Overview – Introduction to the ASWC-1 Interface and Wiring Harness ....4-5 ASWC-1 Installation – Connections to be Made ..............6-7 – Programming .................8-9 Auto Detect Mode: Overview ............8 Auto Detect Mode: Steps ............8-9 – Remapping the SWC (steering wheel control) Buttons ....10-11 Button Assignment Legend ............ -
Page 3: Preface
ASWC-1. Additionally, refer to the Radio Legend (p. 13) and your radio’s owners manual. 5) Update the ASWC-1 to the latest software. Note: To update go to axxessinterfaces.com and download the WebXXpress program. Attention: Even though we have done extensive research and testing to verify that the steering wheel control wires we list are correct. -
Page 4: Overview
Overview Introduction to the ASWC-1 Interface and Wiring Harness On the top of the ASWC-1 interface there are three points of interest: 1) Programming LED 2) Reset Button 3) Update Port Cover (slide to open) Micro “B” Update Port Cover... - Page 5 Overview Below are the wire colors for the ASWC-1. Please visit the Axxess website at www.axxessinterfaces.com for detailed information on your specific vehicle and for what color wire(s) to use with the ASWC-1 interface. Pin-1 Pink Pin-7 Blue/Pink Pin-2 White/Green...
-
Page 6: Aswc-1 Installation Connections To Be Made
ASWC-1 to the chassis, of the vehicle, by itself. 2) With the key in the off position, connect the Red wire of the ASWC-1 to the 12-volt accessory wire. 3) Locate the correct steering wheel control wire(s) in the vehicle’s harness, as described in the “ASWC-1 Vehicle Instructions”. -
Page 7: Connections To Be Made
Connections to be made B. For Metra OE radios: Connect the steering wheel control Key 1 wire (Gray) to the Brown wire of the ASWC-1. Isolate and tape the Brown/White wire, it will not be used. C. For Kenwood, or select JVC’s with a Blue/Yellow steering wheel control wire: Connect the Kenwood/JVC steering wheel control wire to the Brown wire of the ASWC-1. -
Page 8: Programming
(pp. 19-21). The following, which is recommended, is for auto programming. Auto Detect Mode: Overview The ASWC-1 has the ability to auto detect select vehicles and what aftermarket radio it is connected to. The “ASWC-1 Vehicle Instructions”, found at www.axxessinterfaces.com, will indicate if your vehicle will auto detect and what action, if any, is required for this process to take place. -
Page 9: Programming
9) Make sure the steering wheel control buttons function correctly in the vehicle and enjoy. Tip: If the ASWC-1 did not go to a solid LED, press the Reset button for 3 seconds, release, and then start from Step 3. If the LED still doesn’t go to a solid LED refer to the LED Feedback section (p. -
Page 10: Remapping The Swc (Steering Wheel Control) Buttons
Seek Up to be Mute. Follow the steps below to remap the steering wheel control buttons: 1) Make sure the ASWC-1 is visible, so you can see the LED flashes to confirm button recognition. Tip: Turning off the radio is recommended. -
Page 11: Button Assignment Legend
ASWC-1 Installation Remapping the SWC buttons Button Assignment Legend 1. Volume Up 8. Preset Down 2. Volume Down 9. Power 3. Seek Up/Next 10. Band 4. Seek Down/Prev 11. Play/Enter 5. Source/Mode 12. PTT (Push to Talk)* 6. Mute 13. On Hook 7. -
Page 12: Changing Radio Type
Changing Radio Type 1) After 3 seconds of turning the key on, press and hold the Volume Down button on the steering wheel until the LED on the ASWC-1 goes solid. 2) Release the Volume Down button; the LED will go off indicating we are now in Changing Radio Type mode. -
Page 13: Radio Legend
2.1.4 or higher. Additionally, the ASWC-1 must be updated to the most recent firmware available. Note: If you have a Clarion radio and the ASWC-1 did not work try the other Clarion radio type, same for the Eclipse. -
Page 14: Dual Assignment Instructions
ASWC-1 Installation Dual Assignment Instructions Nota: Seek Up and Seek Down are already set to Preset Up and Preset Down for a long button press. 1) Turn on the ignition but do not start the vehicle. 2) Press and hold down the steering wheel button, that you want to assign a long press function, for about 10 seconds until the LED rapidly flashes green. -
Page 15: Dual Assignment Legend
ASWC-1 Installation Dual Assignment Instructions Dual Assignment Legend Button Number New Button Action Not allowed Not allowed Seek Up/Next Seek Down/Prev Mode/Source Mute Preset Up Preset Down Power Band Play/Enter On Hook Off Hook Fan Up Fan Down Temp Up... -
Page 16: Aswc-1 Troubleshooting Auto Detect Mode
The use of a chassis ground solely by itself is highly recommended, especially in data communication vehicles. Attach the solid Black wire of the ASWC-1 to a good chassis ground, all by itself. Ensure this wire is straight from the ASWC-1 without any extensions, and make sure a ring terminal (not supplied) is used, and crimped properly. - Page 17 ASWC-1 for 3 seconds, release, and then follow the instructions on p. 9, starting from Step 3. If the ASWC-1 still does not go to a solid LED at the end, please refer to Manual Programming Mode on pp.
- Page 18 If the setting is on the rear, turn it to the front, then back to the rear. 5) For Pioneer and Sony radios, if the ASWC-1 works, but the buttons are out of order, or become out of order; this could be caused by the 3.5mm jack on the ASWC-1 not seating properly, slipping out, or dirt...
-
Page 19: Manual Programming Mode
ASWC-1 Troubleshooting Manual Programming Mode If your vehicle is not listed for auto detection by the ASWC-1 on the Axxess website, www.axxessinterfaces.com, you may be able to manually program a non-data communication vehicle using the following steps. Tip: If you do not know if you have a data communication vehicle or not, refer to the “ASWC-1 Vehicle Instruction”... - Page 20 Volume Up button. Note: If at any time an error is made hold down the reset button on the ASWC-1 for 10 or more seconds. This will restart the manual programming. Go back to Step 4 and start again.
-
Page 21: Manual Programming Legend
ASWC-1 Troubleshooting Manual Programming Mode 12) Press and hold down the Volume Down button until the LED goes solid. 13) Programming for the vehicle and the radio is now complete. Next, test the steering wheel control functions to make sure it works correctly. -
Page 22: Resetting Original Aswc-1 Settings
2) Press the Reset button for 3 seconds and then release. 3) Refer to the Programming section (pp. 8-9) to program the ASWC-1. 4) Once the LED is solid the ASWC-1 is reset and should be operating with the default settings. -
Page 23: Led Feedback
14th LED flash is for Parrot** 15th LED flash is for XITE *Note (section B): If the ASWC-1 flashes 7 times and you do not have an Alpine radio connected to it that means that the ASWC-1 did not see any radio connected. - Page 24 INSTALLATION INSTRUCTIONS ASWC-1 IMPORTANT WARNING This product includes instructions for installation which must be carefully followed. The instructions are worded in such a manner to assume that the installer is capable of completing these type of electronic installations. If you are unclear as to what you are instructed to do or...
- Page 25 • Todas las conexiones se hacen en el lugar del radio • Actualizable por micro “B” USB COMPONENTES DE LA INTERFASE Interfase ASWC-1 • Arnés de 12pins con conector macho de 3.5mm • Conector hembra de 3.5mm con cables marrón/blanco HERRAMIENTAS REQUERIDAS •...
- Page 26 Índice Prefacio ..................... 3 Información general – Introduction to the ASWC-1 Interface and Wiring Harness ....4-5 Instalación del ASWC-1 – Conexiones que se deben hacer ............6-7 – Programación ................8-9 Modo de detección automática: Información general ....8 Modo de detección automática: Steps ........8-9 –...
-
Page 27: Prefacio
4) Asegúrese de que el radio que está instalando sea compatible con el ASWC-1. Además, consulte la leyenda del radio (pág. 13) y el manual del propietario de su radio. 5) Actualice el ASWC-1 con el software más reciente. Nota: Para actualizarlo vaya a axxessinterfaces.com y descargue el programa... -
Page 28: Información General
Información general Introducción a la interfase ASWC-1 y al arnés de cables En la parte superior de la interfase ASWC-1 hay tres puntos de interés: 1) LED de programación 2) Botón de restablecimiento 3) Cubierta del puerto de actualización (deslice para abrirla) Micro “B”... - Page 29 Información general A continuación se indican los colores de los cables del ASWC-1. Visite el sitio web de Axxess en www.axxessinterfaces.com para obtener información detallada sobre su vehículo específico y para saber cuáles colores de cables usar con la interfase ASWC-1.
-
Page 30: Instalación Del Aswc-1
Dentro del vehículo: 1) Conecte el cable negro del ASWC-1 a tierra. Puede usar el mismo punto a tierra que el radio de mercado secundario, pero es muy recomendable conectar el ASWC-1 a tierra con el chasís del vehículo, sin compartir la conexión. - Page 31 Conexiones que se deben hacer B. Para radios Metra OE: Conecte el cable Clave 1 (gris) del control en el volante con el cable marrón del ASWC-1. Aísle y encinte el cable marrón/blanco, no se utilizará. C. Para Kenwood o algunos JVC con cable del control en el volante azul/amarillo: Conecte el cable del control en el volante Kenwood/JVC con el cable marrón del ASWC-1.
-
Page 32: Programación
1) Realice las conexiones al vehículo y al radio de mercado secundario. 2) Encienda la ignición; el foco LED empezará a parpadear rápidamente de color rojo, lo que significa que el ASWC-1 está buscando el vehículo y el radio. Nota: Si el foco LED no empezó a parpadear rápidamente de color rojo, presione el botón de restablecimiento por 3 segundos y continúe con el... - Page 33 8) Para vehículos con botones Bluetooth del fabricante original, presione Colgar o Descolgar en el control de su volante después de que el foco LED del ASWC-1 se encienda sin parpadear Si pueden utilizarse los botones de Bluetooth del fabricante de equipo original, el foco LED se apagará...
-
Page 34: Remapeo De Los Botones Swc
Nota: Si la siguiente función de la lista no está en el volante, presione el botón de aumentar volumen durante 1 segundo hasta que el foco LED se encienda y luego suelte el botón. Esto le indica al ASWC-1 que la función no está disponible y pasará a la siguiente función. -
Page 35: Leyenda De Asignación De Botones
Instalación del ASWC-1 Remapeo de los botones SWC Leyenda de asignación de botones 1. Subir volumen 8. Bajar prestablecido 2. Bajar volumen 9. Encendido 3. Buscar siguiente 10. Banda 4. Buscar anterior 11. Reproducir/Aceptar 5. Fuente/Modo 12. PTT (presionar para hablar) 6. -
Page 36: Cambio De Tipo De Radio
1) Después de 3 segundos de girar la llave a encendido, presione y mantenga presionado el botón de bajar volumen en el volante hasta que el foco LED en el ASWC-1 se encienda sin parpadear. 2) Suelte el botón de bajar volumen, el foco LED se apagará indicando que ahora estamos en el modo de cambio de tipo de radio. -
Page 37: Leyenda De Radio
2.1.4 o más reciente. Además, el ASWC-1 debe actualizarse al firmware más reciente disponible. Nota: Si tiene un radio Clarion y el ASWC-1 no funcionó pruebe con el otro tipo de radio Clarion, lo mismo aplica con el radio Eclipse. -
Page 38: Instrucciones De Asignación Dual
Instalación del ASWC-1 Instrucciones de asignación dual Nota: Los botones buscar siguiente y buscar anterior ya están configurados en subir prestablecido y bajar prestablecido al presionar y sostener el botón. 1) Encienda la ignición pero no encienda la marcha del vehículo. -
Page 39: Leyenda De Asignación Dual
Instalación del ASWC-1 Instrucciones de asignación dual Leyenda de asignación dual Número de botón Nueva acción del botónn No se permite No se permite Buscar siguiente Buscar anterior Modo/Fuente Silencio Subir prestablecido Bajar prestablecido Potencia Banda Reproducir/Aceptar Colgado Descolgado Aumentar ventilador... -
Page 40: Resolución De Problemas De Aswc-1 Modo De Detección Automática
Atención: Debido a la naturaleza del funcionamiento de los microprocesadores, algunas veces compartir la conexión a tierra del ASWC-1 y usar la conexión a tierra de fábrica del arnés de cables original no es suficiente, y ocasionará problemas. Se recomienda ampliamente usar la tierra al chasís sin compartir especialmente... - Page 41 ASWC-1 presionando el botón de restablecimiento en el ASWC-1 durante 3 segundos, suéltelo y luego siga las instrucciones en la página 9 empezando a partir del paso 3. Si el foco LED del ASWC-1 aún no se enciende sin parpadear al final, consulte el modo de programación manual en las páginas 19 a 21 para programar el ASWC-1 manualmente.
- Page 42 4) Para radios Alpine, retire el conector de 3.5 mm del radio, vuelva a programar el ASWC-1 sin el conector, y luego vuelva a conectar el conector de 3.5 de nuevo con el radio. Sugerencia: Algunos radios Alpine tienen una función que cambia el control remoto a la parte posterior o frontal.
-
Page 43: Modo De Programación Manual
Nota: Lea todos los pasos de programación manual antes de comenzar. 1) Siga los pasos en la sección de conexiones que se deben hacer (pág. 6 y 7) para conectar los cables del ASWC-1 con su radio. 2) Encienda la ignición, luego presione y mantenga presionado el botón... - Page 44 LED parpadee lentamente y luego suelte el botón de aumentar volumen. Nota: Si en cualquier momento se equivoca, mantenga presionado el botón de restablecimiento en el ASWC-1 durante 10 segundos o más. Esto reiniciará la programación manual. Vuelva al Paso 4 y empiece de nuevo.
-
Page 45: Manual Programación Legend
Resolución de problemas de ASWC-1 Modo de programación manual Nota: Si el número de parpadeos no coincide con el radio que ha instalado, consulte la sección de cambio de tipo de radio (pág. 13). 12) Presione y mantenga presionado el botón de bajar volumen hasta que el foco LED se ilumine sin parpadear. -
Page 46: Restablecimiento De Los Ajustes Originales De Aswc-1
3) Consulte la sección de programación (páginas 8 y 9) para programar el ASWC-1. 4) Después que el foco LED se encienda sin parpadear, el ASWC-1 se restableció y debe funcionar con los ajustes predeterminados. Resolución de problemas de ASWC-1 Retroalimentación LED... -
Page 47: Retroalimentación Led
El 14vo parpadeo del foco LED es para Parrot** El 15vo parpadeo del foco LED es para XITE *Nota (sección B): Si el ASWC-1 parpadea 7 veces y no tiene un radio Alpine conectado a él, esto significa que el ASWC-1 no detectó ningún radio conectado. - Page 48 INSTRUCCIONES DE INSTALACIÓN ASWC-1 ADVERTENCIA IMPORTANTE Este producto incluye instrucciones de instalación que deben seguirse cuidadosamente. Dichas instrucciones están redactadas dando por supuesto que el instalador es capaz de completar estos tipos de instalaciones electrónicas. Si tiene dudas respecto de lo que se le indica que haga o cree que no comprende las instrucciones como para completar la instalación en forma adecuada y segura, debe consultar a...
Need help?
Do you have a question about the ASWC-1 and is the answer not in the manual?
Questions and answers