Ingenico Move/3500 Manual
Hide thumbs
Also See for Move/3500:
- Quick start manual (4 pages) ,
- User manual (53 pages) ,
- Quick manual (17 pages)
Table of Contents
Advertisement
Advertisement
Table of Contents

Related Manuals for Ingenico Move/3500


Summary of Contents for Ingenico Move/3500
- Page 1 Move/3500...
-
Page 2: Table Of Contents
Overview of Move/3500 ..................7 Keyboard details and functionality ............... 8 Switching ON / OFF terminal ................8 Installation ......................9 Location of the Move/3500 ................9 Operating Condition ..................9 Battery Charging Conditions ................9 Storage Conditions ..................9 Terminal Connections .................. - Page 3 Cash Advance – Swipe Card ................. 39 Cash Advance – Insert Card ................40 Reversal ......................41 Pre-Authorisation (Pre-Auth) ................42 Completion ..................... 43 Completion Swipe Card .................. 43 Completion Insert Card .................. 44 Page 3 Copyright© 2017 Ingenico Move/3500 User Guide...
- Page 4 Selecting Function Codes ................63 Function 34 System Security ................64 Function 91 Mobile Network Selection .............. 65 Function 40 Waiter Setup .................. 66 Add Waiter ..................... 66 Delete Waiter ....................67 Print Waiters....................67 Page 4 Copyright© 2017 Ingenico Move/3500 User Guide...
- Page 5 Function 30 Set Date and Time ................70 Recommendations ..................... 71 Safety ......................71 Security of the Terminal ................. 74 Fixed Installation..................... 75 Standards ....................... 76 Troubleshooting ....................77 Notes: ......................... 78 Page 5 Copyright© 2017 Ingenico Move/3500 User Guide...
-
Page 6: Introduction
Power Supply with a paper roll Terminal Base User Guide Battery The power supply unit provided with this equipment is specially designed for Ingenico terminals. Do not use any other power supply. Page 6 Copyright© 2017 Ingenico Move/3500 User Guide... -
Page 7: Overview Of Move/3500
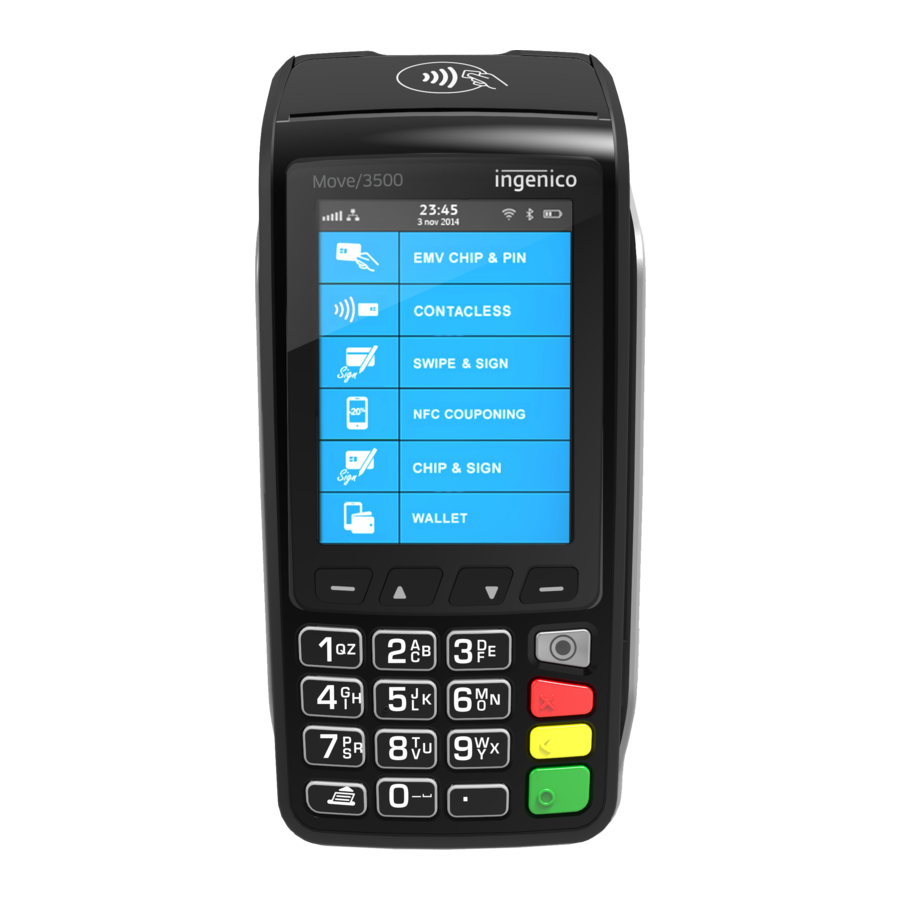
Overview of Move/3500 Easy loading printer 3”2 LCD display Contactless card reader Backlit keyboard Magnetic card reader Chip card reader Weight 310g paper roll or battery) Dimensions (L x w x h) 169x78x57 mm Electrical mains network 100-240VAC / 50-60 Hz - Class II equipment... -
Page 8: Keyboard Details And Functionality
To switch ON the terminal press on the keyboard. • To switch OFF the terminal press and hold simultaneously for 1 • second. Before using the terminal, always check the paper roll is present. Page 8 Copyright© 2017 Ingenico Move/3500 User Guide... -
Page 9: Installation
Installation Location of the Move/3500 Place the base on flat surface near an electric socket and if required near to the telephone or an Ethernet socket. The terminal should be placed far from any very hot zones, protected from vibrations, dust, damp and electromagnetic radiation (computer screen, anti- theft barrier etc.). -
Page 10: Terminal Connections
Terminal Connections µUSB There is a Micro-USB connector on the left side of the Move/3500 wireless terminal. (see picture). This connector manages Host and Slave connections. The terminal supports USB keys with FAT16 or FAT32 The USB key has to be used... -
Page 11: Opening The Back Cover
When introducing a SAM / SIM in its slot, be sure to put the cut corner • as indicated on the engraved markings. SIM 1 connector SIM 2 connector or SAM 3 connector SAM 1 connector SAM 2 connector Page 11 Copyright© 2017 Ingenico Move/3500 User Guide... -
Page 12: Battery
Plug the battery pack into the • battery pack connector Verify that it locks • Place the battery pack in its • compartment. Close the back cover • Battery connector Battery compartment Page 12 Copyright© 2017 Ingenico Move/3500 User Guide... -
Page 13: Charging The Battery
When used daily on battery power only. The terminal will automatically recharge its battery each time it is placed on its base. When used with a terminal power supply: connect the power supply to Move/3500 power connector. How can the battery be charged? Using the base Place the terminal on its base, charging will automatically begin. -
Page 14: Replacing The Battery
Replacing the battery It is imperative to use a battery authorized by Ingenico. There is danger of explosion if battery used is not approved by Ingenico Remove the terminal from its base • Turn it off by pressing simultaneously for about one second •... -
Page 15: R40 Paper Roll
• Rubbing or pressing the paper too strongly • For best performance use only heat sensitised paper roll approved by Ingenico. The use of non-approved paper is likely to damage the terminals printer Page 15 Copyright© 2017 Ingenico Move/3500 User Guide... -
Page 16: Installing A Paper Roll
When a new paper roll is inserted, tear off the first length (one complete turn) to avoid printing on the residue of the adhesive tape Page 16 Copyright© 2017 Ingenico Move/3500 User Guide... -
Page 17: Card Reading
Bring the card firmly up to the active zone above the contactless logo located on the paper trapdoor. Keep the card close to the contactless logo during the transaction. The 4 virtual LEDs will light sequentially during the transaction. Page 17 Copyright© 2017 Ingenico Move/3500 User Guide... -
Page 18: Terminal Base Overview
To replace the cover reverse these instructions being sure to engage all the retaining pins before the access clips. Terminal charging points Terminal guides Power socket Page 18 Copyright© 2017 Ingenico Move/3500 User Guide... -
Page 19: Display/Icons
It is also used to confirm errors during a transaction. The Move 3500 is a touch screen device. Icons displayed are only a reference to which physical buttons may be pressed. Page 19 Copyright© 2017 Ingenico Move/3500 User Guide... -
Page 20: Gprs Terminal
Maximum reception level (100%) High reception level (75%) Medium reception level (50%) Low reception level (25%) Very low reception level (<5%) Network provider name is displayed underneath the signal indicator Page 20 Copyright© 2017 Ingenico Move/3500 User Guide... -
Page 21: Supervisor Functions
Helpdesk immediately. You are strongly advised to ensure that privileged access to your terminal (including access to the ‘Supervisor Code’) is only granted to staff that have been independently verified as being trustworthy. Page 21 Copyright© 2017 Ingenico Move/3500 User Guide... -
Page 22: Voice Referral Password
‘Self Install Process’ to create a password. If you forget your password you will have to contact the helpdesk and they will set your terminal to reset the password back to ‘0000’. Page 22 Copyright© 2017 Ingenico Move/3500 User Guide... -
Page 23: Terminal Configuration
The terminal will If prompted confirm contact the the time by configuration host. pressing if it is correct, or type in the correct time and then press Page 23 Copyright© 2017 Ingenico Move/3500 User Guide... - Page 24 Code’ and then a list of card types that will be press accepted. Press Terminal will acknowledge the return to the ‘Idle change. Screen’ if installation is successful. Page 24 Copyright© 2017 Ingenico Move/3500 User Guide...
-
Page 25: Transaction Selection
You may be given the option to Present/Insert/Swipe the customer’s card. Alternatively the ‘Transaction Menu’ screen will be displayed by pressing to highlight the required transaction type in white from the menu and then press to select it. Page 25 Copyright© 2017 Ingenico Move/3500 User Guide... -
Page 26: Data Input
Pressing any of the following buttons during data entry will have the following effect: Will clear all of the data entered. Will act like a backspace i.e. it will clear one character/digit at a time. Will submit the data entered. Page 26 Copyright© 2017 Ingenico Move/3500 User Guide... -
Page 27: Sale - Card Details Keyed
The terminal will check Tear off the customer the card once all the receipt and press if it details have been is readable or press entered. to reprint the receipt. Page 27 Copyright© 2017 Ingenico Move/3500 User Guide... -
Page 28: Sale - Swiped Card
The terminal will print the customer receipt. Present/Insert/Swipe Terminal will check the Tear off the customer card receipt and press if it is readable or press to reprint the receipt. Page 28 Copyright© 2017 Ingenico Move/3500 User Guide... -
Page 29: Sale - Inserted Card
The terminal will print the merchant receipt. Terminal will check the Tear off the merchant card receipt and press if it is readable or press to reprint the receipt. Page 29 Copyright© 2017 Ingenico Move/3500 User Guide... -
Page 30: Sale - Contactless
Tear off the receipt and successful when all four press if it is readable status lights are lit and or press to reprint confirmation tone is the receipt. heard. Press if a cardholder receipt is required. Page 30 Copyright© 2017 Ingenico Move/3500 User Guide... -
Page 31: Contactless High Value Payment (Hvp) - Wallet Payments
CDCVM on their device prior to starting the transaction and their device has prompted them to complete their CDCVM and tap the phone again. The cardholder should follow the instructions on their device to complete the transaction. Page 31 Copyright© 2017 Ingenico Move/3500 User Guide... -
Page 32: Sale With Gratuity
Press screen. Press cancel the transaction. cancel the transaction. The transaction flow will continue as per a normal ‘Sale Transaction’. Page 32 Copyright© 2017 Ingenico Move/3500 User Guide... -
Page 33: Refund
Terminal will check the If the signature card to ensure it is valid. matches the one on the card press or press if it does NOT match. Page 33 Copyright© 2017 Ingenico Move/3500 User Guide... - Page 34 Terminal will print the Tear off the cardholder cardholder receipt. receipt and press if it is readable or press to reprint the receipt. Terminal returns to the ‘Idle Screen’. Page 34 Copyright© 2017 Ingenico Move/3500 User Guide...
-
Page 35: Refund With Gratuity
Terminal will go for the customer’s card. authorisation and will display the response from the acquirer. Type in your The terminal will print a ‘Supervisor Code’ and merchant receipt. press Press correct mistakes. Page 35 Copyright© 2017 Ingenico Move/3500 User Guide... -
Page 36: Remove The Customer's Card From The Terminal
Terminal returns to the ‘Idle Screen’. Note: If the card used for the refund does NOT require signature verification the cardholder receipt will be printed before the merchant receipt. Page 36 Copyright© 2017 Ingenico Move/3500 User Guide... -
Page 37: Purchase With Cashback (Pwcb) Swiped Card
The transaction will now continue as a normal ‘Sale’ transaction. Page 37 Copyright© 2017 Ingenico Move/3500 User Guide... -
Page 38: Pwcb Inserted Card
Cancel merchant after PIN the transaction. is verified remove card. Type in the amount of ‘Cashback’ required by the cardholder. The transaction will now continue as a normal ‘Sale’ transaction. Page 38 Copyright© 2017 Ingenico Move/3500 User Guide... -
Page 39: Cash Advance
The transaction will now continue as a normal ‘Sale’ transaction. Page 39 Copyright© 2017 Ingenico Move/3500 User Guide... -
Page 40: Cash Advance - Insert Card
The terminal will check the customer’s card to verify the PIN and to ensure it supports the transaction type. The transaction will now continue as a normal ‘Sale’ transaction. Page 40 Copyright© 2017 Ingenico Move/3500 User Guide... -
Page 41: Reversal
30 seconds of the original transaction. The terminal will print a If a reversal is customer receipt. attempted after the 30 second window this screen will be displayed. Press confirm failure. Page 41 Copyright© 2017 Ingenico Move/3500 User Guide... -
Page 42: Pre-Authorisation (Pre-Auth)
‘Idle The Pre-Auth menu Screen’. Highlight ‘Pre- screen will be displayed Auth’ as described Enter the amount and earlier and press press The transaction will now continue as a normal ‘Sale’ transaction. Page 42 Copyright© 2017 Ingenico Move/3500 User Guide... -
Page 43: Completion
Cardholder to sign the card. You may be receipt. Check if they asked to key in the last match, press if OK, four digits of the else press cardholder’s card reverse transaction. number. Page 43 Copyright© 2017 Ingenico Move/3500 User Guide... -
Page 44: Completion Insert Card
Insert the cardholder’s Remove and return card. cardholder’s card to customer. Enter first pre-auth Press if the printout code and press is readable; else press to print the merchant receipt again. Page 44 Copyright© 2017 Ingenico Move/3500 User Guide... -
Page 45: Account Verification
No transaction amount is required. Terminal will receive a Note: If the account is response from the host. not valid a screen similar to the following will be displayed. Page 45 Copyright© 2017 Ingenico Move/3500 User Guide... -
Page 46: Account Verification Insert Card
Terminal will connect to Note: If the account is the host. not valid a screen similar to the following will be displayed. NOTE: This is a ZERO value transaction. Page 46 Copyright© 2017 Ingenico Move/3500 User Guide... -
Page 47: Force Transaction
Insert or swipe the card. Terminal checks the PIN code against the card. The terminal will check Press if the printout the card. is readable; else press to print the cardholder receipt again. Page 47 Copyright© 2017 Ingenico Move/3500 User Guide... - Page 48 All ‘Force’ transaction types will behave in the same manner as their original transaction except they will NOT go online to the acquirer for authorisation as they have already been authorised. Page 48 Copyright© 2017 Ingenico Move/3500 User Guide...
-
Page 49: Sample Receipts
Sample Receipts End Of Day Report Page 49 Copyright© 2017 Ingenico Move/3500 User Guide... -
Page 50: Not Authorised Receipts
Not Authorised Receipts Page 50 Copyright© 2017 Ingenico Move/3500 User Guide... -
Page 51: Cancelled Receipts
Cancelled Receipts Waiter Setup Receipts Page 51 Copyright© 2017 Ingenico Move/3500 User Guide... -
Page 52: Gratuity (Verified By Pin) Receipts
Gratuity (Verified by PIN) Receipts Page 52 Copyright© 2017 Ingenico Move/3500 User Guide... -
Page 53: Gratuity (Verified By Signature) Receipts
Gratuity (Verified by Signature) Receipts Sale (Verified by Signature) Receipts Page 53 Copyright© 2017 Ingenico Move/3500 User Guide... -
Page 54: Sale (Verified By Pin) Receipts
Sale (Verified by PIN) Receipts Refund (Verified by Signature) Receipts Page 54 Copyright© 2017 Ingenico Move/3500 User Guide... -
Page 55: Self-Install Receipt
Self-Install Receipt Page 55 Copyright© 2017 Ingenico Move/3500 User Guide... -
Page 56: Reports
‘Totals’ and then press Repeat the above steps to select any of the other options from the ‘Totals Menu’. Page 56 Copyright© 2017 Ingenico Move/3500 User Guide... -
Page 57: X-Totals / Z-Totals
GRAND TOTAL 359.90DR 10.00CR TOTAL 349.90DR Totals recorded on the acquirer host (for comparison) ------------------------- TOTALS NOT RESET Indication if totals were reset or not 08:32 03/04/17 Date and Time of Report Page 57 Copyright© 2017 Ingenico Move/3500 User Guide... -
Page 58: Waitertotals
The terminal will either print the message ‘WAITER-TOTALS RESET’ or ‘WAITER TOTALS NOT RESET’ depending on which button is pressed before returning to the READY prompt. The waiter totals report is explained on the next page: Page 58 Copyright© 2017 Ingenico Move/3500 User Guide... -
Page 59: Waiter Totals
Number and value of credit transactions (Refunds) TOTAL 125.20DR (GRATUITY) 8.30DR Total Amount of GRATUITY received ------------------------- 08:32 03/04/17 Time/Date report printed WAITER-TOTALS NOT RESET Indication if totals were reset or not 08:32 03/04/17 Page 59 Copyright© 2017 Ingenico Move/3500 User Guide... -
Page 60: End-Of-Day-Banking
‘Idle banked. Screen’. Press to go to Waiter Totals. PLEASE NOTE: The acquirer selection screen will only be displayed if your terminal is set up with more than one acquirer. Page 60 Copyright© 2017 Ingenico Move/3500 User Guide... -
Page 61: Banking Totals Agree
Time & date of banking / Session indication / diagnostic code 08:32 03/04/2017 40IF :76 Receipt number RECEIPT 0036 (if host session changes a session number will be populated i.e. 40IF1:76 – if field is blank the session has not changed) Page 61 Copyright© 2017 Ingenico Move/3500 User Guide... -
Page 62: Banking Totals Not Agreed
Time & date of banking / Session indication / diagnostic code 08:32 03/04/2017 40IF :76 Receipt number RECEIPT 0036 (if host session changes a session number will be populated i.e. 40IF1:76 – if field is blank the session has not changed) Page 62 Copyright© 2017 Ingenico Move/3500 User Guide... -
Page 63: Function Codes
Type in the highlight ‘Select ‘Function Code’ Function’. required and then press to select it. Press to select This screen will the highlighted only be displayed option. if a ‘Supervisor Code’ is required. Page 63 Copyright© 2017 Ingenico Move/3500 User Guide... -
Page 64: Function 34 System Security
‘Idle Screen’. correct mistakes. Enter current Press code and then confirm code press change. confirm. correct mistakes. Enter new code and then press to submit code. correct mistakes. Page 64 Copyright© 2017 Ingenico Move/3500 User Guide... -
Page 65: Function 91 Mobile Network Selection
The terminal will The terminal will scan for and list register with the all the available selected networks. network. Press confirm. The terminal will now remain in ‘Manual Mode’ until you re-select ‘Automatic Mode’. Page 65 Copyright© 2017 Ingenico Move/3500 User Guide... -
Page 66: Function 40 Waiter Setup
‘Waiter’s Name’ as to be added. described earlier in this You may set up a manual. The screen maximum of 99 waiter’s will change to the names. Press to exit following: the menu. Page 66 Copyright© 2017 Ingenico Move/3500 User Guide... -
Page 67: Delete Waiter
Print Waiters Return to the ‘Waiter A list of waiters that Setup Menu’ as have been setup in the described above. terminal will be printed. highlight ‘Print’ and then press Page 67 Copyright© 2017 Ingenico Move/3500 User Guide... -
Page 68: Change Name
Press to confirm The details will be waiter name to be printed before returning changed or press to the ‘Waiter Setup to return to the Menu’. ‘Waiter Setup Menu’. Page 68 Copyright© 2017 Ingenico Move/3500 User Guide... -
Page 69: Delete All
‘Waiter Defaults’ have been created. highlight ‘Create Defaults’ then press Press to ‘Create Defaults’. Press press to exit back to the ‘Waiter Setup Menu’ without creating the defaults. Page 69 Copyright© 2017 Ingenico Move/3500 User Guide... -
Page 70: Function 30 Set Date And Time
Press if the date is Press if the time is correct or type in the correct or type in the correct date correct time (hhmm) (ddmmyyyy) and then and then press press Page 70 Copyright© 2017 Ingenico Move/3500 User Guide... -
Page 71: Recommendations
Turn it off by simultaneously pressing for one second. Lithium cell The Move/3500 is fitted with an internal lithium cell which can only be accessed by a qualified technician Battery The Move/3500 is fitted with a battery specifically designed for this... - Page 72 2.2 and 2.5 of the standard IEC60950- 1:2005+/A1:2010 and EN60950-1:2006+/A11:2009+/A1:2010+/ A12:2011 Cleaning To clean the terminal, use a soft cloth slightly moistened with water. Do not clean the electrical connections; do not use solvents, detergents or abrasive products. Page 72 Copyright© 2017 Ingenico Move/3500 User Guide...
- Page 73 The associated symbol means that WEEE and waste batteries must not be thrown away but collected separately and recycled. Ingenico ensures that efficient collection and recycling schemes are set-up for WEEE and batteries according to the local regulation of your country.
-
Page 74: Security Of The Terminal
It is strongly advised that privileged access to the terminal is only granted to staff that have been independently verified as being trustworthy. The terminal must never be put in or left at a location where it could be stolen or replaced by another device. Page 74 Copyright© 2017 Ingenico Move/3500 User Guide... -
Page 75: Fixed Installation
Positioning of in-store security cameras must be such a way that the PIN entry keypad is not visible. NEVER ask the customer to divulge their PIN Code. Customers should be advised to ensure that they are not being overlooked when entering their PIN Code. Page 75 Copyright© 2017 Ingenico Move/3500 User Guide... -
Page 76: Standards
Standards CE Mark The CE marking indicates Move/3500 complies with the requirements of European Directive 1999/5/EC of 9 March 1999 on Radio and Telecommunications Terminal Equipment for: The protection of the health and the safety of the user and any other person. -
Page 77: Troubleshooting
(Section xx “Installing a paper roll”). Check the type of paper used (thermal paper must be used). Verify thermal paper sensitive side. Page 77 Copyright© 2017 Ingenico Move/3500 User Guide... -
Page 78: Notes
Notes: Page 78 Copyright© 2017 Ingenico Move/3500 User Guide... - Page 79 Page 79 Copyright© 2017 Ingenico Move/3500 User Guide...
- Page 80 This User Guide relates to terminal software UT4.14.01 APACS 40. Whilst every effort has been made to ensure that the content of this document is accurate, Ingenico will not accept responsibility for any loss, damage or injury that may be incurred as a result of any errors or inaccuracies.
Need help?
Do you have a question about the Move/3500 and is the answer not in the manual?
Questions and answers
i do not want a merchant copy of every transaction can i overide this
Is it possible to turn off WiFi roaming on device - Ingenico Move/3500. The device keeps losing connection, there are 2 APs in the building and it keeps jumping between them. Is it possible to disable a "roaming" function so that when it connects to the one nearest it stays there? Thanks for your advice & help