Table of Contents
Advertisement
Advertisement
Chapters
Table of Contents

Related Manuals for Zeiss VISULAS YAG III


Summary of Contents for Zeiss VISULAS YAG III
- Page 1 VISULAS YAG III Documentation set...
- Page 2 It does not, however, continuously check for any changes which could form the basis for liability. If Carl Zeiss Meditec AG determines that a link which it has incorporated could result in civil or criminal liability, or is alerted to the fact by a third party, the link will be removed.
- Page 3 Contents User manual VISULAS YAG III 000000-1272-175-GA-GB-060613 Appendix VISULAS YAG III stand-alone operation - Quick instructions [000000-1272-175-KurzGA01-GB- 070513 VISULAS YAG III combination mode - Quick instructions [000000-1272-175-KurzGA02-GB- 060613 Laser sign [390000-3229-000] 000000-1272-175-Inhalt0-GB-060613...
- Page 5 VISULAS YAG III User manual...
- Page 6 000000-1272-175-GA-GB-060613...
-
Page 7: Table Of Contents
Design of the LSL YAG III laser slit lamp ..............27 Beam delivery in the LSL YAG III laser slit lamp............28 VISULAS YAG III laser console .................. 30 Design of VISULAS YAG III Combi/ VISULAS Trion Combi ......32 VISULAS YAG III Combi ..................... 32 000000-1272-175-GA-GB-060613... - Page 8 Installation of additional components ............51 Moving the instrument table with the instrument ........52 Installation of ACCENTO eyepiece to VISULAS YAG III/ VISULAS YAG III Combi and VISULAS Trion Combi ..............53 Data display in the ACCENTO eyepiece ..............54 ACCENTO foot switch ..................
- Page 9 Error messages on VISULAS YAG III Combi/VISULAS Trion Combi ......92 Replacing the fuses ..................94 Replacing the fuse on the VISULAS YAG III laser console ......... 94 Replacing the halogen bulb in the laser slit lamp ......... 95 Maintenance and care .................. 97 Care and cleaning .....................
-
Page 10: Notes On The User Manual
The user manuals and other documentation enclosed with the VISULAS YAG III should be kept accessible to users at all times to ensure that the information required for use of the VISULAS YAG III is readily available. Questions and comments... -
Page 11: Explanation Of Symbols Used
Notes on the user manual Explanation of symbols used The symbols used in this user manual refer to important safety information which warn against possible health risks or fatal injuries and contain useful notes. Whenever you see these symbols, read the accompanying information carefully and observe all safety notes and information in this user manual and on instrument labels. -
Page 12: Package Check List
Package check list Package check list The delivery package contains the following components: • VISULAS YAG III laser console • LSL YAG III laser slit lamp • Straight binocular tube f = 140 mm • 2 eyepieces 10x • Head restrainer for VISULAS laser •... -
Page 13: Country-Specific Information And Labels
Further notes on classification are to be found in section Technical data, page 104. The device VISULAS YAG III complies with EU Medical Device Directive 93/42/EEC and its national implementation in the form of the German 0297 Medical Products Act (MPG). -
Page 14: Indication For Use
The user is liable for any use of the device other than intended. Side effects/contraindications The VISULAS YAG III should not be used in cases of retinal detachment or cystoid macular edema, or with patients with intraocular glass lenses. Glass lenses can be destroyed by the effect of the optical breakdown. -
Page 15: Intended User Profile
Please adhere to the national qualification guidelines applicable in your country. The VISULAS YAG III may only be operated by physicians who have adequate knowledge of the medical application of the instrument, the effect of the laser beam on tissues and possible side effects. -
Page 16: Disposal Of The Product
Country-specific information and labels Disposal of the product CAUTION - RISK OF ENVIRONMENTAL POLLUTION Packaging materials should be retained for future relocation or repair. If you wish to dispose of the packaging material, hand it over to a recognized collection system for recycling. The instrument contains electronic components. -
Page 17: Labels
Country-specific information and labels Labels Fig. 1 Warning and information labels on the VISULAS YAG III 000000-1272-175-GA-GB-060613... - Page 18 Country-specific information and labels Item Label Explanation VISULAS YAG III type label Manufacturer Date of manufacture Application part type B Housing protection class IP20 (protected against solid foreign bodies of 12.5mm in diameter and larger, no protection against penetration of water)
- Page 19 Explanation Laser class 4 1064/660-680 nm warning label Not applicable Not applicable Label with fuse specifications VISULAS YAG III LSL YAG III type label LSL YAG III Combi type label LSL Trion Combi type label Manufacturer Date of manufacture Application parts type B...
- Page 20 Country-specific information and labels Item Label Explanation REF 1272-071 Identification label SN XXXXXXX LSL YAG III Identification label REF 1272-069 SN XXXXXXX LSL YAG III Combi Identification label REF 1377-684 LSL Trion Combi SN XXXXXXX XX/XXXX Date of manufacture Laser class 4 warning label "Laser exit aperture"...
- Page 21 Identification number of notified body IPX8 Housing protection class (protected against continuous immersion in water) Carl Zeiss Meditec AG ACCENTO foot switch (1.2 m)/ ACCENTO foot switch (5 m) Goeschwitzer Strasse 51-52 07745 Jena, Germany ACCENTO footswitch (1,2m) Manufacturer REF 0483-426...
-
Page 22: General Warning And Safety Instructions
General warning and safety instructions General warning and safety instructions In this section you can find general warning and safety instructions. Also observe the special warning and safety instructions for the individual work steps in the respective chapters of this user manual. General notes WARNING - RISK OF LASER RADIATION This instrument is a class 4 laser device. -
Page 23: Safety Officer
General warning and safety instructions Safety officer The operator and safety officer are responsible for carrying out all safety measures to prevent injury to the patient, physician in attendance and other persons present during laser operation. Observe the national regulations in your country. -
Page 24: Laser Safety Goggles
• a surgical microscope equipped with a 532 nm physician's safety filter • a laser slit lamp supplied by Carl Zeiss Meditec • a diagnostic slit lamp as described in the user manual in conjunction with VISULINK 532/U or •... -
Page 25: Patient Safety
The key parameter in laser treatment is the energy density at the target, i.e. applied laser energy divided by the area of the laser spot. On the VISULAS YAG III Combi, the energy of the laser pulse can be pre-set. The most important parameter in laser treatment when operated in combination mode (VISULAS YAG III Combi and VISULAS Trion Combi) is the energy flux density at the target area, i.e. -
Page 26: Dangers Caused By Direct Irradiation And Reflection
The LIO Trion/532s indirect ophthalmoscope may only be used as an applicator in combination with the Carl Zeiss Meditec VISULAS 532s laser console. The VISULINK 532/U may only be used as an applicator in combination with the Carl Zeiss Meditec VISULAS 532s laser console. - Page 27 3.8 min. If you have any questions concerning the permissible prolonged exposure time with other filter positions, please contact Carl Zeiss Meditec customer service. A 90 D contact glass may not be used.
-
Page 28: Performance Specifications
Performance specifications Functional description Principle of Nd:YAG laser treatment The VISULAS YAG III is an ophthalmic therapy laser system for non-contact incision of ocular tissue. The radiation is generated by a Q-switched Nd:YAG laser, which emits pulses of typically < 4 ns duration and a maximum energy of approximately 10 mJ at a wavelength of 1,064 nm. -
Page 29: Useful Life
Performance specifications Useful life WARNING - GENERAL HAZARDS The development, production and maintenance of this device, together with associated risks, are based on an expected service life of eight years, assuming that the device is serviced at the specified intervals. Modifications to the product or failure to follow the manufacturer’s instructions may substantially reduce the expected service life and significantly increase the risk associated with use of the device. -
Page 30: Description Of The Device
Description of the device Description of the device Instrument base with head rest for VISULAS YAG III/ VISULAS YAG III Combi/VISULAS Trion Combi 1 Fixation lamp mounting 2 Forehead support (application part) 3 Height adjustment for chin rest 4 Chin rest (application part) - Page 31 The laser can be triggered using either the hand switch (11, Fig. 3) or the foot switch (special accessory). The laser console menu is used to switch between the hand and foot switches. The VISULAS YAG III Combi/ VISULAS Trion Combi has an additional micromanipulator on the hand switch (see VISULAS 532s, VISULAS Trion user manual).
-
Page 32: Design Of The Visulas Yag Iii
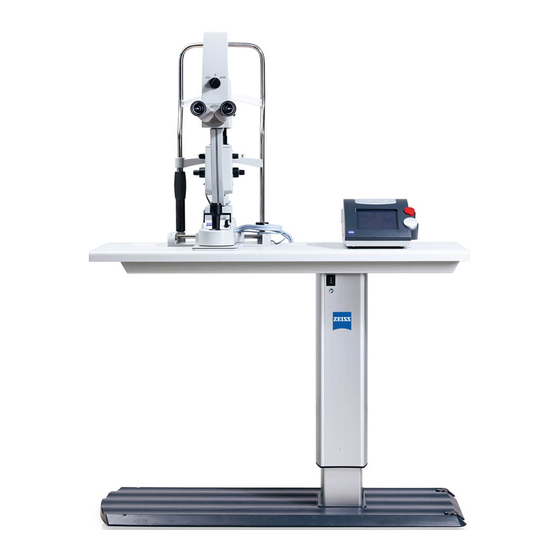
An optional foot switch (4, Fig. 4) is available. The laser console menu is used to switch between the hand and foot switches. The VISULAS YAG III can be mounted to any table with an even table-top. 1 VISULAS YAG III laser head... -
Page 33: Design Of The Lsl Yag Iii Laser Slit Lamp
Description of the device Design of the LSL YAG III laser slit lamp 1 Laser head 2 Focus shift control 3 Fastening screw 4 Interpupillary distance scale 5 Binocular tube 6 Eyepieces 7 Magnification changer 8 Halogen lamp cover (see page 95 for replacing the lamp) 9 Slit length control 10 Slit width control 11 Filter selector... -
Page 34: Beam Delivery In The Lsl Yag Iii Laser Slit Lamp
The prism head of the slit illumination system (13, Fig. 6) is lowered by 10°. The lens system (2, Fig. 6) can be used to adjust the focus shift. Note for VISULAS YAG III: In the central illumination position, a small part of the therapy beam is clipped. -
Page 35: Fig. 6 Lsl Yag Iii Beam Delivery
Description of the device 1 Nd:YAG laser 2 Focus shift lens system 3 Partially transmitting mirror for energy meter 4 Energy meter and pulse counter 5 Energy attenuator 6 Four-point aiming beam diode laser 7 Aiming beam coupling mirror 8 Beam expander 9 Galilean magnification changer 10 Physician's safety filter 11 Coupling mirror for coupling the laser beam into the viewing path... -
Page 36: Visulas Yag Iii Laser Console
Description of the device VISULAS YAG III laser console 1 Key switch 2 Laser console 3 Control knob/button 4 LASER STOP button 5 Control panel 6 Recessed grip Fig. 7 VISULAS YAG III laser console 1 Foot switch connector 2 Door interlock connector... - Page 37 (3, Fig. 7) are located on the front side of the control unit. The power supply and control connectors required for operation of the VISULAS YAG III are located on the rear panel of the laser console (Fig. 8).
-
Page 38: Design Of Visulas Yag Iii Combi/Visulas Trion Combi
Design of VISULAS YAG III Combi/ VISULAS Trion Combi VISULAS YAG III Combi VISULAS YAG III Combi is a combination of the VISULAS YAG III and VISULAS 532s devices consisting of the following components: Fig. 9 Components of the VISULAS YAG III Combi... -
Page 39: Fig. 10 Visulas Yag Iii Combi
1 VISULAS YAG III laser head 2 LSL YAG III Combi laser slit lamp 3 Control panel of the VISULAS 532s laser console 4 VISULAS 532s laser console 5 VISULAS YAG III laser console (Fig. 7) 6 Instrument table (optional) 7 Foot switch Fig. 10... -
Page 40: Visulas Trion Combi
Description of the device VISULAS Trion Combi VISULAS Trion Combi is a combination of the VISULAS YAG III and VISULAS Trion devices consisting of the following components: Fig. 11 VISULAS Trion Combi components 000000-1272-175-GA-GB-060613... -
Page 41: Fig. 12 Visulas Trion Combi
2 LSL Trion Combi laser slit lamp 3 Control panel of the VISULAS Trion laser console 4 VISULAS Trion laser console 5 VISULAS YAG III laser console (Fig. 7) 6 Instrument table (optional) 7 Standard foot switch or ACCENTO foot switch (only for VISULAS Trion Combi) Fig. -
Page 42: Design Of The Lsl Yag Iii Combi/Lsl Trion Combi Laser Slit Lamp
Description of the device Design of the LSL YAG III Combi/LSL Trion Combi laser slit lamp 1 Laser head 2 Focus shift control 3 Fastening screw 4 Interpupillary distance scale 5 Binocular tube 6 Eyepieces 7 Magnification changer 8 Halogen lamp cover (see page 95 for replacing the lamp) 9 Slit length control 10 Slit width control 11 Filter selector... -
Page 43: Beam Delivery In The Lsl Yag Iii Combi/Lsl Trion Combi Laser Slit Lamp
Note for VISULAS YAG III Combi and VISULAS Trion Combi The prism head of the slit illumination system must be swiveled out by about 30° before the YAG laser can be fired and the YAG laser beam can arrive at the patient’s eye without obstruction. -
Page 44: Fig. 14 Beam Delivery In The Lsl Yag Iii Combi/Lsl Trion Combi Laser
Description of the device YAG laser light path Coagulation laser light path 1 Nd:YAG laser 12 Optical fiber 2 Focus shift lens system 13 Coupling lens 3 Partially transmitting mirror for energy meter 14 Laser beam expander 4 Energy meter and pulse counter 15 Slit illumination system 5 Energy attenuator 16 Optical system for slit lamp and laser spot visualization... -
Page 45: Visulas 532S/Visulas Trion Control Panel For Visulas Yag Iii Combi/Visulas Trion Combi
VISULAS 532s/VISULAS Trion control panel for VISULAS YAG III Combi/VISULAS Trion Combi The VISULAS YAG III Combi/VISULAS Trion Combi is menu-operated using the icons on the VISULAS 532s/VISULAS Trion control panel and the combined knob/button of the corresponding laser console. -
Page 46: Installation
Installation Installation Notes for installation and use WARNING - GENERAL HAZARDS Do not store or operate the devices in ambient conditions other than those prescribed (see section Technical data on page 104 and following). Set up the devices so that the power cables can be disconnected from the power supply quickly and easily without any tools. - Page 47 A warning lamp must be installed at the entrance door indicating when the laser is in operation. Only the Carl Zeiss Meditec AG laser warning light (see Optional accessories, page 100) may be connected. The laser hazard area must be demarcated and marked as such during laser operation.
- Page 48 Installation CAUTION - PROPERTY DAMAGE Never touch the end of the optical fiber with your fingers and always protect it from contamination. Because of the laser’s high power output, any dirt may result in damage to the end surface of the fibers. Screw in the optical fiber by hand only.
-
Page 49: Installation And Transport Of The Visulas Yag Iii
The VISULAS YAG III may only be transported in the carrying case provided (optional). If the VISULAS YAG III is to be used as a mobile system, an optionally available carrying case will be required. Before transporting the instrument, the following steps should be taken: •... -
Page 50: Fig. 15 Visulas Yag Iii Combi In Transport Case
6 Laser slit lamp with head rest 7 Laser console 8 Transport castors 9 Fixation lamp 10 Accessories, packed 11 Laser safety goggles (optional) 12 Binocular tube 13 Contact lenses (optional) 14 Arm rests Fig. 15 VISULAS YAG III Combi in transport case 000000-1272-175-GA-GB-060613... -
Page 51: Installation Of Visulas Yag Iii Combi
• Now affix the laser slit lamp to the table. • Slide the VISULAS YAG III from the front onto the upper plate of the table mounting. • Finally, holding it vertically, slide the VISULAS 532s, from the front, onto the lower plate of the table mounting. -
Page 52: Fig. 16 Instrument Table With Laser Consoles
Fig. 16 Instrument table with laser consoles 1 Slit lamp connector 2 Power input connector 3 Connector for combined operation with the VISULAS YAG III 4 Serial port for servicing 5 Door interlock connector 6 Connection to foot switch Fig. 17... - Page 53 • The power cable for the instrument table should be connected to a fixed power socket. • Connect the VISULAS YAG III to one of the sockets on the instrument table (see separate user manual for the instrument table). The VISULAS 532s must be plugged into a separate fixed earthed socket.
-
Page 54: Installation Of Visulas Trion Combi
VISULAS Trion to the right of the instrument table (Fig. 18). • Now affix the laser slit lamp to the instrument table. • Push the VISULAS YAG III (laser console) onto the foot of the VISULAS Trion from the back (Fig. 18). ... -
Page 55: Fig. 18 Instrument Table With Visulas Trion Combi Laser Console
VISULAS Trion marked "Foot 2" (5, Fig. 19). • For combined operation the VISULAS YAG III must be connected by a special combi cable to the VISULAS Trion. For this purpose insert the end of the cable with the single plug into the 532s socket on the YAG III laser console (4, Fig. -
Page 56: Fig. 19 Connections On The Visulas Trion Laser Console
• The power cable for the instrument table should be connected to a fixed power socket. • Connect the VISULAS YAG III to one of the sockets on the instrument table (see separate user manual for the instrument table). The VISULAS Trion must be plugged into a separate earthed mains socket. -
Page 57: Installation Of Additional Components
Installation • Insert the optical fiber carefully into the socket for the optical fiber on the VISULAS Trion console (see VISULAS Trion user manual) and screw in firmly. • Fold out the control panel foot, unwind as much of the control panel cable as required and connect it to the front of the instrument (see VISULAS Trion user manual). -
Page 58: Moving The Instrument Table With The Instrument
Secure the VISULAS Trion once it is in its final position. Lock the steering castors by applying the brakes. Pushing the instrument table will move the entire VISULAS YAG III Combi system, as all components are installed on the table. -
Page 59: Installation Of Accento Eyepiece To Visulas Yag Iii/ Visulas Yag Iii Combi And Visulas Trion Combi
To install, proceed as follows: • Switch off the VISULAS YAG III and disconnect the power cable. • Carefully remove the desired eyepiece (right or left; 2, Fig. 21) from the tube of the slit lamp. -
Page 60: Data Display In The Accento Eyepiece
(VISULAS 532s or VISULAS Trion) is switched off. Switch on only the VISULAS YAG III and select the display as described in section Information mode, page 66). The chosen setting will remain when the coagulation laser (VISULAS 532s or VISULAS Trion) has been switched on. -
Page 61: Accento Foot Switch
Follow the instructions for the ACCENTO eyepiece. ACCENTO foot switch The ACCENTO foot switch may only be used in combination with the VISULAS Trion Combi. Only the standard foot switch may be used with the VISULAS YAG III and VISULAS YAG III Combi. 000000-1272-175-GA-GB-060613... -
Page 62: Daily Use
• Use the power cable supplied with the device. If the instrument is mounted on an instrument table, it will be powered through this table. If using a table not approved by Carl Zeiss Meditec, the user is solely responsible for ensuring the electrical safety of the instrument. -
Page 63: Function Test
Function test When the instrument is switched on using the key switch (1, Fig. 7) on the VISULAS YAG III laser console, a system test will be automatically performed. During the system test the following actions, tests and initialization routines will be executed: •... -
Page 64: Operation Of The Device
Operation of the device Operation of the device CAUTION - GENERAL HAZARDS The patient should not touch the instrument with his/her hands. In particular, the instrument should not be used as a support or an aid for standing up. CAUTION - RISK OF PINCHING Various modules of the laser slit lamp can move against one another. -
Page 65: Laser Treatment Using Visulas Yag Iii/ Visulas Yag Iii Combi/Visulas Trion Combi
Note for VISULAS Trion Combi: When operting the VISULAS Trion Combi with the ACCENTO eyepiece, both devices (VISULAS Trion and VISULAS YAG III) should be switched on. Adjusting the slit lamp and eyepieces Before treating a patient with laser radiation you should be perfectly familiar with the use of the slit lamp. -
Page 66: Start-Up And Laser Treatment
Operation of the device Start-up and laser treatment Control of the VISULAS YAG III is menu-driven using the control panel. Functions and menus are described in detail below. 000000-1272-175-GA-GB-060613... -
Page 67: Visulas Yag Iii Menu Description
The menu descriptions for the VISULAS YAG III Combi are shown from page 70 and the VISULAS Trion Combi from page 78. Menu navigation The VISULAS YAG III is operated via a menu system with four menu screens via the VISULAS YAG III laser console. Power-up mode... -
Page 68: Power-Up Mode
Power-up mode When the system is switched on using the key switch (1, Fig. 7) on the VISULAS YAG III laser console, the start-up screen appears on the control panel. The instrument is now in Power-up mode (Fig. 24). Fig. 24 Power-up mode The system automatically performs a self-test. -
Page 69: Diagnosis Mode
Diagnosis mode (Fig. 25) enables the user to use the laser slit lamp as a diagnostic slit lamp. The VISULAS YAG III is used merely as a power source for the slit lamp. The laser remains switched off and the hand switch or foot switch are deactivated. -
Page 70: Treatment Standby Mode
Operation of the device Treatment STANDBY mode After the system has been switched on and the internal system test has been completed, the system enters this mode automatically unless the instrument is switched to Diagnosis mode by the user. Fig. 26 Treatment STANDBY mode All treatment-related laser parameters are displayed on the control panel and can be changed in this mode. - Page 71 Operation of the device The buttons in the Treatment mode have the following functions: Displays the selected focus shift mode ANT - anterior focus shift POST - posterior focus shift 0 - Zero focus shift Refer to section Focus shift and defocusing on page 88. Laser emission display This field lights up in yellow when the instrument is in treatment READY mode and the aiming beam is...
-
Page 72: Information Mode
Operation of the device Aiming beam Switch on the aiming beam. In Treatment STANDBY mode, the aiming beam is switched on and off by touching this button. If the aiming beam is on, this button appears in reverse color. Aiming beam intensity After touching this button, the intensity of the aiming beam can be adjusted by turning the rotary knob. - Page 73 Operation of the device This mode allows you to view system information. You can also set the triggering mode (hand switch or foot switch), the system time (date and time), the user interface language and the control panel LC display contrast. The following system information is displayed: •...
-
Page 74: Setting The System Time
Operation of the device Fig. 28 Setting the system time Setting the system time • Activate each numerical field in turn by touching it and set the current date and time by turning the rotary knob. • To save the settings and return to Information mode, touch the button. -
Page 75: Treatment Ready Mode
Operation of the device Treatment READY mode Touching the button STANDBY/READY in Treatment STANDBY mode switches the system, after about three seconds, into Treatment READY mode (Fig. 29). Fig. 29 Treatment READY mode In Treatment READY mode, the aiming beam and laser warning lamp are always on. -
Page 76: Menu Description For Visulas Yag Iii Combi
Note for VISULAS YAG III: The menus for the VISULAS YAG III are described on page 61. Menu navigation The VISULAS YAG III is operated via a menu system with eight menu screens using the VISULAS 543s laser console. Power-up mode... -
Page 77: Visulas 532S Power-Up Mode
Please familiarize yourself thoroughly with the contents of the user manual for VISULAS 532s before using the VISULAS 532s. To operate the VISULAS YAG III in combination with the VISULAS 532s, the two laser consoles must be connected by a special interface cable (Combi cable). -
Page 78: Diagnosis Mode
Operation of the device Diagnosis mode This mode enables the user to use the LSL YAG III Combi laser slit lamp as a diagnostic slit lamp. The VISULAS 532s is used merely as a power source for the slit lamp. •... -
Page 79: Visulas Yag Iii Power-Up Mode
(Fig. 34). • Should an error occur on the VISULAS YAG III whilst in combination mode, the VISULAS 532s logs off automatically. The relevant error message is displayed on the YAG console display. -
Page 80: Yag Iii Treatment Mode
Operation of the device Fig. 34 Combination mode is activated YAG III treatment mode In the main menu, select the YAG laser as applicator. Fig. 35 Main menu after selecting the YAG laser as applicator • Select the YAG triggering mode (hand/foot). 000000-1272-175-GA-GB-060613... -
Page 81: Standby
Operation of the device STANDBY • Touching the Arrow button switches the system from the main menu into Treatment STANDBY mode. Fig. 36 Treatment STANDBY mode • Selected focus shift mode display: ANT - anterior focus shift POST - posterior focus shift 0 - Zero focus shift Refer to section Focus shift and defocusing on page 88. - Page 82 Operation of the device • The aiming beam can be turned on and off using the Aiming beam button. When the aiming beam is on, this button is highlighted. • Upon touching the Brightness button, the intensity of the aiming beam can be adjusted by turning the rotary knob.
-
Page 83: Ready
Operation of the device READY Treatment READY mode Fig. 37 • In Treatment READY mode, the aiming beam and laser emission indicators are always on. • Parameters are set in the same way as for Treatment STANDBY mode. • When the trigger is activated, the laser beam will be triggered according to the parameters set. -
Page 84: Visulas Trion Combi Menu Description
VISULAS Trion Combi menu description Note for VISULAS YAG III: The menus for the VISULAS YAG III are described on page 61. Menu navigation The VISULAS Trion Combi is operated via a menu system with five menu screens using the VISULAS Trion laser console. -
Page 85: Visulas Trion Power-Up Mode
Operation of the device To operate the VISULAS YAG III in combination with the VISULAS Trion, the two laser consoles must be connected by a special interface cable (Combi cable). As soon as this cable is connected, the buttons on the YAG III laser console control panel will be deactivated and combination mode will be selected. -
Page 86: Diagnosis Mode
Operation of the device Diagnosis mode This mode enables the user to use the LSL YAG III Combi laser slit lamp as a diagnostic slit lamp. The VISULAS Trion is used merely as a power source for the slit lamp. •... -
Page 87: Visulas Yag Iii Power-Up Mode
(Fig. 42). • Should an error occur on the VISULAS YAG III whilst in combination mode, the VISULAS Trion logs off automatically. The relevant error message is displayed on the YAG console display. -
Page 88: Yag Iii Treatment Mode
Operation of the device Fig. 42 Combination mode is activated YAG III treatment mode If you wish to change the YAG trigger (hand or foot) press the upper blue YAG button in the main menu. Fig. 43 VISULAS Trion main menu 000000-1272-175-GA-GB-060613... -
Page 89: Standby
Operation of the device Fig. 44 YAG trigger selection menu • Select the YAG trigger (hand/foot). The last-selected trigger will be active upon restarting. STANDBY • Pressing the Arrow button in the YAG trigger selection menu will change to the YAG Treatment STANDBY mode Fig. - Page 90 Operation of the device Selected focus shift mode display: ANT - anterior focus shift POST - posterior focus shift 0 - Zero focus shift Refer to section Focus shift and defocusing on page 88. Laser emission display: This field lights up in yellow when the instrument is in Treatment READY mode and the aiming beam is switched on.
-
Page 91: Ready
Operation of the device READY Fig. 46 Treatment READY mode In Treatment READY mode, the aiming beam and laser warning lamp are always on. Parameters are set in the same way as for Treatment STANDBY mode. • When the trigger is activated, the laser beam will be triggered according to the parameters set. -
Page 92: Using The Aiming Beam System With The Visulas Yag Iii/Visulas Yag Iii Combi/Visulas Trion Combi
VISULAS YAG III/VISULAS YAG III Combi/ VISULAS Trion Combi The VISULAS YAG III uses a four-point aiming beam system. If the image is free from distortion, the following aiming beam spot patterns can be seen, depending on the position of the focus: Fig. - Page 93 Operation of the device Always work with the lowest energy possible. Intraocular lenses made of silicone are considerably more sensitive than intraocular lenses made of PMMA. For this reason, you should be particularly careful when working with silicone lenses. The aiming beam spot pattern may also be distorted if the contact lens is held at too much of an angle.
-
Page 94: Focus Shift And Defocusing
The optimal mechanical effect of the optical breakdown occurs at a specific distance from the focus of the therapy beam. For this reason, the aiming beam and therapy beam of the VISULAS YAG III are not parfocal, but are shifted (focus shift). Depending on the application, you can select one of three settings: •... -
Page 95: Fig. 49 Focus Shift Control
Always turn the focus shift control until it clicks into position (an audible click should be heard). The focus shift of the VISULAS YAG III is designed for pulse energies of up to about 1.5 mJ. • If you wish to work with higher energy levels (e.g. for fibrotic secondary cataracts), you must increase the focus shift distance by defocusing: –... -
Page 96: Shutting Down
Faults that cannot by remedied according to the descriptions in this user manual. Label the instrument clearly as being out of service and report the problem to the Carl Zeiss Meditec service. Switching off the instrument WARNING - RISK OF ELECTRIC SHOCK Internal components remain under voltage after the instrument has been switched off with the key switch. -
Page 97: Maintenance And Care
Further maintenance procedures above and beyond those specified in this section (maintenance, safety inspections and repairs) may only be carried out by persons authorized by Carl Zeiss Meditec and solely according to the service instructions issued by Carl Zeiss Meditec. For planning and implementing these maintenance and care procedures please contact Carl Zeiss Meditec service or your local dealer. -
Page 98: Error Messages On Yag Iii
If, in YAG mode, an error occurs on the VISULAS YAG III, an error message will be displayed on the control panel. At the same time, an error message with a specific error code will be displayed on the YAG console. - Page 99 VISULAS Trion user manual. If a fault occurs, which cannot be remedied by using the troubleshooting tables, please contact a Carl Zeiss Meditec authorized specialist, citing the error number displayed. Label the instrument as being out of order and remove the key from the key switch.
-
Page 100: Replacing The Fuses
Maintenance and care Replacing the fuses Replacing the fuse on the VISULAS YAG III laser console The fuses are integrated into the combined power inlet connector/fuse assembly of the laser console. This assembly is located on the rear side of the laser console (see 7, Fig. -
Page 101: Replacing The Halogen Bulb In The Laser Slit Lamp
Maintenance and care Replacing the halogen bulb in the laser slit lamp CAUTION - RISK OF BURNS Before replacing the lamp, switch the system off at the key switch and disconnect the power cable. Allow the lamp to cool down or wear protective gloves. - Page 102 Maintenance and care Replace the halogen bulb (5, Fig. 51) as illustrated in Fig. 51. • The lamp housing can be removed by pressing down and simultaneously pulling the lug (1, Fig. 51). • To unlock the lamp holder, turn the lever (8, Fig. 51). •...
-
Page 103: Maintenance And Care
Maintenance and care Maintenance and care Care and cleaning WARNING - RISK OF ELECTRIC SHOCK Prevent moisture from penetrating the instrument or keyboard. Disconnect the power cable from the power supply before cleaning or disinfecting the device. CAUTION - RISK DUE TO CROSS-CONTAMINATION Parts with which the patient has come into contact during the examination (chin rest, forehead rest) should be cleaned with a disinfectant approved for the purpose. -
Page 104: Cleaning And Disinfection Of Painted Surfaces
Maintenance and care The external surfaces of optical components (eyepieces, objectives), can be cleaned as required: • Dust on the optical surfaces can be removed using a squeeze blower or a clean, grease free brush. • Thorough cleaning can be performed quickly and easily using a moist, anti-static cleaning cloth. -
Page 105: Safety Inspections
The user is required to have the instrument inspected for safety once a year. Safety inspections may only be carried out by persons authorized by Carl Zeiss Meditec and solely according to the service instructions issued by Carl Zeiss Meditec. For planning and implementing these safety inspections please contact Carl Zeiss Meditec service or your local dealer. -
Page 106: Optional Accessories
• Instrument table IT 1060 (see instrument table user manual) • Instrument table IT 760 (see instrument table user manual) • Table mounting for VISULAS 532s/VISULAS YAG III Combi for IT 1060 • Adapter plate for foot switch on IT 1060 or IT 760 •... - Page 107 – Laser safety goggles 532/561 – Laser safety goggles 659 • Laser warning lamp (see laser warning lamp addendum) • Transport case for VISULAS YAG III: • Breathing shield • Laser training eye with holder (complete kit with 10 spare capsules, membranes, fundi and irises) •...
-
Page 108: Contact Lenses
Optional accessories Contact lenses WARNING - RISK OF LASER RADIATION Always hold the contact lens at right angles to the laser beam. Incorrect positioning of the contact lens will cause distortion of the laser focus. This can lead to unwanted side effects. Never trigger the laser if the aiming beam is not clearly visible in the target area. -
Page 109: Essential Performance
Essential performance Essential performance The essential performance features of the instrument are exclusively limited by the parameters and specifications listed in the following. Any other features not contained in this table are not essential performance features. • Emission of pulsed laser radiation with defined values for pulse length, pulse mode and spot size within a specified energy range. -
Page 110: Visulas Yag Iii Laser System
Technical data Technical data VISULAS YAG III laser system Wavelength of therapy beam 1064 nm Focus shift between aiming beam Posterior: +150 μm and therapy beam Zero: 0 μm Anterior: -150 μm Tolerance: ± 25 μm Mode Super Gaussian Pulse length <... -
Page 111: Lsl Yag Iii Laser Slit Lamp
(H x W x D) Weight (including laser head, 11 kg tube, eyepieces) Electrical power supply Electrical power is supplied via the VISULAS YAG III laser console. Protection mode IP 20 LSL YAG III Combi/LSL Trion Combi laser slit lamp Instrument base motion range... - Page 112 Technical data Ambient conditions for intended use of all devices +10 °C to +35 °C Temperature Relative humidity 30 % to 90 %, non-condensing Altitude up to 3000 m above sea level Ambient conditions for the storage of all devices without original packaging Temperature -10 °C to +55 °C Relative humidity...
-
Page 113: Electromagnetic Compatibility
Replacement cables may only be purchased at Carl Zeiss Meditec. The use of accessories, all types of transducers and cables not specified in this user manual or not sold by Carl Zeiss Meditec as replacement parts may result in higher emissions or reduced immunity of the device. - Page 114 Carl Zeiss Meditec. Guidance and manufacturer’s declaration - electromagnetic emissions The VISULAS YAG III is intended for use in the electromagnetic environment specified below. The user of the VISULAS YAG III should assure that it is used in such an environment...
- Page 115 Electromagnetic compatibility Guidance and manufacturer’s declaration - electromagnetic immunity The VISULAS YAG III is intended for use in the electromagnetic environment specified below. The user of the VISULAS YAG III should assure that it is used in such an environment...
- Page 116 RF transmitters, an electromagnetic site survey should be considered. If the measured field strength in the location in which the VISULAS YAG III is used exceeds the applicable RF compliance level above, the VISULAS YAG III should be observed to verify normal operation. If abnormal performance is observed, additional measures may be necessary, such as re-orienting or relocating the VISULAS YAG III.
- Page 117 Recommended separation distances between portable and mobile RF telecommunications equipment and VISULAS YAG III The VISULAS YAG III is intended for use in an electromagnetic environment in which radiated RF disturbances are controlled. The customer or user of the VISULAS YAG III can help prevent electromagnetic interference by...
-
Page 118: Abbreviations/Glossary
Abbreviations/Glossary Abbreviations/Glossary CISPR Comité international special sur les perturbations radioelectrique (Special international committee on radio interference) Diopter Deutsches Institut für Normung (German Institute for Standardization) Electromagnetic compatibility European Standard Fig. Figure International Electrotechnical Commission Laser split lamp Medizinproduktegesetz (German Medical Products Act) NOHD Nominal Ocular Hazard Distance (safety distance from laser source) -
Page 119: Figures
Figures Figures Fig. 1 Warning and information labels on the VISULAS YAG III ....11 Fig. 2 Principle of photodisruption using the Nd:YAG laser ....22 Fig. 3 Instrument base with head rest ........... 24 Fig. 4 VISULAS YAG III instrument components ........26 Fig. - Page 120 Figures Fig. 47 Focusing the aiming beam ............86 Fig. 48 Distorted aiming beam ............... 86 Fig. 49 Focus shift control ..............89 Fig. 50 Replacing the fuse ..............94 Fig. 51 Replacing the halogen bulb ............95 000000-1272-175-GA-GB-060613...
-
Page 121: Index
Index Index Abbreviations ..................112 ACCENTO eyepiece ..................53 ACCENTO foot switch ................55 Accessories, optional ................100 Care ......................97 Country-specific information ..............10 Description of the device ................24 Device classification ..................7 Disposal..................... 10 Electromagnetic compatibility ..............107 Fault remedy ..................... - Page 122 Index Switching on ..................... 56 Symbols ...................... 5 Useful life ....................23 000000-1272-175-GA-GB-060613...
- Page 124 Carl Zeiss Meditec AG Goeschwitzer Str. 51-52 07745 Jena Germany Phone: +49 3641 220 333 Fax: +49 3641 220 112 000000-1272-175-GA-GB-060613 Email: info@meditec.zeiss.com VISULAS YAG III Internet: www.meditec.zeiss.com Specifications subject to change...
- Page 126 Carl Zeiss Meditec AG Goeschwitzer Str. 51-52 07745 Jena Germany Phone: +49 3641 220 333 Fax: +49 3641 220 112 Email: info@meditec.zeiss.com Internet: www.meditec.zeiss.com VISULAS YAG III Specifications subject to change 000000-1272-175-DokS-GB-060613...
Need help?
Do you have a question about the VISULAS YAG III and is the answer not in the manual?
Questions and answers