Brother PT-D600 Service Manual
Hide thumbs
Also See for PT-D600:
- User manual (62 pages) ,
- Operator's manual (2 pages) ,
- User manual (58 pages)
Table of Contents
Advertisement
Quick Links
Advertisement
Table of Contents
Troubleshooting

Related Manuals for Brother PT-D600


Summary of Contents for Brother PT-D600
- Page 1 SERVICE MANUAL MODEL: PT-D600...
- Page 2 This publication is a service manual covering the specifications, theory of operation, disassembly/reassembly procedure, and troubleshooting of the Brother PT-D600. It is intended for service personnel and other concerned persons to accurately and quickly provide after-sale service for our PT-D600.
-
Page 3: Table Of Contents
CONTENTS CHAPTER I SPECIFICATIONS 1.1 Mechanical Specifications ......................I-1 1.1.1 External Appearance ......................I-1 1.1.2 Keyboard ..........................I-1 1.1.3 Display..........................I-1 1.1.4 Printing Mechanism......................I-2 1.1.5 Tape Cassette........................I-2 1.1.6 Tape Cutter ..........................I-3 1.2 Electronics Specifications......................I-4 1.2.1 Character Generator......................I-4 1.2.2 Power Supply........................I-5 1.3 Key commands for Special Functions ..................I-6 1.3.1 Initializing..........................I-6 1.3.2 Inspection Mode ........................I-6 CHAPTER II THEORY OF OPERATION... - Page 4 3.21 Print from PC Mode: Required on the Production Line ............III-46 3.22 Other Inspection Tools: <USB Port Wiping Tool for PT-D600: QM Inspection use only>........III-46 3.23 Check Items after Completion of Line Inspection / Shipment Tool / QA 100% Inspection ............ III-47 CHAPTER IV TROUBLESHOOTING 4.1 Precautions..........................
- Page 5 APPENDIX 1 SERVICEMAN SOFTWARE TOOL 1.1 Introduction..........................1-1 1.1.1 Software Tool ........................1-1 1.1.2 Items Required for Inspections................... 1-1 1.2 Serviceman Tool........................1-2 1.2.1 Role of the Serviceman Tool....................1-2 1.2.2 Inspection Outline ......................1-2 1.2.3 How to Start the Serviceman Tool ..................1-3 1.2.4 Read Serial Number ......................
-
Page 6: Chapter I Specifications
CHAPTER I SPECIFICATIONS 1.1 Mechanical Specifications 1.1.1 External Appearance 86 mm 201 mm Figure 1.1-1 External Appearance (1) Dimensions (W x D x H) Approx. 201 x 192 x 86 mm (Approx. 7.92 x 7.56 x 3.39 inches) (2) Weight Machine proper Approx. -
Page 7: Printing Mechanism
1.1.4 Printing Mechanism (1) Print system Thermal transfer onto plastic and fabric tapes (Fixed thermal print head and tape feed mechanism) (2) Print speed See the table below. Tape type Output Power supply Resolution Laminated Laminated Non- Heat Fabric (black ink) (color ink) laminated shrink tube... -
Page 8: Tape Cutter
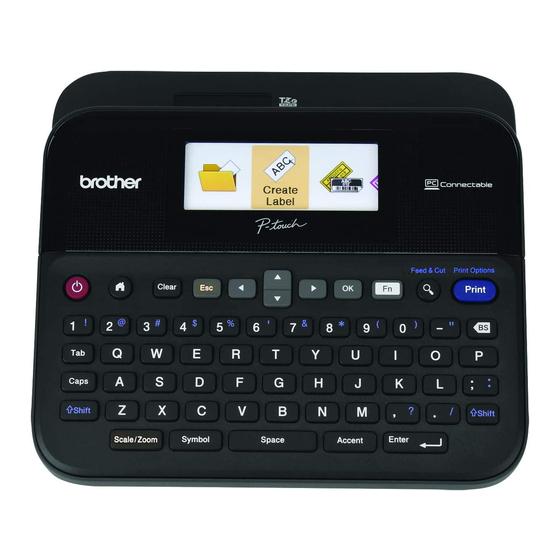
1.1.6 Tape Cutter (1) Tape cutting Automatic cutting (2) Cutter unit Not user-replaceable PT-D600 U.S. version PT-D600 France version PT-D600 Germany version PT-D600 U.K. version Figure 1.1-2 Display and Key Arrangement I - 3... -
Page 9: Electronics Specifications
1.2 Electronics Specifications 1.2.1 Character Generator (1) Internal characters 826 or more (excluding space) - Alphameric characters: 62 or more - Acute accent: 146 or more - Symbols: 618 or more (2) Internal fonts Helsinki, Brussels, US, Florida, Belgium, San Diego, Los Angeles, Calgary, Atlanta, Adams, Brunei, Letter Gothic, Sofia, Germany (3) Text buffer Max. -
Page 10: Power Supply
1.2.2 Power Supply (1) Power supply Driven by: Alkaline batteries (LR6) x6, Ni-MH batteries (HR6) x6 Specified AC adapter available: AD-E001 ** (“**” part changes depending on US, EU, and UK.) (2) Battery type Alkaline batteries (LR6)/Ni-MH batteries (HR6) that come with the machine. (3) Service life of batteries Will last through one 24-mm wide tape cassette, and then some (at room temperature and... -
Page 11: Key Commands For Special Functions
1.3 Key commands for Special Functions 1.3.1 Initializing Inside RAM is cleared by pressing the following key simultaneously at power-off state, and the content of character edit in the machine mode is initialized. For European/North American models: [Space] + [BS] + [ON/OFF] 1.3.2 Inspection Mode After inside RAM is cleared, enter the factory inspection mode by pressing the... -
Page 12: Chapter Ii Theory Of Operation
CHAPTER II THEORY OF OPERATION 2.1 Outline of Mechanisms 2.1.1 Print Mechanism Structure of Thermal Head This machine uses direct thermal printing. The thermal print head has a heat generator consisting of 128 heating elements which are vertically aligned in 180 dpi as shown in Figure 2.1-1. - Page 13 Character Formation See the table below. The feed amount of 0.141 mm is smaller than the width (0.18 mm) of the heating elements so that the heat generated at one heating cycle will overlap with the next heating cycle. This forms a character having no gap between adjacent printed dots. Tape type Output Power supply...
-
Page 14: Roller Holder Assy Setting & Retracting Mechanism
2.1.2 Roller Holder ASSY Setting & Retracting Mechanism This mechanism consists of the roller holder release lever, roller holder release rod 24B, roller holder ASSY and side sensor PCB ASSY. The roller holder supports the platen and tape feed sub roller so that they can move perpendicularly to the thermal head ASSY and tape feed roller built in the tape cassette, respectively, as well as rotating freely. -
Page 15: Roller Holder Assy, Side Sensor & Cassette Cover Interlocking Mechanism
2.1.3 Roller Holder ASSY, Side Sensor & Cassette Cover Interlocking Mechanism Closing the cassette cover pushes down the roller holder release lever and brings the top of the lever into the box provided on the inside of the cassette cover. As described in Subsection 2.1.2 "Roller Holder ASSY Setting &... - Page 16 The locking boss on the side sensor holder 24B enters the locking boss hole on the tape cassette, and the side sensor switches are held down according to the holes on the tape cassette. (The side sensor turns ON when the sensor switches that correspond to the sections without holes are held down.) The tape cassette type and width are determined depending on the pattern that the side sensor switches are held down.
-
Page 17: Tape & Ribbon Feed Mechanism
2.1.4 Tape & Ribbon Feed Mechanism This mechanism consists of a stepping motor, gear train, and roller holder ASSY. Tape Feeding As the stepping motor rotates, the rotation is transmitted via the gear train to the platen idle gear (which rotates the platen roller gear) and tape idle gear (which rotate the tape feed roller and its sub roller at the same rotation speed). - Page 18 Ink Ribbon Feeding As the stepping motor rotates, the ribbon drive cam located at the middle of the gear train rotates counterclockwise. When fitted on the ribbon drive cam, the ribbon take- up roll in the tape cassette also rotates to take up the ink ribbon. To apply proper tension to the ink ribbon between the platen and the ribbon drive cam, the feed amount of the ribbon drive cam is slightly greater than that of the tape idle gear.
-
Page 19: Tape Cutter Mechanism
2.1.5 Tape Cutter Mechanism The cutter ASSY consists of a stationary blade and movable blade. The printed tape will come through those blades. Pressing the feed button (the cutter button) will turn the DC motor, and move the movable blade in the direction of an arrow, cutting the printed tape, just like a scissors. -
Page 20: Outline Of Control Electronics
2.2 Outline of Control Electronics 2.2.1 Configuration Figure 2.2-1 shows a block diagram of the control electronics of this machine. The control electronics consists of three PCBs (main PCB, key PCB and side sensor PCB), a LCD, stepping motor, DC motor, thermal print head and cutter sensor. ... -
Page 21: Main Pcb
LCD with backlight DC motor Side sensor Stepping motor Cutter sensor Main PCB Color sensor USB cable AC adapter Thermal head (option or included) Black: Negative(-) battery terminal Relay Red: Positive(+) battery terminal harness Key PCB Figure 2.2-1 Configuration of the Electronic Part II - 10... -
Page 22: 1 ] Block Diagram
2.2.2 Main PCB [ 1 ] Block Diagram Figure 2.2-2 shows a block diagram of the main PCB. The main PCB consists of the following: (1) CPU (including a RAM) (2) Flash ROM (256-megabit (32 megabyte)) (3) DC motor drive circuit for auto cutter (4) Oscillation circuits (one is main clock. - Page 23 ON_OFF_KEY INTP KO[0] GPIO KO[1] GPIO KO[2] GPIO KO[3] GPIO KO[4] GPIO KO[5] GPIO KO[6] GPIO KO[7] GPIO KI[0] GPIO KI[1] GPIO KI[2] GPIO KI[3] GPIO KI[4] GPIO KI[5] GPIO KI[6] GPIO KI[7] GPIO B4B-PH- SOLDER S6B-PH-SM4(LF) SOLDER VIAS SOLDER VIAS A63265001 FLEX PCB CONNECTOR SM4(LF) VIAS...
-
Page 24: 2 ] Power Supply Circuit
[ 2 ] Power Supply Circuit As shown in the figure below, the power supply circuit uses two linear regulators and one Boost regulator. For linear regulator, one is S-816A33AMC-BAIT2U that stabilizes the battery output (VBT) to supply the 3.3BV power (3.3V ±2%) to the CPU and all keys. The other is R1190S033D-E2-FE that stabilizes the battery output (VBT) to supply the 3.3VCC power (3.3V ±2%) to the LCD module, Flash Rom, SRAM and all logic circuits except CPU and all keys. -
Page 25: 3 ] Side Sensor Circuit
[ 3 ] Side Sensor Circuit The sensor circuit consists of a 5-switch side sensor (SW1 through SW5). Loading a tape cassette turns on some of those five switches on the side sensor while keeping other switches off depending upon the ID encoding holes provided in the tape cassette currently loaded. -
Page 26: 4 ] Color Sensor 24 Mm
[ 4 ] Color Sensor 24 mm Colors of cassette and ribbon are detectable from 5 switches. 0: With cassette hole, sensor not pressed 1: Without cassette hole, sensor pressed Sensor No. Ribbon color Tape color Black White Black Tube White Black Transparent Black... -
Page 27: Chapter Iii Disassembly With Assembling Note
CHAPTER III DISASSEMBLY WITH ASSEMBLING NOTE Safety Precautions (1) You should carry out disassembly & reassembly jobs on an anti-static sheet grounded correctly. Otherwise, the LSI and other electronic devices will be damaged due to the electricity charged in your body. (2) When transporting PCBs, be sure to wrap them in conductive sheets such as aluminum foil. - Page 28 Lubrication List Lubricating oil type Quantity of Lubrication point (Maker name) lubrication Shaft of the sensor frame shaft 1 place 1 mm dia. ball Roller holder release rod 24B 2 places 3 mm dia. ball Kanto Kasei BG1023 Cutter ASSY 2 places 4 mm dia.
-
Page 29: Disassembly With Assembling Note
3.1 Disassembly with Assembling Note [ 1 ] Removing the Tape Cassette (1) Open the cassette cover. (2) Remove the tape cassette. Tape cassette Cassette cover Figure 3.1-1 III - 3... -
Page 30: 2 ] Removing The Battery Lid And Dry Cells
[ 2 ] Removing the Battery Lid and Dry Cells (1) Open the battery lid while pressing the section "A" to remove it. (2) Remove the six dry cells. Dry cells "A" Battery lid Figure 3.1-2 III - 4... -
Page 31: 3 ] Removing The Lower Foot, Bottom Cover And Battery Box Film
[ 3 ] Removing the Lower Foot, Bottom Cover and Battery Box Film (1) Remove the two lower foots. (2) Remove the seven taptite bind B M2.6x10 screws. Taptite bind B M2.6x10 Lower foot Lower foot Figure 3.1-3 III - 5... - Page 32 CAUTION: When handling the PCBs, put on a grounding wrist band. Failure to do so might break LSIs and other electronic devices. (3) Turn the machine left side up and gently open the bottom cover. NOTE: Do not pull the bottom cover away from the middle cover. Those covers are connected with harnesses.
-
Page 33: 4 ] Removing The Battery(+/-) Terminals Assy And Battery Springs Plus/Minus
[ 4 ] Removing the Battery(+/-) Terminals ASSY and Battery Springs plus/minus (1) Release the battery(+) terminal harness and the battery(-) terminal harness from the securing fixtures. (2) Remove the battery(+) terminal ASSY, the battery(-) terminal ASSY, the battery spring plus/minus and the battery spring plus/minus B from the bottom side of the bottom cover. -
Page 34: 5 ] Removing The Cassette Cover
[ 5 ] Removing the Cassette Cover (1) Unlock the lock to disconnect the FFC from the main PCB ASSY, and remove it. Remove the double faced tape. (2) Pull out the two hinge shafts to remove the cassette cover. Pull out the FFC from the hole of machine. -
Page 35: 6 ] Removing The Cassette Panel And Blind Cover
[ 6 ] Removing the Cassette Panel and Blind Cover (1) Release the each hook to remove the cassette panel. (2) Remove the two taptite bind B M2.6x6 screws to remove the blind cover from the cassette cover. (3) Remove the double faced tape from the cassette cover. Taptite bind B M2.6x6 Blind cover Hooks... -
Page 36: 7 ] Removing The Cas Cover Panel And Lcd Unit
[ 7 ] Removing the CAS Cover Panel and LCD Unit (1) Remove the four taptite bind B M2.6x6 screws. Release the each hook to remove the CAS cover panel from the cassette cover. (2) Remove the LCD panel from the CAS cover panel. (3) Remove the LCD unit from the cassette cover. -
Page 37: 8 ] Removing The Frame Assy
[ 8 ] Removing the Frame ASSY CAUTION: When handling the PCBs, put on a grounding wrist band. Failure to do so might break LSIs and other electronic devices. (1) Unsolder the side sensor PCB harnesses and the DC motor harnesses from the main PCB ASSY. - Page 38 (3) Remove the section "A" of the protection film to remove the DC motor harness, the color sensor harness and head flat cable. Remove the protection film from the frame ASSY. Assembling Note: Put the head flat cable through the notch of the protection film, and attach the protection film to the frame ASSY.
- Page 39 (5) Release the color sensor harness from the securing fixtures. Release the each hook to remove the color sensor ASSY. (6) Release the side sensor PCB harness from the securing fixtures. Remove the three taptite bind B M2.6x8 screws to remove the frame ASSY. (7) Remove the tape, and remove the screw PAN M1.7x6 screw to remove the cutter sensor ASSY from the cutter chassis ASSY.
-
Page 40: 9 ] Removing The Sensor Frame 24B Assy, Roller Holder Release Lever And Side Sensor Pcb Assy
[ 9 ] Removing the Sensor Frame 24B ASSY, Roller Holder Release Lever and Side Sensor PCB ASSY (1) Remove the two screw bind M3x4 screws to remove the sensor frame 24B ASSY from the frame ASSY. (2) Release the section "A" of the lever release spring from the notch of the sensor frame 24B ASSY. - Page 41 (5) Remove the side sensor holder 24B and the side sensor spring B from the sensor frame 24B ASSY while sliding the roller holder release rod 24B in the direction of the arrow until it stops. (6) Remove the taptite PAN B M2.6x6 screw from the side sensor holder 24B. Release the hook to remove the side sensor PCB ASSY from the side sensor holder 24B.
-
Page 42: 10 ]Disassembling The Frame Assy
[ 10 ]Disassembling the Frame ASSY (1) Remove the retaining ring E2 to remove the ribbon drive cam and the ribbon drive gear from the frame ASSY. Remove the ribbon clutch spring TZA24 from the ribbon drive cam. Assembling Note: Adjust the straight end of the ribbon clutch spring TZA24 to the slit on the ribbon drive gear. -
Page 43: 11 ] Removing The Upper Cover And Rubber 62 Key
[ 11 ] Removing the Upper Cover and Rubber 62 Key (1) Remove the four taptite bind B M2.6x6 screws to remove the main PCB ASSY and the upper cover. Taptite bind B M2.6x6 Taptite bind B M2.6x6 Main PCB ASSY Upper cover Figure 3.1-15 (2) Remove the rubber 62 key from the upper cover. -
Page 44: How To Enter The Factory Inspection Mode
3.2 How to Enter the Factory Inspection Mode Clearing inside RAM Inside RAM is cleared by pressing the keys below simultaneously at power-off state, and the characters edited in the machine mode is initialized. For European/North American models: [Space] + [BS] + [ON/OFF] ... - Page 45 Reception 2 tapes such as heat shrink tube and self-laminate cannot be used in factory inspection mode. Messages below appear when system error occurs on start-up. Unable to use 01! Kan 01 niet gebr! Turn off the machine Zet het apparaat and on again uit en weer aan Figure 3.2-2...
-
Page 46: Factory Inspection Mode ([1] To [6], [9] And [T] Keys)
3.3 Factory Inspection Mode ([1] to [6], [9] and [T] Keys) This mode is for shipping inspection at factories. [1] to [6] and [9] keys are always enabled except for when inspecting keys, rotating motors, displaying <Figure 3.4-2> in the setting writing mode, displaying <Figure 3.4- 4>... - Page 47 Power Automatically Inspection Mode supply at shift Remarks at factory inspection inspection to DC power T&D Check Mode or battery Program Version Data PRINT 4 Mode PRINT 3 Mode [BS] Three Inside RAM Delete Mode times NOTE: Be sure to provide the following power supply for the factory inspection. AA battery: DC9.0V ±0.1V [Insert resistant 1Ω...
-
Page 48: Write Setting Mode ([1] Key): Required On The Production Line
3.4 Write Setting Mode ([1] key): Required on the Production Line Be sure to provide power supply of DC12.0V ±0.1V / DC9.0V ±0.1V [Insert resistant 1Ω ±5% (2W and more)] for the inspection from DC power or AA battery. 3.4.1 Head Rank Set Mode Press the [OK] or [ENTER] key at the state of <Figure... -
Page 49: Write Country Set: Required On The Production Line
3.4.2 Write Country Set: Required on the Production Line Press the [OK] or [ENTER] key at the state of <Figure 3.4-2>, and the LCD displays as shown in <Figure 3.4-3>. COUNTRY SET Figure 3.4-3 Press the [OK] or [ENTER] key to proceed to the display shown in <Figure 3.4-4>. -
Page 50: Check Lcd Indication: Required On The Production Line
3.4.3 Check LCD Indication: Required on the Production Line For European/North American models Press the [OK] or [ENTER] key while the LCD display is as shown in <Figure 3.4-4>, and the LCD displays as shown in <Figure 3.4-5> for LCD check. LCD CHECK Figure 3.4-5 Press the key below, and the LCD displays as shown in... -
Page 51: Information Mode ([2] Key): Required On The Production Line
Press the key below, and the LCD displays as shown in <Figure 3.4-10> for LCD check 5. For European/North American models: [OK] or [ENTER] Figure 3.4-10 Write head rank and settings by country data. After writing, set the selected specification (language/unit). After writing is completed, proceed to the "INFORMATION Mode". -
Page 52: Inspect Cassette/Color Sensor Switch Mode ([3] Key): Required On The Production Line
3.6 Inspect Cassette/Color Sensor Switch Mode ([3] key): Required on the Production Line Use 24 mm laminate black ink ribbon tape. Be sure to provide power supply of DC12.0V ±0.1V / DC9.0V ±0.1V [Insert resistant 1Ω ±5% (2W and more)] for the inspection from DC power or AA battery. Press the key below at the state of <Figure 3.5-1>, and the LCD displays as shown in... - Page 53 While the LCD displays as shown in <Figure 3.6-1>, press the key below to display as shown in <Figure 3.6-2>. For European/North American models: [OK] or [ENTER] CASSETTE Figure 3.6-2 Cassette Sensor (1) Proceed to the display shown in <Figure 3.6-3>...
- Page 54 COLOR Figure 3.6-7 Color Sensor (1) COLOR Figure 3.6-8 Color Sensor (2) COLOR Figure 3.6-9 Color Sensor (3) COLOR Figure 3.6-10 Color Sensor (4) COLOR Figure 3.6-11 Color Sensor (5) III - 28...
- Page 55 When any sensor is judged as NG, the LCD displays as shown in <Figure 3.6-13>. When the correct sensor is pressed while the LCD displays as shown in <Figure 3.6- 13>, it proceeds to the next inspection. (Proceed to the display shown in <Figure 3.6-14>...
- Page 56 When all the cassette sensor inspections are completed, the LCD displays as shown <Figure 3.6-15>. Once the LCD displays as shown in <Figure 3.6-15>, set the "24 mm laminate black ink ribbon tape cassette" and close the cover. After closing the cover, press the key below to print the contents shown in <Figure 3.6- 16>.
-
Page 57: Inspect Key Mode ([4] Key): Required On The Production Line
3.7 Inspect Key Mode ([4] key): Required on the Production Line Be sure to provide power supply of DC12.0V ±0.1V / DC9.0V ±0.1V [Insert resistant 1Ω ±5% (2W and more)] for the inspection from DC power or AA battery. Press the [4] key, and the LCD displays as shown in <Figure 3.7-1>. - Page 58 When all key inspections are completed, the LCD displays as shown in <Figure 3.7-4>. <Example> Figure 3.7-4 Return to the start of "Inspection Key Mode" <Figure 3.7-1> by pressing the [OK] or [ENTER] key while the LCD displays as shown in <Figure 3.7-4>.
-
Page 59: Print 1 Mode (30 Mm/Sec) ([5] Key): Required On The Production Line
3.8 PRINT 1 Mode (30 mm/sec) ([5] key): Required on the Production Line Use 24 mm laminate black ink ribbon tape. This inspection checks the print quality when the print speed is 30 mm/sec. Be sure to provide power supply of DC12.0V ±0.1V for the inspection from DC power. "! Wrong AC Adapter ! Connect compatible AC Adapter"... - Page 60 <Print samples> Print length: 100.0 mm, Margin: 2 mm 24 mm 18 mm 12 mm 9 mm 6 mm Figure 3.8-3 Print Samples for 24 mm/18 mm/12 mm/9 mm/6 mm Wide Tapes III - 34...
-
Page 61: Print 1 Mode (20 Mm/Sec) ([8] Key): Not Required On The Production Line
3.9 PRINT 1 Mode (20 mm/sec) ([8] key): Not Required on the Production Line Use 24 mm laminate black ink ribbon tape. This inspection checks the print quality when the print speed is 20 mm/sec. Be sure to provide power supply of DC9.0V ±0.1V for the inspection from AA battery. The inspection is not operable without AA battery (or dry cell). - Page 62 <Print samples> Print length: 100.0 mm, Margin: 2 mm 24 mm 18 mm 12 mm 9 mm 6 mm 3.5 mm Figure 3.9-3 Print Samples III - 36...
-
Page 63: Full Cut Mode ([6] Key): Not Required On The Production Line (Shipping Tool)
3.10 Full CUT Mode ([6] key): Not Required on the Production Line (Shipping Tool) Use 24 mm cleaning tape. Be sure to provide power supply of DC12.0V ±0.1V / DC9.0V ±0.1V [Insert resistant 1Ω ±5% (2W and more)] for the inspection from DC power or AA battery. The LCD displays as shown in <Figure 3.10-1>... -
Page 64: Print 2 Mode ([7] Key): Not Required On The Production Line
3.11 PRINT 2 Mode ([7] key): Not Required on the Production Line Print a test pattern. Press the [7] key, and the LCD displays as shown in <Figure 3.11-1>. PRINT 2 Figure 3.11-1 If an error occurs before printing, press any key to return to the beginning. Start printing by pressing the key below. -
Page 65: Print 3 Mode ([X] Key): Not Required On The Production Line
3.12 PRINT 3 Mode ([X] key): Not Required on the Production Line Print a test pattern. Press the [X] key, and the LCD displays as shown in <Figure 3.12-1>. PRINT 3 Figure 3.12-1 If an error occurs before printing, press any key to return to the beginning. Start printing by pressing the key below. -
Page 66: Ad Check Mode 2 ([9] Key): Required On The Production Line
3.13 AD Check Mode 2 ([9] key): Required on the Production Line Be sure to provide power supply of 9.0 ±0.1V [Insert resistant 1Ω ±5% (2W and more)] for the inspection from AA battery. Connect the adapter and battery fixture at the same time, and press the [9] key to display <Figure 3.13-1>. -
Page 67: Cpu Internal Memory Initialization Mode ([Bs] Key: Three Times): Not Required On The Production Line
3.14 CPU Internal Memory Initialization Mode ([BS] key: three times): Not Required on the Production Line This mode is used to initialize CPU internal memory. (CPU internal memory means CPU data flush area.) Although CPU internal memory is initialized when PCB is inspected, models without PCB inspection such as evaluation machine do not have a chance for CPU internal memory initialization. -
Page 68: Checksum Check Mode ([S] Key): Not Required On The Production Line
3.15 Checksum Check Mode ([S] key): Not Required on the Production Line Press the [S] key to display the value stored as checksum and actual checksum value. When those checksum values do not match, it is recognized as system error. Checksum value will be displayed in "????"... -
Page 69: Program Version Data ([V] Key): Not Required On The Production Line
3.17 Program Version Data ([V] key): Not Required on the Production Line Press the [V] key to display the version information of main program and boot program of "CPU", also the version information of main program, boot program, and CG program of "FROM". The LCD displays as shown in <Figure 3.17-1>... -
Page 70: Motor Rotation Mode ([M] Key): Not Required On The Production Line (30 Pieces With A String In Trial Production)
3.18 Motor Rotation Mode ([M] key): Not Required on the Production Line (30 Pieces with a String in Trial Production) Press the [M] key to enter the motor rotation mode. Display shown in <Figure 3.18-1> appears on the LCD. Only use 30 mm/s on the product line. MOTOR Figure 3.18-1 Motor Rotation Press the [OK] or [Enter] key to go to the speed selection screen shown in... -
Page 71: T&D Check Mode ([T] Key): Required On The Production Line
3.19 T&D Check Mode ([T] key): Required on the Production Line Be sure to provide power supply of DC12.0V ±0.1V / DC9.0V ±0.1V [Insert resistant 1Ω ±5% (2W and more)] for the inspection from DC power or AA battery. This mode is used to check T&D operation. Press the [T] key at the state of <Figure 3.2-1>, and the LCD displays as shown in... -
Page 72: Write Serial Number From Pc Mode: Required On The Production Line
<USB Port Wiping Tool for PT-D600: QM Inspection use only> Service space: Production factory Supported OS: Windows 7 Function: Deletes all the PT-D600 relevant USB ports in PC. Driver for PT-D600 will be used after the mass production trail. III - 46... -
Page 73: Check Items After Completion Of Line Inspection / Shipment Tool / Qa 100% Inspection
3.23 Check Items after Completion of Line Inspection / Shipment Tool / QA 100% Inspection When Line inspection / Shipment tool / QA 100% inspection are completed, check that the screen shown below is displayed. English German Set default language Standardsprache festlegen Select language and press OK Sprache wählen + OK drücken... -
Page 74: Chapter Iv Troubleshooting
CHAPTER IV TROUBLESHOOTING This section gives the service personnel some of the troubleshooting procedures to be followed if an error or malfunction occurs with this machine. It is impossible to anticipate all of the possible troubles which may occur in future and determine the troubleshooting procedures, so this chapter covers some sample troubles. -
Page 75: If Any Error Message Is Displayed On The Computer Screen
4.3 If Any Error Message is Displayed on the Computer Screen Check the error message table given below and take any necessary action. If you press the Detail button when an error message is displayed, then the Monitor Help will start and show Advice. If this message appears on the Do this: computer screen:... - Page 76 Printing. Please wait. Remove the tape from the output After removing the tape, slot. (PT-D600 only) click [Resume] in Print Monitor. Error of unknown cause occurred. Turn the printer off, then on again. If the error cannot be resolved, repairs will be necessary.
-
Page 77: Error Messages
4.4 Error Messages The table given below lists error messages that can appear on the LCD. Error Messages English Brazil Portuguese Spanish Rumanian French Slovenian Croat Slovakian Meaning Italian Finnish Hungarian Swedish Dutch Turkey Norwegian Czech Polish Danish Portuguese German The installed batteries are getting Eng: Low Battery! Bra: Bateria Fraca! - Page 78 Error Messages English Brazil Portuguese Spanish Rumanian French Slovenian Croat Slovakian Meaning Italian Finnish Hungarian Swedish Dutch Turkey Norwegian Czech Polish Danish Portuguese German “File” was selected in home menu Eng: No files in memory! Bra: Nenhum arquivo mode when no file was na memória! registered.
- Page 79 Error Messages English Brazil Portuguese Spanish Rumanian French Slovenian Croat Slovakian Meaning Italian Finnish Hungarian Swedish Dutch Turkey Norwegian Czech Polish Danish Portuguese German An incompatible AC adapter is Eng: Wrong AC Adapter! Bra: Adapt. CA Errado! connected. Connect compatible Conectar um AC Adapter Adaptador CA...
- Page 80 Error Messages English Brazil Portuguese Spanish Rumanian French Slovenian Croat Slovakian Meaning Italian Finnish Hungarian Swedish Dutch Turkey Norwegian Czech Polish Danish Portuguese German The installed batteries are about Eng: Battery Empty! Bra: Bateria sem Carga! to run out. Replace batteries Substituir baterias Spa: ¡Batería agotada!
- Page 81 Error Messages English Brazil Portuguese Spanish Rumanian French Slovenian Croat Slovakian Meaning Italian Finnish Hungarian Swedish Dutch Turkey Norwegian Czech Polish Danish Portuguese German High temperature error. Eng: Unit Cooling! Bra: Resfriando! Wait 10 minutes Aguarde 10 min before restart! para reiniciar! Spa: ¡Enfriando!
- Page 82 Error Messages English Brazil Portuguese Spanish Rumanian French Slovenian Croat Slovakian Meaning Italian Finnish Hungarian Swedish Dutch Turkey Norwegian Czech Polish Danish Portuguese German The tape cutter has been closed Eng: Cutter Malfunction! Bra: Avaria no Cortador! when you tried to print or feed Turn off the machine Desligar a máquina e tape.
- Page 83 Error Messages English Brazil Portuguese Spanish Rumanian French Slovenian Croat Slovakian Meaning Italian Finnish Hungarian Swedish Dutch Turkey Norwegian Czech Polish Danish Portuguese German No tape cassette was set during Eng: No Tape Cassette! Bra: Sem Cartucho Fita! printing. Insert tape cassette Inserir Cart.
- Page 84 Error Messages English Brazil Portuguese Spanish Rumanian French Slovenian Croat Slovakian Meaning Italian Finnish Hungarian Swedish Dutch Turkey Norwegian Czech Polish Danish Portuguese German The maximum number of Eng: Too Many Text! Bra: Excesso de texto! characters have already been Reduce characters Reduzir caracteres entered.
- Page 85 Error Messages English Brazil Portuguese Spanish Rumanian French Slovenian Croat Slovakian Meaning Italian Finnish Hungarian Swedish Dutch Turkey Norwegian Czech Polish Danish Portuguese German There is no text, symbols or bar Eng: No Text! Bra: Sem Texto! code data entered when you try to Input data Inserir dados print or preview a label.
- Page 86 Error Messages English Brazil Portuguese Spanish Rumanian French Slovenian Croat Slovakian Meaning Italian Finnish Hungarian Swedish Dutch Turkey Norwegian Czech Polish Danish Portuguese German There are already lines of text Eng: Too Many Lines! Bra: Excesso de Linhas! that can be input when you press Max 7 lines Máx.
- Page 87 Error Messages English Brazil Portuguese Spanish Rumanian French Slovenian Croat Slovakian Meaning Italian Finnish Hungarian Swedish Dutch Turkey Norwegian Czech Polish Danish Portuguese German There are already lines of text Eng: Too Many Lines! Bra: Excesso de Linhas! that can be input when you press Max 7 lines for Máx.
- Page 88 Error Messages English Brazil Portuguese Spanish Rumanian French Slovenian Croat Slovakian Meaning Italian Finnish Hungarian Swedish Dutch Turkey Norwegian Czech Polish Danish Portuguese German There are already lines of text Eng: Too Many Lines! Bra: Excesso de Linhas! that can be input when you press Max 7 lines for Máx.
- Page 89 Error Messages English Brazil Portuguese Spanish Rumanian French Slovenian Croat Slovakian Meaning Italian Finnish Hungarian Swedish Dutch Turkey Norwegian Czech Polish Danish Portuguese German Invalid number is selected. (Tab Eng: Invalid Value! Bra: Valor Inválido! Length, Length) Select valid value Selec.
- Page 90 Error Messages English Brazil Portuguese Spanish Rumanian French Slovenian Croat Slovakian Meaning Italian Finnish Hungarian Swedish Dutch Turkey Norwegian Czech Polish Danish Portuguese German The tape cassette is changed Eng: Tape Removed! Bra: Fita Removida! while printing. Don't remove Não remover o tape cassette cartucho de fita Spa:...
- Page 91 Error Messages English Brazil Portuguese Spanish Rumanian French Slovenian Croat Slovakian Meaning Italian Finnish Hungarian Swedish Dutch Turkey Norwegian Czech Polish Danish Portuguese German There are more than lines of text Eng: Too Many Lines! Bra: Excesso de Linhas! that can be input when you press Max 5 lines for Máx.
- Page 92 Error Messages English Brazil Portuguese Spanish Rumanian French Slovenian Croat Slovakian Meaning Italian Finnish Hungarian Swedish Dutch Turkey Norwegian Czech Polish Danish Portuguese German There are more than lines of text Eng: Too Many Lines! Bra: Excesso de Linhas! that can be input when you press Max 5 lines for Máx.
- Page 93 Error Messages English Brazil Portuguese Spanish Rumanian French Slovenian Croat Slovakian Meaning Italian Finnish Hungarian Swedish Dutch Turkey Norwegian Czech Polish Danish Portuguese German There are more than lines of text Eng: Too Many Lines! Bra: Excesso de Linhas! that can be input when you press Max 3 lines for Máx.
- Page 94 Error Messages English Brazil Portuguese Spanish Rumanian French Slovenian Croat Slovakian Meaning Italian Finnish Hungarian Swedish Dutch Turkey Norwegian Czech Polish Danish Portuguese German There are more than lines of text Eng: Too Many Lines! Bra: Excesso de Linhas! that can be input when you press Max 3 lines for Máx.
- Page 95 Error Messages English Brazil Portuguese Spanish Rumanian French Slovenian Croat Slovakian Meaning Italian Finnish Hungarian Swedish Dutch Turkey Norwegian Czech Polish Danish Portuguese German There are more than lines of text Eng: Too Many Lines! Bra: Excesso de Linhas! that can be input when you press Max 2 lines for Máx.
- Page 96 Error Messages English Brazil Portuguese Spanish Rumanian French Slovenian Croat Slovakian Meaning Italian Finnish Hungarian Swedish Dutch Turkey Norwegian Czech Polish Danish Portuguese German There are more than lines of text Eng: Too Many Lines! Bra: Excesso de Linhas! that can be input when you press Max 2 lines for Máx.
- Page 97 Error Messages English Brazil Portuguese Spanish Rumanian French Slovenian Croat Slovakian Meaning Italian Finnish Hungarian Swedish Dutch Turkey Norwegian Czech Polish Danish Portuguese German There are more than lines of text Eng: Tape Line Limit! Bra: Lim. Linhas Fita! that can be input when you press Max 1 line for Máx.
- Page 98 Error Messages English Brazil Portuguese Spanish Rumanian French Slovenian Croat Slovakian Meaning Italian Finnish Hungarian Swedish Dutch Turkey Norwegian Czech Polish Danish Portuguese German There are more than lines of text Eng: Too Many Lines! Bra: Excesso de Linhas! that can be input when you press Max 1 line for Máx.
- Page 99 Error Messages English Brazil Portuguese Spanish Rumanian French Slovenian Croat Slovakian Meaning Italian Finnish Hungarian Swedish Dutch Turkey Norwegian Czech Polish Danish Portuguese German There are already blocks of text Eng: Too Many Blocks! Bra: Excesso de Blocos! that can be input. Max 5 blocks Máximo de 5 blocos Spa:...
- Page 100 Error Messages English Brazil Portuguese Spanish Rumanian French Slovenian Croat Slovakian Meaning Italian Finnish Hungarian Swedish Dutch Turkey Norwegian Czech Polish Danish Portuguese German The length of the label to be Eng: Label Too Long! Bra: Etiq. Muito Longa! printed using the text entered is Choose smaller font Escolher uma fonte longer than 39.37"...
- Page 101 Error Messages English Brazil Portuguese Spanish Rumanian French Slovenian Croat Slovakian Meaning Italian Finnish Hungarian Swedish Dutch Turkey Norwegian Czech Polish Danish Portuguese German 24mm tape cassette is not Eng: Wrong Tape Width! Bra: Larg. Fita Errada! installed when an Auto Format for Insert 24mm Inserir cartucho 24mm tape is selected.
- Page 102 Error Messages English Brazil Portuguese Spanish Rumanian French Slovenian Croat Slovakian Meaning Italian Finnish Hungarian Swedish Dutch Turkey Norwegian Czech Polish Danish Portuguese German 0.94" tape cassette is not Eng: Wrong Tape Width! Bra: Larg. Fita Errada! installed when an Auto Format for Insert 0.94"...
- Page 103 Error Messages English Brazil Portuguese Spanish Rumanian French Slovenian Croat Slovakian Meaning Italian Finnish Hungarian Swedish Dutch Turkey Norwegian Czech Polish Danish Portuguese German 18mm tape cassette is not Eng: Wrong Tape Width! Bra: Larg. Fita Errada! installed when an Auto Format for Insert 18mm Inserir cartucho 18mm tape is selected.
- Page 104 Error Messages English Brazil Portuguese Spanish Rumanian French Slovenian Croat Slovakian Meaning Italian Finnish Hungarian Swedish Dutch Turkey Norwegian Czech Polish Danish Portuguese German 0.7" tape cassette is not installed Eng: Wrong Tape Width! Bra: Larg. Fita Errada! when an Auto Format for 0.7" Insert 0.7"...
- Page 105 Error Messages English Brazil Portuguese Spanish Rumanian French Slovenian Croat Slovakian Meaning Italian Finnish Hungarian Swedish Dutch Turkey Norwegian Czech Polish Danish Portuguese German 12mm tape cassette is not Eng: Wrong Tape Width! Bra: Larg. Fita Errada! installed when an Auto Format for Insert 12mm Inserir cartucho 12mm tape is selected.
- Page 106 Error Messages English Brazil Portuguese Spanish Rumanian French Slovenian Croat Slovakian Meaning Italian Finnish Hungarian Swedish Dutch Turkey Norwegian Czech Polish Danish Portuguese German 0.47" tape cassette is not Eng: Wrong Tape Width! Bra: Larg. Fita Errada! installed when an Auto Format for Insert 0.47"...
- Page 107 Error Messages English Brazil Portuguese Spanish Rumanian French Slovenian Croat Slovakian Meaning Italian Finnish Hungarian Swedish Dutch Turkey Norwegian Czech Polish Danish Portuguese German 9mm tape cassette is not installed Eng: Wrong Tape Width! Bra: Larg. Fita Errada! when an Auto Format for 9mm Insert 9mm Inserir cartucho tape is selected.
- Page 108 Error Messages English Brazil Portuguese Spanish Rumanian French Slovenian Croat Slovakian Meaning Italian Finnish Hungarian Swedish Dutch Turkey Norwegian Czech Polish Danish Portuguese German 0.35" tape cassette is not Eng: Wrong Tape Width! Bra: Larg. Fita Errada! installed when an Auto Format for Insert 0.35"...
- Page 109 Error Messages English Brazil Portuguese Spanish Rumanian French Slovenian Croat Slovakian Meaning Italian Finnish Hungarian Swedish Dutch Turkey Norwegian Czech Polish Danish Portuguese German 6mm tape cassette is not installed Eng: Wrong Tape Width! Bra: Larg. Fita Errada! when an Auto Format for 6mm Insert 6mm Inserir cartucho tape is selected.
- Page 110 Error Messages English Brazil Portuguese Spanish Rumanian French Slovenian Croat Slovakian Meaning Italian Finnish Hungarian Swedish Dutch Turkey Norwegian Czech Polish Danish Portuguese German 0.23" tape cassette is not Eng: Wrong Tape Width! Bra: Larg. Fita Errada! installed when an Auto Format for Insert 0.23"...
- Page 111 Error Messages English Brazil Portuguese Spanish Rumanian French Slovenian Croat Slovakian Meaning Italian Finnish Hungarian Swedish Dutch Turkey Norwegian Czech Polish Danish Portuguese German 3.5mm tape cassette is not Eng: Wrong Tape Width! Bra: Larg. Fita Errada! installed when an Auto Format for Insert 3.5mm Inserir cartucho 3.5mm tape is selected.
- Page 112 Error Messages English Brazil Portuguese Spanish Rumanian French Slovenian Croat Slovakian Meaning Italian Finnish Hungarian Swedish Dutch Turkey Norwegian Czech Polish Danish Portuguese German 0.13" tape cassette is not Eng: Wrong Tape Width! Bra: Larg. Fita Errada! installed when an Auto Format for Insert 0.13"...
- Page 113 Error Messages English Brazil Portuguese Spanish Rumanian French Slovenian Croat Slovakian Meaning Italian Finnish Hungarian Swedish Dutch Turkey Norwegian Czech Polish Danish Portuguese German Tape cassette is not installed. Eng: No Tape Cassette! Bra: Sem Cartucho Fita! Insert 24mm Inserir cartucho tape cassette! de fita de 24 mm! Spa:...
- Page 114 Error Messages English Brazil Portuguese Spanish Rumanian French Slovenian Croat Slovakian Meaning Italian Finnish Hungarian Swedish Dutch Turkey Norwegian Czech Polish Danish Portuguese German Tape cassette is not installed. Eng: No Tape Cassette! Bra: Sem Cartucho Fita! Insert 0.94" Inserir cartucho tape cassette! de fita de 0,94"! Spa:...
- Page 115 Error Messages English Brazil Portuguese Spanish Rumanian French Slovenian Croat Slovakian Meaning Italian Finnish Hungarian Swedish Dutch Turkey Norwegian Czech Polish Danish Portuguese German Tape cassette is not installed. Eng: No Tape Cassette! Bra: Sem Cartucho Fita! Insert 18mm Inserir cartucho tape cassette! de fita de 18 mm! Spa:...
- Page 116 Error Messages English Brazil Portuguese Spanish Rumanian French Slovenian Croat Slovakian Meaning Italian Finnish Hungarian Swedish Dutch Turkey Norwegian Czech Polish Danish Portuguese German Tape cassette is not installed. Eng: No Tape Cassette! Bra: Sem Cartucho Fita! Insert 0.7" Inserir cartucho tape cassette! de fita de 0,7"! Spa:...
- Page 117 Error Messages English Brazil Portuguese Spanish Rumanian French Slovenian Croat Slovakian Meaning Italian Finnish Hungarian Swedish Dutch Turkey Norwegian Czech Polish Danish Portuguese German Tape cassette is not installed. Eng: No Tape Cassette! Bra: Sem Cartucho Fita! Insert 12mm Inserir cartucho tape cassette de fita de 12 mm Spa:...
- Page 118 Error Messages English Brazil Portuguese Spanish Rumanian French Slovenian Croat Slovakian Meaning Italian Finnish Hungarian Swedish Dutch Turkey Norwegian Czech Polish Danish Portuguese German Tape cassette is not installed. Eng: No Tape Cassette! Bra: Sem Cartucho Fita! Insert 0.47" Inserir cartucho tape cassette de fita de 0,47"...
- Page 119 Error Messages English Brazil Portuguese Spanish Rumanian French Slovenian Croat Slovakian Meaning Italian Finnish Hungarian Swedish Dutch Turkey Norwegian Czech Polish Danish Portuguese German Tape cassette is not installed. Eng: No Tape Cassette! Bra: Sem Cartucho Fita! Insert 9mm Inserir cartucho tape cassette de fita de 9 mm Spa:...
- Page 120 Error Messages English Brazil Portuguese Spanish Rumanian French Slovenian Croat Slovakian Meaning Italian Finnish Hungarian Swedish Dutch Turkey Norwegian Czech Polish Danish Portuguese German Tape cassette is not installed. Eng: No Tape Cassette! Bra: Sem Cartucho Fita! Insert 0.35" Inserir cartucho tape cassette de fita de 0,35"...
- Page 121 Error Messages English Brazil Portuguese Spanish Rumanian French Slovenian Croat Slovakian Meaning Italian Finnish Hungarian Swedish Dutch Turkey Norwegian Czech Polish Danish Portuguese German Tape cassette is not installed. Eng: No Tape Cassette! Bra: Sem Cartucho Fita! Insert 6mm Inserir cartucho tape cassette de fita de 6 mm Spa:...
- Page 122 Error Messages English Brazil Portuguese Spanish Rumanian French Slovenian Croat Slovakian Meaning Italian Finnish Hungarian Swedish Dutch Turkey Norwegian Czech Polish Danish Portuguese German Tape cassette is not installed. Eng: No Tape Cassette! Bra: Sem Cartucho Fita! Insert 0.23" Inserir cartucho tape cassette de fita de 0,23"...
- Page 123 Error Messages English Brazil Portuguese Spanish Rumanian French Slovenian Croat Slovakian Meaning Italian Finnish Hungarian Swedish Dutch Turkey Norwegian Czech Polish Danish Portuguese German Tape cassette is not installed. Eng: No Tape Cassette! Bra: Sem Cartucho Fita! Insert 3.5mm Inserir cartucho tape cassette de fita de 3,5 mm Spa:...
- Page 124 Error Messages English Brazil Portuguese Spanish Rumanian French Slovenian Croat Slovakian Meaning Italian Finnish Hungarian Swedish Dutch Turkey Norwegian Czech Polish Danish Portuguese German Tape cassette is not installed. Eng: No Tape Cassette! Bra: Sem Cartucho Fita! Insert 0.13" Inserir cartucho tape cassette de fita de 0,13"...
- Page 125 Error Messages English Brazil Portuguese Spanish Rumanian French Slovenian Croat Slovakian Meaning Italian Finnish Hungarian Swedish Dutch Turkey Norwegian Czech Polish Danish Portuguese German The length of the label to be Eng: Text Too Long! Bra: Texto Muito Longo! printed using the text entered is Choose smaller font Escolher uma fonte longer than the length setting.
- Page 126 Error Messages English Brazil Portuguese Spanish Rumanian French Slovenian Croat Slovakian Meaning Italian Finnish Hungarian Swedish Dutch Turkey Norwegian Czech Polish Danish Portuguese German There is not enough internal Eng: Memory Full! Bra: Memória cheia! memory available when you try to Delete unused files Excluir arq.
- Page 127 Error Messages English Brazil Portuguese Spanish Rumanian French Slovenian Croat Slovakian Meaning Italian Finnish Hungarian Swedish Dutch Turkey Norwegian Czech Polish Danish Portuguese German The number of digits entered in Eng: Wrong # of Digits! Bra: Erro Núm. Dígitos! the bar code data does not match Check # of digits Verificar nº...
- Page 128 Error Messages English Brazil Portuguese Spanish Rumanian French Slovenian Croat Slovakian Meaning Italian Finnish Hungarian Swedish Dutch Turkey Norwegian Czech Polish Danish Portuguese German The bar code data entered does Eng: Invalid Value! Bra: Valor Inválido! not have the required start/stop Input A,B,C or D at Inserir A,B,C code (A,B,C, or D required at the...
- Page 129 Error Messages English Brazil Portuguese Spanish Rumanian French Slovenian Croat Slovakian Meaning Italian Finnish Hungarian Swedish Dutch Turkey Norwegian Czech Polish Danish Portuguese German There are already bar codes Eng: Too Many Barcodes! Bra: Muitos Códs Barras! entered in the text data that can Max 5 Barcodes Máx.
- Page 130 Error Messages English Brazil Portuguese Spanish Rumanian French Slovenian Croat Slovakian Meaning Italian Finnish Hungarian Swedish Dutch Turkey Norwegian Czech Polish Danish Portuguese German The text size is too large. Eng: Text Too Large! Bra: Texto Muito Grande! Choose smaller font Escolher fonte menor size Spa:...
- Page 131 Error Messages English Brazil Portuguese Spanish Rumanian French Slovenian Croat Slovakian Meaning Italian Finnish Hungarian Swedish Dutch Turkey Norwegian Czech Polish Danish Portuguese German The tape length set using the tape Eng: Invalid Cut Option! Bra: Op. Corte Inválida! length setting is shorter than the Select another cut Selecionar outra opç.
- Page 132 Error Messages English Brazil Portuguese Spanish Rumanian French Slovenian Croat Slovakian Meaning Italian Finnish Hungarian Swedish Dutch Turkey Norwegian Czech Polish Danish Portuguese German When push print out button with Eng: Cover Open! Bra: Tampa Aberta! opening cover. Close the cover Fechar a tampa Spa: ¡Cubierta abierta!
- Page 133 Error Messages English Brazil Portuguese Spanish Rumanian French Slovenian Croat Slovakian Meaning Italian Finnish Hungarian Swedish Dutch Turkey Norwegian Czech Polish Danish Portuguese German When the user insert the Eng: Tape Not Detected! Bra: Fita Não Detectada! noncompliant tape. Check if TZe Verificar se a fita compatible tape is TZe compatível está...
- Page 134 Error Messages English Brazil Portuguese Spanish Rumanian French Slovenian Croat Slovakian Meaning Italian Finnish Hungarian Swedish Dutch Turkey Norwegian Czech Polish Danish Portuguese German Wrong tape is set. Eng: Wrong Tape Width! Bra: Larg. Fita Errada! Attempted to print label collection Insert 12mm tape Inserir cartucho de when a tape other than 12mm,...
- Page 135 Error Messages English Brazil Portuguese Spanish Rumanian French Slovenian Croat Slovakian Meaning Italian Finnish Hungarian Swedish Dutch Turkey Norwegian Czech Polish Danish Portuguese German Label Collection : Eng: Wrong Tape Width! Bra: Larg. Fita Errada! Attempted to print label collection Insert 0.47"...
- Page 136 Error Messages English Brazil Portuguese Spanish Rumanian French Slovenian Croat Slovakian Meaning Italian Finnish Hungarian Swedish Dutch Turkey Norwegian Czech Polish Danish Portuguese German No tape is set. Eng: No Tape Cassette! Bra: Sem Cartucho Fita! Attempted to print label collection Insert 12mm tape Inserir cartucho de when no tape cassette is...
- Page 137 Error Messages English Brazil Portuguese Spanish Rumanian French Slovenian Croat Slovakian Meaning Italian Finnish Hungarian Swedish Dutch Turkey Norwegian Czech Polish Danish Portuguese German Label Collection : Eng: No Tape Cassette! Bra: Sem Cartucho Fita! Attempted to print label collection Insert 0.47"...
- Page 138 Error Messages English Brazil Portuguese Spanish Rumanian French Slovenian Croat Slovakian Meaning Italian Finnish Hungarian Swedish Dutch Turkey Norwegian Czech Polish Danish Portuguese German System Error Eng: Unable to use 01! Bra: Impossível usar 01! Head thermistor detected a Turn off the machine Desligar a máquina e temperature error.
- Page 139 Error Messages English Brazil Portuguese Spanish Rumanian French Slovenian Croat Slovakian Meaning Italian Finnish Hungarian Swedish Dutch Turkey Norwegian Czech Polish Danish Portuguese German System Error Eng: Unable to use 02! Bra: Unable to use 02! Memory is broken. Turn off the machine Turn off the machine and on again and on again...
- Page 140 Error Messages English Brazil Portuguese Spanish Rumanian French Slovenian Croat Slovakian Meaning Italian Finnish Hungarian Swedish Dutch Turkey Norwegian Czech Polish Danish Portuguese German High temperature error. Eng: Unit Cooling! Bra: Resfriando! (Heat-shrink Tube) Wait 1 minute before Aguarde 1 minuto restart para reiniciar Spa:...
- Page 141 Error Messages English Brazil Portuguese Spanish Rumanian French Slovenian Croat Slovakian Meaning Italian Finnish Hungarian Swedish Dutch Turkey Norwegian Czech Polish Danish Portuguese German Wrong tape is set. Set the correct Eng: Wrong Type Tape! Bra: Tipo Fita Errado! TZe cassette. Insert a TZe tape Inserir um cartucho Attempted to print or preview...
- Page 142 Error Messages English Brazil Portuguese Spanish Rumanian French Slovenian Croat Slovakian Meaning Italian Finnish Hungarian Swedish Dutch Turkey Norwegian Czech Polish Danish Portuguese German When customers try to change Eng: Can't Change! Bra: Impossível Alterar! the language for transferred Language change is Alteração de idioma category.
- Page 143 Error Messages English Brazil Portuguese Spanish Rumanian French Slovenian Croat Slovakian Meaning Italian Finnish Hungarian Swedish Dutch Turkey Norwegian Czech Polish Danish Portuguese German When customers change the tape Eng: Wrong Tape Width! Bra: Larg. Fita Errada! cassette which can't show the Insert correct width Inserir cartucho de label preview in "Label View"...
- Page 144 Error Messages English Brazil Portuguese Spanish Rumanian French Slovenian Croat Slovakian Meaning Italian Finnish Hungarian Swedish Dutch Turkey Norwegian Czech Polish Danish Portuguese German While edit, customers change Eng: Text Exceeds Printable Area Bra: Texto Excede Área de Impressão "Print Preview" mode into "Label Clear all text or Limpar texto ou editar na View"...
- Page 145 Error Messages English Brazil Portuguese Spanish Rumanian French Slovenian Croat Slovakian Meaning Italian Finnish Hungarian Swedish Dutch Turkey Norwegian Czech Polish Danish Portuguese German When customers open the saved Eng: Text Exceeds Printable Area Bra: Texto Excede Área de Impressão label which is created in "Print Edit in Print Preview to Editar largura da fita na...
- Page 146 Error Messages English Brazil Portuguese Spanish Rumanian French Slovenian Croat Slovakian Meaning Italian Finnish Hungarian Swedish Dutch Turkey Norwegian Czech Polish Danish Portuguese German Cannot print labels in hi-res mode Eng: Change Tape! Bra: Trocar Fita! when non-supported media High-Resolution Impressão de (fabric tape, heat shrink tube etc.) Printing not...
- Page 147 Error Messages English Brazil Portuguese Spanish Rumanian French Slovenian Croat Slovakian Meaning Italian Finnish Hungarian Swedish Dutch Turkey Norwegian Czech Polish Danish Portuguese German When customers open the saved Eng: Text Exceeds Printable Area Bra: Texto Excede Área de Impressão label which is created in "Print Clear all text or Limpar texto ou mudar...
- Page 148 Error Messages English Brazil Portuguese Spanish Rumanian French Slovenian Croat Slovakian Meaning Italian Finnish Hungarian Swedish Dutch Turkey Norwegian Czech Polish Danish Portuguese German There are already Time stamps Eng: Too Many Stamps! Bra: Mtos Carimb Dt/Hr! entered in the text data that can Max 5 Time Stamps Máx.
- Page 149 Error Messages English Brazil Portuguese Spanish Rumanian French Slovenian Croat Slovakian Meaning Italian Finnish Hungarian Swedish Dutch Turkey Norwegian Czech Polish Danish Portuguese German Text typed in the template A/F Eng: Text Too Long! Bra: Texto Muito Longo! typing mode exceeds the length Reduce characters Reduzir caracteres specified.
-
Page 150: Troubleshooting Flows
4.5 Troubleshooting Flows [ 1 ] Tape feeding failure The tape is not fed through. Replace the tape cassette with a new one, then try printing again. End of repair. Normal tape feeding? The old tape cassette may be defective. Is there any foreign Clean them up. - Page 151 Does the cutter Replace the cutter sensor work sensor ASSY. normally? Is the cutter Connect the cutter sensor connector sensor connector to connected to the PCB. the PCB? Does the Replace the cassette cassette sensor work sensor ASSY. normally? (Solder its leads to the main PCB with lead-free solder.) Replace the color...
-
Page 152: 2 ] Printing Failure
[ 2 ] Printing failure The tape is fed normally but no printing occurs. Replace the batteries with new ones. Is the printing normal? End of repair. Are the thermal If the platen roller or thermal print head is stained, head and platen roller clean it with a cotton swab. - Page 153 If there is any foreign material on the thermal print head, Any faintly clean it up. printed character? Check that the platen roller is set into place and works normally. If the printed characters become faint in cycles, the tape feed sub roller gear in the roller holder ASSY may be deformed.
-
Page 154: 3 ] Powering Failure (Nothing Appears On The Lcd
[ 3 ] Powering failure (Nothing appears on the LCD.) Pressing the key does not turn the machine on; nothing appears on the LCD. When driven by batteries: When driven via the AC adapter*: Are the specified batteries Replace them loaded? (alkaline batteries with the specified LR6/Ni-HM batteries... - Page 155 End of repair. Power supplied? Replace the main PCB ASSY. Enter the inspection mode (see Section 3.2) and do the following: - Select “Head Rank” in the Factory Inspection mode. - Regulate the motor speed in PRINT1 submode. IV - 82...
-
Page 156: 4 ] No Key Entry Possible
[ 4 ] No key entry possible No key entry is possible. (Or, no correct key entry is possible.) Any dust or foreign Clean the key contacts material on the key or replace the rubber keypad. contacts? Is the key PCB FFC connected to the main Correct it. -
Page 157: 5 ] Tape Cassette Type Not Identified
[ 5 ] Tape cassette type not identified The tape cassette type cannot be identified correctly. Does each sensor The side sensor PCB is actuator on the side sensor defective. Replace it. PCB work normally? Are the Correct them with cassette sensor leads lead-free solder. - Page 158 The tape cassette type cannot be identified correctly. Does each sensor The side sensor PCB is actuator on the side sensor defective. Replace it. PCB work normally? Are the Correct them with side sensor leads lead-free solder. soldered correctly? Does each switch on the Replace the color sensor.
-
Page 159: Appendix 1 Serviceman Software Tool
APPENDIX 1 SERVICEMAN SOFTWARE TOOL 1.1 Introduction 1.1.1 Software Tool A serviceman tool below is equipped for PT-D600. • Serviceman tool (SE) This tool checks the full cut operation and writes serial number in the machine after the factory inspection mode is completed. -
Page 160: Serviceman Tool
1.2 Serviceman Tool 1.2.1 Role of the Serviceman Tool Serviceman tool checks the full cut operation and writes serial number in the machine after the factory inspection mode is completed. Be sure to implement the factory inspection mode in advance. All inspections for this tool can be performed with both AC adaptor and batteries. NOTE: Implement the serviceman tool with batteries which weren't used for the factory inspection mode to check the power supply by the AC adaptor and batteries after the repair. -
Page 161: How To Start The Serviceman Tool
1.2.3 How to Start the Serviceman Tool Select the "SE" > "ProductChkTool.exe" file to start the serviceman tool. NOTE: Be sure to store all pre-included setting files (e.g. "***.ini") in the same folder with the execution file "ProductChkTool.exe". The tool is inoperable without the file. NOTE: Multiple tools cannot be started simultaneously. -
Page 162: Read Serial Number
1.2.4 Read Serial Number Enter the serial number printed on the rating plate which is attached on the back of the machine. Serial number is not written in this process. Always implement "Write serial number" at the end of all inspections. Make sure that the "Read serial number"... - Page 163 The machine passes the inspection when the serial number entered satisfies conditions below. The serial number read is displayed in the Model code (6 digits) and Serial number (9 digits) fields on the main window. Conditions required for "Read Serial No" OK Serial numbers entered in the 1st and 2nd fields are the same.
-
Page 164: Full Cut Test
1.2.5 Full Cut Test Checks the full cut operation with the cleaning tape. If the factory inspection mode [6] (Full CUT Mode) has been completed already, this inspection is not necessary. Open the cover of the machine and set the cleaning tape. Check that the inspection item is highlighted in yellow, and press the [Run] button. -
Page 165: Write Serial Number
1.2.6 Write Serial Number Writes serial number into the machine. Also reads and displays the firmware version data of the machine. Check that the inspection item is highlighted in yellow, and press the [Run] button. Firmware version is read from the machine and the serial number is written into the machine. - Page 166 A62055001 TP12 TP21 VBLL - Cutter Sensor - LCD interface BL_ON CTRL TP14 - Decoding Logic 2-6D COMP TPS61160DRV A40416001 R179 3VCC_ON_OFF TP318 4.7k 5E/2-4A LCD_BL_EN 2-4A MAIN PCB CIR NAME DTC143ZUA YF5044360 PT-D600 (1/5) CODE APP 2 - 1...
- Page 167 3.3VCC 74LVC373A RA13 TC7WZ00FK A40475001 A40030001 5 GND TP55 4 ID TP49 3 D+ CPU_UDP TP50 TP56 2 D- CPU_UDM TP54 TP51 1 VBUS DLP11SN900HL2 100k A51062001 MNC23-5K5H00 LW2612000 MAIN PCB CIR NAME PT-D600 (2/5) CODE APP 2 - 2...
- Page 168 NC55 DQ15/A-1 S29GL256S90TFI020 A63248001 AD[0-15] MAIN PCB CIR 2-5A/2-6A/2-7D/7E/4-1D NAME PT-D600 (3/5) * In D600, either 1 FROM chip of 256MBit or both (256Mbit x 2) FROM chips will be mounted based on the requirement. CODE APP 2 - 3...
- Page 169 3 NC TP131 TP199 TP218 2-7C/3-1D/3-6D/1D R120 22 2 BLH LCD_CS VBLH 3-8C VBLL 1 BLL A40470001 08 6212 025 340 800A 3.3VCC MAIN PCB CIR CONTACT IS UPPER SIDE NAME 74LVC245APW A40474001 PT-D600 (4/5) R216 CODE APP 2 - 4...
- Page 170 2-6C TP286 R197 100k TP313 COLOR_SENS_4 2-6D CH30 TP287 R198 100k SS_BLACK_K COLOR_SENS_3 2-6D TP288 R199 100k COLOR_SENS_2 2-6D TP289 R200 100k COLOR_SENS_1 2-5F S6B-PH-SM4 YG1606990 SMT SIDE COLOR:NATURAL MAIN PCB CIR NAME PT-D600 (5/5) CODE APP 2 - 5...
- Page 171 Oct. 2014 SM-PT079...
Need help?
Do you have a question about the PT-D600 and is the answer not in the manual?
Questions and answers