Advertisement
Quick Links
Advertisement

Related Manuals for Aeronaut Airmarine Special


Summary of Contents for Aeronaut Airmarine Special
- Page 1 Airmarine Special Order-No. 3042/00...
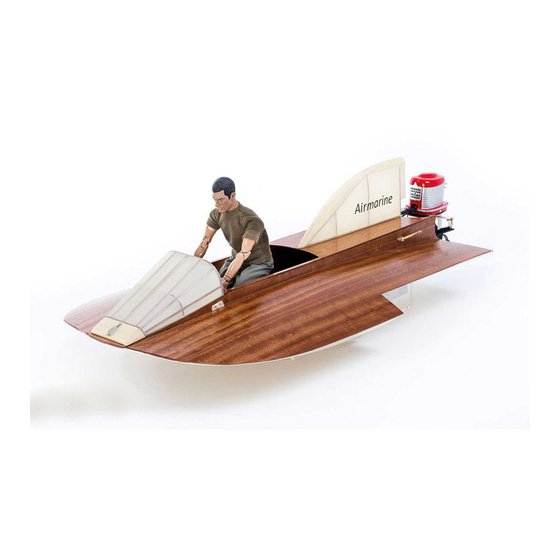
- Page 2 Airmarine Special In 1958, Jo Michelini won the „APBA Class F“ title with the Airmarine Special. As an experienced designer he created a unique hull for his hydroplane that proved to run very stable and reliable at speeds in excess of 110 km/h.
- Page 3 Fit together both parts of the aero-naut jig and secure on building board with tape. Glue together two parts 11 to form the keel. Insert formers into jig as shown, insert keel into formers and jig and glue keel to formers. Secure parts in this and in following bulding steps with pegs, clamps or tape until glue has dried.
- Page 4 Insert the two stringers 12 in formers and jig and glue stringers to formers. Glue in place bow plate 13 together with stringers 14. Then glue stringers 15 in place.
- Page 5 Insert stringers 16 + 17 into notches on the underside of sponsons and glue. Carefully sand the contact surfaces of keel and formers with a sanding block and glue in place part 18. Secure and weigh down evenly until glue has dried. Make sure that the front section of the bottom (light brown) is in good contact with keel and formers while the tabs of the formers remain in firm contact with the building board underneath the jig, so that the front section of part 18 is slightly rounded.
- Page 6 Glue parts 19 to the underside of the sponsons. Make sure that parts 19 are flush with stringers 16 along the inner edge of the sponsons. Carefully fit parts 22, then glue in place. Slightly bevel the contact surfaces of parts 20 + 21 for a proper fit, then glue in place to complete the sponsons. Leave to dry.
- Page 7 Remove hull from jig and cut off building tabs with a razor saw as indicated. Assemble the boatstand from parts 75, 76 + 77, and glue together. Insert parts 23 into hull and glue in place.
- Page 8 Fit stringers 24 to formers along the outside of parts 23 and glue in place. Make sure that stringers are fully seated in notches of formers. Now is a good time to treat the inside of the hull with wood filler or diluted epoxy resin to protect the wood against moisture. Glue reinforcement 26 and steel plate 27 to frame 25.
- Page 9 Flush witht the upper edge glue mahogany panels 28 to the outside of parts 23. Make sure there is a gap of approximately 1.5 to 2 mm between stringer 19 and the lower edge of part 28. Remove any residual glue from the gap. Note: Glue two pieces 20.1 to the inside of each sponson, if you want to secure the steel fin/airtrap to the sponsons with srews later on.
- Page 10 Glue mahogany panels 31 to 35 in place. Insert spacers 36 into formers along the inside of parts 23 (but do not glue!), so that they are in full contact with parts 23.
- Page 11 Protect the inside of the hull with cling film against glue, then insert cockpit side panels 37 and press against spacers 36. Glue in place cockpit floor 38 as well as front and rear panels 39 + 40. The cling film protects the hull from glue so that the cockpit can be removed after the glue has dried.
- Page 12 Use the markings on the side panles as a guide to glue in instrument panel 41. Glue in place cover 42 on side panels 37. Make sure you protect the hull with cling film before you glue. Glue in place the side cockpit fairings 94. The front edges of parts 94 will need to be adapted to the hood later on.
- Page 13 Glue steering column 83 and Insert steering shaft with steering wheel into flange 84 to instrument panel 41. steering column. Glue together parts 85 - 87 to assemble throttle lever, then glue to left inside panel of cockpit. Glue together hood from parts 49 to 52: glue together two parts 50, then glue parts 50, 51 and 52 to base plate 49 at an angle of 90°.
- Page 14 Glue mahogany strips 53 to 55 into notches of formers. Glue magnet 104 precisely into rectangular marking on underside of part 49 and remove any surplus glue around magnet. Make up two corner pieces from three parts 50.1 each, then glue corner pieces to base plate 49 and rear of former 50.1 Carefully sand complete hood structure and cover with Oratex.
- Page 15 Carefully round off the shape of the fin, then cover with Oratex. Attach steering frame 105 with screws 88 and stop nuts 89 to base plate of outboard motor. Attach blocks 106 with screws 88 and nuts 89 to frame 105. Connect steering wires 93 with Z-bends to frame 105.
- Page 16 Adjust the hight of servo tray 73 and mounting brackets 74 to fit the servo you want to install, then glue parts into hull. Install connectors 107 to servo arm. Glue in parts 69 + 70. Drill two 3 mm holes in part 70 and install outbord motor with screws 91 and stop nuts 92.
- Page 17 From the outside insert pulley 96 with shaft 95 into cutout in side panel, then glue in place cover 97 over pulley. Route wire 99 over pulleys 96 and through hull. Drill two 2 mm holes for bracket 98 and install bracket with screws 90, washer 89.1 and stop nuts 89.
-
Page 18: Parts List
Carefully sand the complete model (grade 240 sandpaper) and apply 2 to 3 coats of wood filler. Before you apply each coat, carefully sand the model. Apply clear varnisch to the bottom parts of the hull or the colour of your choice, and apply several coats of clear varnish to all mahogany parts. - Page 19 No. Description Pieces Material Plate Type Dimensions front panel/cockpit birch ply laser cut 3 mm instrument panel mahogany ply laser cut 1.5 mm cover mahogany ply laser cut 1.5 mm 43-48 hood nose block obechi laser cut 2 mm hood frame mahogany ply laser cut 1.5 mm...
- Page 20 ... and here are some more models from our range Spitfire 3052/00 Jenny 3055/00 Bellissima 3012/00 Victoria 3082/00 Pilot 3046/00 aero naut aero-naut Modellbau Find out more at www.aero-naut.com Stuttgarter Strasse 18-22 D-72766 Reutlingen www.aero-naut.com...
Need help?
Do you have a question about the Airmarine Special and is the answer not in the manual?
Questions and answers