Advertisement
Quick Links
Building
instructions
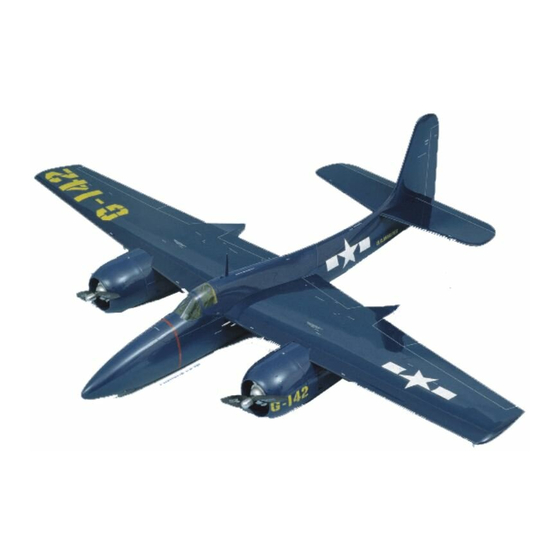
Grumman F7 F-3
Tigercat
Electric RC model
Order No. 1349/00
Specification:
Wingspan
Length
Wing area
Tailplane area
Total surface area
All-up weight with 10 cells
Total surface area loading
at 1950 g take-off weight
Wing loading (wing only)
RC functions: ailerons, elevator, rudder, motor speed
Replacement parts:
"aero-naut" Modellbau
Stuttgarterstr. 18-22
D-72766 Reutlingen
Germany
http://www.aero-naut.de
© "aero-naut" Modellbau
Building instructions - Grumman F7 F-3 Tigercat
approx.
1330 mm
approx.
1063 mm
approx.
27.5 dm²
approx.
6.6 dm²
approx.
34.1 dm²
approx.
1950 g
approx.
57.2 g/dm²
approx.
70.9 g/dm²
GRP fuselage
GRP nacelles
Pair wing panels
Tailplane
Canopy
Grumman F7 F-3 Tigercat
Order No. 1349/02
Order No. 1349/03
Order No. 1349/05
Order No. 1349/09
Order No. 1349/04
1
Advertisement

Subscribe to Our Youtube Channel
Related Manuals for Aeronaut Grumman F7 F-3 Tigercat


Summary of Contents for Aeronaut Grumman F7 F-3 Tigercat
-
Page 1: Building Instructions
Order No. 1349/02 GRP nacelles Order No. 1349/03 Pair wing panels Order No. 1349/05 Tailplane Order No. 1349/09 Canopy Order No. 1349/04 “aero-naut” Modellbau Stuttgarterstr. 18-22 D-72766 Reutlingen Germany http://www.aero-naut.de © “aero-naut” Modellbau Building instructions - Grumman F7 F-3 Tigercat... - Page 2 Micro-servos and a small receiver are basic essentials with models of this type. Before starting construction thoroughly rub down the surfaces of all GRP parts with 400 abrasive paper, used wet. Building instructions - Grumman F7 F-3 Tigercat...
- Page 3 The next step is to trial-fit the wing in the recess in the fuselage. Set it exactly central on the fuselage and secure it temporarily, so that you can mark the position of the dowels (26) on the leading edge. Remove Building instructions - Grumman F7 F-3 Tigercat...
- Page 4 4 mm Ø hole in the half-former (53) to clear the latch pin (20) - see fuselage side elevation. Open up the hole to about 5 mm Ø using a round file, and tack the latch (20) in place with a little cyano (don’t glue it Building instructions - Grumman F7 F-3 Tigercat...
- Page 5 Apply several coats of clear dope to seal the covering. We recommend a final coat of Building instructions - Grumman F7 F-3 Tigercat...
- Page 6 (you will need to enlarge it slightly at the front), taking the same safety measures as already described. All that remains now is to fit the dummy engines. Building instructions - Grumman F7 F-3 Tigercat...
- Page 7 Tigercat’s aerobatic capabilities are impressive. Although the wing loading is relatively high, this offers advantages in dynamic aerobatics (higher kinetic energy); however, the landing speed is always manageable. We hope you have many hours of pleasure flying your new model. Happy landings! “aero-naut” Modellbau Building instructions - Grumman F7 F-3 Tigercat...
- Page 8 Screw plate Plywood 3, die-cut Half-former Plywood 3, die-cut Half-former Plywood 3, die-cut Plate Plywood 3, die-cut Plate Plywood 3, die-cut False rudder leading edge Plywood 3, die-cut Dowel Beech 3 Ø, as plan Building instructions - Grumman F7 F-3 Tigercat...
- Page 9 Ready made Strip Balsa 10 x 3, as plan Strip Balsa 10 x 8, as plan Tube Brass 1.5 Ø / 1.1 Ø As plan: dimensions taken from plan or model DIE-CUT SHEET DRAWINGS Building instructions - Grumman F7 F-3 Tigercat...
Need help?
Do you have a question about the Grumman F7 F-3 Tigercat and is the answer not in the manual?
Questions and answers