Avaya J129 Using Manual
Hide thumbs
Also See for J129:
- Installing and administering (133 pages) ,
- Using manual (76 pages) ,
- Instructions manual (70 pages)
Table of Contents
Advertisement
Advertisement
Table of Contents

Related Manuals for Avaya J129


Summary of Contents for Avaya J129
- Page 1 Using Avaya J129 IP Phone Release 1.1 March 2017...
- Page 2 RESERVES THE RIGHT TO TAKE LEGAL ACTION AGAINST YOU the express behalf of Avaya. End User agrees to indemnify and hold AND ANYONE ELSE USING OR SELLING THE SOFTWARE harmless Avaya, Avaya's agents, servants and employees against all WITHOUT A LICENSE.
- Page 3 LICENSED TO PROVIDE AVC VIDEO. NO LICENSE IS GRANTED written consent of Avaya can be a criminal, as well as a civil offense OR SHALL BE IMPLIED FOR ANY OTHER USE. ADDITIONAL under the applicable law.
- Page 4 AC adapters shipped with the equipment or specified by This equipment has been tested and found to comply with the limits Avaya to be used with the equipment. If you use any for a Class B digital device, pursuant to Part 15 of the FCC Rules.
- Page 5 The trademarks, logos and service marks (“Marks”) displayed in this site, the Documentation, Hosted Service(s), and product(s) provided by Avaya are the registered or unregistered Marks of Avaya, its affiliates, its licensors, its suppliers, or other third parties. Users are not permitted to use such Marks without prior written consent from Avaya or such third party which may own the Mark.
-
Page 6: Table Of Contents
Contents Chapter 1: Introduction...................... 9 .......................... 9 Purpose Chapter 2: Avaya J129 IP Phone overview................ 10 ........................ 11 Physical layout ........................ 12 Connection jacks ........................ 13 Icons on the phone ........................ 15 Supported features Chapter 3: Getting started...................... 17 ................. 17 Entering the provisioning server address ...................... 17 Logging in to your phone ...................... 18... - Page 7 Chapter 10: Managing your presence................... 41 ...................... 41 Enabling Away timer Chapter 11: Managing voice mails.................. 42 ...................... 42 Retrieving a voice mail Chapter 12: Customizing Avaya J129 IP Phone.............. 43 ...................... 43 Setting the Dial mode ...................... 43 Assigning Speed Dial .............. 44 Replacing and clearing a Speed Dial contact ......................
- Page 8 Contents Chapter 13: Related resources.................... 49 ........................ 49 Documentation ............. 51 Finding documents on the Avaya Support website .................... 51 Viewing Avaya Mentor videos .......................... 52 Support March 2017 Using Avaya J129 IP Phone Comments on this document? infodev@avaya.com...
-
Page 9: Chapter 1: Introduction
Chapter 1: Introduction Purpose This document describes how to use Avaya J129 IP Phone features. This document is intended for people who use Avaya J129 IP Phone. March 2017 Using Avaya J129 IP Phone Comments on this document? infodev@avaya.com... -
Page 10: Chapter 2: Avaya J129 Ip Phone Overview
Chapter 2: Avaya J129 IP Phone overview The Avaya J129 IP Phone is a SIP-based phone intended to be used for basic business communications. The phone supports two-call appearances with a single-line call display. Physical specifications • Two call appearances •... -
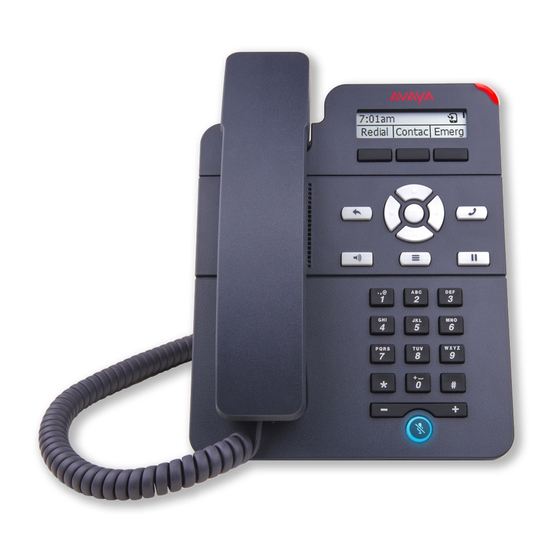
Page 11: Physical Layout
Physical layout Physical layout March 2017 Using Avaya J129 IP Phone Comments on this document? infodev@avaya.com... -
Page 12: Connection Jacks
Mutes and unmutes the microphone. Connection jacks The following image illustrates the connection jacks that are present on the back panel of Avaya J129 IP Phone models. The image schematically describes which device to connect in which jack. March 2017 Using Avaya J129 IP Phone Comments on this document? infodev@avaya.com... -
Page 13: Icons On The Phone
Icons on the phone Network Computer Handset Port Port Jack Icons on the phone The following table lists the icons used in the Avaya J129 IP Phone: March 2017 Using Avaya J129 IP Phone Comments on this document? infodev@avaya.com... - Page 14 Avaya J129 IP Phone overview Icon Description Line indicator; first call appearance Line indicator; second call appearance More than 10 recent missed calls Recents- Outgoing call Recents- Missed call Recents- Incoming call Outgoing recents MDA Missed call Check MDA active...
-
Page 15: Supported Features
Supported features Icon Description Do not disturb Supported features ® Avaya J129 IP Phone supports the Avaya Aura and IP Office environments. The following table shows the supported features in both the environments. ® Features Avaya Aura IP Office End to end security indicator... - Page 16 Avaya J129 IP Phone overview Dial mode Yes. It supports only manual mode. Speed dial March 2017 Using Avaya J129 IP Phone Comments on this document? infodev@avaya.com...
-
Page 17: Chapter 3: Getting Started
3. Press Save. The phone reboots. Logging in to your phone About this task Before you begin Get the log in password from the system administrator. March 2017 Using Avaya J129 IP Phone Comments on this document? infodev@avaya.com... -
Page 18: Logging Out Of Your Phone
About this task If the administrator enables the offline call-log feature, missed calls are added to the call history. The ® offline call-log feature is only available in an Avaya Aura environment. Procedure 1. Press Main Menu > Log Out. -
Page 19: Chapter 4: Handling Outgoing Calls
The phone initiates the call when the inter digit timer times out. Redialing a number About this task Use this procedure to redial a number. If you delete the outgoing call log, the last dialed number is deleted. March 2017 Using Avaya J129 IP Phone Comments on this document? infodev@avaya.com... -
Page 20: Making A Call Using Speed Dial
• Redial • OK Making a call using speed dial About this task ® This feature is only available in the Avaya Aura environment. Before you begin Ensure that you assign speed dial numbers to your contacts. Procedure Press and briefly hold the dialpad key assigned to the person you want to call. -
Page 21: Making A Call From The Corporate Database Contacts List
Emerg softkey replaces the Recents softkey. Procedure 1. On the Phone screen, press one of the following: • Main Menu > Recents • Recents March 2017 Using Avaya J129 IP Phone Comments on this document? infodev@avaya.com... -
Page 22: Emergency Calling Overview
• On the Phone screen, press Emerg softkey, and again press Emerg when the phone prompts for confirmation. • Dial the emergency number by using the dial pad. March 2017 Using Avaya J129 IP Phone Comments on this document? infodev@avaya.com... -
Page 23: Making An International Call
15 digits and is preceded by a plus sign (+). Use the following procedure to dial an E.164 number. Procedure 1. Long press the 0 key to display the plus sign (+). 2. Dial the number that you want to call. March 2017 Using Avaya J129 IP Phone Comments on this document? infodev@avaya.com... -
Page 24: Chapter 5: Handling Incoming Calls
Procedure Press one of the following: • The Answer softkey • OK The phone puts the first call on hold and moves to the second call. March 2017 Using Avaya J129 IP Phone Comments on this document? infodev@avaya.com... -
Page 25: Ignoring A Call
If you register to multiple devices with the same extension, you can switch between devices during an active call. ® This feature is only available in an Avaya Aura environment. Before you begin Ensure that the system administrator activates the option for your extension. -
Page 26: Making An Unattended Transfer
• NewCall: To make a new call. • Answer: To answer a call 2. When the called party answers the call or you answer the call, press the Transfer softkey. March 2017 Using Avaya J129 IP Phone Comments on this document? infodev@avaya.com... - Page 27 Transferring a call on hold 3. Press the Transfer softkey again when the phone prompts for confirmation. March 2017 Using Avaya J129 IP Phone Comments on this document? infodev@avaya.com...
-
Page 28: Chapter 6: Managing Contacts
Editing a contact About this task Use this procedure to edit a contact in the contacts list. In IP Office environment, during failover, the Edit softkey is not available. March 2017 Using Avaya J129 IP Phone Comments on this document? infodev@avaya.com... -
Page 29: Viewing The Contact Details
2. Select the contact that you want to view. 3. Press More > Details. • To call a contact, press Call. • To edit a contact, press Edit. • To delete a contact, press Delete. March 2017 Using Avaya J129 IP Phone Comments on this document? infodev@avaya.com... -
Page 30: Searching For A Contact
1. Do one of the following: • Press Contacts. • Press Main Menu > Contacts. 2. Select the contact you want to delete. 3. Press More > Details > Delete. March 2017 Using Avaya J129 IP Phone Comments on this document? infodev@avaya.com... -
Page 31: Chapter 7: Managing Call History
3. Press Details. The details section contain: call type icon such as incoming call icon, outgoing call icon, or missed call icon, name, extension number, time, date, and duration. March 2017 Using Avaya J129 IP Phone Comments on this document? infodev@avaya.com... -
Page 32: Adding Or Deleting A Call Record From The Call History Menu
3. Select one of the following when the phone prompts for confirmation: • ClearAll: To clear all entries. • Cancel: To cancel and return to the previous menu. March 2017 Using Avaya J129 IP Phone Comments on this document? infodev@avaya.com... -
Page 33: Chapter 8: Managing Conference Calls
1. During an active call, press Hold. 2. Do one of the following: • To make a new call, press NewCall and dial the extension of the second person. March 2017 Using Avaya J129 IP Phone Comments on this document? infodev@avaya.com... -
Page 34: Putting A Conference Call On Hold
Use this procedure to put a conference call on hold, while the other parties can talk to each other. Procedure 1. Press Hold during a conference call. 2. Press Resume or OK or select the call appearance to resume the conference call. March 2017 Using Avaya J129 IP Phone Comments on this document? infodev@avaya.com... -
Page 35: Chapter 9: Using Call Related Features
• Both: Combines the actions of both audible and visual alerting. • None: Disables the mute alert for your phone. March 2017 Using Avaya J129 IP Phone Comments on this document? infodev@avaya.com... -
Page 36: Visual Alerting
Use this procedure to transfer an active call to voice mail. Before you begin Your system administrator must activate the feature for your extension. ® This feature is only available in the Avaya Aura environment. March 2017 Using Avaya J129 IP Phone... -
Page 37: Parking And Unparking A Call
About this task Use this procedure to park the active call and answer the call from another extension. ® This feature is only available in the Avaya Aura environment. Your system administrator must activate the feature for your extension. In the IP Office environment, this feature is supported using short code dialing. Contact your system administrator for the list of short codes. -
Page 38: Setting Up Automatic Call Back
• Call Forward Busy: Forwards incoming calls to another number if you are on a call. • Call Forward No Answer: Forwards incoming calls that you do not answer within a stipulated time to another number. March 2017 Using Avaya J129 IP Phone Comments on this document? infodev@avaya.com... -
Page 39: Activating And Deactivating Call Forward
About this task Use this procedure to answer calls on your cell phone. ® This feature is only available in the Avaya Aura environment. Before you begin The system administrator must program the phone so that you can receive incoming calls on your cell phone. -
Page 40: Tracing A Malicious Call
This feature is available only if your administrator has set up the phone system to trace and track malicious calls and there is an attendant or controlling user to oversee the trace. ® This feature is only available in an Avaya Aura environment. Before you begin Your system administrator must activate the feature for your extension. -
Page 41: Chapter 10: Managing Your Presence
Enabling Away timer About this task Although Avaya J129 IP Phone does not display presence, it can report it so that the other devices can display your presence. Use this procedure to automatically update the presence status to Away after a predefined time. -
Page 42: Chapter 11: Managing Voice Mails
1. Press Main Menu. 2. Use the Down Arrow key to go to the Voicemail screen. 3. Press Select. 4. Follow the voice prompts to playback your voice messages. March 2017 Using Avaya J129 IP Phone Comments on this document? infodev@avaya.com... -
Page 43: Chapter 12: Customizing Avaya J129 Ip Phone
Use this procedure to assign speed dial numbers to your contacts. You can assign up to nine speed dial entries. ® This feature is only available in the Avaya Aura environment. Procedure 1. Press Main Menu > Settings > Phone Settings. -
Page 44: Replacing And Clearing A Speed Dial Contact
Replacing and clearing a Speed Dial contact About this task Use this procedure to replace or remove a Speed Dial contact. ® This feature is only available in the Avaya Aura environment. Before you begin Assign a contact to a Speed Dial number. -
Page 45: Displaying Call Timers
Turning Error Tones on and off About this task Use this procedure to activate the error tone alarm when you perform an incorrect action while using the phone. March 2017 Using Avaya J129 IP Phone Comments on this document? infodev@avaya.com... -
Page 46: Turning Audio Settings On And Off
Customizing Avaya J129 IP Phone Procedure 1. Press Main Menu > Settings > Audio Settings. 2. Use the Down Arrow key to go to the Error Tones screen. 3. Press Change to turn error tones on or off. 4. Press Save. -
Page 47: Adjusting The Contrast Of The Display Screen
2. Use the Down Arrow key to go to the Time Format screen. The phone displays the following: • Time Format 24 Hour • Time Format 12 Hour 3. Press Change to select one of the options. 4. Press Save. March 2017 Using Avaya J129 IP Phone Comments on this document? infodev@avaya.com... -
Page 48: Setting The Date Format
Customizing Avaya J129 IP Phone Setting the Date Format Procedure 1. Press Main Menu > Settings > Display Settings. 2. Use the Down Arrow key to go to the Date Format screen. The phone displays one of the following: • Default •... -
Page 49: Chapter 13: Related Resources
Chapter 13: Related resources Documentation See the following related documents at http://support.avaya.com. Title Use this document to: Audience Overview ® Avaya Aura Session Manager See characteristics and capabilities, For people who want Overview and Specification including feature descriptions, to gain a high-level... - Page 50 SIP telephone devices on IP Office. Administering ® Administering Avaya Aura Session See information about how to perform Avaya For people who ® ® Manager Aura Session Manager administration tasks perform Avaya Aura including how to use management tools,...
-
Page 51: Finding Documents On The Avaya Support Website
Avaya Mentor videos provide technical content on how to install, configure, and troubleshoot Avaya products. About this task Videos are available on the Avaya Support website, listed under the video document type, and on the Avaya-run channel on YouTube. Procedure •... -
Page 52: Support
Related resources Note: Videos are not available for all products. Support Go to the Avaya Support website at http://support.avaya.com for the most up-to-date documentation, product notices, and knowledge articles. You can also search for release notes, downloads, and resolutions to issues. Use the online service request system to create a service request. - Page 53 ............speed dialing ............20, Main Menu ..............20 calls attended transfer ............automatic callback ............deleting beacon LED ..............36 removing a contact ............Call Forward ..............March 2017 Using Avaya J129 IP Phone Comments on this document? infodev@avaya.com...
- Page 54 Hold log out ................18 putting a conference call on hold ........34 phone settings call history ..............31 Call timers ..............45 log recent calls ..............31 icons ..................visual alerting ..............44 March 2017 Using Avaya J129 IP Phone Comments on this document? infodev@avaya.com...
- Page 55 ..............44 speed dialing contacts ................ removing contact ............replacing contact ............support .................52 supporting features Avaya Aura environment ..........IP Office environments ..........time zone display settings ............. March 2017 Using Avaya J129 IP Phone Comments on this document? infodev@avaya.com...
Need help?
Do you have a question about the J129 and is the answer not in the manual?
Questions and answers