MKS Granville-PhillipsMini-Convectron 275 series Instruction Manual
Module with rs-485 interface
Hide thumbs
Also See for Granville-PhillipsMini-Convectron 275 series:
- Instruction manual (68 pages) ,
- Quick start manual (2 pages) ,
- Instruction manual (56 pages)
Table of Contents
Advertisement
Quick Links
Download this manual
See also:
Instruction Manual
Advertisement
Table of Contents

Related Manuals for MKS Granville-PhillipsMini-Convectron 275 series


Summary of Contents for MKS Granville-PhillipsMini-Convectron 275 series
- Page 1 Series 275 Granville-Phillips Mini-Convectron Module ® ® with RS-485 Interface Instruction Manual Instruction manual part number 275955 Revision F - November 2016...
- Page 3 Instruction Manual © 2016 MKS Instruments, Inc. All rights reserved. ® ® Granville-Phillips and Convectron are registered trademarks, and mksinst is a trademark of MKS Instruments, Inc. All other trademarks and registered trademarks are the properties of their respective owners.
- Page 4 This instruction manual is for use only with the following catalog numbers: Catalog numbers for Series 275 Mini-Convectron Modules with RS-485 Interface Mini-Convectron Module with: Catalog # 1/8 NPT / 1/2 inch tubulation 275944 1/4 inch VCR-type female fitting 275945 1/2 inch VCR-type female fitting 275946 3/8 inch VCO-type male fitting...
-
Page 5: Table Of Contents
Table of Contents Chapter 1 Safety and Introduction ........Safety Introduction . - Page 6 Set parity to 7 bits, even ......Set frequency ........Reset module .
-
Page 7: Safety And Introduction
NOTE: These instructions do not and cannot provide for every contingency that may arise in connection with the installation, operation, or maintenance of this product. If you require further assistance, contact MKS, Granville-Phillips Division at the address on the title page of this manual. -
Page 8: Reading And Following Instructions
You must comply with all instructions while you are installing, operating, or maintaining the module. Failure to comply with the instructions violates Following standards of design, manufacture, and intended use of the module. MKS Instructions Instruments, Inc. disclaims all liability for the customer's failure to comply with the instructions. -
Page 9: Explosion / Implosion
Safety and Introduction Caution and warning statements comply with American Institute of Standards Z535.1–2002 through Z535.5–2002, which set forth voluntary practices regarding the content and appearance of safety signs, symbols, and labels. Each caution or warning statement explains: The specific hazard that you must prevent or unsafe practice that you must avoid, The potential result of your failure to prevent the specified hazard or avoid the unsafe practice, and... - Page 10 Chapter 1 Danger of injury to personnel and damage to equipment exists on all vacuum systems that incorporate gas sources or involve processes capable of pressuring the system above the limits it can safely withstand. For example, danger of explosion in a vacuum system exists during backfilling from pressurized gas cylinders because many vacuum devices such as ionization gauge tubes, glass windows, glass belljars, etc., are not designed to be pressurized.
-
Page 11: System Grounding
Service Guidelines Some minor problems are readily corrected on site. If the product requires service, contact the MKS, Granville-Phillips Division Technical Support Department at 1-303-652-4400 or 1-800-776-6543 for troubleshooting help over the phone. If the product must be returned to the factory for service, request a Return Material Authorization (RMA) from Granville-Phillips. -
Page 12: Receiving Inspection
Chapter 1 For Customer Service / Technical Support: MKS Pressure and Vacuum Measurement Solutions ® MKS Instruments, Inc., Granville-Phillips Division 6450 Dry Creek Parkway Longmont, Colorado 80503 USA Tel: 303-652-4400 Fax: 303-652-2844 Email: mks@mksinst.com MKS Corporate Headquarters MKS Instruments, Inc. -
Page 13: Damaged Material
Safety and Introduction Damaged Material Any damaged material, including all containers and packaging, should be held for carrier inspection. Contact our Customer Service Department, 6450 Dry Creek Parkway, Longmont, Colorado 80503, USA (telephone 303-652-4400) if your shipment is not correct for reasons other than shipping damage. - Page 14 Convectron Gauge Gold-plated tungsten (standard) Sensing Wire Filament 40 cc (2.5 cu in.) Internal Volume 304 stainless steel, gold, borosilicate glass, kovar, alumina, Materials Exposed to Vacuum NiFe alloy, polyimide Digital Interface 2-wire or 4-wire RS-485 300 baud to 38.4 Kbaud Baud Rate 7-bits, even parity, 1 stop bit Data Format...
-
Page 15: Installation
Chapter 2 Installation Important The following precautions in the use and installation of the Mini-Convectron must be observed. Precautions for Mini-Convectron • It is recommended that the Mini-Convectron be installed with the port Installation oriented vertically downward to ensure that no system condensates or other liquids collect in the gauge tube. -
Page 16: Mounting Location And Orientation
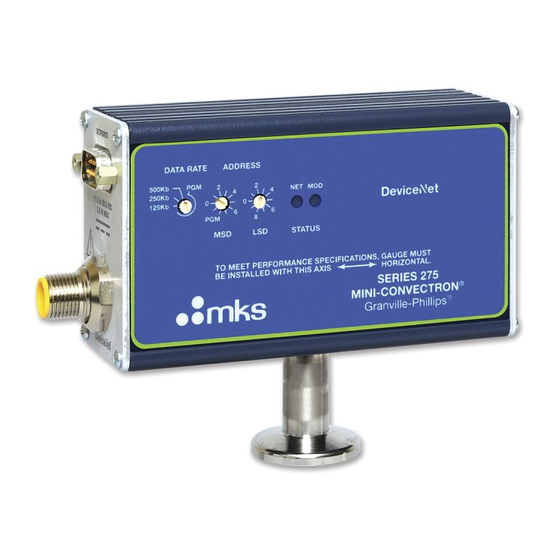
Chapter 2 Mounting Location • Cleanliness pays. Keep the port cover in place until just before installation. and Orientation • For proper operation above about 1 Torr, install Mini-Convectron Modules with the gauge axis horizontal (see Figure 2-1). Although the gauge will read correctly below 1 Torr when mounted in any position, erroneous readings will result at pressures above 1 Torr if the gauge axis is not horizontal. -
Page 17: Location
Installation Location Where you mount the Mini-Convectron Module is critical to obtaining reliable pressure measurements. Long tubing or other constrictions can cause large errors in pressure readings. If you mount the gauge near the pump, the pressure in the gauge may be considerably lower than in the rest of the system. -
Page 18: Dimensions
Chapter 2 Dimensions Figure 2-3 Mini-Convectron Module Physical Dimensions Table 2-1 Vacuum Connections Fitting Description Dimension H 1/8 NPT pipe thread 1/8 NPT pipe thread 25.4 mm (1.0 in.) 1/2 inch compression fitting 1/2 inch quick connect/weld VCR-type female fitting 1/2 inch 4 VCR-type female fitting 30.5 mm (1.2 in.) 1/2 inch 8 VCR-type female fitting... -
Page 19: Compression Mount/Quick Connect
Installation Compression Do not use for positive pressure applications. The gauge may be forcefully Mount/Quick Connect ejected. The gauge port is designed to fit a standard 1/2 in. compression/quick connect mounting such as an Ultra-Torr fitting. Insert the gauge tube port into the compression fitting and finger-tighten the ®... -
Page 20: Network Wiring
Chapter 2 RS-485 Network Connection between multiple controllers can easily be made by daisy chaining gauge controllers together with the signal from the host computer Wiring going into one connector then out the other to another gauge controller. • The maximum total cable length is 4,000 ft. •... -
Page 21: Theory Of Operation
Chapter 3 Operation Theory of Operation –4 The module measures gas pressures from 1 x 10 Torr to 1000 Torr. Vacuum chamber pressure is measured by a Convectron (convection-enhanced) Pirani heat-loss gauge. The Convectron gauge operates like a standard Pirani gauge, which employs the principle of a Wheatstone bridge to convert pressure to voltage, but uses convection cooling to enable accurate pressure –4... -
Page 22: Front Panel Features
Chapter 3 As vacuum chamber pressure decreases, the number of molecules in the vacuum chamber and the resulting heat loss from the sensing wire also decrease. Temperature and R resistance therefore increase. The increased resistance through R causes the bridge to become unbalanced and a voltage to develop across the null terminals. -
Page 23: Digital Communications
Operation Digital Table 3-2 Default Settings Communications Function Default setting Baud rate 19.2 Kbaud Data format ASCII 8 databits, 1 stopbit, no parity Address Syntax/Address A command from the host must include a start character, address, data, and Overview terminator: (start character)(address)(data)(terminator) •... -
Page 24: Command Set
Chapter 3 Command Set Table 3-3 Summary of RS-485 Commands Command Description Command Type Data Returned Read pressure Read Pressure Set address offset Write Confirm Set span Read/Write Confirm or state Set zero Read/Write Confirm or state Set factory default Write Confirm Set baud rate... -
Page 25: Read Convectron Pressure Response
Operation ReaD Convectron pressure response Example: From host: #01RD CR From Mini-Convectron: *01_9.34E-02 CR Notes: __ = space, CR = carriage return. ASCII string representing pressure in scientific notation. Three significant digits except in 10 Torr range with 2 significant digits and a zero filler, 10 range with 1 significant digit with 2 zero fillers. -
Page 26: Set Span (Typically At Atmospheric Pressure)
Chapter 3 Example SA command from host: #01SA30↵ Response from module: *01 PROGM OK↵ Valid SA command values are (00), 10 (16), 20 (32), or 30 (48). Example: From host: #01SA20 CR From Mini-Convectron: *01_PROGM_OK CR Notes: The address selector setting is added to this value. Example: address selector is set at 2 and offset value is 20 then the module address is 22. -
Page 27: Set Zero (At Or Near Vacuum)
Operation response will occur. The change occurs as soon as the function is performed. Set zero (at or near vacuum) Use scientific notation or 0. Example: From host: #01TZ0 CR From Mini-Convectron: *01_PROGM_OK CR From host: #01TZ1.00E-02 CR From Mini-Convectron: *01_PROGM_OK CR Possible responses: *01_HI_VAC_V CR... -
Page 28: Set Factory Default
Chapter 3 Set factory default Example: From host: #01FAC CR From Mini-Convectron: *01_PROGM_OK CR Notes: This can be used when a Mini-Convectron is not responding properly. Cycle power or send RST after doing this function. FAC will cause default communication and transducer parameters to be programmed: •... -
Page 29: Set Parity To 7 Bits, Even
Operation Set parity to 7 bits, even Example: From host: #01SPE CR From Mini-Convectron: *01_PROGM_OK CR Note: Same as SPN. Set frequency Example: From host: #01SF10 CR From Mini-Convectron: *01_PROGM_OK CR Notes: This is the frequency in Hz that the A/D samples the transducer voltage. This can be programmed to reject line frequency noise or noise caused by mechanical vibration. -
Page 30: Rx, Tx Timing
Chapter 3 RX, TX Timing The speed of the response from the Mini-Convectron varies depending on the type of command being carried out. The Mini-Convectron will shut OFF its driver H= 80 µSec after sending data to the host. Baud rate 38400 3.3 ms 19200... -
Page 31: Calibration
Chapter 4 Calibration Calibration Each Mini-Convectron gauge tube is individually calibrated for N temperature compensated prior to leaving the factory, therefore, initial calibration should not be necessary. See Use with Gases other than N Air on page-32 for use with gases other than N and air. - Page 32 Chapter 4 Use with Gases Before using the Mini-Convectron gauge to measure the pressure of other gases make certain the TS adjustment is correctly set for air. other than N and Air It is important to understand that the indicated pressure on a Mini-Convectron gauge depends on the type of gas in the tube, and on the orientation of the tube axis as well as on the gas pressure in the tube.
- Page 33 Calibration If you must measure the pressure of gases other than N or air, use Figures 4-1 through 4-6 to determine the maximum safe indicated pressure for the other gas as explained below. Example 1: Maximum safe indicated pressure Assume a certain system will withstand an internal pressure of 2000 Torr or 38.7 psia.
- Page 34 Chapter 4 –4 –1 Figure 4-1 True Pressure vs Indicated Pressure for Commonly used Gases, 10 to 10 Torr Mini-Convectron Module with RS-485 Instruction Manual - 275955...
- Page 35 Calibration –4 –1 Figure 4-2 True Pressure vs Indicated Pressure for Commonly used Gases, 10 to 10 Torr Mini-Convectron Module with RS-485 Instruction Manual - 275955...
- Page 36 Chapter 4 –4 –1 Figure 4-3 True Pressure vs Indicated Pressure for Commonly used Gases, 10 to 10 Torr Mini-Convectron Module with RS-485 Instruction Manual - 275955...
- Page 37 Calibration –4 –1 Figure 4-4 True Pressure vs Indicated Pressure for Commonly used Gases, 10 to 10 mbar Mini-Convectron Module with RS-485 Instruction Manual - 275955...
- Page 38 –1 Figure 4-5 True Pressure vs Indicated Pressure for Commonly used Gases, 10 to 1000 mbar Mini-Convectron Module with RS-485 Instruction Manual - 275955...
- Page 39 Calibration –1 Figure 4-6 True Pressure vs Indicated Pressure for Commonly used Gases, 10 to 1000 mbar Mini-Convectron Module with RS-485 Instruction Manual - 275955...
- Page 40 Chapter 4 Notes: Mini-Convectron Module with RS-485 Instruction Manual - 275955...
-
Page 41: Service/Maintenance
Chapter 5 Service/Maintenance Service Guidelines It is recommended that only qualified technical personnel attempt repairs. If difficulties are encountered during use of your Mini-Convectron, the following list of symptoms and possible causes, along with the schematics, can prove useful in quickly getting back into operation. If the prescribed remedies do not correct the troubles, or if additional assistance or special parts are required, contact the Technical Service Department, Granville-Phillips, 6450 Dry Creek Parkway, Longmont,... -
Page 42: Troubleshooting
Chapter 5 Troubleshooting Table 5-1 General Symptoms/Possible Causes Symptom Possible Causes No power indication No input power. Verify that there is +11 Vdc to +16 Vdc between pins 2 or 5 and 7 or 8 of the I/O connector. See Figure 2-4 on page 19. Bridge output pressure reads less than Gauge tube failure. -
Page 43: Reset The Module To Factory Defaults
Service/Maintenance Table 5-1 General Symptoms/Possible Causes Symptom Possible Causes Readout indicating a pressure in the Gas composition on system is not what the user believes it to be. This can be system is vastly different than that caused by selective gas pumping, process in use, outgassing of product, etc. being observed by supporting gauges Determine gas composition and calibrate accordingly. -
Page 44: Convectron Gauge Bakeout Instructions
Chapter 5 Figure 5-1 Internal Jumpers Convectron Gauge The Convectron gauge can be baked to 85 C with the electronics attached, but not operational. To bake the Convectron gauge to a higher temperature, Bakeout Instructions up to 150 C, the electronics must be removed. See Mini-Convectron Disassembly on page-41for disassembly procedures. -
Page 45: Returning A Mini-Convectron Module For Service
Cleaning cannot solve this problem. Returning a Some minor problems are readily corrected on site. If the product requires service, contact the MKS, Granville-Phillips Division Technical Support Mini-Convectron Department at 1-303-652-4400 or 1-800-776-6543 for troubleshooting Module for Service help over the phone. -
Page 46: Mini-Convectron Module With Rs
Chapter 5 Notes: Mini-Convectron Module with RS-485 Instruction Manual - 275955... -
Page 47: Instruction Manual
Index Important Precautions 15 location 17 Address selector 22 Mounting orientation 16 Atmosphere adjust 31 Lethal Voltages 11 Baud rate 23, 28 Location for installation 17 Calibration 31 Mini-Convectron module Caution statements 8 mounting gauges Command set 1/8 NPT mount 19 RS-485 24 compression mount/quick connect 19 Connector... - Page 48 Index RS-485 Command Set 24 RS-485 address switch settings 23 RS-485 commands 24 RS-485 wiring 20 Safety 7 instructions 7 Service Guidelines 11, 41 Span 26 Specifications 13 Convectron Gauge Internal Volume 14 Convectron Gauge Sensing Wire 14 Digital Interface 14 I/O connector 13 Power Supply 13 Pressure Measurement 13...
- Page 50 Series 275 Granville-Phillips Mini-Convectron Module ® ® with RS-485 Interface Customer Service / Technical Support: MKS Pressure and Vacuum Measurement Solutions ® MKS Instruments, Inc., Granville-Phillips Division 6450 Dry Creek Parkway Longmont, Colorado 80503 USA Tel: 303-652-4400 Fax: 303-652-2844 Email: mks@mksinst.com MKS Corporate Headquarters MKS Instruments, Inc.
Need help?
Do you have a question about the Granville-PhillipsMini-Convectron 275 series and is the answer not in the manual?
Questions and answers