
Related Manuals for Blackmagicdesign Video Assist


Summary of Contents for Blackmagicdesign Video Assist
- Page 1 Installation and Operation Manual Blackmagic Video Assist January 2017 日本語 English, , Français, Deutsch, Español, and Italiano. 한국어, 中文...
- Page 2 Languages To go directly to your preferred language, simply click on the hyperlinks listed in the contents below. English 日本語 Français Deutsch Español 中文 한국어 Italiano...
-
Page 3: English
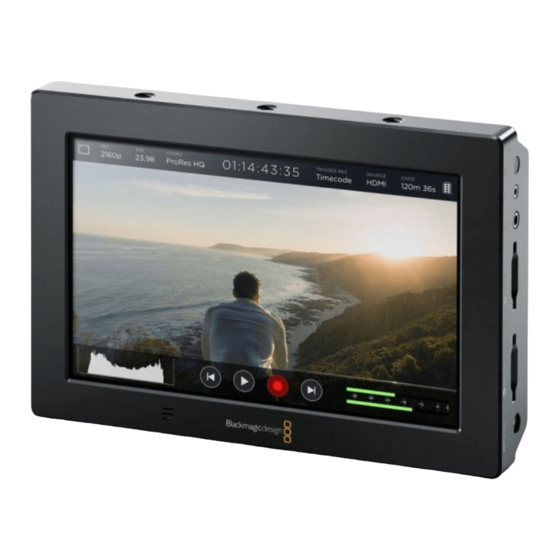
Assist 4K records Ultra HD on two SD cards for continuous recording and is also a powerful audio recorder, so you can mix analog audio into the SDI or HDMI recording. Your Blackmagic Video Assist model is a very versatile monitor and recorder that you can use with any camera and on any project. -
Page 4: Table Of Contents
Formatting SD Cards using Using Avid Media Composer your Video Assist Using Adobe Premiere Pro CC Formatting SD Cards using a Computer Using Autodesk Smoke 2013 Working with Files from SD Cards Help Checking Disk Speed Blackmagic Video Assist Setup Warranty... -
Page 5: Getting Started
Getting Started Plugging in Power Getting started with your Blackmagic Video Assist is as simple as plugging in power, connecting your video source, plugging in your audio and inserting an SD card. To supply power, plug in the supplied power adapter to your Video Assist’s power input on... -
Page 6: Plugging In Video
When plugging in your video, audio is also connected as it’s embedded in the SDI or HDMI video signal. However, Blackmagic Video Assist 4K also has built in mini XLR connectors so you can plug in external balanced analog audio as well. -
Page 7: Inserting Sd Cards
UHS-II type SD cards. These cards need to be capable of write speeds above 110MB/s for recording up to Ultra HD 2160p30. Blackmagic Video Assist 4K also has two SD card slots. You can record to either one, or insert two SD cards for continuous recording or fast media change overs. -
Page 8: Remote Control Via The Lanc Connector
While recording, the timecode counter in the status strip will continuously update, showing you the duration of your clip. When the on screen display is hidden on Blackmagic Video Assist, a small record indicator will be displayed at the bottom of the LCD so you can easily confirm you’re recording. -
Page 9: Recording Clean Hdmi From Dslr Cameras
Swipe the touchscreen up or down to hide the on screen meters so you can monitor only your DSLR camera’s image. On Blackmagic Video Assist 4K the status display at the top of the LCD is independent and separate from the image. This means you can monitor the entire image cleanly and still have the status display visible. -
Page 10: Settings
Looping playback Tap the loop icon once to set your Blackmagic Video Assist to play back the current clip on a continuous loop. Tap again to play all your recorded clips on a continuous loop. Tap a third time to turn loop off. - Page 11 Overlays Tap the overlays icon to open the zebra, focus peaking, guides and grid settings. These settings let you display overlays on the LCD to help with exposure, focus, composition and framing when connected to a camera. Overlay features are not visible via the SDI or HDMI output. Zebra The zebra feature helps you achieve optimum exposure by displaying diagonal lines over areas of the video that exceed your set zebra level.
- Page 12 You can choose from the following frame guides: HDTV Displays action and title safe regions of your image within a 1.78:1 aspect ratio compatible with 16:9 HD television and computer screens. Displays the 4:3 aspect ratio compatible with SD television screens, or to help frame shots when using 2x anamorphic adapters.
- Page 13 The codecs available depend on the model you are using. For example, both models can record HD video to Apple ProRes and Avid DNxHD codecs with a range of bit rates. Blackmagic Video Assist 4K also lets you choose ProRes and DNxHR codecs for Ultra HD recording. Settings...
- Page 14 To disable trigger recording, select ‘never’. T/C Run When timecode run is selected, your Blackmagic Video Assist will start recording as soon as it detects running timecode from your SDI or HDMI source. Recording will stop when the timecode has ceased. This feature is useful when connecting cameras that don’t support SDI start/stop trigger recording.
- Page 15 SDI/HDMI This setting will set your Blackmagic Video Assist to start and stop recording when you press the record start and stop button on your camera. For SDI/HDMI start/stop trigger recording you will need to use a camera that can trigger the record function via HD-SDI or HDMI. Cameras which support trigger recording may include menu options such as ‘trigger rec’, HD-SDI remote...
- Page 16 When your card is full, the indicator will turn solid red and the recording will stop. Your Video Assist will then save the last recorded file. If you have a formatted card in slot 2 of Blackmagic Video Assist 4K, the unit will automatically switch over to slot 2 and continue recording to your second card.
-
Page 17: Volume And Analog Audio Levels
Volume and Analog Audio Levels Speaker Volume To adjust the volume for the built in speaker on Blackmagic Video Assist 4K, swipe the LCD up or down to reveal the on screen meters, then tap the audio meters to open the volume and analog audio level settings. -
Page 18: Storage, Monitor, Display, Audio And Setup Settings
SD card, format your card, adjust monitor and display settings, plus change the date and time. On Blackmagic Video Assist 4K, you can also adjust audio settings. To hide the settings and return to your video image, swipe left or right, or tap the ‘back’... - Page 19 ‘baked in’. However, if you want to apply the same LUT to your image in DaVinci Resolve, you can simply import the exact same LUT .cube file used in your Video Assist into DaVinci Resolve and apply it to your grade.
-
Page 20: Display Settings
Blackmagic Video Assist Setup software utility. To monitor your video using LUTs: Open the ‘monitor’ settings on your Video Assist by swiping left or right on the touchscreen, then tapping ‘monitor’ in the menu bar. Turn the ‘Display 3D LUT’ setting to ‘on’ by tapping its left or right arrows. Tap again to disable the LUTs. -
Page 21: Audio Settings
Setup Settings Setup lets you set the date and time for your Blackmagic Video Assist’s internal clock, plus displays the device name, language, and the internal software version currently installed on the unit. -
Page 22: Monitoring Using On Screen Meters
Tap ‘save’ to confirm the change. Monitoring using on screen meters Your Blackmagic Video Assist features useful scopes such as a histogram and audio levels meter so you can check your exposure and luminance range on cameras, plus monitor the level of your source audio. -
Page 23: About Sd Cards
HD recording. These cards are rated for fast data speeds and support larger storage sizes. For Ultra HD recording on Blackmagic Video Assist 4K, you will need to use the fastest UHS-II cards available. We have included a table below that shows the latest compatible SD cards for recording Ultra HD, HD and SD video. -
Page 24: Formatting Sd Cards Using Your Video Assist
Swipe the touchscreen left or right, or tap the card status display to open the storage settings. Tap the ‘format card’ icon. On Blackmagic Video Assist 4K, tap the icon that corresponds with your selected card. For example, ‘format card 1’ or ‘format card 2’. -
Page 25: Formatting Sd Cards Using A Computer
Formatting SD Cards using a Computer SD cards can also be formatted using a macOS or Windows computer. Preparing SD Cards on a macOS computer Use the ‘disk utility’ application included with macOS to format or initialize your SD card in the HFS+ or exFAT formats. -
Page 26: Working With Files From Sd Cards
Windows computer that features an SD card slot or by using an SD card reader. Remove the SD card from your Blackmagic Video Assist and insert it into the SD card slot of your computer, or SD card reader. The SD card can be accessed the same way as you would an external hard drive, USB drive or any other media storage device attached to your computer. -
Page 27: Checking Disk Speed
The ‘configure’ settings in Blackmagic Video Assist Setup displays the version of the internal software currently installed on your Video Assist, plus lets you change the device name. Simply click in the ‘name’ edit box and type in a new name using your computer’s keyboard. - Page 28 Updating the Internal Software Ocasionally, updates for your Blackmagic Video Assist’s internal software will be available on the Blackmagic Design website. We recommend downloading the software and updating your Blackmagic Video Assist so you can benefit from new features and improvements.
-
Page 29: Using Davinci Resolve
Using DaVinci Resolve Introducing DaVinci Resolve Recording clips with your Blackmagic Video Assist is only part of the process of creating film and television content, and just as important is the process of media backup and management as well as editing, color correction and encoding final master files. DaVinci Resolve for macOS... -
Page 30: Importing Your Clips
simple NLE software tool, as it has extremely advanced technology built in for high end digital film. You get the advantage of this technology when you use DaVinci Resolve to edit and color correct your work. Included here is information on how to get started using DaVinci Resolve with your recorded clips. -
Page 31: Editing Your Clips
Editing your Clips With your clips in the media pool, click on the ‘edit’ tab to open the edit page. Now you can start building your edit! You’ll first need to create a new timeline. Right click anywhere within the media pool and choose Timelines >... -
Page 32: Trimming Clips
The ‘edit’ page. You can trim your clips, change their order, move them around and add transitions between them using the timeline editor. Trimming Clips When editing clips you’ll want to trim them to include only the specific actions you want in each shot. -
Page 33: Mapping Keyboard Shortcuts
Mapping Keyboard Shortcuts If you are familiar with keyboard shortcuts using other editing software, you can easily map your own in DaVinci Resolve to increase speed and optimise your workflow. To map your own keyboard shortcuts: Click on the project setting ‘gear’ icon at the bottom right of your DaVinci workspace, then select ‘keyboard mapping’... -
Page 34: Adding Titles
To add a dissolve transition between two clips: Make sure there are two clips edited right next to one another on the timeline. Click the ‘effects library’ button in the UI toolbar at the top of the ‘edit’ page, and make sure the ‘toolbox’... -
Page 35: Adding Audio Tracks
Drag a title type from the ‘titles’ palette and drop it on an empty track. Adding Audio Tracks If you want to mix a large sound edit with lots of sound effects and music, you can easily add more audio tracks when you need them. To add an audio track: Right click next to the name of the last audio track on your timeline and select ‘add track’. -
Page 36: Color Correcting Your Clips
Color Correcting your Clips Once you have edited your sequence of clips, you can start color correcting. This is best begun after you have finished editing your sequence so you can maintain a consistent look, but part of the fun of DaVinci Resolve is being able to move between the edit and color page to make fine adjustments and discover new creative choices. - Page 37 The parade scope helps you optimize highlights, mid tones and shadows. The ‘lift, ‘gamma’, ‘gain’ and ‘offset’ color wheels give you total control over the color and tonal balance of your clips. To make a uniform adjustment to all colors for each tonal region, drag the dial underneath the color wheels back and forth. Adjusting the ‘lift’...
-
Page 38: Secondary Color Correction
You can also use the curves palette to make primary color corrections. Simply click to create control points on the diagonal line inside the curve graph, and drag them up or down to adjust the master RGB contrast at different areas of image tonality. The optimum points to adjust are the bottom third, mid, and top third of the curve line. -
Page 39: Adding A Power Window
To qualify a color: Add a new serial node. Open the ‘qualifier’ palette and make sure the ‘color range’ sample eyedropper tool is selected. Click on the color in your clip you want to affect. Usually you’ll need to make some adjustments to soften the edges of your selection and limit the region to only the desired color. -
Page 40: Tracking A Window
Power windows let you make secondary corrections to specific parts of your image. Tracking a Window The camera, object or area in your shot may be moving, so to make sure your window stays on your selected object or area, you’ll need to use DaVinci Resolve’s powerful tracking feature. The tracker analyzes the pan, tilt, zoom and rotation of the camera or object in your clip so you can match your windows to that movement. -
Page 41: Using Plugins
Most of the time automatic tracking is successful, but scenes can be complex and sometimes an object can pass in front of your selected area, interrupting or affecting your track. This can be solved manually using the keyframe editor. Refer to the DaVinci Resolve manual to find out more. - Page 42 Immediately above the timeline, you’ll see an options box with ‘entire timeline’ selected. This will export the entire timeline, however you can select a range of the timeline if you want to. Simply choose ‘in/out range’ and then use the ‘i’ and ‘o’ hot key shortcuts to choose the in and out points in your timeline.
-
Page 43: Post Production Workflow
Post Production Workflow Working with 3rd Party Software If you have your own favourite editing software you’d like to use, you can easily copy your clips to an internal/external drive or RAID and then import your clips into the software. If you want to, you can even edit your clips directly from the SD card. -
Page 44: Using Adobe Premiere Pro Cc
Select the media bin where you wish to import your files. Select ‘file>AMA link…’ and select the files that you wish to import and then click ‘ok’. When the clips appear within the media bin you can drag your clips onto the timeline and begin editing. -
Page 45: Using Autodesk Smoke 2013
Using Autodesk Smoke 2013 To edit your clips using Autodesk Smoke 2013, create a new project matching the clips’ video format, bit depth, frame type and frame rate. For this example, clips were recorded using ProRes 422 HQ 1080p25. Launch Smoke and the project and user settings window will appear. Click on the ‘new’ button under the project heading. -
Page 46: Help
Design support office. Checking the Software Version Currently Installed To check which version of Blackmagic Video Assist software is installed on your computer, open the About Blackmagic Video Assist Setup window. On macOS, open Blackmagic Video Assist Setup from the Applications folder. -
Page 47: Warranty
Warranty 12 Month Limited Warranty Blackmagic Design warrants that this product will be free from defects in materials and workmanship for a period of 12 months from the date of purchase. If a product proves to be defective during this warranty period, Blackmagic Design, at its option, either will repair the defective product without charge for parts and labor, or will provide a replacement in exchange for the defective product. - Page 48 インストール / オペレーション マニュアル Blackmagic Video Assist 2017 年 1 月 日本語...
- Page 49 使えば、 デスク 上で通常のモニターとしても使用できます。 また同製品は、 ライブプロダクション スイッチャー用のマスターレコダーとしての使用にも最適です。 Blackmagic Video Assist は、 6G-SDI 入力を搭載しているので Ultra HD のモニタリングが可能で す。 Blackmagic Video Assist 4K は、 2 枚の SD カードに Ultra HD を継続的に収録します。 またパワ フルなオーディオレコーダーにも対応しているため、 アナログオーディオを SDI あるいは HDMI 収録 に組み込むこともできます。 多機能なモニター兼レコーダーである Blackmagic Video Assist は、 あ...
- Page 50 サードパーティ製ソフトウェアの使用 89 高速の SD カードを選ぶ 69 Final Cut Pro X を使う 89 Blackmagic Video Assist で SD カード Avid Media Composer を使う 89 をフォーマット 70 Adobe Premiere Pro CC を使う 90 コンピューターで SD カードをフォーマット 71 Autodesk Smoke 2013 を使う...
- Page 51 はじめに 電源の接続 Blackmagic Video Assist は、 電源を接続して、 ビデオソースとオーディオを接続し、 SD カードを差し込む だけで簡単に使用できます。 電源を供給するには、 同梱の電源アダプターを Video A ssis t の右サイドパネルに付いている電源 入力 このセクションでは以下について に接続します。 説明します: 外部電源を接続すると、 2 つの LP-E6 タイプのリチウ 電源の接続 ■ ムイオンバッテリーの充電もできます。 バッテリーは ビデオの接続 ■ バックパネルのバッテリースロット 1 、 2 にマウントで きます。 LP-E6 タイプのバッテリーを Video Assist に...
- Page 52 LP-E6 タイプのバッテリーを使用。 ビデオの接続 次のステップでは、 SDI/HDMI ソースビデオをミニ BNC 、 BNC 、 あるいは HDMI 入力に接続します。 Blackmagic Video Assist は、 最初に接続したソースに応じて SDI/HDMI 入力を自動検出します。 ミニ BNC - 通常の BNC のケーブルは、 お近くの映像機器専門店で購入可能です。 ミニ BNC コネクターは、 DIN 1.0/2.3 コネクター とも呼ばれています。 ソースビデオを左サイドの SDI/HDMI 入力に接続します。 HDMI/SDI 出力を HDMI TV ある...
-
Page 53: Sd カードの挿入
高品質の HD 収録には、 高速の UHS-I カードを推奨します。 SD や、 低ビットレート、 低品質の圧縮で収録す る場合は低速のカードでも使用可能ですが、 一般的には、 高速であればあるほど良い品質が得られます。 Blackmagic Video Assist 4K で Ultra HD を収録する場合は、 高速の UHS-II タイプの SD カードを推奨しま す。 Ultra HD 2160p30 までの収録を行う場合、 これらのカードは、 110MB/s 以上の書き込みスピードに対 応する必要があります。 Blackmagic Video Assist 4K は、 2 つの SD カードスロットを搭載しています。... -
Page 54: Lanc 接続経由のリモートコントロール
を表示します。 Blackmagic Video Assist のオンスクリーンディスプレイが見えない場合でも、 小さな収録 インジケーターが LCD 画面の下に表示されるので、 収録中であることを確認できます。 Apple ProRes または Avid DNx コーデックを使用して QuickTime ファイルにクリップを収録します。 また、 Video Assist を 「タイムコード」 あるいは 「 SDI/HDMI 開始 / 停止」 トリガー収録に設定することもで きます。 これにより、 HD-SDI あるいは HDMI 信号経由で受け取った情報をトリガーとして、 収録を開始 / 停止できます。 選択したコーデックの設定、 トリガー収録の有効化に関する詳細は、 同マニュアルの 「設定」... -
Page 55: Dslr カメラからクリーンな Hdmi を収録
DSLR カメラからクリーンな HDMI を収録 DSLR カメラによっ ては、 8-bit ビデオを内部収録したり、 HDMI 出力からクリーンなビデオイメージを出力 したりできます。 DSLR カメラの HDMI 出力を Blackmagic Video Assist に接続すれば、 カメラの内部圧縮 を回避して、 高品質の 10-bit ProRes あるいは Avid DNx コーデックを使っ て収録可能です。 DSLR カメラに よっ ては 10-bit 4:2:2 を出力できるものがあります。 これは、 内部収録の 8-bit 4:2:0 よりも高い品質です。... - Page 56 スクラブスライダーを前後にドラッグして、 クリップをシャトルコントロー ル。 再生モードの場合、 スクリーンの左上にパネルが表示されます。 このパ ネルは、 SD カードに収録されたクリップの数、 再生中のクリップ、 クリップ の長さを表示します。 設定 タッチスクリーンで設定を変更 Blackmagic Video Assist はタッチスクリーンを内蔵しています。 このタッチスクリーンを使い、 ビデオの モニタリングや設定の変更が可能です。 LCD の下にあるステータス ・ ストリップのアイコンをタップすることで、 ほとんどの設定を変更できます。 レベル調整やヘッドフォン・ ボリュームなどのオーディオ設定は、 タッチクリーンを上下にスワイプして オンスクリーンメーターを LCD のに表示させ、 オーディオメーターをタップすることで変更できます。 設定ウィンドウを隠すには、 設定の外側をタップします。 ストレージ設定を隠すには左右にスワイプ、 ま たは 「 Back 」 アイコンをタップします。...
- Page 57 フォーカスピーキングおよびフォーカスアシスト フォーカスピーキングおよびフォーカスアシスト設定は、 イメージのフォーカスをスピーディに合わせるた めのパワフルなツールです。 フォーカスピーキングは、 イメージ内の最もシャープなエリアにエッジライン を表示します。 感度調整で、 ラインの強さを変更できます。 Blackmagic Video Assist 4K は、 エッジライ ンの色を変更することもできます。 エッジラインをオンにして感度レベルを調整するには、 左右矢印をタップするかスライダーを左右にドラッ グします。 感度レベルは 「低 ( Low ) 」 、 「中 ( Medium ) 」 、 「高 ( High ) 」 の 3 段階から選択できます。 コント...
- Page 58 以下のフレームガイドから選択できます: HDTV 1.78:1 のアスペクトレシオで、 画像のアクションおよびタイトルのセー フエリアを表示します。 16:9 HD テレ ビおよびコンピュータースクリーンと互換。 4:3 のアスペクトレシオを表示します。 SD テレビスクリーンと互換。 2x アナモルフィックアダプターを使用 している場合、 フレーミングをサポート。 2.40:1 、 2.39:1 、 2.35:1 フラット ・ワイドスクリーンのアスペクトレシオを表示します。 アナモルフィック、 あるいはフラット ・ワイ ドスクリーンシネマと互換。 この 3 つのワイドスクリーン設定は、 時代ごとのシネマ標準の変更に応じて、 若干異なっ ています。 2.39:1 は、 今日最も多く使用されている規格です。 1.85:1 もう 1 つの一般的なフラット ・ ワイドスクリーンのシネマアスペクトレシオを表示します。 この比率は、 HDTV より若干幅広く、...
- Page 59 1080i50 、 1080i59.94 、 1080i60 1080p23.98 、 1080p24 、 1080p25 、 1080p29.97 、 1080p30 、 1080p50 、 1080p59.94 、 1080p60 2160p23.98 、 2160p24 、 2160p25 、 2160p29.97 、 2160p30 ( Blackmagic Video Assist 4K ) コーデック まず 「 CODEC 」 インジケーターをタップして関連の設定を開き、 次に矢印アイコンかスライダーをタップ...
- Page 60 ガー ( SDI/HDMI ) 収録のどちらかを選択します。 これにより、 SDI/HDMI インター フェースで受け取った情 報をトリガーとして、 収録を開始 / 停止できます。 トリガー収録を無効化するには 「 Never 」 を選択します。 T/C Run T/C Run が選択されている場合、 Blackmagic Video Assist は、 SDI または HDMI ソースからのタイムコード を検出するとすぐに収録を開始します。 タイムコードが停止すると、 収録を停止します。 この機能は、 SDI 開始 / 停止トリガー収録に対応していないカメラに接続している際に便利です。 カメラのタイムコード設定...
- Page 61 SDI/HDMI 同設定は、 カメラで収録開始 / 停止ボタンを押した際に、 Blackmagic Video Assist が収録を開始 / 停止す るよう設定します。 SDI/HDMI 開始 / 停止トリガー収録では、 収録機能を HD-SDI/HDMI 経由でトリガーで きるカメラが必要です。 トリガー収録をサポートしているカメラには、 「 Trigger REC 」 、 「 HD-SDI Remote I/F 」 、 「 SDI Remote Start/Stop Trigger 」 などのオプションがあります。 ソース...
- Page 62 バッテリー残量を表示します。 バッテリーアイコンをタップして大きいディスプレイを開くとバッテリーレ ベルを正確に確認できます。 操作中、 Video Assist は残量が少ない方のバッテリーを先に使用し、 次にもう一方のバッテリーに間断な く切り替えます。 バッテリーを充電する際は両方のバッテリーを同時に充電します。 バッテリーは、 種類 や状態によりますが、 使用していない場合はフル充電に約 3 時間必要です。 Blackmagic Video Assist で 2 つの Canon LP-E6 バッテリーがフルに充電されている場合、 およそ 180 分の 収録が可能です。 Blackmagic Video Assist 4K は、 2 つのフル充電バッテリーでおよそ 80 分の 収録が可能です。 設定...
-
Page 63: ボリュームおよびアナログオーディオレベル
スピーカーは再生中は有効になりますが、 Blackmagic Video Assist 4K で ビデオ入力を収録 / モニタリングする際は無効になります。 これは、 マイクが接続されて いる際のハウリングを避けるためです。 ヘッドフォンボリューム ヘッドフォンボリュームを調整するには、 スクリーンディスプレイの右下にあるオーディオメーターをタッ プします。 Blackmagic Video Assist 4K では、 ヘッドフォンを差し込むと直ぐにスピーカーボリューム設定 がヘッドフォンボリューム設定に変わるので、 スピーカーボリュームと同じように調整できます。 アナログオーディオレベル Blackmagic Video Assist 4K では、 各入力のスライダーをドラッグして XLR 入力経由のアナログオーディ オレベルを調整できます。 各入力で調整できるレベル範囲は、 +10dB ~ +65dB です。 設定... -
Page 64: ストレージ、 モニター、 ディスプレイ、 オーディオ、 セットアップ設定
タッチスクリーンを左右にスワイプして追加設定およびインフォメーションを開きます。 この画面で SD カードのストレージ情報の確認、 カードのフォーマット、 モニター調整、 ディスプレイ設定、 日付 / 時刻の 設定が可能です。 Blackmagic Video Assist 4K では、 オーディオ設定も可能です。 設定を隠してビデオの イメージに戻るには、 左右にスワイプするか、 あるいは Blackmagic Video Assist 4K の左下にある 「 Back 」 アイコンをクリックします。 ストレージ設定 ( STORAGE ) ストレージ設定では、 挿入した SD カードの容量、 フォーマットのタイプ ( HFS+ 、 exFAT ) 、 残りスペースを... - Page 65 れます。 また、 最大 6 つの 3D LUT を読み込め、 入力ソースや再生のモニタ リングに使用できます。 3D LUT を表示 ( DISPLAY 3D LUT ) Blackmagic Video Assist は、 イメージに 3D LUT が適用された入力ビデオを表示できます。 3D LUT はディ スプレイに表示されるだけで、 実際にビデオには収録されないので、 収録されたイメージが恒久的に 「焼付く」 心配は必要ありません。 しかし、 DaVinci Resolve で同じ LUT をイメージに適用したい場合、 Video Assist で使ったのと同じ...
- Page 66 ユーティリティを使うと、 Video Assist に最大 6 つの 3D LUT をロードできます。 LUT を使用してのモニタリング : タッチスクリーンを左右どちらかにスワイプして Video Assist の 「 MONITOR 」 設定を開き、 メニ ューバーにある 「 MONITOR 」 をタップします。 左右どちらかの矢印をタップして、 「 Display 3D LUT 」 設定を 「 On 」 にします。 LUT を無効にする には、 もう一度タップしてください。...
- Page 67 Blackmagic Video Assist の電源を切るとすべての設定が保存されます。 これらの特定の設定を変更する と、 LCD に表示されるイメージに影響しますが、 収録するビデオには影響しません。 オーディオ設定 ( AUDIO ) Blackmagic Video Assist 4K は、 パワフルなオーディオレコーダーでもあります。 各 XLR 入力は以下のよ うな独立した設定に対応します: XLR Line 、 XLR Mic 、 Video - マイク以外のプロ仕様オーディオ機器をアナログ XLR 入力に接続 している場合、 収録レベルが 'XLR line' に設定されていることを確認してください。 多くのプロ...
-
Page 68: オンスクリーンメーターを使ったモニタリング
日付 / 時刻設定を調整する : ペンのアイコンをクリックします。 日、 月、 年、 時刻の矢印をタップして設定を変更します。 「 Save 」 をタップして変更を保存します。 オンスクリーンメーターを使ったモニタリング Blackmagic Video Assist は、 ヒストグラム、 オーディオレベルメーターなどの便利なスコープ機能を搭載 しており、 カメラの露出およびルミナンスレンジの確認や、 ソースオーディオレベルのモニタリング が可能です。 ヒストグラム ヒストグラムディスプレイは、 映像のルミナンス分布を表示します。 完全なブラックはヒストグラムの左端 で、 完全なホワイトは右端になります。 これらの範囲内で、 ビデオ信号がある程度底部でシャープになっ ている場合、 シャドウおよびハイライト部分はクリッピングされておらず、 ビデオのすべてのトーンレンジ のディテールが保存されています。 オーディオメーター オーディオメーターは、 入力ソースのチャンネル 1 および 2 のオーディオレベル表示します。 最大レベルを... -
Page 69: Sd カードについて 高速の Sd カードを選ぶ
高速の SD カードを選ぶ Ultra HD および HD 収録には高速 UHS-II カードを、 HD 収録には UHS-1 カードを使用することが重要です。 これらのカードは高速データスピードを誇り、 大容量ストレージに対応しています。 Blackmagic Video Assist 4K で Ultra HD を収録する場合は、 最高速 UHS-II カードを使用してください。 こ のセクションには、 Ultra HD/HD/SD ビデオの収録に使用できる最新 SD カードのリストがあります。 定期 的に同マニュアルの最新バージョンを確認し、 常に新しい情報を入手することをお勧めします。 マニュア ルは Blackmagic Design ウェブサイト ( www.blackmagicdesign.com/jp/support ) でダウンロードできます。... -
Page 70: Blackmagic Video Assist で Sd カード
SD カードをフォーマットする : タッチスクリーンを左右にスワイプするか、 カード状況ディスプレイをタップしてストレージ設定 ( STORAGE ) を開きます。 「 Format Card 」 アイコンをタップします。 Blackmagic Video Assist 4K では、 「 Format Card 1 」 または 「 Format Card 2 」 から、 選択したカードに対応する方のアイコンをタップします。 左右の矢印ボタンをタップしてフォーマットを 「 HFS+ 」 または 「 exFAT 」 から選択し、 もう一度... -
Page 71: コンピューターで Sd カードをフォーマット
コンピューターで SD カードをフォーマット SD カードは、 macOS/Windows コンピューターからでもフォーマットできます。 macOS コンピューターで SD カードを準備する macOS に同梱されている Disk Utility アプリケーションを使って、 SD カードを HFS+ あるいは exFAT で フォーマットまたは初期化します。 フォーマットするとすべてのデータが消去されるため、 SD カードにファイル が記録されている場合は、 必ずメディアをバックアップしてから作業を行っ てください。 SD カードをコンピューターの SD カードスロット、 あるいは SD カードリーダーに差し込みます。 Applications/Utility へ行き、 Disk Utility を起動します。 使用する... -
Page 72: Sd カードファイルでの作業
使用して、 SSD を exFAT にフォーマットします。 SD カードファイルでの作業 SD カードの ProRes/DNx ファイルには、 SD カードスロットを搭載した macOS または Windows 、 あるいは SD カードリーダーからアクセスできます。 Blackmagic Video Assist から SD カードを取り出し、 コンピューターの SD カードスロットもしく は SD カードリーダーに挿入します。 SD カードへのアクセスは、 外付けのハードドライブ、 USB ド ライブ、 あるいはコンピューターに接続した他のメディアストレージデバイスで SD カーを使用 する場合と同じです。... -
Page 73: Blackmagic Video Assist Setup
Blackmagic Disk Speed Test のインター フェース SD カードの性能を確認できます。 Blackmagic Video Assist Setup コンフィギュレーション設定 Blackmagic Video Assist Setup の 「 Configure 」 設定には、 Video Assist に現在インストールされている 内部ソフトウェアのバージョンが表示されます。 この画面でデバイスの名前も変更できます。 「 Name 」 ボックスをクリックし、 コンピューターのキーボードで新しい名前を入力します。 「 Configure 」 ウィンドウでは、 Blackmagic Video Assist の名前を変更できます。 また... - Page 74 で内部ソフトウェアをアップデートする : Blackmagic Video Assist Setup をダウンロードして解凍します。 ディスクイメージを開いて Blackmagic Video Assist Setup Installer を起動します。 スクリーン 上の指示に従います。 最新の Blackmagic Video Assist Setup をインストールしたら、 USB ケーブルで Blackmagic Video Assist とコンピューターを接続します。 Blackmagic Video Assist Setup を起動し、 画面に表示される指示に従っ て内部ソフトウェアを アップデートします。 内部ソフトウェアが最新で何もする必要がない場合、 指示は表示され ません。...
-
Page 75: Davinci Resolve の使用
DaVinci Resolve の使用 DaVinci Resolve について Blackmagic Video Assist を使用した収録は、 映画 / テレビコンテンツ制作の過程のひとつであり、 メディ アのバックアップ、 管理、 編集、 カラーコレクション、 最終マスター ファイルのエンコードと同様にとても 重要です。 DaVinci Resolve ( macOS/Windows 対応) が同梱される Blackmagic Video Assist は、 収録か らポスト プロダクションまでをサポートする完結型ソリューションです! SD カードをコンピューターに接続したら、 DaVinci Resolve のメディアページでクローンツールを使用し て、 撮影を行いながら継続的にバックアップを作成できます。 使用するメディアはその種類にかかわら... - Page 76 DaVinci Resolve でクリップを調整すれば、 目的に応じたあらゆる種類のルックを実現できます。 DaVinci Resolve は、 多くの大ヒット映画で使用されています。 シンプルな NLE ソフトウェアツールとは異なり、 ハ イエンドのデジタルフィルム用に極めて高度なテク ノロジーを搭載しています。 DaVinci Resolve を使用 すれば、 最先端のテク ノロジーを利用した編集やカラーコレクションが実現します。 このセクションでは、 収録したファイルに DaVinci Resolve を使用する方法を説明します。 DaVinci Resolve には極めて高度なテク ノロジーが採用されており、 その機能の多くはユーザーインター フェースを一目見 ただけでは分かりません。 DaVinci Resolve の使用に関する詳細は、 DaVinci Resolve ソフトウェア SD カ ードの...
- Page 77 クリップの編集 メディアプールにメディアを入れたら、 「エディット」 タブをクリックしてエディットページを開きます。 これで、 編集を開始できます! はじめに、 新しいタイムラインを作成する必要があります。 メディアプール内で右クリックし、 「タイムライン」 > 「新規タイムラインを作成」 を選択します。 ダイアログボックスが表示され たら、 「新規タイムラインを作成」 ボタンを押します。 クリップの編集を始めるには、 新規タイムラインを作成する必要があります。 タイムラインとは、 すべての編集を行うステージです。 メディアプールのクリップをダブルクリックしてクリップをソースビューアで開きます。 ソース ビューアの再生ヘッドをマウスで左右に動かし、 そのクリップの開始点として使用したい位置を見つ けます。 「 I 」 ショートカットで、 イン点としてマークします。 同じように、 「 O 」 ショートカットで最後 のフレームを指定します。 タイムラインで、 クリップを挿入したい位置に再生ヘッドを合わせます。 クリップをタイムラインに挿入するには、 ソースビューアの中でクリックし、 マウスでドラッグして タイムラインビューアにドロップします。...
- Page 78 エディットページ。 タイ ムラインエディターを使用して、 クリップのトリム、 順番の変更、 移動、 トランジションの追加などが可能です。 クリップのトリム クリップの編集では、 クリップをトリムして、 各ショットの必要なシーンのみを使用できます。 クリップの トリムには様々な方法がありますが、 タイムラインでクリップのイン点 / アウト点を調整する方法が 最も簡単です。 クリップをタイムラインに追加したら、 マウスのポインターをクリップの開始点に合わせます。 ポインターがトリムアイコンになります。 トリムアイコンが表示されたら、 クリップの開始点をクリックして順方向 / 逆方向にドラッグし、 イン点をトリムします。 タイムラインモニターを確認しながらトリムして、 編集点を決定します。 さらに、 クリップの終了点をクリック&ドラッグして、 アウト点を調整します。 ズームスライダーはタイムラインの上、 中央に集まったツール群の右側にあります。 ズームスライダーを左右 にドラッグすると、 タイムラインが拡大 / 縮小され、 細かい調整がしやすくなります。 「スナップ」 機能は、 編集を微調整する場合はオフにします。 この機能では、 隣り合うクリップの開始点 と終了点を隙間なく結合しやすくできるため、...
-
Page 79: キーボードショートカットのマッピング
キーボードショートカットのマッピング 他の編集ソフトウェアで使用するキーボードショートカットに馴染みがあれば、 DaVinci Resolve でも 独自のマッピングを簡単に行い、 ワークフローのスピードと正確性をアップできます。 自分専用のキーボードショートカットをマッピングする : DaVinci Resolve ワークスペースの右下にある、 プロジェクト設定のギアアイコンをクリックしま す。 さらに設定リストから 「キーボードマッピング」 を選択します。 表示されるカテゴリーの中から、 変更したいショートカットを選択します (例: タイムラインの カット / ペーストのショートカットは 「編集」 カテゴリーにあります) 。 ショートカットをクリックすると、 設定がハイライトされます。 ショートカットをダブルクリック すると、 設定を変更できます。 キーボードを使用して、 新しいショートカットキーを押します。 間違っ てしまった場合は、 設定の 右側にあるやり直しアイコンをクリックして、 変更を簡単にやり直せます。 新しいショートカット設定を確認して 「保存」 を押します。 クリップの開始点... - Page 80 2 つのクリップの間にディゾルブ ・ トランジションを追加: タイムライン上に 2 つのクリップがあり、 それらが隣り合っ ていることを確認します。 エディット ページ上部、 UI ツールバーの 「エフェクトライブラリ」 ボタンをクリックして、 「ツールパネル」 ボックスを開きます。 「クロス D 」 トランジションをクリックして、 タイムラインにドラッグし、 2 つのクリップの間の編 集点に重ねます。 マウスポインターが、 1 つ目のクリップの終了点と、 2 つ目のクリップの開始点を ハイライトします。 トランジションをこれらのクリップの上にドロップします。 ディゾルブ ・ トラン ジションを成功させるには、 編集点の前後で、 各クリップに十分な長さがあることが重要です。 これで、 1 つのクリップから次のクリップへのなめらかなトランジションが得られます。 トランジションの長 さを調整したい場合は、...
- Page 81 「タイトル」 パレットからタイトルの種類をドラッグし、 空のトラックにドロップします。 オーディオトラックの追加 サウンドエフェクトや音楽を多く含むサウンドファイルをミックスしたい場合、 オーディオトラックは必要 に応じて簡単に追加できます。 オーディオトラックを追加する : タイムラインでオーディオトラックのトラック名エリアを右クリックし、 「トラックを追加」 を 選択します。 「ステレオ」 、 「モノ 」 、 「 5.1 」 、 「適応」 から、 必要に応じた種類のオーディオトラックを選択します。 新しいオーディオトラックがタイムラインに表示されます。 この機能は、 声、 サウンドエフェクト、 音楽など、 オーディオ素材を別々のトラックに分けてサウンドミッ クスを行いたい場合に便利です。 パワフルな編集ツールの使用に関する詳細は、 DaVinci Resolve マニュアルを参照してください。 新しいオーディオ / ビデオトラックを追加するには、 トラック名の隣で右クリックし、 「トラックを追加」 を 選択します。...
- Page 82 クリップのカラーコレクション クリップのシーケンスの編集が終わったら、 カラーコレクションを開始できます。 ルックの一貫性を保つ ため、 カラーコレクションはシーケンスの編集が終わっ てから行うのが最善です。 しかし、 DaVinci Resolve の面白い点は、 編集ページとカラーページを行き来して、 微調整などを行い、 新しいクリエイティブな発 見が得られることです。 カラーページでは、 クリップのルックを完全にコントロールできます。 はじめに、 「カラー」 タブをクリックしてカラーページを開きます。 カラーホイール、 カーブパレット、 カラーコレクションツール全般、 プレビューウィンドウ、 ノードウィンド ウが表示されます。 表示される膨大なツール群に戸惑う必要はありません。 これらはすべて、 ユーザーが 素晴らしい映像を作成するのを手伝うための機能です。 DaVinci Resolve マニュアルでは、 すべてのツー ルの内容 / 使い方を簡単なステップで紹介しています。 ハイエンドのカラーコレクションスタジオで専門 家が用いるのと同じテクニックを習得できます。 一般的にカラーコレクションは、 クリップのシャドウ、 中間トーン、 ハイライトの最適化から作業を始めま す。...
- Page 83 パレードスコープは、 ハイライト、 中間トーン、 シャドウの最適化に役立ちます。 リフト、 ガンマ、 ゲイン、 オフセット・ カラーホイールで、 クリップのカラーおよびトーンの バランスを完全にコントロールできます。 各トーン領域のすべてのカラーに同じ調整を 加えたい場合は、 カラーホイールの下のダイヤルを前後にドラッグします。 「リフト」 の調整 カラーページのタイムラインで最初のクリップを選択し、 1 つ目のカラーホイールの下にある 「リ フト」 ダイヤルをクリックします。 ダイヤルを前後にスライドし、 イメージへの影響を確認します。 イメージ内の暗い領域で明るさが増減するのが分かります。 暗い領域の明るさを、 最適なレベ ルに設定します。 リフトを下げ過ぎるとブラックのディテールが失われます。 これを避けるには、 パレードスコープが役に立ちます。 波形で見るブラックの最適な位置は、 パレードスコープ の底辺のすぐ上です。 「ゲイン」 の調整 「ゲイン」 ダイヤルをクリックして、 前後にスライドします。 クリップの最も明るい部分である ハイライトを調整できます。...
- Page 84 また、 カーブパレットを使用してプライマリーカラーコレクションを行えます。 カーブグラフの斜線をクリッ クしてコントロールポイントを作成します。 それらを上下にドラッグして、 イメージ色調の異なるエリア のマスター RGB コントラストを調整します。 調整に最適なポイントは、 カーブラインの下から 3 分の 1 、 中間、 上から 3 分の 1 です。 DaVinci Resolve でプライマリーカラーコレクションを行う方法は他にもたくさんあります。 詳細は、 DaVinci Resolve マニュアルを参照してください。 「カーブ」 パレットは、 プライマリーコレクションや、 Power Window でクリップの特定の 部分を強調する際にに使用できる、 もうひとつのツールです。 セカンダリーカラーコレクション イメージの特定の部分を調整したい場合は、 セカンダリーコレクションを使用する必要があります。 カラー ホイール、...
-
Page 85: Power Window を追加
カラーを特定する : 新しいシリアルノードを追加します。 「クオリファイアー」 パレットを開き、 「選択範囲」 で 「ピッカー」 ツールを選択します。 クリップ内の調整したいカラーをクリックします。 通常、 選択した領域のエッジを滑らかにし、 目的のカラーのみに制限するためには、 多少の調整 が必要です。 選択した領域を確認するには、 「ハイライト」 ボタンを押します。 色相ウィンドウの 「幅」 コントロールを調整して、 選択する色相の幅を調整します。 High 、 Low 、 ソフトネスコントロールを調整して、 選択領域への影響を確認してください。 これで、 トラッ クボールまたはカスタムカーブを使用して、 選択したカラーへのコレクションが開始できます。 時おり、 作 業の影響を与えたくない領域のカラーもわずかに選択されてしまう場合があります。 その場合は Power Window を使用して、 必要ない領域を簡単にマスクできます。 新しいウィンドウを作成したら、 目的のカラー の部分に合わせて形を整えるだけです。... - Page 86 Power Window を使用して、 イメージ内の特定の部分にセカンダリーコレクションを適用できます。 ウィンドウのトラッキング ショットのカメラ、 対象物、 部分には、 動きがある場合があります。 そのため、 DaVinci Resolve のパワフ ルなトラッキング機能を使用して、 ウィンドウに対象物 / 部分を追跡させる必要があります。 トラッキング 機能は、 カメラ / 対象物のパン、 ティルト、 回転を分析するため、 それらの動きにウィンドウをマッチできま す。 この作業を行っ ていない場合は、 選択したターゲットからカラーコレクションが外れ、 望ましい結果 が得られないことがあります。 トラッキング機能で対象物 / 部分を追跡できるため、 Power Window がアクションを追います。 動く対象物のウィンドウをトラッキングする : 新しいシリアルノードを作成し、 Power Window を追加します。 クリップを開始点に合わせ、...
- Page 87 トラッキングはほとんどの場合に成功しますが、 複雑なシーンや、 選択した領域の前を障害物が通るケー スでは、 トラッキングに影響が出る場合があります。 この問題は、 キー フレームエディターを使用して解決 できます。 詳細については、 DaVinci Resolve マニュアルを参照してください。 プラグインの使用 セカンダリーカラーコレクションでは、 OpenFX プラグインの追加が可能です。 OpenFX プラグインを追 加して、 カラーページではスピーディで魅力的なルックを、 エディットページでは想像的なトランジショ ンやエフェクトを作成しましょう。 サードパーティ製の OF X プラグインを購入 / ダウンロードして 使用できます。 OFX プラグインを使用して、 想像的で魅力的なルックをすばやく簡単に作成できます。 プラグインをインストールしたら、 カラーページでノードエディターの右にある 「 OpenFX 」 を開いてアク セスできます。 「 OpenFX 」 ボタンで OpenFX インスペクタを開き、 新しいシリアルノードを作成して、 プラ グインを新しいノードにドラッグ&ドロップします。...
- Page 88 タイムラインの上に、 「タイムライン全体」 が選択されたオプションボックスが表示されます。 これでタイムライン全体が書き出されますが、 タイムラインの幅を選択することも可能です。 「 In/Out 範囲」 を選択し、 「 I/O 」 のホットキーショートカットを使ってタイムラインでイン点 / アウト点を選択します。 「レンダー設定」 の下に行き、 「レンダーキューに追加」 をクリックします。 レンダリングが完了したら、 書き出し先に指定したフォルダーを開き、 レンダリングされた新しいクリップ をダブルクリックして、 完成した編集を確認できます。 「デリバー」 ページでは編集を書き出します。 様々なビデオフォーマットとコーデックが選択可能です。 ページ右側のレンダーキューに、 レンダー設定が追加されます。 ここまでの作業が終わったら、 後は 「レン ダー開始」 をクリックして、 レンダーキューでレンダリングの進行状況をモニタリングするだけです。 レンダリングが完了したら、 書き出し先に指定したフォルダーを開き、 レンダリングされた新しいクリップ をダブルクリックして、 完成した編集を確認できます。 レンダーキューにレンダー設定を追加したら、...
-
Page 89: ポストプロダクションワークフロー
ポスト プロダクションワークフロー サードパーティ製ソフトウェアの使用 お気に入りの編集ソフトウェアを使用したい場合は、 クリップを内蔵 / 外付けドライブまたは RAID に一度 コピーして、 その後それらのクリップを使用するソフトウェアに読み込みます。 また、 SD カード上のクリップをそのまま編集することも可能です。 Final Cut Pro X を使う Final Cut Pro X で Apple ProRes クリップを編集するには、 クリップのビデオフォーマットおよびフレーム レートにマッチする新しいプロジェクトを作成する必要があります。 ここでは、 クリップを ProRes 422 1080p25 とします。 Final Cut Pro X を起動してメニューバーへ行き、 「 File/New Project 」 を選択します。 プロジェク ト設定を含むウィンドウが開きます。... -
Page 90: Adobe Premiere Pro Cc を使う
ファイルをインポートするメディアビンを選択します。 「 File 」 > 「 AMA Link... 」 を選択し、 インポートしたいファイルを選択して 「 OK 」 をクリックします。 メディアビンにクリップが表示されたら、 クリップをタイムラインにドラッグして編集しましょう。 Avid Media Composer 7 でプロジェクト名およびオプションを設定 Adobe Premiere Pro CC を使う Adobe Premiere Pro CC でクリップを編集するには、 クリップのビデオフォーマットおよびフレームレー トにマッチする新しいプロジェクトを作成する必要があります。 ここでは、 クリップを ProRes 422 HQ 1080p25 とします。 Adobe Premiere Pro CC を起動します。... -
Page 91: Autodesk Smoke 2013 を使う
Autodesk Smoke 2013 を使う Autodesk Smoke 2013 でクリップを編集するには、 クリップのビデオフォーマット、 ビット深度、 フレーム タイプおよびフレームレートにマッチする新しいプロジェクトを作成します。 ここでは、 クリップを ProRes 422 HQ 1080p25 とします。 Smoke を起動すると 「 Project and User Settings 」 ウィンドウが表示されます。 プロジェクト ヘディングの 「 New 」 ボタンをクリックします。 「 Create New Project 」 ウィンドウが開きます。 プロジェクトに名前を付けます。 「... - Page 92 Windows 7 では、 スタートメニューから 「 Blackmagic Video Assist Setup 」 を開きます。 ‚ ヘルプメニューから 「 About Blackmagic Video Assist Setup 」 を選択し、 バージョンを確認 してください。 Windows 8 では、 スタートページの 「 Blackmagic Video Assist Setup 」 タイルから Blackmagic ‚ Video Assist Setup を開きます。 ヘルプメニューから 「 About Blackmagic Video Assist Setup 」 を選択し、 バージョンを確認してください。...
- Page 93 保証 12 ヶ月限定保証 Blackmagic Design は、 お買い上げの日から 12 ヶ月間、 本製品の部品および仕上がりについて瑕疵がない ことを保証します。 この保証期間内に製品に瑕疵が見つかった場合、 Blackmagic Design は弊社の裁量 において部品代および人件費無料で該当製品の修理、 あるいは製品の交換のいずれかで対応いたします。 この保証に基づいたサービスを受ける際、 お客様は必ず保証期限終了前に Blackmagic Design に瑕疵を 通知し、 適応する保証サービスの手続きを行ってください。 お客様の責任において不良品を梱包 し、 Blackmagic Design が指定するサポートセンターへ配送料前払で送付いただきますようお願い致しま す。 理由の如何を問わず、 Blackmagic Design への製品返送のための配送料、 保険、 関税、 税金、 その他 すべての費用はお客様の自己負担となります。 不適切な使用、 または不十分なメンテナンスや取扱いによる不具合、 故障、 損傷に対しては、 この保証は 適用されません。...
-
Page 94: Français
Manuel d'utilisation et d'installation Blackmagic Video Assist Janvier 2017 Français... - Page 95 Le Blackmagic Video Assist intègre une entrée 6G-SDI pour le monitoring Ultra HD. Le Blackmagic Video Assist 4K enregistre en continu de l’Ultra HD sur deux cartes SD et est équipé d’un enregistreur audio puissant afin de mélanger l’audio analogique et les signaux SDI et HDMI.
- Page 96 Blackmagic Video Assist Mise en route enregistrés sur carte SD Tester la vitesse du support Brancher l'alimentation Brancher la vidéo Blackmagic Video Assist Setup Brancher l'audio Utiliser DaVinci Resolve Insertion de cartes SD Importation des clips Enregistrement Montage des clips Contrôle à...
-
Page 97: Mise En Route
Mise en route Brancher l'alimentation Pour mettre en route votre Blackmagic Video Assist, il suffit de le brancher à une source d’alimentation, de connecter une source vidéo et d’insérer une carte SD. Pour l’alimenter, branchez l’adaptateur fourni à l’entrée d’alimentation située sur la face latérale Cette section vous droite du Video Assist. -
Page 98: Brancher La Vidéo
Lorsque vous branchez une vidéo, l'audio est également pris en charge, car il est intégré aux signaux vidéo SDI et HDMI. Cependant, le Blackmagic Video Assist 4K dispose de mini connecteurs XLR afin de brancher de l'audio analogique symétrique externe. -
Page 99: Insertion De Cartes Sd
éjectée, saisissez-la par les bords et retirez-la du logement. C'est tout ce que vous devez savoir pour démarrer ! Le Blackmagic Video Assist 4K est désormais alimenté, les sources vidéo connectées et les cartes SD formatées, vous êtes prêt à tourner ! Pour commencer à... -
Page 100: Contrôle À Distance Via Le Connecteur Lanc
2.5mm, situé sur la face droite de l'appareil. Enregistrement en continu Le Blackmagic Video Assist 4K prend en charge l'enregistrement continu sur deux cartes SD. Si vous enregistrez un événement important qui ne doit pas être interrompu, insérez simplement une carte formatée dans la deuxième fente pour carte SD. -
Page 101: Enregistrement D'un Signal Hdmi "Propre" Provenant De Boîtiers Dslr
Lecture Les fonctions de lecture du Blackmagic Video Assist sont très faciles à utiliser. Il suffit de balayer l'écran tactile vers le haut ou vers le bas pour faire apparaître les informations à l'écran. Touchez ensuite les commandes de transport au bas de l'écran LCD. -
Page 102: Menu Paramètres
Menu Paramètres Réglage des paramètres sur l'écran tactile Le Blackmagic Video Assist intègre un écran tactile qui permet de contrôler la vidéo et l'audio, mais aussi de régler les paramètres. Vous pouvez changer les paramètres en appuyant sur les icônes de la barre d'état située au-dessus de l'écran. - Page 103 Vous disposez également de paramètres qui vous permettent de choisir la sensibilité du contour. Sur le Blackmagic Video Assist 4K, vous pouvez aussi modifier sa couleur. Pour activer le contour et modifier le niveau de sensibilité, touchez les flèches gauche et droite ou déplacez le curseur vers la gauche ou vers la droite.
- Page 104 Les repères de cadrage suivants sont disponibles : HDTV Affiche les zones d'action et de sécurité de votre image avec un rapport d'image de 1.78:1 compatible avec les écrans d'ordinateur et de télévision HD 16:9. Affiche un rapport d'image de 4:3 compatible avec les écrans de télévision SD, ou pour faciliter le cadrage des prises si vous utilisez des adaptateurs anamorphiques 2x.
- Page 105 HD en codecs Apple ProRes et Avid DNxHD dans plusieurs débits binaires. Sur le Blackmagic Video Assist 4K, vous pouvez aussi choisir des codecs ProRes et DNxHR pour l’enregistrement en Ultra HD.
- Page 106 Never. Fonction T/C Run Lorsque la fonction T/C Run est sélectionnée, le Blackmagic Video Assist démarre l'enregistrement dès qu'il détecte une activité sur le timecode de la source SDI ou HDMI. L'enregistrement s'arrête lorsque le timecode s'arrête. Cette fonction est très utile lorsque vous connectez des caméras qui ne prennent pas en charge le démarrage/l'arrêt de l'enregistrement via SDI.
- Page 107 été connectée. Lorsqu'une autre source est connectée, le Blackmagic Video Assist bascule sur cette source si le signal de la source originale est perdu pendant quelques instants. Cette redondance peut s’avérer utile si vous avez besoin d'avoir un signal de secours.
- Page 108 Quand la carte est pleine, l'indicateur devient rouge et l'enregistrement s'interrompt. Le Video Assist sauvegarde alors le dernier fichier enregistré. Si une carte formatée est insérée dans la deuxième fente du Blackmagic Video Assist 4K, l'appareil bascule automatiquement sur cette fente et continue donc d'enregistrer.
-
Page 109: Niveaux Et Volume Audio Analogique
Niveaux et volume audio analogique Volume du haut-parleur Pour régler le volume du haut-parleur intégré au Blackmagic Video Assist 4K, balayez l’écran vers le haut ou vers le bas pour faire apparaître les outils de mesure. Appuyez ensuite sur les vumètres pour ouvrir les paramètres du volume et du niveau audio analogique. -
Page 110: Paramètres Storage, Display, Audio Et Setup
SD. Vous pourrez également régler les paramètres d’affichage et configurer la date et l’heure. Sur le Blackmagic Video Assist 4K, il est également possible de régler les paramètres audio. Pour masquer les paramètres et afficher votre image, balayez l’écran vers la gauche ou vers la droite, ou touchez l’icône de retour en bas à... - Page 111 Affichage de la LUT 3D Le Blackmagic Video Assist peut afficher l’entrée vidéo à laquelle la LUT 3D a été appliquée. La LUT 3D est uniquement affichée à l’écran et n’est pas enregistrée sur la vidéo. Ainsi, le rendu de l’image enregistrée ne sera pas permanent.
- Page 112 Assist à l’aide de l’utilitaire Blackmagic Video Assist Setup. Pour contrôler la vidéo à l’aide de LUTs : Ouvrez les paramètres Monitor du Video Assist en balayant l’écran tactile vers la gauche ou vers la droite, puis en touchant Monitor dans la barre de menu.
- Page 113 Paramètres Setup Les paramètres Setup permettent de régler la date et l'heure du Blackmagic Video Assist. De plus, ils permettent d'afficher le nom de l'appareil, la langue et les versions du logiciel interne. Configuration de la date et de l'heure Si ces informations sont correctement réglées, la date et l'heure d'enregistrement de chaque clip...
-
Page 114: Monitoring Avec Des Outils De Mesure À L'écran
Appuyez sur Save pour confirmer le changement. Monitoring avec des outils de mesure à l'écran Le Blackmagic Video Assist comprend plusieurs scopes très utiles. Il dispose notamment d'un histogramme qui vous permet de vérifier l'exposition et la luminance de votre caméra et d'un vumètre pour le contrôle des sources audio. -
Page 115: À Propos Des Cartes Sd
Pour enregistrer de l'Ultra HD avec le Blackmagic Video Assist 4K, vous devez utiliser les cartes UHS-II les plus puissantes du marché. Consultez le tableau ci-dessous pour connaître les cartes SD les plus récentes pour enregistrer de la vidéo Ultra HD, HD et SD. -
Page 116: Formatage De Cartes Sd Avec Le Blackmagic Video Assist
Balayez l'écran vers la gauche ou vers la droite ou appuyez sur l'icône de la carte pour ouvrir les paramètres Storage. Appuyez sur l'icône Format card. Sur le Blackmagic Video Assist 4K, appuyez sur l'icône correspondant à la carte que vous souhaitez utiliser. Par exemple, Format card 1 ou Format card 2. -
Page 117: Formater Des Cartes Sd À L'aide D'un Ordinateur
Formater des cartes SD à l'aide d'un ordinateur Les cartes SD peuvent également être formatées à l’aide d’un ordinateur macOS ou Windows. Préparer une carte SD sur un ordinateur macOS Utilisez l’utilitaire de disque fourni avec macOS pour formater ou initialiser votre carte SD au format HFS+ ou exFAT. -
Page 118: Enregistrés Sur Carte Sd
Windows équipé d’une fente pour carte SD ou au moyen d’un lecteur SD. Retirez la carte SD de votre Blackmagic Video Assist et insérez-là dans la fente pour carte SD de votre ordinateur ou dans votre lecteur SD. Vous pouvez accéder à la carte SD de la même manière qu’à... -
Page 119: Tester La Vitesse Du Support
Les paramètres Configure du Blackmagic Video Assist Setup affichent la version du logiciel interne exécutée sur le Blackmagic Video Assist. Cette section vous permet également de changer le nom de votre appareil. Cliquez simplement dans le champ de modification Name et saisissez le nom que vous souhaitez utiliser. - Page 120 Des mises à jour pour le Blackmagic Video Assist seront régulièrement disponibles sur le site Internet de Blackmagic Design. Nous vous recommandons de télécharger le logiciel et de mettre à jour votre Blackmagic Video Assist afin de bénéficier des fonctions les plus récentes et de toutes les améliorations disponibles.
-
Page 121: Utiliser Davinci Resolve
Utiliser DaVinci Resolve DaVinci Resolve Capturer des clips avec le Blackmagic Video Assist fait bien entendu parti du processus de création de contenu télévisuel et cinématographique, mais il faut aussi sauvegarder et organiser les médias, effectuer le montage, l’étalonnage et l’encodage des fichiers master. DaVinci Resolve pour macOS et Windows est inclus avec le Blackmagic Video Assist. -
Page 122: Importation Des Clips
Vous trouverez ci-dessous des informations relatives à l'utilisation de DaVinci Resolve avec des clips vidéo. Il va sans dire que DaVinci Resolve est un outil ultra performant et que son interface utilisateur renferme de nombreuses fonctionnalités. Pour en apprendre plus sur l'utilisation de DaVinci Resolve, consultez le manuel d'utilisation DaVinci Resolve que vous trouverez sur la même carte que le logiciel DaVinci Resolve. -
Page 123: Montage Des Clips
Montage des clips Maintenant que vos clips se trouvent dans la bibliothèque de médias, cliquez sur l'onglet Edit pour accéder à la page Edit. Vous pouvez à présent commencer votre montage ! Tout d’abord, il faut créer une nouvelle timeline. Faites un clic droit dans la bibliothèque de média et sélectionnez Timelines >... -
Page 124: Raccord Des Clips
Page Edit. Vous pouvez rogner les clips, changer leur ordre et leur ajouter des transitions à l'aide de la timeline. Raccord des clips Lorsque vous montez des clips, vous pouvez rogner chaque prise pour n'inclure que les images souhaitées. Il y a plusieurs façons de le faire, mais la plus simple est d'ajuster les points d'entrée et de sortie du clip sur la timeline : Après avoir ajouté... -
Page 125: Mappage Des Raccourcis Clavier
Mappage des raccourcis clavier Si vous avez l'habitude d'utiliser des raccourcis clavier avec d'autres logiciels de montage, vous pouvez facilement mapper vos propres raccourcis dans DaVinci Resolve pour être plus rapide et optimiser votre workflow. Pour mapper vos propres raccourcis clavier : Cliquez sur la roue dentée en bas à... -
Page 126: Ajout De Titres
Pour ajouter un fondu enchaîné entre deux clips : Assurez-vous qu'il y ait deux clips montés ensemble sur la timeline. Cliquez sur le bouton Effects Library dans la barre d'outils située en haut de la page Edit, et veillez à ce que le panneau Toolbox soit ouvert. -
Page 127: Ajout De Pistes Audio
Faites glisser le titre de votre choix de la palette Titles et déposez-le dans une piste vide. Ajout de pistes audio Si vous souhaitez ajouter de nombreux effets et de la musique à un montage son, vous pouvez facilement ajouter des pistes audio selon vos besoins. Pour ajouter une piste audio : Faites un clic droit à... -
Page 128: Étalonnage Des Clips
Étalonnage des clips Une fois la séquence de clips montée, vous pouvez commencer l'étalonnage. Il est préférable d'effectuer l'étalonnage lorsque le montage de la séquence est terminé pour conserver un rendu homogène, toutefois le logiciel DaVinci Resolve vous permet de passer de la page Edit à la page Color pour apporter des petites modifications et découvrir de nouvelles fonctions créatives. - Page 129 Le scope Parade vous permet d’optimiser les tons clairs, les tons moyens et les ombres. Les roues chromatiques Lift, Gamma, Gain et Offset vous offrent un contrôle complet sur l’équilibre des couleurs et des tons de vos clips. Pour régler toutes les couleurs de façon identique, tournez la roue située sous les roues chromatiques.
-
Page 130: Correction Colorimétrique Secondaire
Vous pouvez également utiliser la palette Curves pour faire vos corrections colorimétriques primaires. Pour créer des points de contrôle, il suffit de cliquer sur la ligne diagonale dans le graphique Curves. Vous pouvez ensuite les déplacer vers le haut ou vers le bas pour ajuster le contraste RVB principal et obtenir différentes tonalités dans l'image. -
Page 131: Ajout D'une Power Window
Pour sélectionner une couleur : Créer un nouveau nœud série (Serial node). Ouvrez la palette Qualifier et vérifiez que la pipette d'échantillonnage Colour Range est bien sélectionnée. Cliquez sur la couleur du clip que vous souhaitez modifier. Il est en général nécessaire d'adoucir les contours afin de limiter la sélection à la couleur souhaitée. -
Page 132: Tracking D'une Power Window
Les Power Windows vous permettent d'effectuer des corrections secondaires sur certaines parties de l'image. Tracking d'une Power Window Lorsque la caméra, l'objet ou la zone de votre prise bougent, utilisez l’outil de tracking disponible dans DaVinci Resolve pour garantir le suivi complet de la zone sélectionnée. Le Tracker analyse les mouvements de la caméra ou de l'objet pour que la fenêtre s'adapte à... -
Page 133: Utilisation De Plug-Ins
En général, le suivi automatique fonctionne sans problème, cependant, certaines scènes peuvent être complexes ou des objets peuvent se trouver devant la zone sélectionnée et ainsi interrompre ou affecter le suivi. Ce problème peut être résolu à l'aide de l'éditeur d'image. Consultez le manuel DaVinci Resolve pour en savoir plus. - Page 134 Juste au-dessus de la timeline, vous verrez que la case entire timeline est sélectionnée. Cela exportera l’intégralité de la timeline, cependant, vous pouvez sélectionner une partie de la timeline si vous le souhaitez. Choisissez simplement in/out range puis utilisez les raccourcis clavier i et o pour sélectionner les points d’entrée et de sortie sur la timeline.
-
Page 135: Workflow De Post-Production
Workflow de post-production Travailler avec un logiciel tiers Si vous souhaitez utiliser votre logiciel préféré, vous pouvez copier vos clips sur un lecteur interne/ externe ou sur un RAID puis les importer dans le logiciel. Si vous le souhaitez, vous pouvez monter vos clips directement dans la carte SD. Utiliser Final Cut Pro X Pour monter vos clips Apple ProRes à... -
Page 136: Utiliser Adobe Premiere Pro Cc
Sélectionnez le chutier dans lequel vous souhaitez importer vos fichiers. Sélectionnez File>AMA Link... puis les fichiers que vous souhaitez importer. Cliquez ensuite sur OK. Lorsque les clips apparaissent dans le chutier, vous pouvez faire glisser vos clips dans la timeline et commencer le montage. -
Page 137: Utiliser Autodesk Smoke 2013
Utiliser Autodesk Smoke 2013 Pour monter vos clips avec Autodesk Smoke 2013, créez un nouveau projet qui correspond au format vidéo, à la profondeur de bit, au type d’image et à la fréquence d’image de vos clips. Dans cet exemple, les clips sont réglés sur ProRes 422 HQ 1080p25. Lancez Smoke. -
Page 138: Assistance
Assist pour connaître le numéro de version. Comment obtenir les dernières mises à jour du logiciel Après avoir vérifié quelle version du logiciel Blackmagic Video Assist Setup est installée sur votre ordinateur, veuillez vous rendre au centre de support technique Blackmagic Design à l’adresse suivante www.blackmagicdesign.com/fr/support pour vérifier les dernières mises à... -
Page 139: Garantie
Garantie Garantie limitée à 12 mois Par la présente, Blackmagic Design garantit que ce produit sera exempt de défauts matériels et de fabrication pendant une durée de un an à compter de la date d'achat. Si un produit s’avère défectueux pendant la période de garantie, Blackmagic Design peut, à sa seule discrétion, réparer le produit défectueux sans frais pour les pièces et la main-d’œuvre, ou le remplacer. -
Page 140: Deutsch
Installations- und Bedienungsanleitung Blackmagic Video Assist Januar 2017 Deutsch... - Page 141 Master-Rekorder für einen Live-Produktionsmischer an. Der in den Blackmagic Video Assist verbaute 6G-SDI-Eingang gestattet das Monitoring von Ultra HD. Der Blackmagic Video Assist 4K zeichnet Ultra HD auf zwei SD-Karten auf und kann so kontinuierlich aufnehmen. Überdies fungiert er als leistungsfähiger Audiorekorder, mit dem Sie Analogaudio in die SDI- oder HDMI-Aufzeichnung mischen können.
- Page 142 Inhaltsverzeichnis Blackmagic Video Assist Erste Schritte Geschwindigkeit Anschließen an das Stromnetz Blackmagic Video Assist Setup Anschließen von Videogeräten Anwendung von DaVinci Resolve Anschließen von Audiogeräten Das Importieren von Clips Einlegen von SD-Karten Schneiden Ihrer Clips Aufzeichnung Das Trimmen von Clips Fernbedienung über den...
-
Page 143: Erste Schritte
So einfach geht die Inbetriebnahme Ihres Blackmagic Video Assist: Stromkabel einstecken, Videoquelle anschließen und eine SD-Karte einlegen. Stecken Sie das mitgelieferte Netzteil in die Strombuchse an der rechten Seite Ihres Video Assist, um den Monitor mit Strom zu versorgen. Bei angeschlossener externer Stromquelle können Sie auch zwei Lithium-Ionen-Akkus des... -
Page 144: Anschließen Von Videogeräten
SDI-Monitor wird über den HDMI- bzw. SDI-Ausgang angeschlossen. Koppeln Sie ein Headset an die Kopfhörerbuchse, damit Sie bei der Aufnahme und Wiedergabe den Ton Ihrer Clips anhören können. Beim Blackmagic Video Assist 4K Modell können Sie Ihr Audio alternativ über den eingebauten unter dem LCD Lautsprecher anhören. -
Page 145: Einlegen Von Sd-Karten
Kompression aufnehmen, geht dies ggf. auch mit langsameren Karten. Allgemein gilt: Je schneller die Karte, desto besser. Für Aufzeichnungen von Ultra HD mit dem Blackmagic Video Assist 4K empfehlen wir Hochgeschwindigkeits-SD-Karten des Typs UHS-II. Um in Ultra-HD-Formaten bis 2160p/30 aufzunehmen, müssen die Karten Schreibgeschwindigkeiten über 110 MB/s meistern. Das Blackmagic Video Assist 4K Modell ist mit zwei SD-Kartenschächten ausgerüstet. -
Page 146: Fernbedienung Über Den Lanc-Verbinder
Sie können Ihre Clips mithilfe von Codecs wie Apple ProRes und Avid DNx in QuickTime-Dateien aufzeichnen. Alternativ geben Sie Ihrem Blackmagic Video Assist vor, die Aufnahme per Timecode oder per „Trigger Recording“ über SDI-Start/-Stopp auszulösen. In diesen Modi wird der Start und Stopp der Aufnahme durch die im eingehenden HD-SDI-oder HDMI-Signal enthaltenen Informationen ausgelöst. -
Page 147: Sauberes Hdmi Von Dslr-Kameras Aufzeichnen
Prüfen Sie bei verborgenem Bildschirmdisplay sorgfältig, dass in der Videoausgabe Ihrer DSLR- Kamera außer dem sauberen Videobild keinerlei weitere Informationen sichtbar sind. Sind auf dem LCD Ihres Blackmagic Video Assist Kamera-Overlays zu sehen, so schalten Sie in den Einstellungen für die HDMI-Ausgabe oder für das Anzeigemenü Ihrer Kamera die HDMI-Overlays aus. -
Page 148: Einstellungen
Loop-Wiedergabe Tippen Sie das Loop-Symbol auf Ihrem Blackmagic Video Assist an, um den aktuellen Clip in einer Endlosschleife wiederzugeben. Tippen Sie das Symbol erneut an, um all Ihre aufgezeichneten Clips in einer Endlosschleife wiederzugeben. Ein drittes Antippen schaltet die Loop-Wiedergabe aus. - Page 149 Fokussieren Ihrer Bilder. Focus Peaking versieht die schärfsten Bereiche des Bildes mit Kantenlinien. Über die Empfindlichkeitseinstellungen bestimmen Sie, wie ausgeprägt diese Linien dargestellt werden. Beim Blackmagic Video Assist 4K können Sie auch die Farbe der Kantenlinien vorgeben. Tippen Sie auf die Pfeile oder ziehen Sie den Schieberegler nach links oder rechts, um die Kantenlinien zu aktivieren und die Empfindlichkeitseinstellungen zu ändern.
- Page 150 In „Guides“ stehen Ihnen folgende Bildrandmarkierungen zur Wahl: HDTV Zeigt Action- und Titel-sichere Bereiche Ihres Bildes innerhalb eines 1.78:1- Seitenverhältnisses an, das mit dem 16:9-Format von HD-Fernseh- und Computer-Bildschirmen kompatibel ist. Zeigt das mit SD-Fernsehbildschirmen kompatible 4:3-Seitenverhältnis an und hilft zudem bei der Kadrierung mit 2x anamorphotischen Adaptern.
- Page 151 Pfeilsymbole oder den Schieberegler, um Ihre Auswahl zu treffen. Welche Codecs verfügbar sind, hängt vom verwendeten Modell ab. Zum Beispiel können beide Modelle HD-Video in den Codecs Apple ProRes und Avid DNxHD mit unterschiedlichen Bitraten aufzeichnen. Der Blackmagic Video Assist 4K ermöglicht auch den Einsatz von DNxHR-Codecs, um in Ultra HD aufzuzeichnen.
- Page 152 Um die Trigger-Aufzeichnung zu deaktivieren, wählen Sie „Never“ (Nie). „T/C Run“ Wenn „T/C Run“ (Timecode-aktiviert) ausgewählt ist, beginnt Ihr Blackmagic Video Assist mit der Aufnahme, sobald er laufenden Timecode in Ihrer SDI- oder HDMI-Quelle erkennt. Wenn der Timecode stoppt, wird auch die Aufnahme abgebrochen. Eine nützliche Funktion für angeschlossene Kameras, die keine Aufnahmeauslösung über SDI-Start/Stopp unterstützen.
- Page 153 „Card“ Zeigt den Status der in den Speichereinstellungen aktuell ausgewählten SD-Karte an. Das Blackmagic Video Assist 4K Modell verfügt über zwei SD-Kartenschächte. So geben Sie die zu bespielende Karte vor: Öffnen Sie die STORAGE-Einstellungen (Speicher), indem Sie auf den „Card“-Button tippen oder auf dem Touchscreen nach links oder rechts wischen.
- Page 154 Ladevorgang je nach Akkutyp und -zustand rund drei Stunden. Mit zwei voll geladenen Akkus des Typs Canon LP-E6 kann der Blackmagic Video Assist ca. 180 Minuten lang aufzeichnen. Das Blackmagic Video Assist 4K Modell bietet mit zwei voll geladenen Canon LP-E6-Akkus eine Aufzeichnungsdauer von ca.
-
Page 155: Lautstärke Und Analog-Audiopegel
Lautstärke und Analog-Audiopegel Lautsprecherlautstärke Rufen Sie zum Justieren der Lautstärke des in den Blackmagic Video Assist 4K eingebauten Lautsprechers zunächst mit einer Auf- oder Abwärtswischgeste auf dem LCD die Bildschirm- Messanzeigen ab. Tippen Sie dann auf die Audio-Pegelmeter, um die Einstellungen für die Lautstärke und die Analog-Audiopegel zu öffnen. -
Page 156: Die Einstellungen Storage, Monitor, Display, Audio
Informationen zu öffnen. Hier können Sie die Speicherinformationen Ihrer SD-Karte überprüfen, Ihre Karte formatieren, Monitor- und Display-Einstellungen anpassen sowie Datum und Uhrzeit vorgeben. Beim Modell Blackmagic Video Assist 4K werden hier überdies die Audioeinstellungen justiert. Wischen Sie nach rechts oder links, um die Einstellungen zu verbergen und zum Videobild zurückzukehren. - Page 157 Es besteht also keine Gefahr, dass ein Look dauerhaft in Ihr Bild eingebrannt wird. Wenn Sie die gleiche LUT für ein Bild in DaVinci Resolve nutzen möchten, können Sie genau dieselbe LUT-.cube-Datei, die Sie mit dem Video Assist verwendet haben, in DaVinci Resolve importieren und dort für die Farbkorrektur verwenden.
- Page 158 Sie bis zu sechs 3D-LUTs für Ihren Video Assist laden So nehmen Sie das Video-Monitoring mit LUTs vor: Öffnen Sie die MONITOR-Einstellungen auf Ihrem Video Assist, indem Sie auf dem Touchscreen nach links oder rechts wischen. Tippen Sie dann in der Menü-Leiste auf MONITOR.
- Page 159 Pegel für den jeweiligen Eingang vor. Dies begründet sich in der geringeren Stärke der von Mikrofonen ausgegebenen Signale im Vergleich zu Geräten mit Leitungspegelausgaben. Mit dieser Einstellung verstärkt Ihr Blackmagic Video Assist 4K das Signal und optimiert so den Aufzeichnungspegel.
-
Page 160: Monitoring Mit Bildschirm-Messwertanzeigen
Tippen Sie auf „Save“, um die Änderung zu bestätigen. Monitoring mit Bildschirm-Messwertanzeigen Der Blackmagic Video Assist bietet Ihnen nützliche Scopes wie bspw. ein Histogramm zur Überprüfung des Belichtungs- und Luminanzspektrums von Kameras sowie Aussteuerungsmesser, mit denen Sie die Pegel der Audioquelle kontrollieren können. -
Page 161: Infos Zu Sd-Karten
Audiopegel für einzelne Kanäle anzuheben oder zu senken Passen Sie die analogen Audiopegel auf Ihrem Blackmagic Video Assist 4K an, indem Sie die Audiopegelmeter antippen und anschließend die Schieberegler für einzelne Kanäle nach links oder rechts ziehen. -
Page 162: Sd-Karten Mit Ihrem Video Assist Formatieren
Wischen Sie auf dem Touchscreen nach links oder rechts, oder tippen Sie oben rechts auf auf das Kartenstatus-Menü „Card“, um die STORAGE-Einstellungen zu öffnen. Tippen Sie auf den Button „Format Card“. Tippen Sie beim Blackmagic Video Assist 4K Modell auf den entsprechenden Button für Ihre ausgewählte Karte. Bspw. auf „Format Card 1“... -
Page 163: Sd-Karten Mit Einem Computer Formatieren
SD-Karten mit einem Computer formatieren SD-Karten können auch auf einem Computer unter macOS oder Windows formatiert werden. Vorbereiten von SD-Karten auf einem macOS-Computer Formatieren oder initialisieren Sie Ihre SD-Karte mit dem Festplatten-Dienstprogramm (Disk Utility) unter macOS in HFS+ oder exFAT. Wenn Ihre SD-Karte bereits mit Dateien bespielt ist, sichern Sie diese unbedingt vorher, da der Formatierungsvorgang alle vorhandenen Daten überschreibt. -
Page 164: Arbeiten Mit Dateien Von Sd-Karten
über jeden beliebigen macOS- oder Windows-Computer mit SD-Kartensteckplatz oder angeschlossenem SD-Kartenlesegerät. Entnehmen Sie die SD-Karte aus Ihrem Blackmagic Video Assist und führen Sie diese in den SD-Kartensteckplatz Ihres Computers oder ein SD-Kartenlesegerät ein. Der Zugriff auf die SD-Karte erfolgt genauso, wie auf eine externe Festplatte, ein USB-Laufwerk oder ein anderes Speichermedium, das an Ihren Computer angeschlossen ist. -
Page 165: Geschwindigkeit
Einstellungen konfigurieren Die Konfigurationseinstellungen „Configure“ des Dienstprogramms Blackmagic Video Assist Setup zeigen die aktuell auf Ihrem Blackmagic Video Assist installierte Produktsoftwareversion an. Hier können Sie auch den Gerätenamen ändern. Klicken Sie einfach auf das Eingabefeld „Name“ und tippen mit Ihrem Computer-Keyboard einen neuen Namen ein. - Page 166 Aktualisierung der Produktsoftware Von Zeit zu Zeit werden Updates für die Produktsoftware Ihres Blackmagic Video Assist auf der Blackmagic Design Website bereitgestellt. Wir empfehlen Ihnen, Software-Updates herunterzuladen und Ihren Blackmagic Video Assist zu aktualisieren, um von neuen Features und Verbesserungen zu profitieren.
-
Page 167: Anwendung Von Davinci Resolve
Masterdateien. DaVinci Resolve für macOS und Windows wird Ihnen zusammen mit Ihrem Blackmagic Video Assist geliefert und ist Ihre Komplettlösung für die Aufzeichnung und Postproduktion! Nachdem Ihre SD-Karte an den Rechner gekoppelt ist, können Sie mithilfe des „Clone“-Tools von DaVinci Resolve in der Medienverwaltung beim Dreh fortlaufend Backups erstellen. -
Page 168: Das Importieren Von Clips
Hier erklären wir Ihnen die ersten Schritte, wie Sie Ihre aufgenommenen Clips mit DaVinci Resolve bearbeiten. Da DaVinci Resolve eine hochkomplexe Software ist, sind darin natürlich viel mehr Features enthalten, als ein erster Blick auf die Bedienoberfläche ahnen lässt. Um mehr über die Anwendung von DaVinci Resolve zu erfahren, sehen Sie bitte in das englischsprachige Bedienungshandbuch, das Sie als PDF auf der SD-Karte mit der DaVinci Resolve Software finden. -
Page 169: Schneiden Ihrer Clips
Schneiden Ihrer Clips Klicken Sie jetzt, wo sich Ihre Clips im Media Pool befinden, auf die Registerkarte „Edit“ (Schnitt), um den „Edit“-Arbeitsraum zu öffnen. Jetzt können Sie den Schnitt aufnehmen! Erstellen Sie zunächst eine neue Timeline. Führen Sie im Media Pool einen Rechtsklick aus und wählen Sie „Timelines“... -
Page 170: Das Trimmen Von Clips
Der „Edit“-Arbeitsraum. Sie können Ihre Clips trimmen, ihre Reihenfolge ändern, sie hin und her bewegen und mithilfe des Timeline-Editors Übergänge einfügen Das Trimmen von Clips Zum Schnitt Ihrer Clips gehört das Trimmen bzw. Beschneiden, um nur die gewünschte Action in einzelne Bildsequenzen aufzunehmen. -
Page 171: Einrichten Von Tastenkürzeln
Einrichten von Tastenkürzeln Wer mit Tastenkürzeln und dem Gebrauch anderer Schnittsoftware vertraut ist, kann in DaVinci Resolve bequem eigene Kürzel anlegen. So arbeitet man schneller und optimiert seinen Workflow. So richten Sie eigene Tastenkürzel ein: Klicken Sie im DaVinci Arbeitsraum unten rechts auf das Zahnradsymbol zur Projekteinrichtung. Wählen Sie dann aus der Einstellungsliste „Keyboard Mapping“... -
Page 172: Hinzufügen Von Titeln
So fügen Sie eine Überblendung zwischen zwei Clips ein: Vergewissern Sie sich, dass in der Timeline zwei Clips direkt nebeneinander geschnitten sind. Klicken Sie auf „Effects Library“ (Effektebibliothek) im Toolbar oberhalb des Arbeitsraums „Edit“ und vergewissern Sie sich, dass die Schaltfläche „Toolbox“ geöffnet ist. Klicken Sie auf den „Cross Dissolve“-Übergang, ziehen Sie diesen in Ihre Timeline und fahren Sie damit über den Schnittpunkt zwischen den beiden Clips. -
Page 173: Hinzufügen Von Audiospuren
Ziehen Sie eine Titelart aus dem „Titles“-Menü und legen Sie sie auf eine leere Spur Hinzufügen von Audiospuren Wenn Sie einen komplexen Tonschnitt mit vielen Toneffekten und Musik mischen wollen, können Sie bei Bedarf mühelos weitere Audiospuren hinzufügen. So fügen Sie eine Audiospur hinzu: Führen Sie neben dem Namen der letzten Audiospur in Ihrer Timeline einen Rechtsklick aus und wählen Sie „Add Track“... -
Page 174: Die Farbkorrektur Ihrer Clips
Die Farbkorrektur Ihrer Clips Sobald Sie Ihre Clipsequenz geschnitten haben, können Sie mit der Farbkorrektur beginnen. Für einen einheitlichen Look empfiehlt es sich, die farbliche Nachbearbeitung erst nach fertigem Schnitt vorzunehmen. Das Tolle an DaVinci Resolve ist aber, dass Sie zwischen dem „Edit“- und „Color“- Arbeitsraum hin und her wechseln können, um Feinabstimmungen vorzunehmen und neue kreative Möglichkeiten zu entdecken. - Page 175 Optimieren Sie anhand des Parade-Scopes die Highlights, Mitteltöne und Schatten Die Farbräder „Lift“, „Gamma“, „Gain“ und „Offset“ geben Ihnen die volle Kontrolle über die farbliche und tonale Balance Ihrer Clips. Ziehen Sie das Einstellrad unter den Farbrädern hin und her, um für jede Farbe eines jeden tonalen Bereichs ganzheitliche Anpassungen vorzunehmen Anpassen von „Lift“...
-
Page 176: Sekundäre Farbkorrektur
Sie können anhand der Kurven-Feature auch primäre Farbkorrekturen vornehmen. Erstellen Sie per Klick einfach Steuerpunkte auf der diagonalen Linie im Kurvendiagramm und ziehen Sie diese nach oben oder unten, um die Haupteinstellungen des RGB-Kontrasts für verschiedene Tonwertbereiche im Bild anzupassen. Am besten lassen sich Punkte im unteren Drittel, in der Mitte sowie im oberen Drittel der Kurve anpassen. -
Page 177: Hinzufügen Eines Power Windows
So qualifizieren Sie eine Farbe: Fügen Sie einen neuen „Serial Node“ (Serieller Node) hinzu. Öffnen Sie das Fenster „Qualifier“ (Qualifizierer) und vergewissern Sie sich, dass das Pipetten-Tool „Color Range“ ausgewählt ist. Klicken Sie in Ihrem Clip auf die Farbe, die Sie bearbeiten möchten. In der Regel werden Sie einige Anpassungen vornehmen müssen, um die Kanten Ihrer Auswahl weichzuzeichnen und den Bereich ausschließlich auf die gewünschte Farbe zu begrenzen. -
Page 178: Tracking Mit Einem Power Window
Power Windows lassen Sie in bestimmten Bereichen Ihres Bildes sekundäre Korrekturen vornehmen Tracking mit einem Power Window Die Kamera, das Objekt oder der Bereich in Ihrer Aufnahme bewegt sich gegebenenfalls. Um sicherzustellen, dass das Power Window auf dem ausgewählten Objekt oder Bereich haften bleibt, müssen Sie das leistungsstarke Tracking-Tool von DaVinci Resolve zu Hilfe nehmen. -
Page 179: Mit Plug-Ins Arbeiten
Meist ist das automatische Tracking erfolgreich. In komplexen Szenen kommt es jedoch gelegentlich vor, dass ein Objekt sich an Ihrem ausgewählten Bereich vorbei bewegt und damit das Tracking unterbricht oder stört. Dies kann manuell mithilfe des Keyframe-Editors gelöst werden. Näheres dazu finden Sie im englischsprachigen DaVinci Resolve Handbuch. - Page 180 Direkt über der Timeline befindet sich ein Optionskästchen, in dem „Entire Timeline“ (Gesamte Timeline) ausgewählt ist. Dies bedeutet, dass die gesamte Timeline exportiert wird. Falls gewünscht, können Sie jedoch auch nur einen Bereich der Timeline festlegen. Wählen Sie „In/Out Range“ und bestimmen Sie mithilfe der Shortcuts „i“ und „o“ die In- und Out-Points in Ihrer Timeline.
-
Page 181: Postproduktions-Workflow
Postproduktions-Workflow Mit Fremdhersteller-Software arbeiten Zur Bearbeitung von Clips mit Ihrer bevorzugten Schnittsoftware können Sie die Clips auf ein internes/externes Laufwerk oder einen RAID kopieren und die Clips anschließend in die Software importieren. Bei Bedarf ist es sogar möglich, Ihre Clips direkt von der SD-Karte zu schneiden. Anwendung von Final Cut Pro X Um Clips im Apple ProRes-Format mit Final Cut Pro X zu bearbeiten, müssen Sie ein neues Projekt erstellen, das dem Videoformat und der Framerate Ihrer Clips entspricht. -
Page 182: Anwendung Von Adobe Premiere Pro Cc
Wählen Sie „Tools“ > „Background Services“ (Tools > Hintergrunddienste) aus. Klicken Sie, wenn „Background Services“ noch nicht aktiviert ist, auf „Start“ und dann auf „OK“. Wählen Sie die Media-Bin aus, in die Sie Ihre Dateien importieren möchten. Gehen Sie auf „File“ > „AMA Link…“, wählen Sie die zu importierenden Dateien aus und klicken dann auf „OK“. -
Page 183: Anwendung Von Autodesk Smoke 2013
Anwendung von Autodesk Smoke 2013 Erstellen Sie zum Bearbeiten Ihrer Clips in Autodesk Smoke 2013 ein neues Projekt, das dem Videoformat, der Bittiefe, dem Frametyp und der Framerate Ihrer Clips entspricht. In diesem Beispiel wurden die Clips in ProRes 422 HQ 1080p/25 aufgezeichnet. Beim Starten von Smoke erscheinen die Fenster „Project“... -
Page 184: Hilfe
Programme (Applications). Wählen Sie im Anwendungsmenü „About Blackmagic Video Assist Setup“, um die Versionsnummer nachzusehen. Öffnen Sie unter Windows 7 die Blackmagic Video Assist Setup Software über das Menü ‚ „Start“. Klicken Sie auf das Menü „Hilfe“ und wählen Sie „About Blackmagic Video Assist Setup“... -
Page 185: Garantie
Garantie 12 Monate eingeschränkte Garantie Für dieses Produkt gewährt Firma Blackmagic Design eine Garantie auf Material- und Verarbeitungsfehler von 12 Monaten ab Kaufdatum. Sollte sich ein Produkt innerhalb dieser Garantiezeit als fehlerhaft erweisen, wird die Firma Blackmagic Design nach ihrem Ermessen das defekte Produkt entweder ohne Kostenerhebung für Teile und Arbeitszeit reparieren oder Ihnen das defekte Produkt ersetzen. -
Page 186: Español
Manual de instalación y funcionamiento Blackmagic Video Assist Enero 2017 Español... - Page 187 La entrada SDI 6G del dispositivo permite supervisar contenidos en definición UHD. Asimismo, el modelo Video Assist 4K brinda la posibilidad de usar dos tarjetas de memoria para grabar material audiovisual sin interrupciones e integrar canales de audio analógicos en la señal registrada.
- Page 188 Índice Blackmagic Video Assist Primeros pasos Velocidad de lectura y escritura Conexión del cable de alimentación Blackmagic Video Assist Setup Conexiones de video DaVinci Resolve Conexiones de audio Importar clips Tarjetas de memoria Editar clips Grabación Recortar clips Control mediante la conexión LANC Asignar teclas de acceso rápido...
-
Page 189: Primeros Pasos
+12 V. Presione el dispositivo sobre un escritorio. Simplemente el botón de encendido para prender levante el borde y gírelo hasta abrirlo por completo. la unidad. Las ilustraciones de esta página corresponden al modelo Video Assist 4K. Primeros pasos... -
Page 190: Conexiones De Video
La versión Video Assist 4K dispone de un altavoz integrado situado debajo de la pantalla LCD. Conexiones de audio El audio se encuentra integrado en la señal SDI o HDMI. Sin embargo, el modelo Video Assist 4K incluye conectores Mini XLR que permiten utilizar señales analógicas balanceadas externas. NOTA En el modelo Video Assist 4K, es posible grabar los canales de audio analógico 1 y 2 o elegir un canal de audio analógico y un canal de audio digital,... -
Page 191: Tarjetas De Memoria
Para registrar imágenes en definición UHD mediante el modelo Video Assist 4K, aconsejamos utilizar tarjetas tipo UHS-II. Estas ofrecen una velocidad de escritura de 110 MB/s y por lo tanto son capaces de grabar contenidos en formato 2160p30. -
Page 192: Control Mediante La Conexión Lanc
Control mediante la conexión LANC En el modelo Video Assist 4K, es posible comenzar y detener la grabación en forma remota mediante un controlador LANC externo. Basta con conectarlo a la entrada de 2.5 mm situada en el lateral derecho del dispositivo. -
Page 193: Grabación De Señales Hdmi Provenientes De Cámaras Dslr
La franja que aparece en la parte superior de la pantalla del modelo Video Assist 4K no forma parte de la imagen. Esto significa que permanecerá visible en todo momento a pesar de no estar presente en la señal transmitida. -
Page 194: Ajustes
Reproducción continua Pulse este botón una vez para volver a reproducir el clip cuando finalice. Púlselo nuevamente para volver a reproducir la secuencia completa una vez que finalice el último clip. Pulse el botón una vez más para desactivar esta función. Para avanzar o retroceder el clip, arrastre el control deslizante hacia la derecha o la izquierda respectivamente. - Page 195 Información en pantalla Pulse este ícono para acceder a los ajustes del indicador de enfoque, la cuadrícula, las guías de encuadre y la función «Zebra». Estos permiten superponer dichas herramientas a la imagen que se muestra en la pantalla del dispositivo para facilitar la composición, el encuadre, la exposición y el enfoque cuando este se encuentra conectado a una cámara.
- Page 196 Es posible seleccionar cualquiera de las siguientes opciones: HDTV Muestra las zonas seguras de la imagen dentro de una relación de aspecto de 1.78:1 compatible con pantallas de equipos informáticos y televisores HD en formato 16:9. Muestra una relación de aspecto de 4:3 compatible con pantallas de televisores SD, o facilita el encuadre al utilizar adaptadores anamórficos 2x.
- Page 197 Por ejemplo, ambas versiones pueden grabar imágenes de alta definición en formato ProRes o DNxHD a diferentes velocidades. Además, el modelo Blackmagic Video Assist 4K brinda la posibilidad de seleccionar códecs DNxHR para la grabación de contenidos en UHD.
- Page 198 Los clips se almacenan en formato QuickTime, a excepción de los archivos MXF DNx, en los cuales MXF aparece en el nombre del códec. Blackmagic Video Assist Blackmagic Video Assist 4K Los clips se almacenan Los clips se almacenan en formato QuickTime, como archivos QuickTime.
- Page 199 SDI/HDMI Esta opción permite iniciar la grabación en el dispositivo al presionar los botones correspondientes en la cámara. Para ello es necesario contar con un modelo capaz de activar esta función a través de la conexión SDI o HDMI. Las versiones compatibles incluyen opciones tales como Trigger REC, HD-SDI Remote I/F o SDI Remote Start/Stop Trigger.
- Page 200 Si esto ocurre, el indicador permanecerá encendido de color rojo y la grabación se detendrá. A continuación, el dispositivo guardará el último archivo grabado. Si en la segunda ranura del modelo Video Assist 4K hay una tarjeta formateada, este continuará la grabación automáticamente en dicha unidad.
-
Page 201: Volumen E Intensidad Del Audio Analógico
Canales de audio analógico En el modelo Video Assist 4K es posible ajustar la intensidad del audio analógico que se transmite mediante las entradas XLR arrastrando el control deslizante correspondiente a cada una de ellas. El rango disponible abarca desde +10 dB a +65 dB. -
Page 202: Almacenamiento, Monitor, Pantalla, Audio Y Otros Ajustes Generales
En el modelo Video Assist 4K también es posible realizar cambios en la configuración del audio. Para ocultar los ajustes y volver a la imagen, deslice el dedo hacia la izquierda o la derecha, o pulse el ícono de retroceso situado en la esquina inferior izquierda en el modelo Blackmagic Video... - Page 203 Cómo importar tablas de conversión tridimensionales Conecte el dipositivo a un equipo informático en el que se haya instalado el programa Blackmagic Video Assist Setup. Ejecute el programa y haga clic en el ícono de configuración circular para acceder a las opciones disponibles.
- Page 204 El programa Blackmagic Video Assist Setup permite importar hasta seis tablas de conversión tridimensionales. Para supervisar imágenes con una tabla de conversión aplicada: Deslice el dedo sobre la pantalla hacia la izquierda o la derecha y pulse la opción MONITOR en la barra de menús.
- Page 205 Ajustes del audio El modelo Video Assist 4K permite grabar audio con una calidad extraordinaria. Cada entrada dispone de opciones independientes que se describen a continuación: XLR Line, XLR Mic o Video - Al conectar equipos de audio profesionales (a excepción de micrófonos) a las entradas XLR, compruebe que la opción XLR line esté...
-
Page 206: Monitorización Mediante Los Indicadores En Pantalla
Para modificar la fecha y la hora: Pulse el ícono del lápiz para modificar los ajustes. Pulse las flechas correspondientes al día, el mes, el año o la hora para realizar los cambios correspondientes. Pulse el botón Save para confirmar. Monitorización mediante los indicadores en pantalla El dispositivo cuenta con indicadores que incluyen un histograma para comprobar el rango de exposición y luminancia de las cámaras y un vúmetro digital para monitorizar la intensidad del audio. -
Page 207: Información Sobre Las Tarjetas De Memoria
UHS-I son adecuadas para almacenar imágenes en HD. Ambos tipos de soporte permiten procesar datos rápidamente y cuentan con una mayor capacidad. En el caso del modelo Video Assist 4K, recomendamos emplear las tarjetas UHS-II más rápidas que haya disponibles para grabar material en definición UHD. A continuación, se proporciona una tabla que indica los últimos modelos compatibles. -
Page 208: Formateo Mediante El Dispositivo
Pulse el indicador CARD o deslice el dedo sobre la pantalla hacia la izquierda o la derecha para acceder a la opción STORAGE. Toque el botón Format Card. En el modelo Video Assist 4K, pulse aquel que corresponda a la unidad seleccionada (p. ej. Format Card 1 o Format Card 2). -
Page 209: Formateo Mediante Equipos Informáticos
Formateo mediante equipos informáticos Asimismo, es posible formatear la tarjeta mediante un equipo informático con sistema operativo Mac OS X o Windows. Preparación de tarjetas de memoria en equipos con sistema operativo Mac OS X El programa Utilidad de Discos incluido en el sistema operativo Mac OS X permite formatear o inicializar tarjetas de memoria empleando el sistema HFS+ o exFAT. -
Page 210: Acceso A Archivos Almacenados
Utilice el cuadro de diálogo Formato en Windows para formatear la unidad mediante el sistema exFAT. Acceso a archivos almacenados Es posible acceder a los archivos ProRes o DNx almacenados en la tarjeta de memoria mediante cualquier equipo informático Mac OS X o Windows que cuente con una ranura para este tipo de soportes, o a través de un lector para dichas unidades. -
Page 211: Velocidad De Lectura Y Escritura
Blackmagic Video Assist Setup Ajustes de configuración La opción Configure del programa Blackmagic Video Assist Setup muestra la versión del software interno instalado en el dispositivo y permite modificar el nombre de la unidad. Basta con hacer clic en el cuadro de edición Name e ingresar el texto deseado. - Page 212 Descargue y descomprima el archivo que contiene el programa Blackmagic Video Assist Setup. Verá una carpeta con el nombre Blackmagic Video Assist Setup que contiene este manual y el programa de instalación. Haga doble clic en el archivo correspondiente a este programa y siga las instrucciones en pantalla para completar la instalación.
-
Page 213: Davinci Resolve
DaVinci Resolve Introducción a DaVinci Resolve La grabación de clips con el dispositivo Blackmagic Video Assist es solo una parte del proceso para crear contenidos televisivos o cinematográficos. El respaldo y la organización del material capturado, la edición, el etalonaje y la codificación de los archivos finales son etapas que también cobran vital importancia. -
Page 214: Importar Clips
obtener imágenes de calidad extraordinaria. El usuario puede sacar provecho de esta funcionalidad para editar y etalonar toda clase de proyectos. A continuación se proporciona información sobre cómo utilizar DaVinci Resolve para realizar ajustes en los clips grabados. El programa es extraordinariamente avanzado y contiene muchas más funciones de las que se aprecian en la interfaz a primera vista. -
Page 215: Editar Clips
Editar clips Luego de mover los clips al panel multimedia, haga clic en Edición para acceder al módulo de edición y comenzar a realizar cambios. En primer lugar deberá crear una línea de tiempo nueva. Haga clic con el botón derecho en cualquier parte del Panel multimedia. -
Page 216: Recortar Clips
Módulo de edición El editor de líneas de tiempo permite recortar clips, cambiar su posición en la secuencia y agregar transiciones. Recortar clips Al editar los clips, es posible que necesite cortarlos para incluir solamente imágenes específicas en cada toma. Existen varias formas de lograr este objetivo, pero la más sencilla es ajustar los puntos de entrada y salida en la línea de tiempo. -
Page 217: Asignar Teclas De Acceso Rápido
Asignar teclas de acceso rápido Si está acostumbrado a utilizar teclas de acceso rápido en otros programas de edición, puede crear sus propios atajos en DaVinci Resolve para acelerar y optimizar los procesos de trabajo. Para asignar teclas de acceso rápido: Haga clic sobre el ícono del engranaje situado en la parte inferior derecha de la interfaz y seleccione el panel Asignación de teclas. -
Page 218: Agregar Títulos
Para agregar una transición entre dos clips: Compruebe que los dos clips editados se encuentren juntos en la línea de tiempo. Haga clic en el botón Biblioteca de efectos dentro de la barra de herramientas situada en la parte superior del módulo Edición y asegúrese de que el panel Herramientas se encuentre abierto. -
Page 219: Agregar Pistas De Audio
Seleccione un tipo de título en el panel Títulos y arrástrelo a una pista vacía. Agregar pistas de audio El programa permite agregar fácilmente pistas de audio adicionales si fuera necesario para crear una mezcla compleja con música y efectos sonoros. Para agregar pistas de audio: Haga clic con el botón derecho junto al nombre de la última pista de audio en la línea de tiempo y seleccione la opción Agregar pista. -
Page 220: Etalonaje
Etalonaje Luego de editar la secuencia de clips, es necesario corregir el color de las imágenes. En general, esta etapa se realiza luego de la edición, a fin de mantener una apariencia consistente. Sin embargo, una de las ventajas que ofrece DaVinci Resolve es poder alternar entre los módulos de edición y etalonaje para realizar ajustes específicos y descubrir nuevas opciones creativas. - Page 221 La gráfica de crominancia permite ajustar con precisión las luces, sombras y tonos intermedios. Los círculos cromáticos Lift, Gamma, Gain y Offset permiten controlar con precisión el balance de colores y tonos en los distintos clips. Para ajustar cada área tonal en forma similar, deslice el dial situado debajo de los círculos cromáticos hacia la izquierda o la derecha.
-
Page 222: Correcciones Secundarias
Asimismo, es posible utilizar el panel de curvas para realizar correcciones de color primarias. Basta con hacer clic sobre las líneas diagonales en las gráficas del panel Curvas y arrastrarlas hacia arriba o abajo para modificar los ajustes RGB en diferentes áreas cromáticas de la imagen. Es importante ajustar los puntos situados en el tercio superior, intermedio e inferior de la curva. -
Page 223: Creación De Power Windows
Para ajustar un color específico: Agregue un nodo en serie. Abra el panel Colores específicos y asegúrese de que la herramienta Rango de color, identificada con el ícono de un cuentagotas, esté seleccionada. Haga clic en el color dentro del clip que desea modificar. Por lo general, deberá... -
Page 224: Seguimiento De Power Windows
Las Power Windows permiten llevar a cabo correcciones secundarias en partes específicas de una imagen. Seguimiento de Power Windows Es posible que la cámara, el objeto o el área seleccionada dentro de una toma esté en movimiento. Por esta razón, para garantizar que la ventana permanezca vinculada a estos, es necesario utilizar la función de seguimiento de DaVinci Resolve. -
Page 225: Complementos
En la mayoría de los casos, la función de seguimiento automático no presenta ningún problema. Sin embargo, en escenas complejas, es posible que algún objeto se atraviese en el área seleccionada e interrumpa o afecte esta operación. Este inconveniente puede resolverse manualmente utilizando el editor de fotogramas clave. - Page 226 Sobre la línea de tiempo, aparecerá un menú desplegable con la opción Toda la línea de tiempo seleccionada. De esta forma, se renderizará todo el contenido de la línea de tiempo. Sin embargo, también es posible seleccionar solo una parte de la misma. Basta con elegir la opción Rango y luego marcar los puntos de entrada y salida mediante las teclas I y O.
-
Page 227: Proceso De Posproducción
Proceso de posproducción Otros programas Para editar imágenes utilizando su programa preferido, puede copiar los clips en una unidad interna/ externa o RAID y luego importarlos desde la aplicación. Si lo desea, puede incluso editar los clips directamente desde la tarjeta de memoria. Final Cut Pro X Para editar clips en formato ProRes con Final Cut Pro X, es necesario crear un nuevo proyecto en el cual el formato y la frecuencia de imagen coincidan con los del clip que se desea editar. -
Page 228: Premiere Pro Cc
Seleccione la carpeta de contenidos en la que desea importar los archivos. Haga clic en File y luego en AMA Link. A continuación, seleccione los archivos que desea importar y luego haga clic en OK. Cuando los clips aparecen en la carpeta, puede arrastrarlos a la línea de tiempo y comenzar a editarlos. -
Page 229: Smoke 2013
Smoke 2013 Para editar clips utilizando Smoke 2013, es necesario crear un nuevo proyecto en el cual el formato y la frecuencia de imagen coincidan con los del clip que se desea editar. En este ejemplo se utiliza el formato ProRes 422 (HQ) con una resolución de 1080p25. Al ejecutar el programa, se abrirá... -
Page 230: Ayuda
En Mac OS X, ejecute el programa desde la carpeta de aplicaciones. Seleccione el ‚ menú About Blackmagic Video Assist Setup en la barra superior de la ventana para ver el número de la versión. En Windows 7, abra el programa mediante el ícono correspondiente en el menú Inicio. -
Page 231: Garantía
Garantía 12 meses de garantía limitada Blackmagic Design garantiza que el producto adquirido no presentará defectos en los materiales o en su fabricación por un período de 12 meses a partir de su fecha de compra. Si un producto resulta defectuoso durante el período de validez de la garantía, Blackmagic Design podrá... - Page 232 安装操作手册 Blackmagic Video Assist 2017 年 1 月 中文...
- Page 233 Blackmagic Video Assist系列是我们引以为豪的设计佳作。 不论您使用何种类型的摄影机, 它都能帮助您拍摄出更优秀的视频影像。 Video Assist有着小巧紧凑且使用便捷的特性。 它凝 聚了我们在监看和录像领域的技术精华, 是现场监看和专业录制的理想选择。 Blackmagic Video Assist可以安装在您的摄影机上, 或者使用其自带的翻折式底部支架立 于工作台上进行常规使用和监看。 此外, 它还能作为现场制作切换台的母版录像机使用。 Blackmagic Video Assist搭载6G-SDI输入, 因此可以监看Ultra HD影像。 Blackmagic Video Assist 4K可以在两张SD卡上连续记录Ultra HD视频, 而且还是一款强大的录音设备, 因此您 可以将模拟音频加入SDI或HDMI记录中。 Blackmagic Video Assist型号是非常全能的监视器 和录像机, 可与任何类型的摄影机搭配使用, 从事各类项目制作。 本操作手册包含使用Blackmagic Video Assist所需之全部信息。 请登陆公司网站www.blackmagicdesign.com并进入支持页面获得Blackmagic Video Assist 的最新版操作手册及其软件更新。...
- Page 234 跟踪窗口 音量和模拟音频电平 使用插件 存储、 监视屏、 显示、 音频和初始设置 制作母版剪辑 使用屏幕技监功能 后期制作工作流程 关于SD卡 使用第三方软件 选择高速SD卡 使用Final Cut Pro X 使用Video Assist格式化SD卡 使用Avid Media Composer 使用计算机格式化SD卡 使用Adobe Premiere Pro CC 处理SD卡上的文件 使用Autodeck Smoke 2013 检查存储介质速度 Blackmagic Video Assist Setup 帮助 使用DaVinci Resolve 保修...
-
Page 235: 连接电源
入门 连接电源 Blackmagic Video Assist使用前的准备工作非常简单, 只要先连接电源, 然后连接视频源, 再连接 音频, 最后插入SD卡即可。 要为设备连接电源, 请将内附的电源适配器插入 Video Assist右侧面板的电源输入接口上。 此部分向您介绍了设备在使用前 的准备工作, 具体内容包括 : 连接外部电源时, 您还能为两块LP-E6型锂电子 电池充电, 这两块电池安装在设备后面板的1号和 ■ 连接电源 2号电池槽内。 要将一块LP-E6型电池安装到 ■ 连接视频 Video Assist上, 请先将电池轻轻按在电池槽内 ■ 连接音频 测顶部, 然后再推入电池槽, 直至听到固定销定 位的声音。 按设备顶板的电池释放按钮可移除电 安装 SD 卡... -
Page 236: 连接视频
连接音频 当您插入视频时, 音频也会一同连接, 这是因为SDI或HDMI视频信号含有内嵌音频。 但是, Blackmagic Video Assist 4K内置有迷你XLR接口, 因此您也可以连接外部平衡模拟音频。 注意 使用 Blackmagic Video Assist 4K 时, 您可以将音频设置设定为记录模拟通 道 1 和 2 , 或选择一个模拟音频通道和一个 SDI 或 HDMI 音频通道, 具体根据源视频 而定。 更多关于模拟音频和调整电平等信息, 请阅读 “设置” 章节中 “音频设置” 部分的内容。 Blackmagic Video Assist 4K... -
Page 237: 安装Sd卡
安装 SD 卡 想要开始记录片段, 您需要插入一张兼容的SD卡。 为获得高质量HD记录, 我们建议使用高速UHS-I型SD卡。 但是, 如果您记录标清或低码流低画质 的压缩文件时, 可以使用读写速度较慢的卡。 通常来讲卡的速度越快越好。 如果您是在Blackmagic Video Assist 4K上记录Ultra HD, 那么我们建议使用高速UHS-II型SD卡。 这些卡需要具备超过110MB/s的写入速度, 可记录高达Ultra HD 2160p30的影像。 Blackmagic Video Assist 4K配有两个SD卡槽。 您可以只使用一张卡上记录, 也可以插入两张SD卡, 从而获得 连续不间断记录或实现存储媒介的快速更换。 使用您的存储卡前, 请先将卡格式化为HFS+或exFAT格式。 通过 “Storage” (存储) 设置格式化存 储媒介的步骤非常简单。 关于存储设置的详情请参阅 “设置” 部分的内容。... -
Page 238: 通过Lanc接口远程控制
您可以使用Apple ProRes及Avid DNx编解码器将片段记录为QuickTime文件。 您可通过设置让Video Assist使用 “Timecode” (时间码) 或 “SDI/HDMI Start/Stop” (SDI/HDMI 的开始/停止) 触发记录。 这样就可以通过HD-SDI或HDMI信号接收到的信息触发开始和停止记 录。 请参考本操作手册的 “设置” 章节获取更多关于如何设置编解码选项以及启用触发记录功 能的信息。 要开始记录, 请在触摸屏上向上或向下滑动调出屏幕技监选项, 然后点 按记录图标。 再次按下该图标可停止记录。 注意 从 HDMI 或 SDI 摄影机记录时, 请确保设备输出的是无叠加信息的纯画面, 因 为任何显示在摄影机视频输出画面上的叠加信息都将被一同记录下来。 详情请参考名为 “从 DSLR 摄影机记录纯 HDMI 影像” 部分的内容。... -
Page 239: 从Dslr摄影机记录纯Hdmi影像
两个卡槽都插入SD卡还可以让您快速更换存储媒介。 如果您想要在某个指定位置停止记录, 只要 先停止记录, 然后在存储设置中选择 “Card 2” (第二张卡) , 再次按下记录就可以了 。 提示 如果要在使用 Blackmagic Video Assist 4K 时进行持续记录或快速更换记录 卡槽, 请事先确保所有存储卡均已格式化。 从 DSLR 摄影机记录纯 HDMI 影像 有些DSLR摄影机可于机内记录8bit视频, 有些则能通过其HDMI输出口提供纯视频画面。 将DSLR 摄影机的HDMI输出口连接Blackmagic Video Assist后, 您就能绕过摄影机自身的机内压缩步骤, 以优质的10bit ProRes或Avid DNx编解码器记录影像。 有些DSLR摄影机可输出10bit 4:2:2影像, 这 类视频的品质高于机内记录的8bit 4:2:0压缩影像。... -
Page 240: 使用触摸屏更改设置
循环回放 点按循环图标一次可将Blackmagic Video Assist设置为循环回放当前片段。 再次点按该图标可依次循环播放所有记录片段。 第三次点按该图标可关闭循环功能。 向前或向后拖动滚动滑块可查看片段前后内容。 播放模式过程中, 屏幕左上 角将出现一个显示栏。 该栏可显示您的SD卡上所记录的片段数量, 当前播放 片段的号码, 以及当前片段时长。 设置 使用触摸屏更改设置 您的Blackmagic Video Assist配有内置触摸屏, 可用来监看您的视频和音频, 并更改设置。 大部分设置的更改都可通过点击LCD顶部状态栏的图标实现。 如电平调整或耳机音量等音频设置, 可向上或向下滑动触摸屏显示出LCD底部的屏幕技监选项, 然后点按音频表选项来进行调整。 点按设置外部区域可隐藏设置窗口。 向左或向右滑动, 或点按返回箭头图标可隐藏存储设置。 更改设置步骤如下: 在状态栏或在屏幕技监选项上点按您想要更改的设置。 例如, 如果您想要更改记录时的编解码器, 就可以在状态栏内点按编解码器指示并打开编 解码器设置。 如果您想要调整音频电平, 只要点按音频表选项即可。 在您选定的设置窗口里, 从各类可用设置中点按菜单按钮、 箭头或滑块图标进行选择。 点... - Page 241 叠加信息 点按叠加图标可打开斑马纹、 峰值对焦、 帧导栏以及网格设置。 这些设置可以在LCD 屏幕上显示叠加信息, 以便在连接摄影机时帮助您查看曝光、 对焦、 构图和取景。 叠加功能不会通过SDI或HDMI输出显示。 Zebra (斑马纹) 斑马纹功能可将视频中超过您所设斑马纹曝光度的部分以对角线标出, 从而帮助您获得最佳的曝 光值。 例如, 如果您将斑马纹设置为100%, 那么图像中任何显示有斑马纹的区域都将出现裁切。 如 果您将斑马纹设置为90%, 那么就可以确定图像曝光尚留有一定余地, 以便保护镜头中的高光部分。 提示 您可以设置斑马纹来高光显示出该图像在波形图中代表特定视频级别的区 域, 例如将斑马纹设为 50% 意味着您可以肉眼识别出图像的哪些区域将在波形示 波器上显示为大约 50% 。 点按 “Zebra” 设置中的左右箭头或滑块即可开启斑马纹功能并更改斑马纹水平。 峰值对焦和对焦辅助 峰值对焦和对焦辅助设置可提供强大工具, 帮助您快速完成图像对焦。 峰值对焦可以线条标出图 像最清晰部分的轮廓。 敏感度设置可让您更改这些线条的粗细程度。 使用Blackmagic Video Assist 4K型号时,...
- Page 242 帧导栏选项如下: HDTV 显示宽高比为1.78:1的动作和字幕图像安全区域, 适合于16:9的高清电视机和电脑屏幕。 可显示4:3宽高比, 适用于SD电视屏幕, 或使用2倍变形附加镜时辅助构图取景。 2.40:1 、 2.39:1 和 2.35:1 采用常用的宽屏宽高比, 适用于变形或遮幅宽银幕电影。 由于电影标准随时间改变, 这三种宽高比 或采用略微不同的宽屏设置。 2.39:1是目前最为广泛使用的标准之一。 1.85:1 显示了另一种常用的遮幅宽银幕电影宽高比。 这种宽高比介于HDTV和2.39:1之间。 Grid (网格) 网格功能即 “三分法” , 取画面三分之一处分别加以两条竖线和两条横线组成网格叠加显示。 点 按 “On” (开) 或 “Off” (关) 可查看或隐藏三分法叠加显示。 三分法是一种帮助镜头构图的极其强大的工具。 例如, 人眼通常会将注意力落于两条直线的交叉 点位置, 因此网格非常有助于构图时将关键元素定位在这些重要区域。 提示...
- Page 243 525i59.94 NTSC、 625i50 PAL 720p50、 720p59.94、 720p60 1080i50、 1080i59.94、 1080i60 1080p23.98、 1080p24、 1080p25、 1080p29.97、 1080p30、 1080p50、 1080p59.94、 1080p60 2160p23.98、 2160p24、 2160p25、 2160p29.97、 2160p30 (Blackmagic Video Assist 4K) 编解码器 点按 “CODEC” (编解码器) 可打开相关的设置, 然后点按图标或通过滑块进行选择。 编解码器是 否可用取决于您所使用的型号。 例如, 两个型号均可将HD视频记录为各类比特率的Apple ProRes 和Avid DNxHD编码格式。 Blackmagic Video Assist 4K用户还能选择ProRes和DNxHR编码来记录...
- Page 244 时间码计数器以 “小时:分钟:秒数:帧数” 的格式显示了您片段的时长。 触发记录 点按 “TRIGGER REC” 可在时间码运行或SDI/HDMI触发记录选项间进行选择。 这样就可以通过 SDI或HDMI接口接收到的信息触发开始和停止记录。 想要禁用触发记录功能, 请选择 “Never” (从不) 。 T/C Run (运行时间码) 选中运行时间码后, 只要从您的SDI或HDMI信号源里检测到时间码运行, Blackmagic Video Assist 就会立即开始记录。 时间码停止后, 记录也将停止。 当连接的摄影机不支持SDI开始/停止触发记录 时, 此功能非常有帮助。 您可能需要将摄影机的时间码设置为 “Record Run” (记录运行) 来确保 时间码仅在摄影机记录时运行。 如果您摄影机的时间码设置与此不同, 例如时间码是当天的时间, 这样时间码总是一直运行着, 那么就会不断持续地触发您的Blackmagic Video Assist记录。 设置...
- Page 245 止记录。 想要获得SDI/HDMI的开始/停止触发记录功能, 您需要使用一台可以通过HD-SDI或HDMI 触发记录功能的摄影机。 支持触发记录的摄影机可能包含 “TRIGGER REC” 、 “HD-SDI Remote I/F” 或 “SDI Remote Start/Stop Trigger” 等菜单选项。 源信号 显示所连接的SDI或HDMI输入源。 设备将使用首先连接的输入源。 如果连接了两个视频源, 那么当 原始信号源短暂消失时, 您的Blackmagic Video Assist将转到另一个输入源上。 如果您需要运行 一个备用信号, 此功能是非常有用的冗余方案。 存储卡 显示SD卡当前在储存设置中选择的状态。 Blackmagic Video Assist 4K配有两个SD卡槽。 选择其中一张储存卡进行记录的步骤如下: 点按 “Card” (存储卡) 状态或在触摸屏上向左或向右滑动以打开 “Storage” (存储) 设置。...
- Page 246 显示 “Card Full” (存储卡已满) 。 当您的存储卡录满时, 提示器将变成红色且将停止记录。 此时您的Video Assist将 保存最后记录的文件。 如果Blackmagic Video Assist 4K的第二个卡槽内含有已格式化的存储卡, 设备将自动切 换到第二个卡槽并继续在第二张存储卡上记录。 剩余记录时间 在播放模式下, 状态提示器将显示您SD卡的剩余记录时间。 剩余电池电量 显示了您电池剩余的电量情况。 点按电源图标可打开更大的显示空间, 从而提供更精确的电池电 量信息。 运行过程中, 您的Video Assist将先使用电量较低的电池, 然后当电源耗尽时可在不中断运行的情 况下换到另一块电池。 两块电池可同时充电。 根据电池类型和条件, 在不使用状态下电池完全充满 需要大约3小时。 如使用Blackmagic Video Assist型号, 两块充满电的佳能LP-E6电池可提供大约180分钟的记录时 间。 如使用Blackmagic Video Assist 4K型号, 两块充满电的电池可提供大约80分钟的记录时间。 设置...
-
Page 247: 音量和模拟音频电平
扬声器音量 想要在Blackmagic Video Assist 4K上为内置扬声器调整音量时, 向上或向下滑动LCD屏幕可显示 出屏幕技监选项, 然后点按音频选项可打开音量和模拟音频电平设置。 只要拖动音量滑块就可以 升高或降低音量。 提示 为防止在连接麦克风时可能出现的回授问题, 请在回放期间启用扬声器, 并 且在 Blackmagic Video Assist 4K 记录或监看视频输入时禁用扬声器。 耳机音量 想要调整耳机音量, 只需在屏幕显示的右下方点按音频表即可。 如使用Blackmagic Video Assist 4K型号, 一旦您插入耳机后, 耳机音量设置将更改到 “Headphone” (耳机) , 然后您就可以像调 整扬声器音量一样来调整其音量。 模拟音频电平 如使用Blackmagic Video Assist 4K型号, 经由XLR输入的模拟音频电平可通过拖动每路输入的滑... -
Page 248: 存储、 监视屏、 显示、 音频和初始设置
想要记录无限幅的最优音频效果, 可调整每路输入上的滑块, 直到XLR输入音频表上的电平峰值 位于-12到-6范围内。 详情请参阅 “使用屏幕技监功能” 部分的信息。 存储、 监视屏、 显示、 音频和初始设置 左右滑动触摸屏可打开其他设置和信息。 您可以在此查看SD卡存储信息并格式化SD卡, 还能调整 监视屏和显示设置, 以及日期和时间信息。 如使用Blackmagic Video Assist 4K型号, 您还可以调整 音频设置。 要隐藏设置并返回到视频图像状态, 只要左右滑动触摸屏, 或点按Blackmagic Video Assist 4K左下角的返回箭头图标即可。 储存设置 储存设置让您可以查看插入SD卡的容量、 HFS+或exFAT格式化类型, 以及空余可用空间等信息。 您还可以通过Video Assist直接格式化您的存储卡。 更多关于格式化SD卡的信息, 请参阅 “关于 SD卡” 部分的内容。 监视屏设置... - Page 249 选择 “Auto” , 可启用自动屏幕旋转功能。 如果对焦辅助线条的色彩和画面色彩过于接近, 您可以更改线条色彩来 加以区分。 具体颜色包括绿色、 红色、 蓝色或白色。 你还可以导入多达六 个3D LUT, 以便在监看输入画面或回放画面时套用。 Display 3D LUT (显示 3D LUT ) Blackmagic Video Assist可显示套用了3D LUT的输入视频图像。 3D LUT仅应用于显示器, 并不会 被记录到视频本身, 因此您不用担心这一风格会永久影响记录画面。 但是, 如果您想让DaVinci Resolve中的画面应用相同的LUT, 只需将您在Video Assist中所使用的同一个LUT .cube文件导入 DaVinci Resolve, 并且为您的调色套用这一文件即可。 这样能为您提供许多强大的选项, 例如将后期和现场监看进行匹配, 或者套底为特定的色彩配置...
- Page 250 您可以使用Blackmagic Video Assist Setup实用软件为 Video Assist加载多达六个3D LUT。 要监看套用了 LUT 的视频: 左右滑动触摸屏, 点按菜单栏中的 “Monitor” 以打开Video Assist的监看设置。 点按左右箭头图标开启 “Display 3D LUT” (显示3D LUT) 设置。 再次点按该 按钮可禁用该LUT。 到 “3D LUT” 设置下, 点按左右箭头来选择您导入LUT的那一栏, 如果您在其他栏也导入了 LUT的话, 可继续点按来选择其他栏。 左右滑动触摸屏, 或点按触摸屏左下角的返回图标, 即可回到源画面显示。 现在, 您就可以监看套 用了3D LUT的输入视频了 。 您甚至可以在监看回放画面时使用3D LUT。...
- Page 251 用于增加或减少图像所显示的色彩含量。 设备关闭时, 所有这些设置都设有记忆保护功能。 需要注意的是, 对于任何特定设置的更改将影响 LCD屏幕上的图像显示, 但不会影响到录制的视频效果。 Audio 音频设置 Blackmagic Video Assist 4K还是一个强大的录音设备。 它的每路XLR输入都有其独立的设置, 例如: XLR Line 、 XLR Mic 或 Video - 当在模拟XLR输入上连接了专业的音频设备而非麦克风 时, 请确保您将录制电平设为 “XLR Line” 。 大部分专业音频设备输出的是 “Line” (线路) 音频电平, 这是比 “Mic” (麦克风) 电平更强的信号。 而当您在XLR输入上连接了麦克风时, 请相应地将输入设为 “XLR Mic” 电平。 这是因为通...
-
Page 252: 使用屏幕技监功能
调整日期和时间设置步骤如下: 点按笔状图标来编辑各项设置。 点按 “Day” (日) 、 “Month” (月) 、 “Year” (年) 或 “Time” (时间) 编辑箭头来更改某 项设置。 点按 “Save” (保存) 以确认更改。 使用屏幕技监功能 您的Blackmagic Video Assist配备直方图和音频电平表等各类实用的示波器, 可有助于您检查摄 影机的曝光度和亮度, 并监测源音频的电平指标。 Histogram (直方图) 直方图可显示视频中的亮度分布。 图中显示的最左侧为全黑, 最右侧为全白。 当视频信号在这些限 定范围内并于底部两侧边缘两点相交时, 您可以确定视频的亮部和暗部都未出现裁切, 也就是画 面中的各类色调范围都被完整保留。 音频表 音频表可显示输入源的通道1和通道2上的音频电平。 该表以dBFS为单位, 并有削波警告功能, 可... -
Page 253: 关于Sd卡
想要在Blackmagic Video Assist 4K上调整您的模拟音频电平, 只需点按音频表, 然后向左或向右 拖动每个通道的滑块即可。 注意 要记录通过 Blackmagic Video Assist 4K 的 XLR 接口连接的音频, 请到音频 设置中选择 “ XLR Line ” ( XLR 线路) 或 “ XLR Mic ” ( XLR 麦克风) 选项。 关于 SD 卡 选择高速 SD 卡... -
Page 254: 使用Video Assist格式化Sd卡
ExFAT是macOS和Windows系统都支持的格式, 因此无需另外购买软件。 但是, exFAT不支持日志 功能, 因此万一出现存储卡发生故障的情况, 数据相对不易恢复。 格式化 SD 卡步骤如下: 在触摸屏上自左向右滑动, 或点按存储卡状态显示来打开 “STORAGE” (存储) 设置。 点按 “Format Card” (格式化存储卡) 图标。 如使用Blackmagic Video Assist 4K型号, 请点按所选存储卡所对应的图标。 例如: “Format Card 1” (格式化卡1) 或 “Format Card 2” (格式化卡2) 。 点按左右箭头图标来选择HFS+或exFAT格式化类型, 然后再次点按 “Format Card” (格式化卡) 按钮。... -
Page 255: 使用计算机格式化Sd卡
使用计算机格式化 SD 卡 您也可以在macOS或Windows计算机上格式化SD卡。 在 macOS 计算机上格式化 SD 卡 macOS计算机自带的 “磁盘工具” 应用程序可以将您的SD卡格式化或初始化为HFS+或exFAT。 如 果您的SD卡上含有录制文件, 请务必在格式化前先备份您的媒体文件, 否则将丢失所有数据。 将SD卡插入电脑上的SD卡槽或SD读卡器中。 进入 “应用程序” / “ 实用工具” 界面, 运行 “磁盘工具” 程序。 点击SD卡图标, 然后点击 “抹掉” 按钮。 将格式设置为 “Mac OS扩展 (日志式) ” 或 “exFAT” 。 输入新增分区的名字, 并点击 “抹掉” 。 您的SD卡会迅速格式化, 以备使用。 在macOS计算机上使用... -
Page 256: 处理Sd卡上的文件
在Windows计算机上可使用 “格式化” 对话框功 能将SD卡格式化为exFAT格式。 处理 SD 卡上的文件 您 可通 过 mac OS或 W in d ow s 计算 机 上的S D卡槽 或使用S D读卡器来直 接 读 取S D卡上的 ProRes或DNx文件。 只需从Blackmagic Video Assist中取出SD卡, 并将其插入计算机上的SD卡槽或SD读卡器中 即可。 读取SD卡和读取连接到计算机上的外接硬盘、 U盘和其他媒体存储设备方式一样。 双击并打开SD卡后, 您会看到一组QuickTime或MXF电影文件。 现在您只需选中需要从卡上导入的文件, 再拖动到桌面或者其他硬盘中即可, 或者用NLE软 件直接从卡中读取文件。... -
Page 257: 检查存储介质速度
使用Blackmagic Disk Speed Blackmagic Disk Speed Test测速工具界面。 Test检查SD卡的性能。 Blackmagic Video Assist Setup 配置设置 Blackmagic Video Assist Setup中的 “Configure” (配置) 设置可显示Video Assist当前安装的内 部软件版本, 您还可以使用该设置来更改设备名称。 只要点击 “Name” (名称) 编辑框, 并使用计 算机键盘键入一个新名称即可。 “Configure” (配置) 设置可更改Video Assist 的设备名称, 并显示当前安装的内部软件版本。 Blackmagic Video Assist Setup... - Page 258 运行Blackmagic Video Assist Setup程序, 并根据屏幕提示更新内部软件。 如果系统未弹 出任何提示信息, 即表示当前内部软件已是最新版本, 无需升级。 在 Windows 系统上更新内部软件步骤如下: 下载并解压缩Blackmagic Video Assist Setup程序。 您应该可以看到一个名为Blackmagic Video Assist Setup的文件夹, 该文件夹中含有本 操作手册以及Blackmagic Video Assist Setup Installer安装程序。 双击该安装程序, 并根 据屏幕提示完成安装。 安装完最新版Blackmagic Video Assist Setup实用程序后, 请使用USB线缆连接Video Assist和您的计算机。 运行Blackmagic Video Assist Setup程序, 并根据屏幕提示更新内部软件。 如果系统未弹...
-
Page 259: 使用Davinci Resolve
要升级Blackmagic Video Assist的内部软件, 请通过USB端口将设备连接到您的计算机, 然后下载并运行最新版Blackmagic Video Assist Setup实用程序。 根据屏幕提示操作。 如果系统未弹出任何提示, 则说明您的内部软件已经是最新版本。 使用 DaVinci Resolve DaVinci Resolve 简介 使用Blackmagic Video Assist进行记录仅是制作影视节目过程中一个部分而已, 就如整个过程中 的媒体备份和管理、 剪辑、 调色和最后的编码输出母版文件一样都很重要。 Blackmagic Video Assist自带macOS和Windows版DaVinci Resolve, 为您提供完备的记录和后期制作方案! 将您的SD卡连接到计算机后, 就可以使用DaVinci Resolve “媒体” 页面中的 “克隆” 工具, 在拍摄 过程的同时备份素材。 由于任何类型的存储介质都有可能损坏或出现故障, 因此建议您进行文件... -
Page 260: 导入片段
以下内容介绍了如何使用DaVinci Resolve开展片段记录工作。 当然, DaVinci Resolve是非常高端 的软件, 它包含了大量的功能, 这远比您在用户界面上一眼看上去的要多得多。 想要了解更多关于 使用DaVinci Resolve的信息, 请查看DaVinci Resolve软件SD卡上的DaVinci Resolve操作手册 PDF文件, 或在网上查看相关的培训课程或是教学视频。 导入片段 开始剪辑您的片段前, 请先将它们导入到媒体池中: 运行DaVinci Resolve。 如果您是首次打开DaVinci Resolve, 请耐心等待项目管理器界面出 现, 然后双击项目管理器窗口的 “未命名项目” 图标。 如果出现登录窗口, 则表示您启用了 多用户环境Resolve。 如遇此类情况, 请点击登录窗口左下方的 “添加新用户” 按钮, 键入 用户名并点击 “设置新用户” 以创建一个新的用户。 然后, 双击这一用户图标进入项目管理 器。... -
Page 261: 剪辑片段
剪辑片段 将片段拖入媒体池后, 点击 “剪辑” 选项卡打开剪辑页面。 现在您可以开始剪辑工作了! 首先, 请创建新的时间线。 右键点击媒体池内任何位置, 选择 “时间线” > “新建时间线” 。 在弹出的对话框中点击 “创建” 按钮。 开始剪辑片段前, 请先创建新的时间线。 该时间线是您从事所有剪辑工作的平台。 双击媒体池中的任意片段, 使其在源片段检视器中打开。 使用鼠标指针左右移动源片段检 视器中的播放头, 直至找到想要的片段起始帧。 用快捷键 “I” 标记入点。 重复上述步骤使 用快捷键 “O” 为结束帧进行相同操作。 到时间线界面下, 将时间线播放头置于您想要插入该片段的位置。 在源片段检视器中点击并将鼠标指针拖动到时间线检视器上即可将该片段插入到时间线 上。 系统会显示出一系列剪辑选项。 请选择您需要的剪辑类型。 片段将会以您所选的剪辑类型添加到时间线上。 DaVinci Resolve操作手册对每种剪辑类型及其使 用方式均有详细描述。... -
Page 262: 修剪片段
“剪辑” 页面。 您可以使用时间线编辑器修剪片段, 更改片段顺序, 来回移动片段并在片段之间添加转场。 修剪片段 当剪辑片段时, 您会通过对片段进行修剪从而使其只包含每个镜头中的某些特定画面。 实现这一 操作有多重途径, 最简单的方式是在时间线上调整片段的入点和出点。 将片段添加到时间线上后, 将鼠标指针移动到片段的开头处, 直至指针变成修剪图标。 出现修剪图标后, 点击片段开头并来回拖动可修剪入点。 修剪时请注意查看时间线监视 器, 以便找到编辑点。 点击并拖动片段末尾来调整出点。 缩放滑块位于时间线上方, 也就是工具栏中间位置的工具右侧。 左右拖动滑块可缩放时间线, 以便进行精细的调整。 对剪辑进行精细调整时, 关闭 “吸附” 功能较为有用; 但该功能是保证片段彼此紧密连接的有用工 具, 因此完成细调操作后请重新开启该功能。 按 “N” 键可快速开启或关闭吸附功能。 “剪辑” 页面。 您可以使用时间线编辑器修剪片段, 更改片段顺序, 来回移动片段并在片段之间添加转场。 使用DaVinci Resolve... -
Page 263: 映射键盘快捷键
映射键盘快捷键 如果您对其他剪辑软件的键盘快捷键较为熟悉, 可以对DaVinci Resolve进行简易的映射设置来提 高速度, 从而优化工作流程。 自定义映射键盘快捷键步骤如下: 点击DaVinci工作区右下角齿轮形状的项目设置图标, 然后在设置列表中选择 “键盘映射” 。 选择您想要的快 捷键来更改 所显示的各个类 别, 例如时间线的剪切和粘 贴快 捷键 位于 “编辑” 类别中。 单击快捷键, 使其在设置中以高光显示。 双击快捷键可应用更改。 在键 盘上使用新 设置的快捷键。 如果操作有误, 您只需要点击 位于设置边上的 “撤 销” 图标即可撤销更改。 点击 “保存” 以确认新的快捷键设置。 左右拖拽片段的开头和结尾可进行片段修剪操作。 进行精细调整时可 以关闭 “吸附” 功能。 添加转场... -
Page 264: 添加字幕
在两个片段之间添加叠化转场步骤如下: 请确保时间线上的两个剪辑片段紧密相邻。 点击 “剪辑” 页面顶部工具栏中的 “特效库” 按钮, 并确保打开 “工具箱” 面板。 点击 “交叉叠化” 转场, 将其拖到时间线上并停留在两个片段之间的编辑点上方。 此时您 将可以看到鼠标指针高光出第一个片段的结尾和第二个片段的开头。 然后将该转场放置在 该片段上。 请务必确保两个片段的编辑点前后均有足够的长度进行叠化转场。 两个片段之间的流畅转场过渡就添加完成了 。 如果要调整转场的长度, 您可以使用类似方法延长开 头或缩短结尾来修剪片段。 将鼠标指针停留在转场开头或结尾直至转场修剪图标出现, 然后左右 拖动该图标。 只需将转场拖拽到相邻的片段之间即可。 添加字幕 为您的剪辑创建字幕步骤非常简单。 就像对片段操作一样, 您可以将字幕添加到任何视频轨道 上。 如果轨道数量不够, 只需在现有轨道名称边上右击并选中 “添加轨道” 就可轻松添加新轨道。 如何创建字幕: 找到位于媒体池下方 “特效库” 中的工具箱, 向下滚动到中间位置后可看到 “字幕” 发生 器。... -
Page 265: 添加音频轨道
从 “字幕” 面板中挑选一种字幕类型并拖放到空白轨道上。 添加音频轨道 如果您想要将较大的声音剪辑文件混合大量音效和音乐, 只需根据需要添加更多音频轨道即可。 添加音频轨道步骤如下: 在时间线上最后一个音频轨道的名称旁边右击并选择 “添加轨道” 。 选择想要的音频轨道类型, 如立体声、 单声道、 5.1或自适应。 新的音频轨道将出现在时间线上。 当您想要将音频元素分离到单独的轨道上用于如声音、 音效以及音乐等的混音时, 这一功能非常实用。 请参考DaVinci Resolve操作手册获得更多关于如何使用强大剪辑工具的详情。 要添加新的音频或视频轨道, 只需在轨道名字旁边右击并选择 “添加轨道” 。 如果是音频, 则选择需要的轨道类型。 使用DaVinci Resolve... -
Page 266: 为片段调色
为片段调色 完成片段序列的剪辑工作后, 就要开始调色步骤。 在片段序列剪辑完成后再开始调色处理较为妥 善, 因为这样能保持画面的一致性, 但是DaVinci Resolve的其中一个优点就在是它能够在剪辑和 调色页面之间来回操作进行精细调整, 并发现新的创意选择。 “调色” 页面能为片段风格提供多种完善的控制选择。 首先, 点击 “调色” 选项卡, 打开 “调色” 页面。 该页面中有色轮、 曲线面板和常用的调色工具以及预览和节点窗口。 当您看到面前这些大量工具时 不用慌张, 它们都是能够帮助您获得最精彩画面的实用功能。 DaVinci Resolve操作手册将为您详 细介绍每项功能, 以及如何按照简单易行的步骤进行使用。 从中您可以了解到专业人士在高端调 色工作室所使用的技能。 一般来说, 您首先要做的就是对片段的暗部、 中间调和亮部进行优化。 您可以通过调整 “Lift” 、 “Gamma” 和 “Gain” 设置来实现。 这可以让您的素材画面有一个干净明亮的起点, 从而更好 地开展影片调色工作。... - Page 267 分量示波器可帮助您优化画面的亮部、 中间调和暗部。 Lift、 Gamma、 Gain和偏移色轮可让您控制片段的色彩及色调平衡。 拖动并来回滚动色轮下方的滚轮可对所有色彩的每种色调区域进行统一的调整。 调整 “ Lift ” 首先请在色彩时间线上选中一个片段, 点击位于第一个色轮下方的 “Lift” 滚轮。 来回滚动 该滚轮来查看该参数变化对画面的影响。 您可以看到画面中暗部的亮度会相应提高或降 低。 请根据需要进行设置, 使暗部区域获得最佳表现。 如果Lift参数提升过度, 暗部的细节 将丢失, 您可以参考分量示波器加以避免。 波形图上的暗部位置以恰好位于分量示波 器的底线之上为最佳。 调整 “ Gain ” 点击 “Gain” 滚轮并来回滚动。 该参数可调整亮部信息, 即片段中最亮的部分。 亮部信息位 于分量示波器的波形顶部。 如果画面有充足明亮的风光, 那么该画面在示波器中以恰好位 于波形顶线之下为最佳。 如果亮部信息超越了示波器波形的顶线, 那么这部分信息将被切 掉,...
-
Page 268: 二级调色
此外, 您还能使用曲线设置面板来实现一级调色。 只需通过点击操作在曲线图中的对角线上创建 控制点, 并上下拖拽来调整画面不同区域的主RGB对比度色调即可。 曲线调整的最佳位置位于底部 三分之一、 中部及顶部三分之一处。 DaVinci Resolve中还有很多方式来完成一级调色。 请参考DaVinci Resolve操作手册 了解全面的使用方法。 曲线面板工具也可用来进行一级调色, 或使用Power Window来强化片段中的局部区域。 二级调色 如果要对画面中的特定部分进行调整, 那么您就需要使用二级调色。 目前为止, 您使用色轮以及 Lift、 Gamma和Gain等参数所做的调整都会同时影响画面整体效果, 因此这些参数被称为 “一 级调色” 。 但是, 如果需要调整画面中的特定部分, 例如要美化画面中草地的部分, 或要加深天空的蓝色, 那么 就要用到二级调色功能。 二级调色时, 您可以选中局部画面内容, 并只对选中部分来进行调整。 您可 以使用节点将多个二级调色操作堆栈在一起, 这样就可以一直处理画面各部分内容, 直至所有部分 完成相应的处理!... -
Page 269: 添加Power Window
如何限定某一色彩: 添加一个新的串行节点。 打开 “限定器” 设置面板, 确保选中 “色彩范围” 采样取色器工具。 点击片段中您想要调整的色彩。 一般情况下, 您需要进行一些调整来柔化所选对象的边缘, 且该操作仅对所选颜色有效。 点击 “突出显示” 按钮查看所选内容。 调整 “色相” 窗口中的 “宽度” 控制来控制所选内容的宽窄。 尝试调整高区柔化、 低区柔化以及柔化程度控制工具来观察这些参数如何细化您的所选内容。 然 后您就可以使用轨迹球和自定义曲线对所选内容进行调整了 。 有时, 所选色彩会溢出到镜头中其 他不需要调整的部分。 您可以使用Power Window将不需要调整的部分通过遮罩功能隔离出来。 只 需创建新的Power Window窗口, 并调整其形状, 让它只包括所选色彩的区域。 如果所选色彩在镜 头中处于移动状, 您可以使用跟踪功能来跟踪Power Window。 添加 Power Window Power Window是极其高效的二级调色工具,... -
Page 270: 跟踪窗口
Power Window可以让您对画面中的特定部分进行二级调色。 跟踪窗口 由于拍摄画面中的摄影机、 物体或区域可能会移动, 因此为了确保窗口位于所选物体或区域, 您需 要使用DaVinci Resolve强大的跟踪功能。 跟踪器可分析摄影机或画面中物体的平移、 竖移以及缩 放和旋转, 以便您添加的窗口可始终跟随所选对象。 如果不进行窗口跟踪, 您的调色操作可能会离 开所选目标并给您造成不必要的麻烦。 您可以使用跟踪器功能来跟踪片段中的对象或区域, 以便Power Window跟随对象移动。 如何对移动的物体进行窗口跟踪: 创建新的串行节点并添加一个Power Window。 回到片段开头部分放置窗口并调整大小, 以便仅突出显示需要的区域。 打开 “跟踪器” 面板。 根据需要勾选或取消勾选相应的 “分析” 复选框, 为片段选择平移、 竖移、 缩放以及旋转等相应的3D设置。 点击复选框左侧的向前箭头。 然后DaVinci Resolve将会在您的片段上应用一组跟踪点, 并 逐帧分析对象的移动。 完成跟踪后, Power Window将跟随片段中的移动路径。 使用DaVinci Resolve... -
Page 271: 使用插件
大部分情况下使用自动跟踪便可以成功完成上述操作, 但是有时候场景会比较复杂, 并且有些物 体可能会从您选中的区域前景越过, 这会扰乱并影响跟踪功能。 此时您可以使用关键帧编辑器来 手动解决这一问题。 请参考DaVinci Resolve操作手册获得更多信息。 使用插件 从事二级调色时, 您可能还需要添加OpenFX插件在调色页面快速创建有趣的画面风格和效果, 或 在剪辑页面为片段添加富有创意的转场和特效。 OFX插件可通过第三方供应商购买或下载。 OFX插件是您发挥想象力进行趣味风格创作的一种快速便捷的途径。 安装一组插件后, 只要开启 “节点编辑器” 右侧的OpenFX检查器就能在调色页面中打开这些插件。 只需要点击 “OpenFX” 按钮就能打开OpenFX检查器, 并创建一个新的串行节点, 然后将某个插件 拖放到新的节点上即可。 如果该插件具有可编辑设置, 您可以在相邻的 “设置” 面板中使用这些设置。 您可以到 “剪辑” 页面下打开 “特效库” 中的 “OpenFX” 面板, 并将所选插件拖放到时间线片段的 视频轨道上, 为片段添加插件特效发生器和转场。 制作母版剪辑... - Page 272 然后, 您马上就会看到时间线上方出现选项框, 并且 “整条时间线” 选项被选中。 这样就会 导出整条时间线, 但是您可以根据需要选择一段时间线范围。 要进行这一操作, 只需要选 择入范围和出范围, 并使用 “i” 和 “o” 热键在时间线上选择入点和出点即可。 点击 “渲染设置” 底部的 “添加到渲染队列” 按钮。 “交付” 页面可用来导出您的剪辑。 您可以从中选择多种不同的视频格式和编解码器。 您的渲染设置将被添加到页面右侧的渲染队列中。 现在, 您只需要点击 “开始渲染” 并监看渲染队 列中的渲染进度即可。 当渲染工作完成后, 您可以打开目标文件夹, 双击新的渲染片段来查看完成后的剪辑片段。 将渲染设置添加到渲染队列后, 点击 “开始渲染” 按钮可导出您的剪辑。 使用DaVinci Resolve...
-
Page 273: 后期制作工作流程
后期制作工作流程 使用第三方软件 如果想使用自己喜爱的软件来剪辑素材, 您只需将素材复制到内置/外接硬盘或者RAID上, 再将素 材导入到该软件中即可。 如果有需要, 您甚至还能直接从SD卡上剪辑素材片段。 使用 Final Cut Pro X 若使用Final Cut Pro X剪辑Apple ProRes片段, 您需要创建一个和素材视频格式及帧率相对应的 新项目。 本例子中的素材均使用ProRes 422 1080p25设置。 运行Final Cut Pro X, 到 “Menu” (菜单) 中选择 “File” (文件) / “New Project” (新项 目) 后, 会出现一个含有项目设置的窗口。 给项目命名,... -
Page 274: 使用Adobe Premiere Pro Cc
选择用于导入文件的媒体库。 到 “File” > “AMA Link...” 选项中选择想要导入的文件, 然后点击 “OK” 。 当媒体库中显示出素材片段后, 您便可以将素材拖动到时间线上进行剪辑了 。 在Avid Media Composer 7上设置项目名称和项目选项。 使用 Adobe Premiere Pro CC 若使用Adobe Premiere Pro CC剪辑素材, 您需要创建一个和素材视频格式及帧率相匹配的新项 目。 本例子中的素材均使用ProRes 422 HQ 1080p25设置。 运行Adobe Premiere Pro CC。 在Welcome欢迎窗口中, 选择 “Create New” (创建) / “New Project”... -
Page 275: 使用Autodeck Smoke 2013
使用 Autodeck Smoke 2013 若使用Autodesk Smoke 2013剪辑素材, 您需要创建一个和素材视频格式、 位深度、 帧类型以及帧 率相对应的新项目。 在本例子中, 素材均使用ProRes 422 HQ 1080p25记录。 运行Smoke后, 会弹出 “Project and User Settings” (项目及用户设置) 窗口。 点击项目标 题下方的 “New” (新建) 按钮。 弹出 “CreateNewProject” (创建新项目) 窗口后, 为项目命名。 从分辨率下拉菜单中选择1920x1080HD 1080。 将位深度设置为10bit, 帧类型设置为 “Progressive” (逐行扫描) 。 在... - Page 276 在Windows 7系统下, 请到开始菜单打开Blackmagic Video Assist Setup。 点击 “帮助” 菜 ‚ 单并选择 “About Blackmagic Video Assist Setup” 后即可查看版本号。 在Windows 8系统下, 请从开始页面的Blackmagic Video Assist Setup板块打开 ‚ Blackmagic Video Assist Setup。 点击 “帮助” 菜单并选择 “About Blackmagic Video Assist Setup” 后即可查看版本号。 如何获得软件更新 检查完您计算机上安装的Blackmagic Video Assist Setup软件版本号之后, 请登录网址www. blackmagicdesign.com/support访问Blackmagic Design支持中心查看最新版本。 请及时将软件升...
- Page 277 保修 12 个月有限保修 Blackmagic Design保证本产品自购买之日起12个月内不会有材料和工艺上的缺陷。 若本产品在保 修期内出现质量问题, Blackmagic Design可选择为产品提供免费修理或更换零部 件, 或者更换缺陷产品。 为确保消费者有权享受本保修条款中的服务, 如遇产品质量问题请务必在保修期内联系 Blackmagic Design并妥善安排保修事宜。 消费者应将缺陷产品包装并运送到Blackmagic Design 的指定服务中心进行维修, 运费由消费者承担并预先支付。 若消费者因任何原因退货, 所有运费、 保险费、 关税等各项税务以及其他费用均由消费者承担。 本保修条款不适用于任何因使用、 维护不当或保养不周造成的缺陷、 故障或损坏。 根据本保修服 务, Blackmagic Design的保修服务范围不包括以下内容: 1. 对由非Blackmagic Design专门人员进 行的安装、 维修或保养所造成的损坏进行维修, 2. 对因使用不当或连接到不兼容设备所造成的损 坏进行维修, 3. 对因使用了非Blackmagic Design生产的零部件所导致的损坏或故障进行维修, 及 4.
- Page 278 설치 및 사용 설명서 Blackmagic Video Assist 2017 년 1 월 한국어...
- Page 279 Blackmagic Video Assist 에는 6G-SDI 입력이 탑재되어 Ultra HD 영상도 모니터링할 수 있습니다 . Blackmagic Video Assist 4K 는 2 개의 SD 카드에 Ultra HD 영상을 연속으로 녹화할 수 있으며 , 강력한 오디오 리코더가 탑재되어 있어 SDI 또는 HDMI 녹화 영상에 아날로그...
- Page 280 서드파티 소프트웨어와 함께 작업하기 SD 카드에 관하여 Final Cut Pro X 사용하기 빠른 SD 카드 선택하기 Avid Media Composer 사용하기 Video Assist 에서 SD 카드 포맷하기 Adobe Premiere Pro CC 사용하기 컴퓨터로 SD 카드 포맷하기 Autodesk Smoke 2013 사용하기 SD 카드 파일 작업하기...
-
Page 281: 시작하기
시작하기 전원 연결하기 전원을 연결하고 비디오 소스 및 오디오를 연결한 뒤 , SD 카드를 삽입하기만 하면 Blackmagic Video Assist 의 사용 준비가 완료됩니다 . 제품과 함께 제공되는 전원 어댑터를 Video Assist 우측면에 있는 전원 입력에 연결해 이 섹션에서는 사용 시작과 관련해... -
Page 282: 비디오 연결하기
일반 LP-E6 타입 배터리를 사용합니다. 비디오 연결하기 다음 단계로는 SDI 또는 HDMI 소스 입력을 Blackmagic Video Assist 의 미니 BNC 나 BNC 또는 HDMI 입력에 연결합니다 . Blackmagic Video Assist 는 먼저 연결된 SDI 또는 HDMI 입력을 자동으로 감지합니다 . 미니 BNC - 일반 BNC 케이블은 가까운 전문 비디오 장비 판매점에서... -
Page 283: Sd 카드 삽입하기
없습니다 . 일반적으로 카드 속도가 빠를수록 좋습니다 . Blackmagic Video Assist 4K 에서 Ultra HD 로 녹화할 경우 , 초고속 UHS-II 타입의 SD 카드 사용을 권장합니다 . 이러한 종류의 카드는 최대 2160p30 의 Ultra HD 녹화를 위해 110MB/s 이상의 쓰기... -
Page 284: Lanc 커넥터를 통한 원격 제어
Apple ProRes 및 Avid DNx 코덱를 사용해 QuickTime 파일로 클립을 녹화할 수 있습니다 . Blackmagic Video Assist 에서 타임코드 또는 SDI 및 HDMI 시작 / 정지 트리거 녹화 기능을 사용할 수 있도록 설정할 수 있습니다 . 이 기능을 사용할 경우 , HD-SDI 또는 HDMI 신호로 전송받은 정보를... -
Page 285: Dslr 카메라의 Hdmi 를 통해 클린 피드 녹화하기
일부 DSLR 카메라의 경우 , 8 비트 비디오를 자체적으로 녹화할 수 있으며 , 일부는 HDMI 출력을 통해 클린 피드를 제공하기도 합니다 . DSLR 카메라의 HDMI 출력을 Blackmagic Video Assist 에 연결할 경우 카메라 내부에서 파일을 압축하지 않고 10 비트 ProRes 및 Avid DNx 코덱을 사용해... -
Page 286: 터치스크린으로 설정 변경하기
반복 재생 반복 재생 아이콘을 한 번 누르면 Blackmagic Video Assist 에서 현재 클립을 반복 재생하도록 설정됩니다 . 다시 한번 누르면 리코더에 있는 모든 클립을 반복 재생합니다 . 세 번째 누르면 반복 재생 설정이 취소됩니다 . 재생 슬라이더를 앞뒤로 드래그해 클립 영상을 셔틀할 수 있습니다. 재생... - Page 287 포커스 피킹 및 포커스 어시스트 설정을 통해 영상 초점을 신속하게 맞출 수 있는 강력한 도구를 사용할 수 있습니다 . 포커스 피킹을 사용하면 영상의 가장 선명한 부분 가장자리에 선이 나타납니다 . 감도 설정을 통해 선의 굵기를 조절할 수 있습니다 . Blackmagic Video Assist 4K 에서는 가장자리에 나타나는 선의 색상을 변경할 수도 있습니다 .
- Page 288 다음과 같은 프레임 가이드를 선택할 수 있습니다 . HDTV 16:9 HD TV 및 컴퓨터 화면과 호환하는 1.78:1 종횡비 내에 영상의 안전 연기 영역 및 타이틀 안전 영역이 나타납니다 . SD TV 화면과 호환하는 4:3 종횡비를 나타내거나 , 2 개의 애너모픽 어댑터를 사용할 때 숏을 프레이밍하기...
- Page 289 사용해 원하는 코덱을 선택하세요 . 사용 가능한 코덱은 사용 중인 모델에 따라 다릅니다 . 예를 들어 , 두 모델 모두 HD 비디오를 다양한 비트 전송률의 Apple ProRes 및 Avid DNxHD 코덱으로 녹화할 수 있습니다 . Blackmagic Video Assist 4K 에서는 Ultra HD 를 위한 DNxHR 코덱 또한 사용할 수 있습니다 .
- Page 290 정지하도록 실행시킬 수 있습니다 . 트리거 녹화를 원하지 않을 경우 , [Never] 를 선택하세요 . 타임코드 런 (T/C Run) [T/C Run] 을 선택하면 Blackmagic Video Assist 가 SDI 또는 HDMI 소스에서 타임코드가 진행되는 것을 감지하자마자 녹화를 시작합니다 . 타임코드가 멈추면 녹화도 중단됩니다 . 이...
- Page 291 카드 (Card) 저장 설정에서 현재 선택된 SD 카드의 상태를 표시합니다 . Blackmagic Video Assist 4K 에는 2 개의 SD 카드 슬롯이 있습니다 . 다음과 같은 방법으로 녹화할 카드를 선택합니다 . 카드 상태가 표시된 부분을 누르거나 터치스크린을 좌 / 우로 쓸어넘기면 저장 설정...
- Page 292 카드 용량이 가득 차면 해당 표시가 빨간색으로 표시되면서 녹화가 중단됩니다 . 녹화가 중단되면 Video Assist 에서 최종 녹화 파일을 저장합니다 . Blackmagic Video Assist 4K 의 슬롯 2 에 포맷된 카드가 장착되어 있는 경우 , 슬롯 2 로 자동 전환되어 두 번째 카드로 녹화가 이어집니다 .
-
Page 293: 볼륨 및 아날로그 오디오 레벨
볼륨 및 아날로그 오디오 레벨 스피커 볼륨 Blackmagic Video Assist 4K 에 내장된 스피커 볼륨을 조정하려면 , LCD 화면을 위 / 아래로 쓸어 넘겨 화면에 나타나는 온 스크린 미터에서 오디오 미터를 누른 뒤 , 볼륨 및 아날로그 오디오 레벨을 설정하세요 . 볼륨 슬라이더를 간단히 드래그해 볼륨을 높이거나 줄일 수 있습니다 . -
Page 294: Storage 와 Monitor, Display, Audio 및 Setup 설정
정보 모니터링과 카드 포맷 , 모니터 및 디스플레이 설정 변경 , 날짜와 시간 설정 변경 등의 작업을 수행할 수 있습니다 . Blackmagic Video Assist 4K 의 경우 , 오디오 설정 또한 변경할 수 있습니다 . Blackmagic Video Assist 4K 의 화면을 좌 / 우로 쓸어 넘기거나 좌측 하단에 있는 뒤로 가기... - Page 295 재생할 경우 최대 6개의 3D LUT을 불러올 수 있습니다. 3D LUT 디스플레이 (Display 3D LUT) Blackmagic Video Assist 는 입력 비디오에 3D LUT 을 적용해 디스플레이할 수 있습니다 . 3D LUT 은 디스플레이에만 사용될 뿐 실제 영상에는 녹화되지 않기 때문에 LUT 이 녹화 영상에...
- Page 296 Video Assist를 위한 3D LUT을 최대 6개까지 불러올 수 있습니다. LUT 을 사용해 비디오 모니터링하기 Video Assist 터치스크린을 좌 / 우로 쓸어넘겨 Monitor 설정에 접속한 뒤 메뉴바에서 Monitor 를 누르세요 . 좌 / 우 화살표를 눌러 Display 3D LUT 설정을 On 으로 설정하세요 . 다시 한 번 누르면 LUT 이...
- Page 297 LCD 에는 적용되지만 , 녹화 영상에는 영향을 미치지 않는다는 점을 유념하시기 바랍니다 . 오디오 설정 (Audio Settings) Blackmagic Video Assist 4K 에는 강력한 오디오 리코더 또한 탑재되어 있습니다 . 각 XLR 입력은 다음과 같은 개별 설정을 지원합니다 . XLR Line 또는 XLR Mic, Video - 마이크 이외의 전문 오디오 장비를 아날로그 XLR 입력에...
-
Page 298: 온스크린 미터를 활용한 모니터링
[Save] 버튼을 눌러 변경 사항을 저장합니다 . 온스크린 미터를 활용한 모니터링 Blackmagic Video Assist 는 히스토그램과 오디오 레벨 미터 등 유용한 스코프를 지원하여 카메라 노출과 루미넌스 범위를 확인할 수 있을 뿐만 아니라 소스 오디오 레벨 또한 모니터링할 수 있습니다 . -
Page 299: Sd 카드에 관하여 빠른 Sd 카드 선택하기
확인할 수 있습니다 . 최신 버전의 설명서를 통해 주기적으로 최신 정보를 확인하는 것이 좋습니다 . Blackmagic Design 웹사이트 www.blackmagicdesign.com/kr/support 에서 다운로드할 수 있습니다 . 아래의 표에서 검증을 마친 SD 카드 정보를 확인할 수 있으며 , Blackmagic Video Assist 4K 에서 허용된 최대 포맷으로 비디오를 녹화할 수 있습니다 . 호환 SD 카드... -
Page 300: Video Assist 에서 Sd 카드 포맷하기
터치스크린을 좌 / 우로 쓸어 넘기거나 카드 상태 표시줄을 누르면 [Storage] 설정 메뉴가 나타납니다 . [Format Card] 아이콘을 누르세요 . Blackmagic Video Assist 4K 의 경우 , 선택한 카드의 아이콘을 누르세요 . 예를 들면 , [Format Card 1] 이나 [Format Card 2] 를 누르세요 . -
Page 301: 컴퓨터로 Sd 카드 포맷하기
컴퓨터로 SD 카드 포맷하기 macOS 또는 Windows 컴퓨터에서 SD 카드를 포맷할 수도 있습니다 . macOS 컴퓨터에서 SD 카드 사용 준비하기 macOS 에 포함된 디스크 유틸리티 응용프로그램을 사용하여 SD 카드를 HFS+ 또는 exFAT 로 포맷하거나 초기화하세요 . 포맷이 완료되면 SD 카드에 저장된 모든 데이터가 사라지므로 중요한 데이터는... -
Page 302: Sd 카드 파일 작업하기
SD 카드 슬롯을 탑재한 macOS 및 Windows 컴퓨터 또는 SD 카드 리더기를 통해 SD 카드의 ProRes 또는 DNx 파일에 바로 접속할 수 있습니다 . Blackmagic Video Assist 에서 SD 카드를 꺼낸 뒤 , 컴퓨터의 SD 카드 슬롯 또는 SD 카드 리더기에 삽입합니다 . SD 카드는 외장 하드 드라이버 , USB 드라이버 또는 다른 미디어... -
Page 303: 디스크 속도 확인
Blackmagic Video Assist Setup 환경 설정 Blackmagic Video Assist Setup 의 Configure 설정에서는 현재 Blackmagic Video Assist 에 설치된 내부 소프트웨어 버전을 확인할 수 있을 뿐만 아니라 장비 이름을 변경할 수도 있습니다 . Name 설정란 안을 클릭해 컴퓨터 키보드로 새로운 이름을 입력하세요 . - Page 304 작업이 완료된 디스크 이미지를 열어 Blackmagic Video Assist Setup 설치 프로그램을 실행합니다 . 화면에 나타나는 지시 사항을 따르세요 . 최신 버전의 Blackmagic Video Assist Setup 을 설치한 뒤 , USB 케이블로 Video Assist 를 컴퓨터에 연결합니다 . Blackmagic Video Assist Setup 을 실행한 뒤 , 화면에 나타나는 지시 사항에 따라...
-
Page 305: Davinci Resolve 사용하기
DaVinci Resolve 사용하기 DaVinci Resolve 소개 Blackmagic Video Assist 로 클립을 녹화하는 작업은 영화 및 TV 콘텐츠 제작의 한 부분일 뿐이며 편집 , 색보정 , 최종 마스터 파일 인코딩 작업과 미디어 백업 및 관리 절차 또한 제작에 있어 상당히 중요한 부분입니다 . Blackmagic Video Assist 에는 macOS 와 Windows 를 모두... -
Page 306: 클립 불러오기
성능의 기술을 탑재한 소프트웨어 도구로 , 일반 비선형 편집 소프트웨어 도구와는 비교할 수 없을 만큼 그 성능이 강력합니다 . DaVinci Resolve 의 이러한 최첨단 기술을 활용하여 편집과 색보정 작업을 진행할 수 있습니다 . 이 부분에는 DaVinci Resolve 에서 녹화 파일로 작업을 시작하는 방법에 대해 자세히 설명되어 있습니다... -
Page 307: 클립 편집하기
클립 편집하기 미디어풀에 클립이 저장된 상태에서 Edit 탭을 클릭하면 편집 페이지가 열립니다 . 이제 편집을 시작할 수 있습니다 ! 먼저 새로운 타임라인을 생성합니다 . 미디어풀을 우클릭한 뒤 Timelines > New Timeline 을 클릭합니다 . 해당 창이 나타나면 Create 버튼을 클릭합니다 . 클립의... -
Page 308: 클립 트리밍하기
편집 페이지 모습. 타임라인의 편집 기능을 사용하여 클립의 트리밍, 순서 이동, 위치 이동, 트랜지션 추가 등을 수행할 수 있습니다. 클립 트리밍하기 클립 편집 도중 각각의 숏에서 원하는 특정 액션만 트리밍하여 삽입해야 하는 경우가 많습니다 . 트리밍 방식에는 여러 가지가 있지만 , 가장 간단한 방식은 타임라인의 입 / 출력 포인트를 조절하는... -
Page 309: 키보드 단축키 매핑하기
키보드 단축키 매핑하기 다른 편집 소프트웨어에서 제공하는 키보드 단축키 사용이 익숙한 경우 , DaVinci Resolve 에서 직접 단축키를 지정하여 작업 속도를 높이고 워크플로를 최적화할 수 있습니다 . 키보드 단축키 매핑하기 DaVinci 화면 우측 하단에 있는 톱니바퀴 모양의 Project Setting 아이콘을 클릭하고 , 설정... -
Page 310: 타이틀 추가하기
두 개의 클립 사이에 디졸브 트랜지션 추가하기 타임라인에 두 개의 편집 클립이 서로 맞닿아 있는지 확인합니다 . Edit 페이지 상단의 UI 도구 모음에서 Effects Library 버튼을 클릭하여 Toolbox 패널이 열렸는지 확인합니다 . Cross Dissolve 트랜지션을 타임라인에 드래그한 뒤 , 두 개의 클립이 만나는 편집 포인트에... -
Page 311: 오디오 트랙 추가하기
Title 팔레트에서 원하는 유형의 타이틀을 드래그하여 빈 트랙에 추가합니다. 오디오 트랙 추가하기 음향 편집에 많은 음향 효과를 믹스할 시 , 필요에 따라 오디오 트랙을 추가하여 사용할 수 있습니다 . 오디오 트랙 추가하기 타임라인 맨 마지막에 있는 오디오 파일명을 우클릭하고 [Add Track] 을 선택하세요 . Stereo, Mono, 5.1, Adaptive 중에서... -
Page 312: 클립 색보정하기
클립 색보정하기 클립에서 원하는 장면의 편집이 끝나면 색보정을 시작할 수 있습니다 . 이는 시퀀스 편집을 마친 뒤에 색보정을 시작해야 영상의 일관성을 유지할 수 있기 때문입니다 . 하지만 Edit 페이지와 Color 페이지를 자유자재로 이동할 수 있는 DaVinci Resolve 의 뛰어난 기능 덕분에 더욱 미세한 작업이... - Page 313 퍼레이드 스코프는 하이라이트, 미드톤, 섀도우를 최적화할 수 있도록 도와줍니다. 리프트, 감마, 게인, 오프셋을 위한 각각의 컬러휠을 사용하여 클립의 전체 색상과 색상의 균형을 조절할 수 있습니다. 각각의 컬러휠에서 균일하게 색상을 조절하려면 컬러휠 아래 위치한 다이얼을 앞/뒤로 움직여 조절합니다. Lift 조절하기 Color 페이지 타임라인의 첫 번째 클립을 선택한 상태에서 첫 번째 Lift 컬러휠 아래 위치한...
-
Page 314: 세컨더리 색보정
커브 팔레트를 사용하여 프라이머리 색보정을 진행할 수도 있습니다 . 커브 그래프 안에 그려진 대각선 위를 클릭하면 컨트롤 포인트가 생깁니다 . 이 포인트를 위 / 아래로 드래그하여 이미지 속 각 부분의 마스터 RGB 콘트라스트를 조절합니다 . 커브 라인을 3 분의 1 로 나눴을 때 , 맨 아래와 중간... -
Page 315: 파워 윈도우 추가하기
색상 식별하는 방법 새로운 시리얼 노드를 추가하세요 . Qualifier 팔레트를 열고 Color Range 의 샘플 점안기 도구가 선택되어 있는지 확인하세요 . 클립에서 보정하려는 특정 색상을 클릭합니다 . 대부분의 경우 , 선택 영역의 테두리를 부드럽게 조절하고 , 선택 영역의 색상만 보정해야 합니다... -
Page 316: 윈도우 트래킹
세컨더리 색보정 단계에서 사용하는 파워 윈도우는 이미지의 특정 부분에만 효과를 줍니다. 윈도우 트래킹 카메라 또는 숏의 피사체 및 특정 부분이 움직일 수도 있으므로 , DaVinci Resolve 의 강력한 트래킹 기능을 사용하여 항상 윈도우가 선택한 피사체 및 영역에 머무르도록 합니다 . 트래킹 기능은... -
Page 317: 플러그인 사용하기
자동 트래킹 기능은 대부분의 상황에서 성공적으로 사용할 수 있지만 , 복잡한 장면이나 선택 영역 앞으로 물체가 지나가는 장면에서는 트래킹 기능이 방해를 받을 수도 있습니다 . 이러한 문제는 키프레임 편집 기능을 수동으로 사용하여 해결할 수 있습니다 . 더 자세한 정보는 DaVinci Resolve 설명서를... - Page 318 타임라인 바로 위에 Entire Timeline 으로 선택된 옵션 상자가 있습니다 . 해당 설정은 전체 타임라인을 엑스포트하는 설정으로 , 원할 경우 다양한 타임라인 옵션으로 설정 가능합니다 . 간단히 In/Out Range 로 선택한 뒤 , i 및 o 단축키를 사용하여 타임라인의 입 / 출력...
-
Page 319: 후반 제작 워크플로
후반 제작 워크플로 서드파티 소프트웨어와 함께 작업하기 사용하고자 하는 편집 소프트웨어가 따로 있을 경우 , 내장 / 외장 드라이버 또는 RAID 에 클립을 복사한 뒤 소프트웨어로 클립을 불러옵니다 . SD 카드에서 바로 클립을 편집할 수도 있습니다 . Final Cut Pro X 사용하기 Apple ProRes 클립을... -
Page 320: Adobe Premiere Pro Cc 사용하기
불러올 파일이 있는 미디어 빈을 선택합니다 . File > AMA Link …를 선택하고 불러올 파일을 선택한 뒤 , [OK] 를 클릭합니다 . 미디어 빈에 클립이 나타나면 클립을 타임라인에 드래그한 뒤 편집을 시작할 수 있습니다 . Avid Media Composer 7의 프로젝트 이름과 옵션을 설정하세요. Adobe Premiere Pro CC 사용하기... -
Page 321: Autodesk Smoke 2013 사용하기
Autodesk Smoke 2013 사용하기 Autodesk Smoke 2013 을 사용하여 클립을 편집하려면 클립의 영상 포맷 , 비트 심도 , 프레임 타입 , 프레임 레이트에 맞는 새로운 프로젝트를 생성하세요 . 여기서는 클립을 ProRes 422 HQ 1080p25 로 설정한 것을 예로 듭니다 . Smoke 를... - Page 322 ‚ 실행합니다 . 애플리케이션 메뉴에서 About Blackmagic Video Assist Setup 을 선택하고 버전을 확인하세요 . Windows 7 에서는 시작 메뉴에서 Blackmagic Video Assist Setup 을 실행합니다 . 도움 ‚ 메뉴에서 About Blackmagic Video Assist Setup 을 선택하고 버전을 확인하세요 .
- Page 323 보증 12 개월 한정 보증 Blackmagic Design 은 본 제품의 부품 및 제조에 어떠한 결함도 없음을 제품 구매일로부터 12 개월 동안 보증합니다 . 보증 기간 내에 결함이 발견될 경우 , Blackmagic Design 은 당사의 결정에 따라 무상 수리 또는 새로운 제품으로 교환해드립니다 . 구매...
- Page 324 Blackmagic Video Assist 2017 .
- Page 325 для записи мастер-копий при работе с эфирным видеомикшером. Интерфейс 6G-SDI обеспечивает вывод на экран видео сверхвысокой четкости. Модель Blackmagic Video Assist 4K имеет два слота для непрерывной записи в Ultra HD на SD-карты, а также позволяет встраивать аналоговый звук в SDI- или HDMI-сигнал. Благодаря такой...
- Page 326 Содержание Blackmagic Video Assist Проверка скорости диска Подключение питания Blackmagic Video Assist Setup Подключение источников видео DaVinci Resolve Подключение источников аудио Импорт клипов Установка SD-карт Монтаж видеоклипов Подгонка клипов Дистанционное управление по Назначение сочетаний клавиш протоколу LANC Добавление переходов Непрерывная запись...
-
Page 327: Подключение Питания
Чтобы начать работу с Blackmagic Video Assist, достаточно подключить питание, источники видеосигнала и звука, а также установить SD-карту. Подключите прилагаемый сетевой адаптер ко входу питания с правой стороны Video Assist. В этой главе описан порядок работы с устройством. При использовании внешнего источника питания... -
Page 328: Подключение Источников Видео
устройство с HDMI-экраном или SDI-монитором через HDMI- или SDI-выход. Подключите наушники к соответствующему гнезду, чтобы слушать аудио во время записи и воспроизведения клипа. На Blackmagic Video Assist 4K во время просмотра видео звук также можно выводить через встроенный динамик. Так как звук встроен в SDI- и HDMI-сигнал, при подключении источника видео также используется... - Page 329 Blackmagic Video Assist 4K поддерживает работу с Ultra HD вплоть до 2160p/30. Для такого видео рекомендуется использовать SD-карты класса UHS-II со скоростью записи свыше 110 Мбайт/с. Модель Blackmagic Video Assist 4K имеет два слота для карт памяти. Запись можно вести на любую из них. Если требуется обеспечить непрерывное сохранение, установите два накопителя.
-
Page 330: Протоколу Lanc
протоколу LANC. Для этого контроллер необходимо подключить к разъему LANC 2,5 мм с правой стороны устройства. Blackmagic Video Assist 4K имеет два слота для SD-карт. Если в каждый из них установить отформатированные накопители, можно вести непрерывную запись. После заполнения первого... - Page 331 DSLR Проведите пальцем по сенсорному экрану вверх или вниз, чтобы скрыть выводимые параметры и видеть только изображение с DSLR-камеры. На Blackmagic Video Assist 4K строка состояния в верхней части ЖК-дисплея не накладывается на изображение, что позволяет без помех просматривать видео.
- Page 332 специальная панель. Она отображает количество записанных на SD-карту файлов, номер текущего клипа и его продолжительность. Blackmagic Video Assist имеет встроенный сенсорный экран, предназначенный для вывода видео с аудио и изменения настроек. Для изменения большинства настроек достаточно коснуться соответствующего значка в строке...
- Page 333 Функция Focus Assist является мощным инструментом для быстрой установки фокуса. При выборе опции Peaking наиболее резкие элементы изображения выделяются линиями. Шкала чувствительности позволяет задать их интенсивность. На модели Blackmagic Video Assist 4K можно также изменить цвет этих линий. Чтобы включить отображение контуров или изменить настройку их чувствительности, коснитесь...
- Page 334 Доступны несколько видов рамки. HDTV Эта опция позволяет отображать границы текста и изображения с пропорциями кадра 1,78:1, которые соответствует соотношению 16:9 для ТВ-экранов высокой четкости и компьютерных мониторов. Отображение в формате 4:3, который подходит для телевизоров стандартной четкости и для кадрирования...
- Page 335 720p/50/59,94/60 1080i/50/59,94/60 1080p/23,98/24/25/29,97/30/50/59,94/60 2160p/23,98/24/25/29,97/30 (Blackmagic Video Assist 4K) Чтобы открыть настройки кодека, нажмите на значок Codec, затем коснитесь одной из стрелок либо слайдера. Доступные кодеки зависят от используемой модели. Например, запись HD-материала в Apple ProRes и Avid DNxHD с разным битрейтом возможна на обеих моделях, а Blackmagic Video Assist 4K также...
- Page 336 работе с камерами без поддержки функции "SDI start/stop". Чтобы тайм-код обновлялся только во время записи, на камере необходимо активировать настройку "Record Run". Если камера использует другую настройку тайм-кода (например, на основе времени суток), она будет постоянно запускать запись на Blackmagic Video Assist. Настройки...
- Page 337 Отображает источник входящего SDI- или HDMI-сигнала, поступающего на Blackmagic Video Assist. Монитор-рекордер использует тот из них, который был подключен первым. Если появится новый источник, Blackmagic Video Assist перейдет на работу с ним только в том случае, когда потерян предыдущий сигнал. Это позволяет применять дублирование.
- Page 338 выполняется одновременно. В зависимости от типа и состояния батареи для полной зарядки (без использования в течение этого времени) требуется примерно три часа. На Blackmagic Video Assist две полностью заряженных аккумуляторных батареи Canon LP-E6 позволяют вести запись примерно в течение трех часов, на Blackmagic Video Assist 4K — в течение 80 минут. Настройки...
-
Page 339: Громкость И Уровни Аналогового Звука
дисплея. Если к Blackmagic Video Assist 4K подключена стереогарнитура, вместо громкости динамика используется громкость наушников. Уровень можно изменить простым перетаскиванием слайдера. На Blackmagic Video Assist 4K уровни аналогового звука на XLR-входах можно изменить простым перетаскиванием слайдера. Диапазон регулировки каждого канала: от +10 дБ до +65 дБ. Настройки... -
Page 340: Настройки Storage, Monitor, Display, Audio И Setup
Проведите пальцем по экрану в горизонтальном направлении, чтобы открыть дополнительные настройки. Эта функция позволяет проверять свойства SD-карты и форматировать ее, выбирать настройки дисплея и мониторинга, устанавливать дату и время. На Blackmagic Video Assist 4K можно также менять настройки звука. Чтобы скрыть настройки и вернуться к видео, проведите... - Page 341 Display 3D LUT ( 3D LUT- Blackmagic Video Assist позволяет обрабатывать поступающее видео с помощью 3D LUT-таблицы. Она применяется только к выводимому на дисплей изображению и не влияет на запись материала. Если на этапе постпроизводства необходимо воссоздать такую же цветовую схему, эту таблицу в виде...
- Page 342 С помощью утилиты Blackmagic Video Assist Setup на монитор-рекордер можно загрузить до шести 3D LUT-таблиц LUT- Чтобы открыть настройки Monitor, проведите пальцем по экрану в горизонтальном направлении и коснитесь значка Monitor в строке меню. С помощью правой или левой стрелки выберите опцию On для настройки Display 3D LUT.
- Page 343 При отключении устройства от сети все настройки сохраняются. Любые изменения этих настроек затрагивают только изображение на дисплее и не влияют на записываемое видео. Blackmagic Video Assist 4K также позволяет записывать качественную звуковую дорожку. Для каждого XLR-входа можно использовать несколько разных настроек.
-
Page 344: Мониторинг С Помощью Экранных Индикаторов
Чтобы изменить дату или время, коснитесь значка для перехода к нужному параметру. Нажмите Save для подтверждения ввода. Blackmagic Video Assist имеет экранные индикаторы, которые позволяют выводить гистограмму, отображающую уровень экспозиции и распределение яркости, а также проверять уровень звука. Гистограмма отображает распределение яркости в видео. Черному цвету соответствует крайняя... -
Page 345: Выбор Скоростной Sd-Карты
только в HD подойдут карты UHS-I. Эти носители обеспечивают высокую скорость передачи и хранение большого объема данных. Для записи Ultra HD-видео на Blackmagic Video Assist 4K потребуются самые скоростные карты UHS-II. Таблица ниже содержит перечень последних моделей, которые можно использовать для... -
Page 346: Blackmagic Video Assist
Проведите пальцем по сенсорному экрану в горизонтальном направлении или коснитесь значка с отображением состояния карты, чтобы открыть настройки Storage. Коснитесь кнопки Format Card. На Blackmagic Video Assist 4K коснитесь кнопки, которая соответствует нужной карте, т. е. Format card 1 или Format Card 2. - Page 347 Форматирование SD-карт можно также выполнить с помощью компьютера на платформе macOS или Windows. macOS Для форматирования (инициализации) SD-карты под систему HFS+ или exFAT воспользуйтесь дисковой утилитой Disk Utility, которая входит в пакет macOS. Если носитель уже содержит какие-либо данные, выполните их резервное копирование, потому что при форматировании они будут удалены. Установите...
- Page 348 слот компьютера с операционной системой macOS или Windows либо с помощью устройства чтения. Извлеките SD-карту из Blackmagic Video Assist и установите ее в соответствующий слот компьютера или устройство чтения. Доступ к карте осуществляется так же, как к внешнему жесткому диску, накопителю USB или другому устройству хранения данных, подключенному...
-
Page 349: Проверка Скорости Диска
скорости SD-карт Blackmagic Video Assist Setup Configure Blackmagic Video Assist Setup имеет вкладку Configure, которая отображает текущую версию прошивки и позволяет изменить имя устройства. Чтобы присвоить монитору-рекордеру новое имя, щелкните кнопкой мыши в поле Name и введите нужный текст с клавиатуры. - Page 350 Загрузите и распакуйте Blackmagic Video Assist Setup. Найдите папку Blackmagic Video Assist Setup, в которой содержатся данное руководство и установщик Blackmagic Video Assist Setup. Дважды щелкните кнопкой мыши по значку установщика и следуйте инструкциям на экране. После установки последней версии Blackmagic Video Assist Setup подключите монитор- рекордер...
-
Page 351: Davinci Resolve
DaVinci Resolve DaVinci Resolve Запись с помощью Blackmagic Video Assist — это только один из этапов создания телевизионной программы или кинофильма. Не менее важные функции — сохранение материала и его систематизация, в том числе монтаж, цветокоррекция и кодировка конечных мастер-копий. В... -
Page 352: Импорт Клипов
Resolve имеет доступ к инструментам, с помощью которых создают самые известные голливудские фильмы. Ниже описан порядок использования DaVinci Resolve при монтаже записанного материала. Чтобы узнать больше о функционале этого приложения, обратитесь к руководству по DaVinci Resolve в pdf-файле, которое содержится на SD-карте с программным обеспечением. В Интернете можно найти... -
Page 353: Монтаж Видеоклипов
Для монтажа клипов, находящихся в Media Pool, откройте вкладку Edit. Теперь можно начать редактирование. Сначала создайте новую монтажную линейку. Нажмите правой кнопкой мыши в любом месте окна Media Pool и выберите Timelines>New Timeline. В открывшемся диалоговом окне нажмите Create. Чтобы начать редактирование клипа, создайте новую монтажную линейку. Все... -
Page 354: Подгонка Клипов
На странице Edit с помощью монтажной линейки выполняют подгонку клипов, меняют их последовательность и добавляют переходы Во время монтажа необходимо выполнять подгонку клипов, чтобы отредактированный материал содержал только нужные фрагменты. Самый простой способ подгонки — задать точки входа и выхода на монтажной линейке. Добавив... -
Page 355: Назначение Сочетаний Клавиш
Для оптимизации и ускорения работы в DaVinci Resolve можно назначить сочетания клавиш, которые вы используете в других приложениях для монтажа. Нажмите значок Project Settings в правом нижнем углу интерфейса DaVinci Resolve, затем из списка настроек выберите Keyboard Mapping. Выберите сочетания клавиш в предлагаемых группах. Например, сочетания для функций Cut и... -
Page 356: Добавление Титров
Убедитесь в том, что два клипа расположены на монтажной линейке непосредственно рядом друг с другом. Нажмите кнопку Effects Library вверху страницы Edit и убедитесь в том, что открыта панель Toolbox. Выберите переход Cross Dissolve, перетащите его на монтажную линейку и наведите курсор... -
Page 357: Добавление Звуковых Дорожек
Перетащите тип титра с панели Titles и поместите его на пустой трек Для микширования звука, наложения эффектов и музыки можно добавить новые звуковые дорожки. Щелкните правой кнопкой мыши рядом с именем последней звуковой дорожки на монтажной линейке и выберите Add Track. Выберите... -
Page 358: Цветокоррекция Клипов
После того как последовательность клипов смонтирована, можно приступать к цветокоррекции. Грейдинг дает наилучшие результаты, если его выполнять после редактирования, потому что в этом случае легко получить однородный визуальный ряд. Вместе с тем, DaVinci Resolve позволяет переключаться между страницами монтажа и цветокоррекции, если необходимо внести отдельные изменения. - Page 359 Дисплей параметров помогает выбрать оптимальные параметры областей света, полутона и тени Круги Lift, Gamma, Gain и Offset предназначены для изменения параметров цвета и баланса тонов. Чтобы выполнить глобальную коррекцию всех цветов для каждой области, перетащите слайдер шкалы вперед или назад. Lift Выберите...
-
Page 360: Вторичная Цветокоррекция
Для выполнения первичной цветокоррекции можно также использовать кривые. Чтобы изменить общую контрастность изображения для всех трех каналов (RGB), создайте точки на диагональной линии, щелкнув кнопкой мыши в нужных местах, и перетащите их вверх или вниз. Для оптимального результата лучше выбрать точки в верхней и нижней третях, а также посередине. Первичную... -
Page 361: Добавление Зоны Power Window
Добавьте новый последовательный узел. Откройте панель Qualifier и убедитесь в том, что выбран инструмент Color Range. Щелкните кнопкой мыши на том цвете, который нужно обработать. Обычно требуется дополнительно изменить отдельные параметры, чтобы сделать более ровными края области с выбранным цветом. Нажмите кнопку Highlight, чтобы увидеть выбранную... -
Page 362: Трекинг Зон
Зона Power Window позволяет выполнять вторичную цветокоррекцию отдельных участков изображения Так как камера и предметы в кадре могут двигаться, для привязки зоны к выбранному участку используют функцию отслеживания. Она анализирует положение камеры и перемещение предметов, позволяя сохранить заданные зоны. Если этого не сделать, цветокоррекция может затронуть те области, которые... -
Page 363: Использование Плагинов
В большинстве случаев автоматический трекинг бывает успешным, однако для некоторых сложных сцен может потребоваться ручная обработка с помощью редактора ключевых кадров. Более подробно эта функция описана в руководстве по DaVinci Resolve. При выполнении вторичной цветокоррекции можно использовать плагины OpenFX, которые позволяют... - Page 364 Непосредственно над монтажной линейкой находится окно Entire Timeline. Оно служит для выбора полной временной шкалы либо определения ее диапазона. Выберите In/Out Range, затем с помощью клавиш I и O задайте точки входа и выхода на временной шкале. Внизу окна Render Settings нажмите кнопку Add to Render Queue. После...
-
Page 365: Работа С Final Cut Pro
Чтобы выполнить монтаж видео в любом другом приложении, скопируйте клипы на внутренний/ внешний диск или RAID-массив, а затем импортируйте их в программу. Клипы можно также редактировать непосредственно на SD-карте. Final Cut Pro X Чтобы отредактировать клипы Apple ProRes в Final Cut Pro X, создайте новый проект с такими же настройками... -
Page 366: Работа С Adobe Premiere Pro Cc
Укажите папку, в которую необходимо импортировать файлы. Выберите File>AMA Link...,… укажите файлы для импорта и нажмите OK. Когда клипы отображаются в папке, их можно поместить на монтажную линейку перетаскиванием и начать монтаж. Создание нового проекта и выбор настроек в Avid Media Composer 7 Adobe Premiere Pro CC Чтобы... -
Page 367: Работа С Autodesk Smoke 2013
Autodesk Smoke 2013 Чтобы отредактировать клипы в Autodesk Smoke 2013, создайте новый проект с такими же настройками формата, глубины цвета, вида развертки и частоты кадров, как у имеющегося видео. В примере ниже для записи используется формат ProRes 422 HQ 1080p/25. Запустите... - Page 368 позвонить в ближайшее представительство Blackmagic Design, телефон которого вы найдете на нашем веб-сайте. Чтобы узнать версию Blackmagic Video Assist, установленную на вашем компьютере, откройте окно About Blackmagic Video Assist Setup. На компьютере с операционной системой macOS откройте Blackmagic Video Assist ‚...
- Page 369 Компания Blackmagic Design гарантирует отсутствие в данном изделии дефектов материала и производственного брака в течение 12 месяцев с даты продажи. Если во время гарантийного срока будут выявлены дефекты, Blackmagic Design по своему усмотрению выполнит ремонт неисправного изделия без оплаты стоимости запчастей и трудозатрат или заменит такое изделие новым. Чтобы...
-
Page 370: Italiano
Manuale di istruzioni Blackmagic Video Assist Gennaio 2017 Italiano... - Page 371 Blackmagic Video Assist include un ingresso 6G-SDI per monitorare i contenuti Ultra HD. Blackmagic Video Assist 4K cattura in Ultra HD su due schede SD, per una registrazione illimitata in SDI e HDMI completa di audio analogico. È un monitor e un registratore talmente versatile da essere compatibile con qualsiasi videocamera e adatto a ogni progetto.
- Page 372 Istruzioni per Avid Media Composer Formattare le schede SD con Istruzioni per Adobe Premiere Pro CC il computer Istruzioni per Autodesk Smoke 2013 Utilizzare i file delle schede SD Assistenza Controllare la velocità del disco Blackmagic Video Assist Setup Garanzia...
-
Page 373: Operazioni Preliminari
“Impostazioni” di questo manuale. Per accendere il dispositivo, premi il pulsante di accensione sul lato destro di Video Assist. Per spegnerlo, tieni premuto lo stesso pulsante un po’ più a lungo. -
Page 374: Collegare La Fonte Video
I cavi mini BNC sono anche conosciuti come connettori DIN 1.0/2.3. Connetti la fonte video all'ingresso SDI o HDMI sul lato sinistro di Video Assist. Puoi anche connettere una Tv HDMI o un monitor SDI all'uscita HDMI o SDI. Per ascoltare l'audio delle tue clip durante la registrazione e la riproduzione, connetti le cuffie all'ingresso per jack. -
Page 375: Inserire La Scheda Sd
Solitamente le schede più veloci offrono una qualità superiore. Per registrare in Ultra HD su Blackmagic Video Assist 4K, sono preferibili le schede SD UHS-II, dalla velocità di scrittura di oltre 110MB/s per l'Ultra HD 2160p30. Blackmagic Video Assist 4K offre due slot per schede SD: puoi registrare su una delle due, oppure su entrambe. -
Page 376: Controllo Remoto Tramite Il Connettore Lanc
Video Assist. Registrazione senza interruzioni Blackmagic Video Assist 4K offre una registrazione illimitata utilizzando due slot per schede SD. Quando è importante registrare gli eventi senza interruzioni, inserisci una scheda SD formattata nel secondo slot, per continuare a registrare quando la prima scheda è piena. Questo procedimento evita la perdita dei fotogrammi. -
Page 377: Registrare In Hdmi "Pulito" Dalle Dslr
"pulito". In questo modo si evita che gli overlay della DSLR vengano registrati insieme al video. Per escludere gli overlay di registrazione dal segnale video, segui queste istruzioni: Passa il dito verso l'alto o verso il basso sullo schermo di Video Assist per nascondere le informazioni di registrazione del dispositivo e monitorare esclusivamente le immagini provenienti dalla DSLR. -
Page 378: Impostazioni
Impostazioni Cambiare le impostazioni dallo schermo touch Blackmagic Video Assist offre uno schermo touch, per monitorare l'audio e il video della registrazione e cambiare le impostazioni. Le icone sulla barra di stato sulla parte superiore dell'LCD danno accesso alle impostazioni principali. - Page 379 Video Assist è connesso a una videocamera. Gli overlay non sono visibili se si utilizza l'uscita SDI o HDMI di Blackmagic Video Assist. ZEBRA La funzione Zebra consente di impostare l'esposizione ottimale, mostrando linee diagonali sulle aree sovraesposte dell'immagine.
- Page 380 Scegli tra le seguenti guide d'inquadratura: HDTV Mostra la safe area di ripresa e dei titoli con un rapporto d'aspetto di 1.78:1, compatibile con televisioni HD 16:9 e con gli schermi dei computer. Mostra il rapporto d'aspetto 4:3, compatibile con televisioni SD, e agevola le riprese quando vengono utilizzati adattatori anamorfici 2x.
- Page 381 I codec disponibili sono differenti secondo il modello. Per esempio, entrambi i modelli registrano in HD su codec Apple ProRes e Avid DNxHD con la scelta di diversi bitrate. Blackmagic Video Assist 4K inoltre registra in Ultra HD con i codec ProRes e DNxHR. Impostazioni...
- Page 382 "Never". T/C Run Selezionando "T/C Run", Blackmagic Video Assist comincia a registrare dopo aver rilevato il timecode attivo della fonte SDI o HDMI. La registrazione termina quando il timecode di entrata s'interrompe. Questa funzione è molto utile quando si impiegano videocamere che non consentono di avviare o interrompere la registrazione tramite SDI.
- Page 383 SOURCE Mostra il tipo di fonte SDI o HDMI di entrata. Video Assist legge la prima fonte connessa in presenza di due fonti collegate. Se il segnale della prima si disconnette anche per qualche istante, Blackmagic Video Assist passa automaticamente alla seconda. Questa funzione è molto utile per mantenere un segnale di riserva.
- Page 384 Lo stato si illumina di rosso fisso quando la scheda è piena e la registrazione termina. Video Assist salverà l'ultimo file registrato. Se è presente una scheda formattata nello slot 2 di Blackmagic Video Assist 4K, la registrazione continua automaticamente sulla seconda scheda.
-
Page 385: Volume E Livelli Audio Analogico
Volume e livelli audio analogico Volume dello speaker Per regolare il volume dello speaker integrato a Blackmagic Video Assist 4K, passa il dito verso l'alto o il basso dell'LCD per mostrare gli indicatori di livello. Tocca i livelli audio per accedere alle impostazioni del volume e dell'audio analogico. -
Page 386: Archiviazione, Monitoraggio, Display, Audio E Configurazione
SD, formattare la scheda, regolare le opzioni di monitoraggio e del display, e cambiare data e ora. Su Blackmagic Video Assist 4K puoi anche regolare i livelli audio. Per nascondere le impostazioni e tornare alle immagini, scorri il dito verso destra o sinistra, o tocca l’icona di ritorno sulla parte un basso a sinistra. - Page 387 Display 3D LUT Blackmagic Video Assist consente di visualizzare il video in entrata con le LUT 3D. Le LUT 3D sono utili ai fini del monitoraggio ma non hanno alcun effetto sulla registrazione. Se desideri applicare la stessa LUT 3D alle immagini in fase di post, basta importare il file .cube utilizzato su...
- Page 388 Blackmagic Video Assist Setup. Per monitorare le immagini con le LUT: Passa il dito sul display touch di Video Assist, e poi tocca la tab “Monitor” dalla barra dei menù. Usa le frecce di “Display 3D LUT” e seleziona ON. Tocca di nuovo per disabilitare le LUT.
- Page 389 Assicurati che l'alimentazione phantom sia impostata su "Off" per non danneggiare i microfoni a batterie. SETUP Tocca la tab "Setup" per impostare data e ora interne di Blackmagic Video Assist. Inoltre visualizza il nome del dispositivo, la lingua, e la versione del software in uso. Data e ora Impostando data e ora, è...
-
Page 390: Monitorare I Livelli Su Schermo
Per cambiare il giorno, il mese, l'anno e l'ora, tocca sull'icona desiderata. Clicca "Save" per confermare. Monitorare i livelli su schermo Blackmagic Video Assist offre indicatori di livello come istogrammi e livelli audio, per controllare l'esposizione e luminanza della videocamera e monitorare l'audio della fonte collegata. Istogramma L'istogramma mostra la distribuzione della luminanza del tuo video. -
Page 391: Informazioni Sulle Schede Sd
Per registrare in Ultra HD con Blackmagic Video Assist 4K, utilizza le schede UHS-II più veloci. La tabella qui sotto mostra le ultime schede SD compatibili con la registrazione in Ultra HD, HD e SD. -
Page 392: Formattare Le Schede Sd Con Video Assist
"Formatting complete". Tocca l'icona "Ok" per ritornare alla tab "Storage". Video Assist formatta le schede SD in HFS+ e exFAT dalla tab delle impostazioni. Passa il dito verso destra o sinistra sullo schermo touch per accedere alle impostazioni di archiviazione "Storage". -
Page 393: Formattare Le Schede Sd Con Il Computer
Formattare le schede SD con il computer Puoi formattare le schede SD con un computer Mac OS o Windows. Formattazione delle schede SD su Mac OS Usa “Utilità disco” su Mac OS per formattare la scheda SD nei formati Mac OS esteso ( journaling) o exFAT. -
Page 394: Utilizzare I File Delle Schede Sd
Mac OS o Windows o in un lettore esterno di schede SD. Estrai la scheda SD dal Blackmagic Video Assist e inseriscila nello slot SD del computer, o nel lettore esterno di schede SD. Puoi accedere alla scheda SD come qualunque altro dispositivo di archiviazione esterno, ad esempio un disco rigido esterno, o una chiavetta USB. -
Page 395: Controllare La Velocità Del Disco
Blackmagic Video Assist Setup Impostazioni di configurazione La voce “Configure” delle impostazioni di Blackmagic Video Assist Setup mostra la versione del software interno installato su Video Assist, e consente di cambiare il nome del dispositivo. Clicca su “Name” e digita il nuovo nome usando la tastiera del tuo computer. - Page 396 Aggiornamento del software interno Gli aggiornamenti del software interno del tuo Blackmagic Video Assist saranno disponibili sul sito di Blackmagic Design. Si consiglia di scaricare gli aggiornamenti per utilizzare appieno le funzioni esistenti e migliorare le prestazioni di Blackmagic Video Assist.
-
Page 397: Davinci Resolve
DaVinci Resolve Funzioni di DaVinci Resolve Registrare le clip con Blackmagic Video Assist rappresenta solo una parte del processo di creazione di materiale televisivo e cinematografico. Altrettanto importanti sono la gestione e il back up del materiale multimedia, il montaggio, la correzione colore e la codifica dei master finali. -
Page 398: Importare Le Clip
Di seguito troverai le istruzioni per cominciare ad usare DaVinci Resolve con le tue clip. Questo programma è estremamente avanzato, ed include numerosissime funzioni che potrai scoprire consultando il pdf del manuale di istruzioni contenuto nella scheda SD del software di DaVinci Resolve, oppure grazie ai tanti video di dimostrazione e tutorial online. -
Page 399: Montare Le Clip
Montare le clip Ora che le clip sono nell'archivio multimedia, clicca sulla tab "Edit" per cominciare il montaggio! Come primo passo, crea una nuova cronologia con un clic destro all’interno di “Media Pool”. Seleziona Timelines > New Timeline. Apparirà una finestra di dialogo, clicca su “Create”. -
Page 400: Tagliare Le Clip
La pagina "Edit". Con l'editor della cronologia puoi tagliare, spostare e cambiare la posizione delle clip, nonché inserire le transizioni. Tagliare le clip Il taglio delle clip è un'operazione di montaggio molto comune, perché permette di selezionare solo le parti interessate. La soluzione più semplice è marcare i punti di attacco e stacco delle clip sulla cronologia: Dopo aver aggiunto le clip alla cronologia, sposta il mouse all'inizio della barra di riproduzione, finché... -
Page 401: Configurare I Tasti Di Scelta Rapida
Configurare i tasti di scelta rapida Configura i tasti di scelta rapida su DaVinci Resolve per velocizzare il flusso di lavoro ed ottimizzare le operazioni di montaggio. Come configurare i tasti di scelta rapida: Clicca sull’icona dell’ingranaggio situata in basso a destra dello spazio di lavoro DaVinci, poi seleziona “Keyboard mapping”... -
Page 402: Inserire I Titoli
Come inserire una transizione con dissolvenza tra due clip: Assicurati che le due clip siano montate insieme sulla stessa cronologia. Accedi al menù "Effects Library" nella barra degli strumenti in alto alla tab "Edit", assicurandoti che il pannello "Toolbox" sia aperto. Clicca su "Cross Dissolve"... -
Page 403: Inserire Le Tracce Audio
Trascina un titolo dalla lista "Titles" e posizionalo su una traccia vuota. Inserire le tracce audio Inserisci più tracce audio per creare un complesso mix di musica ed effetti sonori. Come inserire le tracce audio: Fai clic destro sull'ultima traccia audio creata sulla cronologia e aggiungi una nuova traccia con "Add Track". -
Page 404: Fare La Correzione Colore Delle Clip
Fare la correzione colore delle clip Si consiglia di completare il montaggio delle sequenze video prima di cominciare la correzione colore. In questo modo potrai mantenere un look omogeneo, anche se DaVinci Resolve consente di passare dal montaggio alla correzione colore in qualsiasi momento per continuare a perfezionare il progetto con creatività. - Page 405 Il visualizzatore di allineamento RGB "Parade" consente di ottimizzare i mezzitoni, le zone di luce e di ombra. I cerchi cromatici di “Lift”, “Gamma”, “Gain” e “Offset” consentono di creare il colore ottimale per bilanciare i toni del colore delle clip. Per regolare in maniera uniforme tutti i colori per ogni tono, muovi opportunamente le rotelle sotto i cerchi cromatici.
-
Page 406: Correzione Secondaria Del Colore
Utilizza la palette delle curve per eseguire la correzione primaria del colore. Basta cliccare sui punti desiderati lungo la diagonale nel grafico della curva, e trascinarli verso l'alto o il basso per regolare il contrasto RGB in diverse aree dell'immagine. I punti ottimali di regolazione della curva sono: il terzo più... -
Page 407: Aggiungere Una Finestra Power Window
Per isolare un colore: Aggiungi un nodo seriale. Apri la palette "Qualifier" e seleziona l'icona del contagocce "Color Range". Clicca sul colore dell'immagine che desideri isolare. Spesso è necessario attenuare i bordi della selezione per isolare solo il colore desiderato. Clicca sull'icona "Highlight" per visualizzare la tua selezione. Per allargare o ridurre la tua selezione, usa il controllo "Width"... -
Page 408: Fare Il Tracking Di Una Finestra Power Window
Utilizza le finestre Power Window per fare la correzione secondaria di aree specifiche dell'immagine. Fare il tracking di una finestra Power Window Se l'oggetto o le aree selezionati nella clip sono in movimento, appurati che la finestra segua i movimenti dell'area desiderata con la potente funzione di tracking di DaVinci Resolve, che analizza con precisione lo zoom, le panoramiche e i movimenti di ripresa o degli oggetti della clip. -
Page 409: Usare I Plug-In
Questa funzione di tracking automatico funziona il più delle volte, ma in scene complesse dove altri oggetti passano davanti all'area selezionata è possibile che si interrompa. In questo caso, basta usare la funzione manuale "Keyframe". Consulta il manuale di DaVinci Resolve per tutte le istruzioni. - Page 410 Appena sopra la cronologia, vedrai l’opzione “Entire timeline”, per esportare l’intera cronologia. Puoi anche selezionare più timeline, scegliendo l’opzione “In/out range” e utilizzando i tasti di scelta rapida “i” e “o” per confermare i punti di attacco e di stacco nella cronologia.
-
Page 411: Flusso Di Lavoro Post Produzione
Flusso di lavoro post produzione Software di terzi Se preferisci utilizzare un programma di montaggio differente, basta copiare le tue clip su un dispositivo esterno di archiviazione o su un'unità RAID, e poi importarle sul tuo software. È addirittura possibile fare montaggio direttamente dalla scheda SD! Istruzioni per Final Cut Pro X Per fare montaggio delle clip Apple ProRes su Final Cut Pro X, crea un nuovo progetto con lo stesso formato video e frame rate delle clip. -
Page 412: Istruzioni Per Adobe Premiere Pro Cc
Seleziona il bin "Media" dove importare i tuoi file. Clicca su File>AMA link..., scegli i file da importare e poi clicca "Ok". Una volta importate le clip nella cartella bin Media basta trascinarle sulla cronologia per cominciare il montaggio. Imposta il nome e scegli le opzioni del progetto in Avid Media Composer 7. -
Page 413: Istruzioni Per Autodesk Smoke 2013
Istruzioni per Autodesk Smoke 2013 Per fare montaggio con Autodesk Smoke 2013, crea un nuovo progetto con le stesse impostazioni di formato video, profondità di bit, frame rate e tipo di frame delle tue clip. Questo esempio usa le impostazioni ProRes 422 HQ, 1080p25. Apri Smoke e apparirà... -
Page 414: Assistenza
Dove trovare gli aggiornamenti più recenti del software Dopo aver verificato quale versione del software Blackmagic Video Assist è installata sul tuo computer, visita la pagina Supporto di Blackmagic Design su www.blackmagicdesign.com/it/support per scaricare gli aggiornamenti più recenti. Ti consigliamo di non aggiornare il software se stai lavorando ad un progetto importante. -
Page 415: Garanzia
Garanzia Garanzia limitata di un anno Blackmagic Design garantisce che questo prodotto è fornito privo di difetti nei materiali e nella manifattura per un periodo di un anno a partire dalla data d'acquisto. Durante il periodo di garanzia Blackmagic Design riparerà o, a sua scelta, sostituirà tutti i componenti che risultino difettosi esonerando il Cliente da costi aggiuntivi, purché...
Need help?
Do you have a question about the Video Assist and is the answer not in the manual?
Questions and answers