Advertisement
Table of Contents
- 1 Assembly Instructions
- 2 Before You Start
- 3 Tools Required
- 4 Further Information
- 5 Important Notes
- 6 Operating Instructions
- 7 End of Cooking Session
- 8 Preparation before Cooking
- 9 Cleaning and Maintenance
- 10 Troubleshooting
- 11 Fixtures and Fittings
- 12 Getting to Know Your Product
- Download this manual
Advertisement
Table of Contents

Subscribe to Our Youtube Channel
Related Manuals for Master cook SRGG30004


Summary of Contents for Master cook SRGG30004
-
Page 1: Assembly Instructions
3+1 Burner gas grill Assembly instructions Product size assembled: H111 x W143 x D59 cm Product code: SRGG30004 Please retain this manual Produced in China for future reference... -
Page 2: Before You Start
3+1 Burner gas grill Assembly instructions Before you start WARNINGS IMPORTANT! • Read the instructions before using the appliance. Follow the Hazardous fire or explosion may result if these instructions steps in the order they are specified and please observe the are ignored. -
Page 3: Tools Required
3+1 Burner gas grill Assembly instructions Before you start Dont’s Do not use the barbecue unless it’s completely assembled and all Assembly instructions parts are securely fastened and tightened. Find a large, clean area to assemble your barbecue. Please refer Do not leave a lit barbecue unattended, especially keep children to the parts list and assembly diagram as necessary. -
Page 4: Further Information
3+1 Burner gas grill Assembly instructions Further information Important Notes: Leak Testing (To be performed in a To operate you will need a precision-filled standard G30/G31 well-ventilated area) barbecue LP gas cylinder with external valve threads. Confirm all barbecue control knobs are in the off position. Use standard flexible tube with length less than 1.5 m. -
Page 5: Operating Instructions
3+1 Burner gas grill Assembly instructions Operating instructions Warnings End of cooking session After each cooking session, turn the barbecue control knob • Before proceeding, make certain that you have assembled the burners to the “Max” position and burn for 5 minutes. appliance according to instructions. -
Page 6: Cleaning And Maintenance
3+1 Burner gas grill Assembly instructions Cleaning and maintenance Regularly clean your barbecue between uses and 1. Cooking Grill Clean with hot soapy water. To remove any food residue, use a especially after extended periods of storage. mild cream cleaner on a non-abrasive pad. Rinse well and dry Ensure the barbecue and its components are sufficiently cool thoroughly. -
Page 7: Troubleshooting
3+1 Burner gas grill Assembly instructions Trouble shooting PROBLEM POSSIBLE CAUSE PREVENTION/CURE Burner will not light Wires or Electrode covered with Clean wire and/or electrode with rubbing alcohol using igniter cooking residue Electrode and burners are wet W ipe dry with cloth Electr ode cracked or broken –... -
Page 8: Fixtures And Fittings
3+1 Burner gas grill Assembly instructions Fixtures and Fittings Components supplied (not actual size) Components supplied (not actual size) Description Visual Description Visual Warming rack Grease cup Cooking grid Grease cup hanger Flame tamers Wheel Cart front panel Wheel cap Side burner rack Right leg Right side table... - Page 9 3+1 Burner gas grill Assembly instructions Fixtures and Fittings Fittings supplied (actual size) Dimensions Visual M5x12 ST5x8 M4x10 M10x75 Control knob and bezel M6x8 Please retain this manual Produced in China for future reference...
-
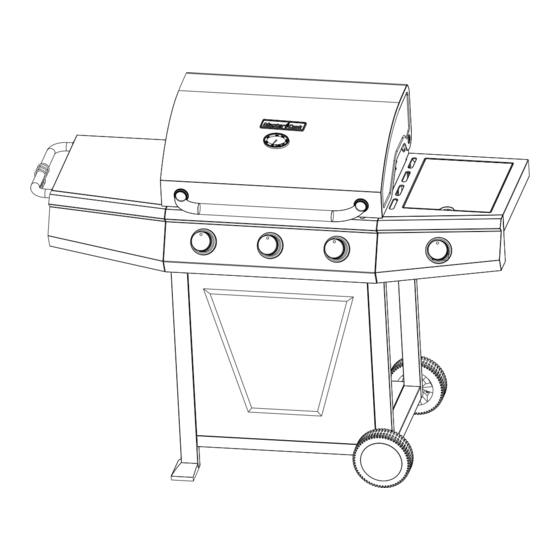
Page 10: Getting To Know Your Product
3+1 Burner gas grill Assembly instructions Getting to know your product Please retain this manual Produced in China for future reference... - Page 11 3+1 Burner gas grill Assembly instructions 10x75 supplied Please retain this manual Produced in China for future reference...
- Page 12 3+1 Burner gas grill Assembly instructions B x4 supplied Please retain this manual Produced in China for future reference...
- Page 13 3+1 Burner gas grill Assembly instructions B x4 supplied Please retain this manual Produced in China for future reference...
- Page 14 3+1 Burner gas grill Assembly instructions 5x12 supplied 5x12 supplied Please retain this manual Produced in China for future reference...
- Page 15 3+1 Burner gas grill Assembly instructions Please retain this manual Produced in China for future reference...
- Page 16 3+1 Burner gas grill Assembly instructions 5x12 supplied 5x12 supplied Please retain this manual Produced in China for future reference...
- Page 17 3+1 Burner gas grill Assembly instructions 5 12 supplied 5 13 supplied Please retain this manual Produced in China for future reference...
- Page 18 3+1 Burner gas grill Assembly instructions 4x10 supplied supplied Please retain this manual Produced in China for future reference...
- Page 19 3+1 Burner gas grill Assembly instructions supplied Please retain this manual Produced in China for future reference...
- Page 20 3+1 Burner gas grill Assembly instructions “Ensure the grease cup and hanger are sufficiently cool before cleaning" Please retain this manual Produced in China for future reference...
- Page 21 3+1 Burner gas grill Assembly instructions Please retain this manual Produced in China for future reference...
- Page 22 3+1 Burner gas grill Assembly instructions Please retain this manual Produced in China for future reference...
Need help?
Do you have a question about the SRGG30004 and is the answer not in the manual?
Questions and answers