Mul-t-lock ENTR User Manual
Intelligent locking solution
Hide thumbs
Also See for ENTR:
- User manual (46 pages) ,
- Quick start manual (15 pages) ,
- User manual (32 pages)

Related Manuals for Mul-t-lock ENTR


Summary of Contents for Mul-t-lock ENTR
-
Page 1: Table Of Contents
Cylinder & Unit Installation Magnet Fitting Cylinder to Unit Assembly (optional) 2. ENTR® Description ENTR® Description Indications ON/OFF Switch 2.3.1 Turning ENTR® ON 2.3.2 Turning ENTR® OFF 2.3.3 Low-battery Indication Initiating the Lock Default PIN Code 3. Operation Changing PIN Code... - Page 2 Delete all PIN Codes 5.10 Volume Control 5.11 Factory Reset 6. Fingerprint Reader Mounting the Fingerprint Reader Battery Replacement Adjusting Date & Time Pairing Fingerprint Reader 6.4.1 Add Master 6.4.2 Set Finger 6.4.3 Set PIN Code Unlock Door ENTR® User Manual...
- Page 3 7. Smartphone App App Installation Pairing Smartphone 8. Remote Control Battery Change Battery Removal Battery Insertion 9. Sabbath Mode 10. ENTR® Wire-free Charger 10.1 General 10.2 Indications 10.3 Door Unit Charging 11. Troubleshooting 11.1 Limitations and External Influences 11.2 Cases Limited Warranty ENTR®...
-
Page 4: Cylinder Installation
Base plate & Knob Battery charger Electrical unit Magnet Mounting screw Inside drive adapter Panel screw Mounting screws Decorative spacer Allen key #3 1.2 Tools Requirements • Small Phillips screwdriver Note: Do not use power tools or any excessive force to assemble ENTR® parts. ENTR® User Manual... -
Page 5: Prior To Installation
• Press & hold the knob (1) and turn slightly (2) until the cylinder cam is no longer protruding from the side of the cylinder body (see illustration). 1.4 Cylinder & Unit Installation • Insert the cylinder (including baseplate & knob) from the interior side of the door. • Once the cylinder is correctly aligned within the door, secure the cylinder in place using the M5 screw. • Do not over tighten the screw or use power tools to do so. Note: Do not hammer (or use any other excessive force) on the cylinder or knob when inserting them into the door. • Turn the knob back to the zero position. Knob marks point upwards. Note: The knob will jump out when returned to zero position. Zero position ENTR® User Manual... -
Page 6: Magnet Fitting
1.5 Magnet Fitting • Position the magnet on the front panel of the door frame, as close as possible to the lock. • The top point of the magnet should be approximately 20mm below the M5 screw (see illustration). • Use the supplied double-sided sticker to adhere magnet. Note: The magnet area on door frame should be clean and free from dust, peeling paint etc. If required use alcohol to clean. Wait until completely dry prior to sticking. Door frame Cylinder fixing screw (M5) Magnet 1.6 Cylinder to Unit Assembly (optional) Note: Follow the instructions only if the cylinder was dismantled from the door unit. • Insert the operating key into the external side of the cylinder and turn one full turn. • Take the key out. Note: Verify that the gear is not pressed in. Gear not pressed in ENTR® User Manual... - Page 7 • Assemble the cylinder into the door unit (baseplate & knob). • Tighten the cylinder's mounting screw. Note: Verify that the cylinder and the knob are engaged. Press the knob and turn. If the knob can not be pressed or turned, disassemble the cylinder, adjust the cylinder's projecting rectangle and reassemble. Mounting screw • Connect the data cable plug. • Assemble electrical unit as illustrated. • Tighten the electrical unit's panel screw. Data cable ENTR® User Manual...
-
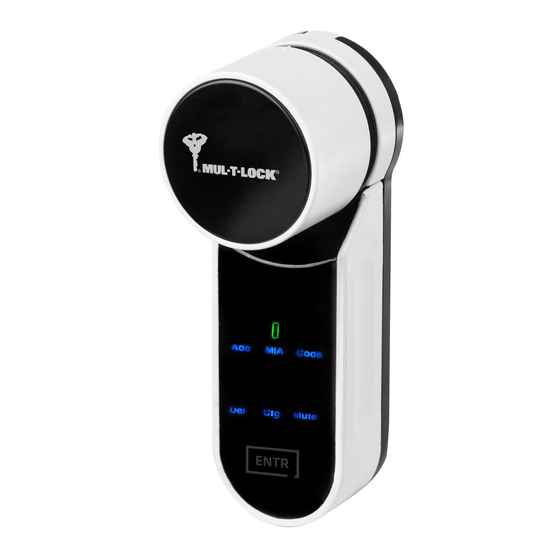
Page 8: Entr® Description
2. ENTR® Description 2.1 ENTR® Description Knob Indications Touchpad ON/OFF switch 2.2 Indications Mute (Green) Manual mode (Green) OK (Green) Door not closed (Red) Battery status (Green/Red) Error (Red) ENTR® User Manual... -
Page 9: On/Off Switch
2.3 ON/OFF Switch • Turning the ENTR® lock ON or OFF. 2.3.1 Turning ENTR® ON Before turning ENTR® ON, verify that the door is shut. • Move the switch to the ON position. Make sure that the knob is in the zero position (see illustration). • Zero position • Function and numeric buttons will blink all once. • Hazard beep sound will be emitted and error indication will blink once. • ENTR® is now in operating mode. Note: • After turning ENTR® ON, avoid touching the front panel until beep sound ends. • After turning ENTR® ON, the door will be shut but not locked. -
Page 10: Initiating The Lock
The lock's default factory PIN code is: 1 2 3 4 5 # Please note: • Default PIN code must be changed before starting the configuration process. • The PIN code must consist of 4-10 digits using numbers 1 through 5 in any sequence. • Only the Code and Mute functions will operate until the default PIN code is changed. Warning: Don't forget/lose the PIN code once changed, otherwise you will be locked out. Keep your new PIN code in a safe place. ENTR® User Manual... -
Page 11: Operation
1 long beep emitted, Illuminated buttons turn off. For example: 1231234# Illuminated buttons turns off. PIN Code match PIN Code doesn't match Numeric buttons illuminated. [OK] indication illuminated. [Error] indication illuminated. Reenter [New PIN Code] 2 short beeps emitted. 2 long Beeps emitted for 1 second. For example: 1231234# New PIN Code is set. ENTR® goes to menu mode. Restart the process from step 1 ENTR® User Manual... -
Page 12: Door Configuration
This process should be done after successful installation of the lock. It will take 15-20 seconds to complete. Important: Verify that the door is Press [Cfg] Touch screen with palm or fingers shut and no key is inserted into the for 3 seconds to active. cylinder during configuration steps. Press [1] or [3] to configure ENTR® Numeric buttons illuminated Type [PIN Code] side (see illustration). Press [1] for ENTR® on left side. Numeric buttons blinking. Press [3] for ENTR® on right side. ENTR® on left ENTR®... - Page 13 Press [Cfg] [OK] Indication blinks once. The lock will carry out the 2 short beeps emitted, configuration process. Illuminated buttons turn off. Troubleshooting #1 Lock configuration failed 1. Remove the mechanical key from the cylinder. 2. Check that the door was closed properly or if lock operation was interfered. ENTR® User Manual...
- Page 14 Configuration failed Troubleshooting #2 [Error] indication illuminated. Magnet configuration failed 2 long beeps emitted. 1. You can still operate ENTR® in Manual mode (w/o automatic locking). Refer to troubleshooting #2 2. Remove any other magnets from the door. 3. Place the magnet according to instructions. 4. Consult your installer or contact ENTR® Technical Support. Door frame Cylinder fixing screw (M5) Magnet Note: The top point of the magnet should be approximately 20mm below the cylinder fixing screw M5 (see illustration). ENTR® User Manual...
-
Page 15: Pairing Remote Control
3.3 Pairing Remote Control Touch screen with palm or fingers Press [Add] Numeric buttons illuminated. for 3 seconds to active. Type [PIN Code] Numeric buttons blinking. Press [1] to add remote control. Press the remote control button. Illuminated buttons turn off. [OK] indication blinks for 15 seconds waiting for remote control unit. Remote control button ENTR® User Manual... -
Page 16: Deleting Remote Control
• A remote control unit can be paired with one door unit only. • It is possible to add up to 20 remote control units to a single door. • Only an authorized dealer can reset a paired remote. 3.4 Deleting Remote Control The deleting remote control process' will delete all remote control units including Touchpad and Fingerprint readers defined within the system. Touch screen with palm or fingers Press [Del] Type [PIN Code] for 3 seconds to active. Numeric buttons illuminated. 1 long beep emitted. ENTR® User Manual... -
Page 17: Setting Sound Signals
Deletion accomplished [Del] blinks for 30 seconds. Press [Del] to confirm. [OK] indication blinks once, 2 short beeps emitted. Illuminated buttons turn off. Note: Wall reader and smartphones connected to the ENTR® lock will not be deleted. 3.5 Setting Sound Signal Toggle the sound signal to OFF or ON Touch screen with palm or fingers Press [Mute] [Mute] indication illuminated. for 3 seconds to active. Sound signal is off. -
Page 18: Setting Locking Mode
3.6 Setting Locking Mode Toggle Automatic to Manual locking mode Press [M A] Touch screen with palm or fingers Type [PIN Code] for 3 seconds to active. [Manual] indication illuminated. Notes: • Setting the ENTR® lock to Manual will disable automatic locking. • Follow the same procedure to set the ENTR® lock to Automatic locking. ENTR® User Manual... -
Page 19: Doorknob Operation
UNLOCKED. Knob operation is meant solely for mechanical override in the rare event it will not otherwise unlock. 3.8 Slide Buttons Operation Slide your fingers on the recessed grooves on both sides of the ENTR® front panel: • To open, slide fingers downwards on the recessed grooves on both sides. • To lock, slide fingers upwards on the recessed grooves on both sides. Open Lock ENTR® User Manual... -
Page 20: Touchpad Reader
1. Release lid screw and open the lid. 2. Insert new batteries (2xAA) according to the "+" "-" signs. 3. Close the lid and tighten the screw. 4. Touch [#] for 5 seconds. Notes: • A short beep sound emitted and a green [OK] indication is illuminated for 2 seconds. Important: Do not touch the Touchpad during the self-test procedure and until the indication lights are off. 4.2.1 Low-battery Indication When batteries need recharging, a red warning signal will blink rapidly and long beep will sound during every lock/unlock action. ENTR® User Manual... -
Page 21: Touchpad Reader Operation
5. Touchpad Reader Operation 5.1 Operation To turn the Touchpad Reader ON press [#] for 5 seconds. The reader will perform a self-test, followed by series of beeps. LED blinks green, red, and Blue. 5.2 Pairing Touchpad Reader This procedure is done via the ENTR® lock. See also: Pairing Remote Control. Touch ENTR® lock screen with palm Press [Add] Numeric buttons illuminated. Type [PIN Code] or fingers for 3 seconds to active. Numeric buttons blink. - Page 22 Pairing OK Pairing failed [OK] indication blinks once. [OK] indication blinks for 15 seconds. 2 short beeps emitted, No beeps emitted. Touchpad Reader added. On Wall Reader: green LED illuminated and 2 beeps emitted. Start the process from step 1. • Fix the Touchpad Reader to the baseplate. • Tighten fixing screw. Fixing screw ENTR® User Manual...
-
Page 23: Touchpad Reader Master Pin Code
Touch Touchpad Reader screen with Enter [Personal PIN Code] Retype: palm or fingers. (4-10 digits) [Personal PIN Code] Press [ [Master PIN Code] For example: 1231234# Press [11] PIN Code added PIN Code not added Green [OK] illuminated for 1 second, Red [Error] illuminated for 1 second, 2 short beeps emitted. 1 long beep emitted. ENTR® User Manual... -
Page 24: Open Door
Enter [Master PIN Code] or fingers. Reenter: [Master PIN Code] Press [ [Master PIN Code] Press [22] All PIN Codes deleted All PIN Codes not deleted Green [OK] illuminated for 1 second, Red [Error] illuminated for 1 second, 2 short beeps emitted. 1 long beep emitted. Note: Master PIN Code can not be deleted. ENTR® User Manual... -
Page 25: Volume Control
Press [ [Master PIN Code] Press [#] to confirm volume level. Press [55] 5.11 Factory Reset The reset action will delete all PIN codes (master and personal) and will cut off the Touchpad Reader from the ENTR® lock. Touch Touchpad Reader's screen with palm Enter [Master PIN Code] or fingers. Press [ [Master PIN Code] Press [99] Personal and Master PIN... -
Page 26: Fingerprint Reader
"+" "-" signs. Green LED will illuminate for 2 seconds 3. Close the lid and tighten the screw. 4. Touch [#] for 5 seconds. The reader will self calibrate, which will be followed by a series of beeps and blinking LEDs. 6.3 Adjust Date & Time DEVICE --/--/-- --/-- 15/03/15 DATE/TIME DD/MM/YY hh:mm 11:00 Enter Date Enter Time Press [OK] Press [OK] Press [OK] ENTR® User Manual... -
Page 27: Pairing Fingerprint Reader
6.4 Pairing Fingerprint Reader This procedure is done via the ENTR® lock. See also: Pairing Touchpad Reader. Touch ENTR® lock screen with palm Press [Add] Numeric buttons illuminated. or fingers for 3 seconds to active. Type [PIN Code] Numeric buttons blinking. Press [1] to add the Reader. Touch Fingerprint Reader screen. Illuminated buttons turn off, 2 short beeps emitted, [OK] indication blinks for 15 Press [OK] for YES or [ ] to cancel. -
Page 28: Add Master
Type in [PIN Code], (4 to 10 digits) Retype [PIN Code] ENTER CODE ADD USER RETYPE CODE ENTER CODE SET CODE ****** ****** 4-10 digits 4-10 digits Press [OK] Press [OK] Press [OK] Matched Codes Mismatched Codes SUCCESS FAILED SET CODE INVALID ENTR® User Manual... -
Page 29: Unlock Door
Place finger on fingerprint scanner. Touch the Fingerprint Touchpad. Short beep emitted & white LED illuminates. Screen prompts for user code. Swipe finger over fingerprint scanner. Enter your code [OK] Fingerprint authorized: Blue LED blinks and unlock command is sent. Fingerprint not authorized: Red LED illuminates. The device goes to standby. USER CODE 23:49 03/01 FAILED Note: In the event, the unlocking attempt fails, ENTR® will display an unlock failed’ message. UNLOCK ENTR® User Manual... -
Page 30: Lock Door
Touch the Fingerprint Touchpad. Press [1] 6.7 Low-battery Indication Warning signal blinks Fingerprint Reader Low-battery Indication Red LED illuminates for 1 second after 2 long wake-up beeps are emitted. BATTERY LOW 6.8 Setting Menu USER CODE MASTER CODE SETTING Touch screen ****** USERS 23:49 03/01 23:49 03/01 Press [ Enter [Master PIN Code] [OK] or swipe finger over fingerprint scanner ENTR® User Manual... -
Page 31: Add User
4-10 digits Press [OK] for YES or [ Type [CODE] [OK] Retype [CODE] [OK] for NO Mismatched Matched Codes Codes SUCCESS FAILED INVALID SET CODE Process did not complete. All data typed in will be erased from memory. ENTR® User Manual... -
Page 32: Delete User
Use [8 ▼ ] or [2 ▲ ] to Use [8 ▼ ] or [2 ▲ ] to Press [OK] Two beeps emitted. select: toggle between users. Green LED illuminates. [ENABLE USER] [OK] Press [OK] Note: Repeat this procedure to disable a user ENTR® User Manual... -
Page 33: Delete All Users
NO Notes: 1. Define up to 7 different time schedules for the same user. 2. Press [ * ] to go back on every menu. 3. Press [ * ] for 3 seconds to exit setting menu. ENTR® User Manual... -
Page 34: Edit Time Schedule
Use [8 ▼ ] or [2 ▲ ] to Use [8 ▼ ] or [2 ▲ ] to Use [8 ▼ ] or [2 ▲ ] to Press [OK] Two beeps emitted. select: select: toggle between HIGH, Green LED illuminates. [DEVICE] [OK] [VOLUME] [OK] MEDIUM or LOW. ENTR® User Manual... -
Page 35: Double Security
*-NO OK-YES *-NO OK-YES FACTORY Use [8 ▼ ] or [2 ▲ ] to Use [8 ▼ ] or [2 ▲ ] to Press [OK] Press [OK] Two beeps emitted. select: select: Green LED illuminates. [DEVICE] [OK] [FACTORY] [OK] ENTR® User Manual... -
Page 36: Smartphone App
7. Smartphone App 7.1 App Installation • Android smartphone users: go to Google Play to download the ENTR® application. System requirements: Android 4.4 • iOS (iPhone/iPad) users: go to the app store to download the ENTR® application. System requirements: iOS 7.0 or higher • Bluetooth low-energy compliant The below message will be displayed when opening the ENTR® app prior to pairing it with your lock: "There are no available locks or keys within range". ENTR® User Manual... -
Page 37: Pairing Smartphone
Press [2] to add a smartphone. [OK] indication blinks for 3 seconds. Illuminated buttons turn off ENTR® will be visible for 5 min. Open the ENTR® app and follow the steps described in order to pair the smartphone with the ENTR® lock. • Please pay attention that only one phone can be connected to the lock at the same time. • A phone can have only one eKey per each lock. -
Page 38: Remote Control Battery Change
8. Remote Control Battery Change 8.1 Battery Removal a. Release the lid by safely inserting a small tool into the notch (1), and press the lid clasp (2). Notch Clasp b. Take out the push button and intermediate part. c. Take out the electronic board with the battery and remove battery. ENTR® User Manual... -
Page 39: Battery Insertion
8.2 Battery Insertion a. Insert new battery (CR2032) into the electronic board according to the "+" "-" signs (1). b. Insert the electronic board into the remote control’s housing (2). c. Reassemble the intermediate part and the push button and place over the electronic board. d. Place the lid and press until the clasp clicks into place. Clasp ENTR® User Manual... -
Page 40: Sabbath Mode
9. Sabbath Mode Auto-locking and hazard beeps after knob operation are disabled. Battery indication LED blinks every 20 seconds. Press [Cfg] Touch screen with palm or fingers Numeric buttons illuminated. for 3 seconds to active. Type [PIN Code] [#], Numeric buttons blinking. Sabbath mode Sabbath mode activated deactivated Press [5] to toggle between activation and deactivation of the Sabbath mode. ENTR® User Manual... -
Page 41: Entr® Wire-Free Charger
10. ENTR® Wire-free Charger 10.1 General The "ENTR® Wire-free Charger" is used to charge the Door Unit on the door. The device is being charged by wired charger. The charging of the Door Unit is done through a cable with micro-USB male connector. 10.2 Indications In-Charge Indication When the "ENTR® Wire-free Charger" is in charge mode the indication will blink green LED. Fully Charged When the "ENTR® Wire-free Charger" is fully charged and still plugged to a power supply the indication (green LED) is off. Charging Mode When the "ENTR® Wire-free Charger" is charging the Door Unit there is no indication. Indications shall be shown on the ENTR® Door Unit. No Power (Low Power Battery) When the "ENTR® Wire-free Charger" needs to be charged the indication will blink alternate red and green. 10.3 Door Unit Charging Connect the micro-USB to the Door Unit and hang the Wire-free charger as shown. Cable with micro-USB male connector... -
Page 42: Troubleshooting
Right = 3). actions of what should happen. Remote Control Symptom Corrective action Page I'm having trouble pairing the remote 1. Please confirm that the LED on the remote control is ON control. when you press the button. 2. Repeat the pairing process again while standing closer to the door unit. 3. If after these steps are taken and pairing still isn't working, please contact your locksmith / installer. Sometimes the remote control doesn't The remote control operates on RF signal, so you need to open on the first attempt. be within a certain proximity to the lock. Get closer and try again. ENTR® User Manual... - Page 43 Set the door unit to pair mode, by pressing Add+Code+1, with the door unit. then immediately set the wall reader to pair mode. You'll have a 30 second window until the door unit reverts back to standby mode. The wall reader's blue LED is blinking, but Verify that the wall reader is paired to the door unit by the door unit isn't responding. redoing the pairing process -- you will hear double beeps from both devices when completed. The touchpad isn't accepting the PIN code 1. This specific code already exists within the device's I'm entering. memory. 2. Make sure that the PIN code is 4 - 10 digits. ENTR® User Manual...
- Page 44 The ENTR® mobile app is disconnected 1. Make sure your phone is compatible with bluetooth from the door unit and/or I can't find my 4.0, and that your phone model and OS version are lock on the app. approved for ENTR®. 2. Refresh the app. 3. Only one phone can connect to ENTR® at the same time. It's possible that another user's phone is already connected to ENTR®. If so, close the app on any other user's phone. 4. Close the app, turn off your phone's Bluetooth. Then turn Bluetooth back on, and open the app. 5. Turn the door unit off, and then turn it on again.
-
Page 45: Limited Warranty
Some basic instructions and recommendations for correct use of the Product are shown overleaf. Mul-T-Lock®’s sole obligation under this limited warranty is to repair or replace, at Mul-T-Lock®’s sole discretion, at the venue of a Dealer, any Product and/or Product component found by Mul-T-Lock®... - Page 46 INCIDENTAL, OR CONSEQUENTIAL DAMAGES, WHICH PURCHASER MAY SUSTAIN, OR PUNITIVE DAMAGES, EVEN IN THE EVENT OF NOTICE OF THE POSSIBILITY OF SUCH DAMAGES. Some Basic Instructions and Requirements for Correct Use of ENTR® Products Protection of Keys: • Keys should be used only for their original purpose, of operating the corresponding cylinder.
- Page 47 LEGAL NOTICES Mobile phones ENTR® warranty should not cover any problem related with end user mobile phone/ smartphone or its operation system, by connecting to ENTR® lock or installing ENTR® application. For any other limitation please refer to End User licence agreement. Items excluded / limited from this warranty • Screws • Normal wear and tear • Cleaning with cleaning detergents • Warranty for ENTR®’s Main battery is limited for 1 year Trademarks Mul-T-Lock® and ENTR® are trademarks/trade names belonging to Mul-T-Lock® Ltd. No unauthorised use may be made of these trademarks.
Need help?
Do you have a question about the ENTR and is the answer not in the manual?
Questions and answers