Table of Contents
Advertisement
INSTR
INSTR UCTION MANU
INSTR
INSTR
INSTR
MICR
MICR
MICR OCENTRIFUGE
MICR
MICR
National Labnet Company
National Labnet Company
National Labnet Company
National Labnet Company
National Labnet Company
PO Box 841
PO Box 841
PO Box 841
PO Box 841
PO Box 841
Woodbridge, NJ 07095
Woodbridge, NJ 07095
Woodbridge, NJ 07095
Woodbridge, NJ 07095
Woodbridge, NJ 07095
Phone: (732) 417-0700
Phone: (732) 417-0700
Phone: (732) 417-0700
Phone: (732) 417-0700
Phone: (732) 417-0700
Fax:
Fax:
Fax:
Fax:
Fax: (732) 417-1750
(732) 417-1750
(732) 417-1750
(732) 417-1750
(732) 417-1750
UCTION MANU
UCTION MANU A L
UCTION MANU
UCTION MANU
F O R
F O R
F O R
F O R
F O R
OCENTRIFUGE
OCENTRIFUGE
OCENTRIFUGE
OCENTRIFUGE
Z 233 M-2
Z 233 M-2
Z 233 M-2
Z 233 M-2
Z 233 M-2
A L
A L
A L
A L
1
Advertisement
Table of Contents

Subscribe to Our Youtube Channel
Related Manuals for Hermle z233 m-2


Summary of Contents for Hermle z233 m-2
- Page 1 INSTR INSTR UCTION MANU INSTR UCTION MANU UCTION MANU A L UCTION MANU INSTR INSTR UCTION MANU F O R F O R F O R F O R F O R MICR MICR OCENTRIFUGE OCENTRIFUGE MICR OCENTRIFUGE OCENTRIFUGE MICR MICR OCENTRIFUGE Z 233 M-2...
-
Page 2: Table Of Contents
INDEX INDEX Page Page INDEX INDEX INDEX Page Page Page General Information 1 . 1 Precaution and hazards................. 1 . -
Page 3: General Information
The Hermle Z 233 M-2 is neither explosion proof nor inert gas shielded and should, therefore, never be operated in explosive-hazardous locations. Never stay in the safety zone of 30 cm around the centrifuge or deposit dangerous materials inside this zone during centrifugation. -
Page 4: Description
- The rotor is not installed securely on the motor shaft. - Rotors or accessories will be used which are not authorized for this unit by Hermle or Labnet. Exception: Commercially available tubes or bottles made of glass or plastic. -
Page 5: Technical Data
1 . 5 1 . 5 Technical Data Technical Data Technical Data 1 . 5 1 . 5 Technical Data Technical Data ______________________________________________________________________ Manufacturer Hermle Labortechnik GmbH ______________________________________________________________________ Type Z 233 M2 ______________________________________________________________________ Dimensions: Width 28 cm Depth 37 cm Height... -
Page 6: Accessories Supplied With Each Centrifuge Unit
1 . 6 Accessories supplied with each centrifuge unit 2 Fine-wire fuses 6.3 AT, 1 Instruction manual, 1 Tool for removing the rotor 1 . 7 Warranty This centrifuge has been subjected to thorough testing and quality control during the production process. -
Page 7: How To Install And Load A Rotor
2 . 3 I n s t a l l a t i o n Check that: - the power supply corresponds to that on the manufacturer's rating label which is ! ! ! ! ! mounted on the rear panel, then connect the power cord to the centrifuge and the socket. -
Page 8: Set Or Change Rotor-Code
-Load the rotor symmetrically by inserting tubes into spaces opposite from each other. The rotor must always be balanced in this fashion prior to operation. ATTENTION: ATTENTION: ATTENTION: ATTENTION: ATTENTION: Before operation, secure the rotor lid to the rotor by pressing the snap Before operation, secure the rotor lid to the rotor by pressing the snap Before operation, secure the rotor lid to the rotor by pressing the snap Before operation, secure the rotor lid to the rotor by pressing the snap... -
Page 9: Overloading Rotors
On the digital display for "speed rpm / rcf g x 10" the number code for the set rotor type appears. On the digital display "time min-sec" the letters "ro" ( rotor ) appears. Turn the speed knob (1), (see figure 4) till the required rotor code appears on the d i s p l a y . -
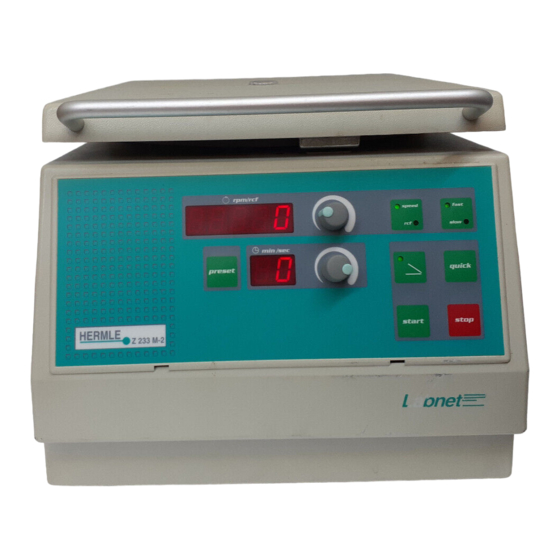
Page 10: Operation
4 . 4 . 4 . 4 . 4 . Operation Operation Operation Operation Operation 4 . 1 Power You can switch on the centrifuge by plugging in the power supply. The digital indications on the display will light up when the power is on. 4 . -
Page 11: Preselection Of Speed / Rcf
4 . 4 Preselection of speed / RCF When the centrifuge lid is open, you can preset the required speed or rcf with the speed knob ( 1 ) . With the "speed/rcf" key (2) you can change the display from speed to g-value. The green control lamps (3) show which mode is activated. -
Page 12: Preselection Of Operating Time
4 . 5 Preselection of operating time You can adjust the desired operating time between 1 and 60 minutes or hold. With the centrifuge lid open you can preset the operating time with the knob ( 3 ) . During a run and with the centrifuge lid closed you have to press the "preset" key (1), hold it and change operating time by turning the knob (3). -
Page 13: Preselection Of Brake Intensity And Acceleration
4 . 6 Preselection of brake intensity and acceleration With the "fast/slow" key (1) you have the choice between two steps of brake and acceleration intensity. Figure 8 If the green "fast" control lamp is lit, the unit accelerates and decelerates fast. If the green "slow"control lamp is lit, the unit accelerates and decelerates very softly below 2 000 rpm. -
Page 14: Keyboard - Starting The Centrifuge - "Quick"-Key
4 . 7 Keyboard - Starting the centrifuge - "quick"-key "Lid" key: To open the centrifuge lid. I f t h e g r e e n L E D o f t h e " l i d " k e y i s l i t , t h e l i d i s c l o s e d c o r r e c t l y . -
Page 15: Temperture
5 . 5 . 5 . 5 . 5 . Temperature Features Temperature Features Temperature Features Temperature Features Temperature Features 5 . 1 Temperature During centrifugation, heat is generated by air friction between the rapidly spinning rotor and the air inside the rotor chamber. The temperature rise depends on the rotor ( swing-out or angle rotor ),bucket type, ambient temperature, running time and the speed of the rotor. -
Page 16: Service And Inspection Of Centrifuge
7 . 1 Service and inspection of centrifuge Centrifuge service and inspection should be done regularly and only by authorized Use only original spare parts! Use only original spare parts! and qualified personnel. Use only original spare parts! Use only original spare parts! Use only original spare parts! 7 . -
Page 17: Cleaning Of Centrifuge After Breakage Of Glass Tubes/Bottles
7 . 3 Cleaning of centrifuge after breakage of glass tubes/glass bottles With high g-values, there is a possibility that tube breakage will occur. Should this happen, the centrifuge, rotor, buckets, adapters and the rotor chamber must be thoroughly cleaned and all broken particles removed immediately. If this is not done, they could scratch the protective coating of the rotor. -
Page 18: Check List / Trouble Shooting
8 . 2 Check list / Trouble shooting The error message will be indicated by an error number on the digital speed d i s p l a y ( s e e f i g u r e 1 1 ) . There is a distinction between two different kinds of errors. - Page 19 Error no.: 25 Error no.: 25 Error no.: 25 Power failure Power failure Power failure Power failure Error no.: 25 Error no.: 25 Power failure Reason: Power failure while rotor is in motion Action: Open and reclose the lid, restart the centrifuge Error no.: 36 Error no.: 36 Error no.: 36...
- Page 20 Error no.: 82 Error no.: 82 Error no.: 82 Error no.: 82 Error no.: 82 Cutoff power board - frequency converter Cutoff power board - frequency converter Cutoff power board - frequency converter Cutoff power board - frequency converter Cutoff power board - frequency converter Reason: Overcurrent or undervoltage due to power supply fluctuations Action:...
Need help?
Do you have a question about the z233 m-2 and is the answer not in the manual?
Questions and answers