Table of Contents
Advertisement
Quick Links
Advertisement
Table of Contents

Subscribe to Our Youtube Channel
Related Manuals for MRC AM-4214SD


Summary of Contents for MRC AM-4214SD
-
Page 2: Table Of Contents
TABLE OF CONTENTS 1. FEATURES.................1 2. SPECIFICATIONS................ 2 3. FRONT PANEL DESCRIPTION..............3-1 Display..................3-2 Power Button ( ESC, Backlight Button )............3-3 Hold Button ( Function Button, Next Button )..........3-4 REC Button ( Enter Button, Unit Button )............3-5 SET Button ( ▼... -
Page 3: Features
1. FEATURES * Combination of hot wire and standard thermistor, deliver rapid and precise measurements even at low air velocity value. * Slim probe, ideal for grilles & diffusers. * Air velocity : m/s, Ft/min, Km/h, Knot, Mile/h, ℃ ℉ * Air temperature ( * Air Temp. -
Page 4: Specifications
* Applications : Environmental testing, Air conveyors, Flow hoods, Clean rooms, Air velocity, Air balancing, Fans/motors/blowers, Furnace velocity, Refrigerated case, Paint spray booths. 2. SPECIFICATIONS 2-1 General Specifications Circuit Custom one-chip of microprocessor LSI circuit. Display LCD size : 52 mm x 38 mm LCD with green backlight ( ON/OFF ). - Page 5 Datalogger Auto 1 second to 3600 seconds Sampling Time @ Sampling time can set to 1 second, Setting range but memory data may loss. Manual Push the data logger button once will save data one time. @ Set the sampling time to 0 second.
- Page 6 * AC/DC power adapter is optional. Power Supply Alkaline or heavy duty DC 1.5 V battery ( UM3, AA ) x 6 PCs, or equivalent. * AC/DC power adapter is optional. DC 9V adapter input. ( AC/DC power adapter is optional ). Power Current Normal operation ( w/o SD card save data and LCD Backlight is OFF) : Approx.
- Page 7 ℃ 2-2 Electrical Specifications (23± 5 Air velocity Measurement Range Resolution Accuracy 0.2 to 5.0 m/s 0.01 m/s ± ( 5% + a ) 5.1 to 25.0 m/s 0.1 m/s reading Km/h 0.70 to 18.00 km/h 0.01 Km/h 18.0 to 72.0 km/h 0.1 Km/h Mile/h 0.50 to 11.20 mph 0.01 mph ±...
-
Page 8: Front Panel Description
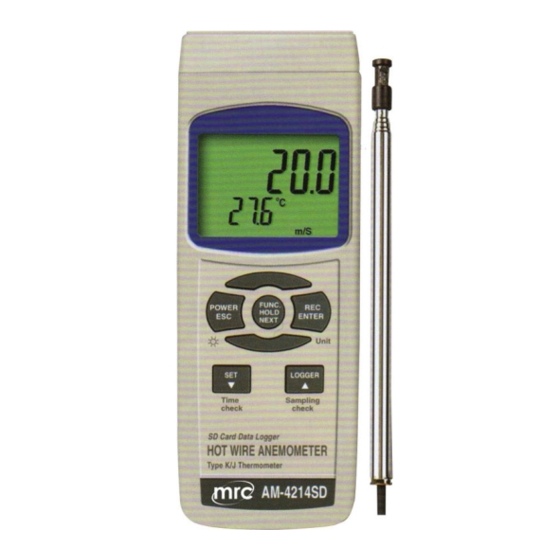
3. FRONT PANEL DESCRIPTION Fig. 1 3-1 Display 3-2 Power Button ( ESC, Backlight Button ) 3-3 Hold Button ( Function Button, Next Button ) 3-4 REC Button ( Enter Button, Unit Button ) 3-5 SET Button ( ▼ Button, Time check Button ) 3-6 Logger Button ( ▲... -
Page 9: Measuring Procedure
4. MEASURING PROCEDURE 4-1 Function selection 1) Turn on the meter by pressing the " Power Button " ( 3-2, Fig. 1 ) momentarily. Pressing the " Power Button " ( 3-2, Fig. 1 ) continuously and > 2 seconds again will turn off the meter. -
Page 10: Air Velocity/Temp. Measurement
4-2 Air velocity/Temp. measurement 1) Important information of using the Telescope Probe * When the probe is not used, the " Sensor cover " should slide to the up position. When the probe is not used, the " Sensor cover " should slide to the up position. - Page 11 * Do not use the fingers or any tools to touch the air velocity sensor, otherwise the meter may happen the permanent damage without warranty. * Direction of the sensor head : There is a mark on the top of the " Sensor Head ", When make the measurement, then this mark should against the measured wind, refer Fig.
-
Page 12: Type K/J Thermometer
Measuring Consideration : The mark on the sensor head indicates the direction that " need to face against the air flow. Change the Air velocity unit Air velocity unit are : m/s, FPM ( Ft/min ), Km/h, Knots, mph ( Mile/h ) If intend to change the Air velocity unit, press the Unit Button "... -
Page 13: Data Hold
Remark : The meter is defaulted to " Type K thermometer ". If intend to select the " Type J thermometer with default , please refer chapter 7-5 ( page 20 ). 4-4 Data Hold During the measurement, press the " Hold Button " ( 3-3, Fig. -
Page 14: Lcd Backlight On/Off
4-6 LCD Backlight ON/OFF After power ON, the " LCD Backlight " will light automatically. During the measurement, press the " Backlight Button " ( 3-2, Fig. 1 ) once will turn OFF the " LCD Backlight ". Press the " Backlight Button " once again will turn ON the "... -
Page 15: Auto Datalogger ( Set Sampling Time ≧ 1 Second )
5-2 Auto Datalogger ( Set sampling time ≧ 1 second ) a. Start the datalogger Press the " REC Button ( 3-4, Fig. 1 ) once , the LCD will show the text " REC ", then press the " Logger Button " ( 3-6, Fig. -
Page 16: Manual Datalogger ( Set Sampling Time = 0 Second )
5-3 Manual Datalogger ( Set sampling time = 0 second ) a. Set sampling time is to 0 second Press the " REC Button ( 3-4, Fig. 1 ) once , the LCD will show the text " REC ", then press the " Logger Button " ( 3-6, Fig. -
Page 17: Check Sampling Time Information
5-5 Check sampling time information During the normal measurement ( not execute the Datalogger ), If press " Sampling Button " ( 3-6, Fig. 1 ) once , the lower LCD display will present the Sampling time information in second unit. 5-6 SD Card Data structure 1) When the SD card is used into the meter, the SD card When the first time, the SD card is used into the meter,... -
Page 18: Saving Data From The Sd Card To The Computer
6. Saving data from the SD card to the computer ( EXCEL software ) 1) After execute the Data Logger function, take away the SD card out from the " SD card socket " ( 3-9, Fig. 1 ). 2) Plug in the SD card into the Computer's SD card slot ( if your computer build in this installation ) or insert the SD card into the "... -
Page 19: Advanced Setting
EXCEL graphic screen ( for example ) 7. ADVANCED SETTING Under do not execute the Datalogger function, press the " SET Button " ( 3-5, Fig. 1 ) continuously at least two seconds will enter the " Advanced Setting " mode. then press the "... -
Page 20: Set Clock Time ( Year/Month/Date, Hour/Minute/ Second )
Remark : During execute the " Advanced Setting " function, if press " Esc Button " ( 3-2, Fig. 1 ) once will exit the " Advanced Setting " function, the LCD will return to normal screen. 7-1 Set clock time ( Year/Month/Date, Hour/Minute/ Second ) When the lower display show "... -
Page 21: Decimal Point Of Sd Card Setting
7-2 Decimal point of SD card setting The numerical data structure of SD card is default used the " . " as the decimal, for example "20.6" "1000.53" . But in certain countries ( Europe ...) is used the " , " as the decimal point, for example "... - Page 22 7-4 Set beeper sound ON/OFF When the lower display show " bEEP " 1) Use the " ▲ Button " ( 3-6, Fig. 1 ) or " ▼ Button " ( 3-5, Fig. 1 ) to select the upper value to " yES " or "...
-
Page 23: Set Sampling Time
℃ ℉ 7-6 Select the Temp. unit to When the lower display show " t-CF " 1) Use the " ▲ Button " ( 3-6, Fig. 1 ) or " ▼ Button " ( 3-5, Fig. 1 ) to select the upper Display text to " C " or "... -
Page 24: Power Supply From Dc Adapter
2) If select the upper to " yES ", press the " Enter Button " ( 3-4, Fig. 1 ) once again, the Display will show text " yES Enter " to confirm again, if make sure to do the SD memory card format, then press "... -
Page 25: System Reset
10. SYSTEM RESET If the meter happen the troubles such as : CPU system is hold ( for example, the key button can not be operated... ). Then make the system RESET will fix the problem. The system RESET procedures will be either following method : During the power on, use a pin to press the "... - Page 26 Meter (9W 'D" Connector) Center Pin..........Pin 4 (3.5 mm jack plug) Ground/shield........... Pin 2 2.2 K resistor Pin 5 The 16 digits data stream will be displayed in the following format : D15 D14 D13 D12 D11 D10 D9 D8 D7 D6 D5 D4 D3 D2 D1 D0 Each digit indicates the following status : End Word D1 &...
-
Page 27: Optional Type K Temp. Probe
RS232 FORMAT : 9600, N, 8, 1 Baud rate 9600 Parity No parity Data bit no. 8 Data bits Stop bit 1 Stop bit 12. Optional Type K Temp. probe (Type K) TP-01 * Max. short-tern operating ℃ ℉ Temperature: 300 (572 * It is an ultra fast response naked-bead thermocouple... -
Page 28: Patent
13. PATENT The meter ( SD card structure ) already get patent or patent pending in following countries : Germany Nr. 20 2008 016 337.4 JAPAN 3151214 TAIWAN M 358970 M 359043 CHINA ZL 2008 2 0189918.5 ZL 2008 2 0189917.0 Patent pending...
Need help?
Do you have a question about the AM-4214SD and is the answer not in the manual?
Questions and answers