Table of Contents
Advertisement
Quick Links
Advertisement
Table of Contents

Related Manuals for CYP EL-5400D


Summary of Contents for CYP EL-5400D
- Page 1 EL-5400D DVI/VGA/Display Port Presentation Switch OPERATION MANUAL...
-
Page 3: Copyright Notice
DISCLAIMERS The information in this manual has been carefully checked and is believed to be accurate. CYP (UK) Ltd assumes no responsibility for any infringements of patents or other rights of third parties which may result from its use. CYP (UK) Ltd assumes no responsibility for any inaccuracies that may be contained in this document. -
Page 4: Safety Precautions
SAFETY PRECAUTIONS Please read all instructions before attempting to unpack, install or operate this equipment and before connecting the power supply. Please keep the following in mind as you unpack and install this equipment: • Always follow basic safety precautions to reduce the risk of fire, electrical shock and injury to persons. -
Page 5: Table Of Contents
CONTENTS 1. Introduction ...........6 2. Applications ...........6 3. Package Contents ........6 4. System Requirements ......6 5. Features ..........7 6. Operation Controls and Functions ..8 6.1 Front Panel ........... 8 6.2 Rear Panel ...........10 7. OSD Menu and Function List ..... 11 8. -
Page 6: Introduction
1. INTRODUCTION The EL-5400D Presentation Switch with integral scaler is designed to be used with Dual-link DVI, Mini Display-Port, and PC/Component sources allowing users to switch and scale these sources to it's HDMI output. Digital Optical and Analogue Stereo Audio inputs and outputs... -
Page 7: Features
5. FEATURES v1.3 HDMI, HDCP 1.1 and DVI 1.0 compliant Integrate and switch DVI, VGA, and Mini Display-Port sources to a single HDMI output Digital to Analogue & Analogue to Digital Audio conversion (DAC/ADC) Audio support: Dolby Digital, Dolby DTS, Dolby Digital Plus, Dolby True HD, DTS-HD Master Audio, LPCM Multi-channel, LPCM Stereo, Analogue Stereo Resolution Support: Component up to 1080p@60Hz / Dual-Link DVI &... -
Page 8: Operation Controls And Functions
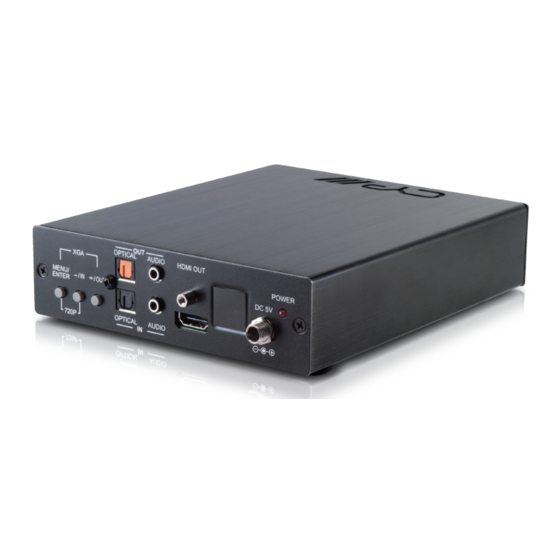
6. OPERATION CONTROLS AND FUNCTIONS 6.1 Front Panel OPTICAL AUDIO HDMI OUT POWER DC 5V MENU/ ENTER OPTICAL AUDIO 720P MENU/ENTER Press this button to ENTER the OSD menu. Press again to confirm the selection. Press it together with - button to switch output to 720p or with + button to switch output to XGA instantly. - Page 9 OPTICAL IN This slot is to connect from the input OPTICAL audio source equipment such as Blu-ray or DVD player. AUDIO L/R IN This slot is to connect from the L/R input audio source equipment such as PC/laptop. HDMI OUT This slot is to connect to HDMI display with HDMI cable.
-
Page 10: Rear Panel
6.2 Rear Panel RS232 Dual-Link DVI PC/COMP SERVICE RS232 This slot is to connect with D-Sub 9pin cable from the PC/NB device for RS-232 control. SERVICE This slot is to connect with USB cable for manufacturers’ firmware update only. Mini-DisplayPort IN This slot is to connect with MiniDisplayPort source output for DisplayPort signal sending. -
Page 11: Osd Menu And Function List
720x480P 1280x720P 1920x1080P 640x480 800x600 1024x768 1280x1024 1600x1200 1920x1200 1280x800 By Native Exit Misc. Setup EDID Mode Internal / External / Exit Info. OSD Mode Off / On / Exit About EL-5400D FW Ver. Factory Reset System Reset Exit Exit... -
Page 12: Remote Control
8. REMOTE CONTROL Power Press to turn ON/OFF the system. VIDEO IN Press to select DVI/MDP/PC/Component COMP VIDEO IN input source. AUDIO OPTICAL MUTE AUDIO IN AUDIO IN EXIT MENU Press to select AUDIO/OPTICAL/MDP ENTER input audio or MUTE the system. INFO OUTPUT EXIT... -
Page 13: Rs-232 Protocols
8.1 RS-232 Protocols RS-232 modem cable. Pin definition of modem cable EL-5400D Remote Controller Definition Definition → ← Baud Rate: 19200 bps Data Bit: 8 bits Parity: None Stop Bit: 1 bit Flow Control: None... -
Page 14: Rs-232 Commands
8.2 RS-232 Commands User Command Code Description POWER ? Power Status POWER ON Power On POWER OFF Power Off VIDEO ? Video Input Source Video Input in DVI Video Input in Mini-DisplayPort Video Input in PC COMP Video Input in Component AUDIO ? Audio Input Source AUDIO... - Page 15 FEEDBACK OFF Key Feedback Disable STATE ? Video Input Signal Status VERSION ? Firmware Version DEFAULT Reset to Factory Default About ? About EL-5400D Note: Any commands will not be executed unless followed by a carriage return. Commands are not case-sensitive.
-
Page 16: Connection And Installation
9. CONNECTION AND INSTALLATION Laptop Laptop Mini DisplayPort Input Analogue Optical Stereo Input Input Input Input RS232 EL-5400D Controller Optical Analogue HDMI Output Stereo Output Output Amplifier Display Active Speakers... -
Page 17: Specifications
10. SPECIFICATIONS DP Input Frequency 2.7 Gbps & 1.62 Gbps/Lane Bandwidth Input Ports 1×Dual-Link DVI (Female type), 1×Mini-DisplayPort, 1×PC/COMP Audio Input Ports 1×L/R, 1xOptical Output Ports 1×HDMI, 1×L/R, 1×Optical Power Supply 5V DC/ 2.6A (US/EU standards, CE/FCC/UL certified) ESD Protection Human body model: ±8 kV (air-gap discharge) ±4 kV (contact discharge) -
Page 18: Pc, Hdmi, Dp Input Timing
10.1 PC, HDMI, DP Input Timing Input Resolution CVBS × 640×350@85 × 640×400@85 × 720×400@85 × VGA640×480@60/72/75/85 × SVGA800×600@56/60/72/75/85/120R × 848×480@60Hz × XGA1024×768@43i/60/75/85/120R ... - Page 19 Input Resolution CVBS × 1920×1200@60R/60 @60R only × × 1920×1440@60 × × × 720×480i/p × × × 720×576i/p × × × 720i/p@24/25/30/50/60 × × × 1080i@50/60 × × × 1080p@24/30/50/60 ×...
-
Page 20: Output Resolution
10.2 Output Resolution Output Resolution HDMI 640*480 800*600 1024*768 1280*1024 1600*1200 1920*1200@60 1280*800 720*480P 1280*720P(Default) 1920*1080P Note: When output timing is set to 'By Native' yet the timing does not match the built-in support timing,output timing will set to default at 1280 ×... -
Page 21: Acronyms
11. ACRONYMS ACRONYM COMPLETE TERM HDMI High-Definition Multimedia Interface... - Page 24 CYP (UK) Ltd., Unit 7, Shepperton Business Park, Govett Avenue, Shepperton, Middlesex, TW17 8BA Tel: +44 (0) 20 3137 9180 | Fax: +44 (0) 20 3137 6279 Email: sales@cypeurope.com www.cypeurope.com v1.00...
Need help?
Do you have a question about the EL-5400D and is the answer not in the manual?
Questions and answers