Avery Berkel M Series User Instructions
Retail system scales
Hide thumbs
Also See for M Series:
- User instructions (221 pages) ,
- Operator instructions manual (170 pages)

Related Manuals for Avery Berkel M Series


Summary of Contents for Avery Berkel M Series
-
Page 1: User Instructions
M Series Retail System Scales User Instructions Part 1 ENGLISH AWT35-000061 Issue AC 14 April 2008 *awt35-000061*... - Page 2 Full acknowledgment of the source must be given. Avery Berkel is a division of ITW Limited. This publication was correct at the time of going to print and is supplied without liability for errors or omissions.
-
Page 3: Table Of Contents
Contents page no. Safety Warnings About Your Machine Description Using the documentation Installation Getting started Function keys Servicing your scales Printing The cassette printer The receipt printer Programming The Machine Manager mode Creating and editing text Setting up data tables Setting the date and time Creating departments Creating product groups... - Page 4 4.12 Printing data reports Machine Set-up Direct access (Hot) keys Dedicated keys Printer set-up Dual printer operation Assigning a barcode format Adjusting the display brightness Machine operating modes Setting alarms Trade transactions (stock mode) 5.10 Re-pricing goods Programming Products Selecting PLUs by barcode Customising the menus Changing prices Creating and Editing PLUs...
- Page 5 Overriding prices Overriding weight Voiding a transaction Using tares 7.10 Using the FIX key 7.11 Receipt operations 7.12 Using the ADD key 7.13 Returning products Pre-pack Operations Setting the machine to pre-pack Using PLUs Using tares Preset tare keys Multiple labels Returning labels Using the NON ADD key Using the Re-Wrap key...
- Page 6 Mseries User Instructions Part One...
-
Page 7: Safety
1 Safety 1.1 Warnings Mseries User Instructions Part One... - Page 9 1.1 Warnings 1 Safety Safety Warnings Safe Installation The mains plug must be inserted into a socket outlet with a protective earth contact. The electrical supply at the socket outlet must provide over current protection of an appropriate rating. CAUTION: The mains lead must be connected to a supply outlet with a protective earth contact.
- Page 10 1 Safety 1.1 Warnings The outside of standard products may be wiped down with a clean cloth moistened with water containing a small amount of washing up liquid. The outside of products waterproofed to IP65, IP66 and IP67 may be washed down with water containing a small amount of a proprietary detergent.
-
Page 11: About Your Machine
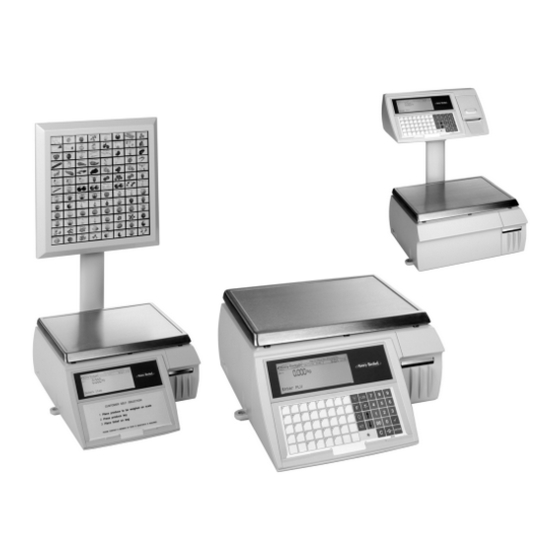
2 About Your Machine 2.1 Description 2.2 Using the documentation 2.3 Installation 2.4 Getting started 2.5 Function keys 2.6 Servicing your scales Mseries User Instructions Part One... - Page 13 2.1 Description 2 About Your Machine About Your Machine Description Figure 2.1 M series models Mseries User Instructions Part One...
- Page 14 2 About Your Machine 2.1 Description Sub total Items £ M a r i a T r a n s butter 1.05 cheddar cheese 9.75 organic coffee 2.80 Figure 2.2 Vendor display What you see Operator details Transaction count Sub-total Transaction details Machine ID Metrology information...
-
Page 15: Using The Documentation
Part 1, Operator Instructions, and Part 2, Manager Functions include all the functions available across the complete range of M series machines. This means that some of the functions described may not be available at your machine. You should ignore those sections which do not apply. - Page 16 2 About Your Machine 2.2 Using the documentation temperature flashing character call service engineer spirit level Mseries User Instructions Part One...
-
Page 17: Installation
2.3 Installation 2 About Your Machine Installation Handling Levelling Adjustable feet Non slip feet If the machine is to be positioned on a slippery surface we recommend that two special feet are fitted. The feet can be obtained from your Avery Berkel supplier: part number 70257-144 Mseries User Instructions Part One... - Page 18 2 About Your Machine 2.3 Installation Legal requirements To use the machine only in a manner which complies with any mandatory markings. In certain countries it is illegal to use pre-pack mode for direct trade with the public. Mseries User Instructions Part One...
-
Page 19: Getting Started
2.4 Getting started 2 About Your Machine Getting started Before operating your machine make sure that it has been programmed with the required functions. Connections/switch positions Note: Take care not to trap any cables under the feet, or the ribs in the base of the machine, as this could cause weighing inaccuracies and damage to the cables. - Page 20 2 About Your Machine 2.4 Getting started Operator keyboard € Å 1.23 ü 100 g Ö Ü ENTER Manager mode keyboard ° Æ Ä Á £ & É Å € ° Ø ü Cntrl Shift Ó Ú Caps ENTER Ö Ü...
-
Page 21: Function Keys
2.5 Function keys 2 About Your Machine Function keys Resets an out of balance scale. Subtracts the weight of the container when weighing goods. In receipt mode, retains the PLU until the transaction is entered. Retains a tare, if in operation, until it is cancelled. In label mode, the PLU is retained until it is cancelled. - Page 22 2 About Your Machine 2.5 Function keys Selects the other price base when entering the price of an open, weighed PLU or a hand entered price. 100 g Initiates a display test sequence. Pressed again during the test sequence prints a test report. Press operator key and type in PIN during test sequence to gain access to Manager Mode.
-
Page 23: Servicing Your Scales
2.6 Servicing your scales 2 About Your Machine Servicing your scales Your scales may be set with a suitable service interval. If a service interval has been set, a notice will display as you near the service date. Note: If the machine is left switched on, then the message will be displayed immediately after midnight provided the machine is in sales mode. - Page 24 2 About Your Machine 2.6 Servicing your scales Mseries User Instructions Part One...
-
Page 25: Printing
3 Printing 3.1 The cassette printer 3.2 The receipt printer Mseries User Instructions Part One... - Page 27 3.1 The cassette printer 3 Printing Printing Most M series machines are supplied with either a cassette label/receipt printer or a clamshell (receipt) printer. Dual printer machines M420 models have two printers, a clamshell (receipt) printer and a cassette (label/receipt) printer. The way in which your machine has been configured will determine where labels are printed.
- Page 28 Approved labels and paper rolls are available from a number of suppliers, whose addresses can be obtained from your Avery Berkel centre. • The message Products appears on the display to inform you that the printer roll is finished.
- Page 29 3.1 The cassette printer 3 Printing Advancing the printer roll To advance the paper roll, or print a blank label, press the total key when the display shows • Enter PLU or • Pre-Pack Printer roll dimensions These dimensions are approximate and for guidance only. Refer to the appropriate Thermal Label/Receipt Material Specifications for further information.
- Page 30 3 Printing 3.1 The cassette printer Changing the printer roll Removing the cassette Raise print head release lever. Pull firmly to remove cassette. Mseries User Instructions Part One...
- Page 31 3.1 The cassette printer 3 Printing Changing the label/paper roll Note: If you are rewinding the backing paper follow the instructions on page 30 paper guide. Adjust paper width guide to fit width of paper or label. guide bar Feed paper over rewind spindle, under guide bar and beneath paper guide.
- Page 32 3 Printing 3.1 The cassette printer Rewinding the paper Label roll: • rewind the backing when serving customers. Paper roll: • you can rewind the paper when printing reports. Follow the instructions on page 28 to remove the cassette. Tear paper and remove core. Turn knob on rewind spindle to position 2 and remove backing paper from rewind spindle.
- Page 33 3.1 The cassette printer 3 Printing paper guide. Adjust paper width guide to fit width of paper or label. guide bar Feed paper over rewind spindle, under guide bar and beneath paper guide. 7 Turn knob on rewind spindle 8 Turn knob back to position 1. to position 2 and feed backing paper through outer slots.
- Page 34 3 Printing 3.1 The cassette printer Routine maintenance WARNING: To avoid the possibility of electric shock or damage to the machine, always switch off the machine and isolate from the power supply before carrying out any routine maintenance. The ON/OFF switch is located in the base of the machine just in front of the rear left foot.
- Page 35 3.1 The cassette printer 3 Printing Lift up print head release lever 5 Pull firmly to remove cassette Close print head Repeat steps 7 and 8 two or three times. Mseries User Instructions Part One...
- Page 36 3 Printing 3.1 The cassette printer 10 Clean front plate 12 Make sure that print head is down firmly Mseries User Instructions Part One...
- Page 37 Approved paper rolls are available from a number of suppliers, whose addresses can be obtained from your Avery Berkel centre. The message Out Of Paper appears on the display to warn you that the printer roll is finished...
- Page 38 3 Printing 3.2 The receipt printer Changing the printer roll Receipt only printer Slide catch downwards Make sure that the cover is properly closed Routine maintenance WARNING: To avoid the possibility of electric shock or damage to the machine, always switch off the machine and isolate from the power supply before carrying out any routine maintenance.
- Page 39 3.2 The receipt printer 3 Printing Cleaning the print head We recommend that the print head is cleaned regularly in order to ensure maximum life and to maintain the quality of print. Always follow the instructions on the cleaning kit. Slide catch downwards On/Off switch cleaning card...
-
Page 41: Programming The Machine
4 Programming The Machine 4.1 Manager mode 4.2 Creating and editing text 4.3 Setting up data tables 4.4 Setting the date and time 4.5 Creating departments 4.6 Creating product groups 4.7 Setting up the ADD label 4.8 Information labels 4.9 Creating messages 4.10 Programming Operators 4.11 Setting function security 4.12 Printing data reports... - Page 43 4.1 Manager mode 4 Programming The Machine Programming The Machine This chapter tells you how to program the machines so that they operate in the way required to match the store operations. Manager mode Please remember ..You must be in manager mode in order to perform a programming operation.
- Page 44 4 Programming The Machine 4.1 Manager mode To enter Manager Mode You can enter Manager Mode by pressing test, and following the sequence described below. Note: The factory default setting for operator 1 PIN is 4296 and for operator 1 security level is 2. All other operators will have factory default settings of PIN 0 and security level 0 unless you change them.
- Page 45 4.1 Manager mode 4 Programming The Machine Programming menus The complete programming menus can be found on the separate sheets supplied with your machine. The following diagram shows the keys you should use to • move around the programming screen •...
- Page 46 4 Programming The Machine 4.1 Manager mode Go to Change Price ENTER ENTER ENTER Go to System Setup ENTER Figure 4.3 Navigating the Manager Menus Mseries User Instructions Part One...
-
Page 47: Creating And Editing Text
4.2 Creating and editing text 4 Programming The Machine Creating and editing text To enter text use the programming keyboard on the machine. To type the upper marking shown on the keys press Shift and release for characters printed in red Cntrl and release for characters printed in blue. - Page 48 4 Programming The Machine 4.2 Creating and editing text Shift press followed by to re-centralise the text. Selecting the size of printed text There are 32 different character (font) sizes from which you can select when entering text for printing. Enter the font identification number (A to X and 1to8), as illustrated in Figure 4.4, for the size of characters required before entering the text otherwise it will be printed in the...
- Page 49 4.2 Creating and editing text 4 Programming The Machine Inverted text You can print text in inverse print: Press twice during text entry Select the relevant control from the list displayed: • Inverse On is displayed as <INVERSE> • Inverse Off is displayed as <!INVERSE> •...
- Page 50 4 Programming The Machine 4.2 Creating and editing text Press to delete the last character. Clearing the entire text entered • Press Shift then . Do not press any other key. Enter new text if required. PLU display text The PLU display text allows you to enter up to 60 characters over two lines (30 characters per line).
-
Page 51: Setting Up Data Tables
4.3 Setting up data tables 4 Programming The Machine Setting up data tables Tax rate You can program each PLU with one or two tax references. There are ten tax references available (0-9) and each one can be assigned a different tax rate. Use tax reference 0 for products which are non taxable. - Page 52 4 Programming The Machine 4.3 Setting up data tables Sales mode - selecting the tax rate You can select • Tax reference 1. This is the reference normally used to calculate the tax. • Tax reference 2. Press with the PLU selected but change before assigning the transaction to use tax reference 2.
- Page 53 4.3 Setting up data tables 4 Programming The Machine Assigning a stored tare You can • enter a tare reference number when programming PLUs See section 6.4, Tax reference 1 and 2 on page 137. • enter a tare reference when assigning a dedicated (preset) tare key.
- Page 54 4 Programming The Machine 4.3 Setting up data tables Discount keys You can only apply discounts if you have set up the appropriate discount keys on the sales mode keyboard, see section 5.2, page 91. Note: If you set up a discount key without assigning a discount reference to it, the operator is prompted to enter the discount reference number.
- Page 55 4.3 Setting up data tables 4 Programming The Machine • select one of seven types of payment for each payment option or to disable it • select from a range of programmable values associated with each payment type. The flow chart (Figure 4.7) shows which options are available for each payment type.
- Page 56 4 Programming The Machine 4.3 Setting up data tables Payment Key 6 - 15 Num. (1 - 15) Payment Method Cash Cheque Card Account Coupon (16 chars max) Local Credit Stock Type General Account Coupon Disabled Cash Card Movement Pre-set Value 0.00 0.00 0.00...
- Page 57 4.3 Setting up data tables 4 Programming The Machine • Coupon • General • Stock Movement Preset value Payment keys programmed with a pre-set value will only allow a payment entry that matches the pre-set value. For example, you could have a dedicated key for £50 notes. Prices If you select No, neither the unit/item price or the total price will be printed on the receipt.
- Page 58 4 Programming The Machine 4.3 Setting up data tables Mixed payments You can enter payments greater than the amount owed provided that: • payments have been entered using keys that allow change • the change required does not exceed the value entered using keys that allow change.
- Page 59 4.3 Setting up data tables 4 Programming The Machine Conversion rate If you have selected foreign currency as the payment type you can programme the conversion rate to be used for converting the local amount to pay into the foreign cash. •...
- Page 60 4 Programming The Machine 4.3 Setting up data tables Security level Payment entry is only allowed if the operator security level is as high or higher than the security level set for the payment key. Setting up accounts You can set up the account system to allow either: •...
- Page 61 4.3 Setting up data tables 4 Programming The Machine 1 Create & Edit Account 2 Delete Account 3 Account Entry Account Ref. 1 Free 1 Delete Record Account Name 2 Validated 2 Delete File (16) Credit Status Account Ref. Are You Sure? No Entry Accepted Figure 4.9 Account programming Charging to account...
- Page 62 4 Programming The Machine 4.3 Setting up data tables Received on account Customers may make payments to their accounts when they are not purchasing goods. When the transaction is completed the machine prints two copies of a Recvd.On Account slip. One copy is given to the customer and the other copy is retained.
-
Page 63: Setting The Date And Time
4.4 Setting the date and time 4 Programming The Machine Setting the date and time The machine has an internal clock which stores the date and time. It uses the clock to calculate the sell-by dates printed on labels and to print the date and time on printouts and reports. Please remember .. -
Page 64: Creating Departments
4 Programming The Machine 4.5 Creating departments Creating departments A department is a group of machines within the store which reflects the way the store operates, for example produce, bakery, fresh meat, fish. Each department has its own set of PLUs. - Page 65 4.5 Creating departments 4 Programming The Machine System Data 1 Products 2 Departments Department Number Description of department (20 characters max.) Assign Machine ENTER Press instead of typing in the machine ID if you do not wish to allocate a specific machine to the department. Figure 4.11 Creating departments Department keys You can set up:...
- Page 66 4 Programming The Machine 4.5 Creating departments Example: Department 1 (Produce) assigned as default department Department 2 Department 3 Department 1 Bakery Fresh meat Produce PLU 1 PLU 2 PLU3 PLU 1 PLU 2 PLU 4 PLU 1 PLU 2 PLU 1 PLU 2 PLU 3...
-
Page 67: Creating Product Groups
4.6 Creating product groups 4 Programming The Machine Creating product groups A product group is a category such as fish, fresh meat or vegetables to which an individual PLU may be assigned. You can: • create up to 99 groups •... -
Page 68: Setting Up The Add Label
4 Programming The Machine 4.7 Setting up the ADD label Setting up the ADD label The ADD function enables you to obtain a label with totals printed on it. Your machine can be configured to print one of four types of ADD labels: •... - Page 69 4.7 Setting up the ADD label 4 Programming The Machine 1 Products System Data 6 Label Details 1 Add Label Label Format Add Label Text (200 chars. max.) Barcode Disabled/Enabled Date 1 Disabled Date 1 Days Date 1 Months Date 1 Hours Date 2 Disabled Date 2 Days Date 2 Months...
- Page 70 4 Programming The Machine 4.7 Setting up the ADD label Transaction labels ADD labels ‘Receipt type’ ADD label Standard ADD label Figure 4.15 Typical labels Barcode printing in ADD mode You can print the PLU label barcode on the ADD receipt as well as on the ADD total label.
- Page 71 4.7 Setting up the ADD label 4 Programming The Machine To print the PLU barcode: • your machine must be configured to print receipt type labels at the end of all the transactions • the PLU barcode must use the appropriate format •...
-
Page 72: Information Labels
4 Programming The Machine 4.8 Information labels Information labels You can program a PLU to print an additional label providing information such as: • cooking instructions • recipes • safe handling • traceability information The label can use any of the fields that are available for standard labels. -
Page 73: Creating Messages
You can include substitution codes in text messages for printing sales information. For a complete list of Avery Berkel and Dewey Decimal substitution codes available and how to use them, see Part 2, Section 10.3 - Substitution codes, page 197. -
Page 74: Store Name
4 Programming The Machine 4.9 Creating messages Insert from the right (default). Show line by line vertically. In this case word wrapping will occur automatically so that a word is not split across two lines. Scrolling logo - you can define a bit map which scrolls up. Store name The store name can: •... - Page 75 4.9 Creating messages 4 Programming The Machine %%+4.4%%or%%Z3prints the time in the format 125 %%+7.3#pp%% or%%Rpp prints the sales message numbered ‘pp’. You could use this to insert text that you wish to appear in all PLU texts. %%+3.1%% or %%V1prints the current operator number. %%+3.2%% or %%V1prints the current operator name.
- Page 76 4 Programming The Machine 4.9 Creating messages Printed text for 1.0 kg sold: COOK AT 150° C FOR 50Mins Example of loyalty points Sales message text: YOU HAVE EARNED %%+9.1#20%% (or %%P20) BONUS POINTS Printed text for 1.5 kg sold: YOU HAVE EARNED 30 BONUS POINTS Sign on/off text These are messages that appear at the top (sign on) or at the...
- Page 77 4.9 Creating messages 4 Programming The Machine Example:Creating a scroll message System Data 4 Messages 4 Scroll Message No Scroll Message text 1 Assign One M/c (200 chars. max.) 2 Assign All M/c ENTER Press instead of typing the machine ID if you do not wish to assign a specific machine to the department.
- Page 78 4 Programming The Machine 4.9 Creating messages Machine specific messages If you include the substitution code for machine message (%%+7.1#pp%% or %%Mpp) in the sign on or sign off message, you can print different messages at each machine. The printed text is determined by the sales message reference number assigned to the machine as the Machine message in Printer setup.
-
Page 79: Programming Operators
4.10 Programming Operators 4 Programming The Machine 4.10 Programming Operators You can select the status of an operator to be either trading or training. You only change the operator status if there are no outstanding transactions against the operator. Trading All transactions carried out by the operator are added to the trading totals stored by the machine Training... - Page 80 4 Programming The Machine 4.10 Programming Operators Operator names • You can enter up to 99 operator names and you can assign dedicated keys to any number of them. • Each name may have up to 16 characters. • Operator names are printed on receipts and the operator totals report.
- Page 81 4.10 Programming Operators 4 Programming The Machine Operator security level • There are 10 security levels from 0 to 9. • The security level determines operator access to scale functions. • The operator will have access to those functions whose security level is the same as or less than their own security level.
-
Page 82: Setting Function Security
4 Programming The Machine 4.11 Setting function security 4.11 Setting function security Security levels • There are 10 security levels from 0 to 9. • The security level determines operator access to scale functions. • The operator will only have access to those functions whose security level is the same as or less than their own security level. - Page 83 4.11 Setting function security 4 Programming The Machine Pick Up Paid Out Account Manager functions You can assign a security level to most of the manager functions or you can change the level set, provided that your own security level is the same or higher than the function security.
-
Page 84: Printing Data Reports
4 Programming The Machine 4.12 Printing data reports 4.12 Printing data reports Data reports comprise the PLU file and lists of the data tables and messages set up. A printout provides you with a reference copy of information programmed at the machine. To stop a report press Data reports available are: •... - Page 85 4.12 Printing data reports 4 Programming The Machine • Email Reports • Keyboard Report Please remember ..Instructions for printing totals reports can be found in Part 2, section 4.3, page 105. Mseries User Instructions Part One...
- Page 86 4 Programming The Machine 4.12 Printing data reports Data report examples *****Discount List***** ***Operators Report*** 03-08-2002 12.07 03-08-2002 12.05 Discount 1 Operator Num 1 BULK BUY SANDRA Percentage Security Level Security Level Trading Discount 2 Logged On Operator Num 2 ONE DAY SPECIAL Value £5.00...
- Page 87 4.12 Printing data reports 4 Programming The Machine • a range of PLUs • PLUs in a selected range of departments ****PLU File List**** The PLU file list shows all the information programmed in the 03-08-2002 12.15 PLU record. Dept. Start: Dept.
- Page 88 4 Programming The Machine 4.12 Printing data reports Text report The text report lists: • Sign on text • Scroll message text • Sign off text • ADD label text • Store name text • Department text • Sales message texts •...
-
Page 89: Machine Set-Up
5 Machine Set-up 5.1 Direct access (Hot) keys 5.2 Dedicated keys 5.3 Printer set-up 5.4 Dual printer operation 5.5 Assigning a barcode format 5.6 Adjusting the display brightness 5.7 Machine operating modes 5.8 Setting alarms 5.9 Trade transactions (stock mode) 5.10 Re-pricing goods Mseries User Instructions Part One... - Page 91 5.1 Direct access (Hot) keys 5 Machine Set-up Machine Set-up In machine set up you can customise the way in which your machine operates. You can: • select which function keys are operable • program dedicated keys for quick access to several functions.
- Page 92 5 Machine Set-up 5.1 Direct access (Hot) keys Hold down the key you want to use until you hear a series of short bleeps followed by a long bleep. You will see the message Entry Accepted when the key has been assigned.
-
Page 93: Dedicated Keys
5.2 Dedicated keys 5 Machine Set-up Dedicated keys Dedicated keys are ‘soft' keys which can be assigned to any of the programmable keys on the keyboard. You can label the key position for a soft key according to your own requirements. Figure 7.1 shows how to assign a dedicated PLU (commodity) key for PLU 117. - Page 94 5 Machine Set-up 5.2 Dedicated keys Standard keys Standard keys are: Euro Convert Edit Preset Traceability Operator Return Traceability Passport Discount Pre-Weigh Checkout Oper. Code Tax Change Sub-Total Print Stock Tax Print Customer Number Weight Override, Department Hash Consec. Num. Tare UP/PLU PLU Search...
- Page 95 5.2 Dedicated keys 5 Machine Set-up • Negative Non Weighed Allows you to enter the price of a negative nonweighed item. Pre-pack keys These keys are only available for use when the machine is operating in pre-pack mode. If you attempt to use a pre-pack key in any other mode you will see the message Pre-Pack Only.
- Page 96 5 Machine Set-up 5.2 Dedicated keys To set up a generic key, do not enter a reference number for the key before assigning it to the keyboard. Manager Mode 4 Machine Setup 1 Keyboard Setup 1 Dedicated Keys 4....1 Standard Assign 2 ECR Assign 3 Prepack Assign 12 Discount...
-
Page 97: Printer Set-Up
5.3 Printer set-up 5 Machine Set-up Printer set-up This group of functions enable you to customise the way in which your machine generates and prints labels, receipts and talons. Label setup These options allow you to choose: • how you want labels to look and •... - Page 98 5 Machine Set-up 5.3 Printer set-up For dual printer machines, See Label formats on page 107. If you machine is operating in Hand Price mode the label format assigned to the machine will be used. Passport label format The default label format is 90. If you select a different label format you must ensure that only text field 3 and barcode fields are defined.
- Page 99 5.3 Printer set-up 5 Machine Set-up 1.23 You cannot use Pre-pack The machine retains the PLU and tare (if set up) and issues a label each time the weight becomes steady. Default operator When selecting the print mode you will be asked to enter an operator number.
- Page 100 5 Machine Set-up 5.3 Printer set-up To print the label, press while the PLU is displayed. Transactions totals for the labels are stored as counter values against the default operator. This means that you can: • individually label products with ingredients, cooking instructions, promotional information.
- Page 101 5.3 Printer set-up 5 Machine Set-up Talon A talon is a log of each receipt printed at a machine and is printed after the receipt. It shows the operator number, the number of transactions and the total value of the last receipt. Duplicate receipt This function to sets up the printer to print a duplicate receipt.
- Page 102 5 Machine Set-up 5.3 Printer set-up Bag labels A ‘bag label’ is a total label that is used to seal the bag and is then scanned at the checkout. This function makes it possible for several transactions that have already been individually wrapped to be packed in one larger outer bag.
- Page 103 5.3 Printer set-up 5 Machine Set-up The ‘bag’ label will be printed on whichever printer has been selected for label printing. If your machine has been setup to print receipts and labels on the same printer, there will be a 2 second delay between printing the receipt and the bag label.
- Page 104 5 Machine Set-up 5.3 Printer set-up Margin This function allows you to centralise the text on receipts and reports when printing to wide receipt paper. The default setting is 0.0mm and you can program a margin width up to 9.9mm. Setting a margin has the effect of moving the print to the left of the paper by the amount programmed.
- Page 105 5.3 Printer set-up 5 Machine Set-up Euro print If this function is enabled: • euro price information is printed automatically on receipts and labels • euro prices are displayed on request • a warning message may be printed on the receipt. On labels either: •...
- Page 106 5 Machine Set-up 5.3 Printer set-up Printer 2 If your machine has two printers you can configure the way in which the clamshell printer operates. Dual printer operations are described in section 5.4, page 105. Note: In Manager Mode, if no clamshell printer is detected when Printer is selected you will see the message Invalid Option.
-
Page 107: Dual Printer Operation
5.4 Dual printer operation 5 Machine Set-up Dual printer operation The M420 machine has two printers, a clamshell (receipt) printer and a cassette label/receipt printer. The default setup for the machine is for label/prepack operations to print to the cassette printer and receipt/report operations to print to the clamshell printer (printer 2). - Page 108 5 Machine Set-up 5.4 Dual printer operation Manager Mode 4 Machine Setup 5....2 Printer Setup 1....3....7 Printer 2 1 Disabled 2 Receipt & Report 3 Label 4 Printer 2 Label Format number 1 Closed 2 Open Figure 5.8 Printer 2 setup Please remember ..
- Page 109 5.4 Dual printer operation 5 Machine Set-up Default configuration The default configuration is for printer 2 as a receipt and report printer. P1 open or closed format Figure 5.9 Default setting Label formats When label printing is enabled for Printer 2, you can select open, allowing all formats to be printed, or closed, allowing only a single label format to be printed in the same way as for the cassette printer.
- Page 110 5 Machine Set-up 5.4 Dual printer operation b)PLU:label format 1 Label format does not match Label printed on P1 Example: Printer 2: label printing enabled: open format selected: label format 7 assigned. Printer 1: open format selected PLU: any label format Label always printed on P2 Example: Printer 2: label printing enabled: open format...
- Page 111 5.4 Dual printer operation 5 Machine Set-up Example:Printer 2: label printing enabled: closed format selected.label format 7 assigned Printer 1:closed format selected: label format 1 assigned a)PLU:label format 1 Label format matches P1 Label printed on P1 b)PLU:any other label format Label format does not match P1 or P2 Label printed on P2 Mseries User Instructions Part One...
-
Page 112: Assigning A Barcode Format
5 Machine Set-up 5.5 Assigning a barcode format Assigning a barcode format In order for barcodes to be printed you must assign a format to the machine. On label machines the format assigned to the machine is used unless the PLU has a programmed barcode. Enter a barcode reference number from 1 to 9. - Page 113 5.5 Assigning a barcode format 5 Machine Set-up Height of Barcode The height of barcode option allows you to set the height of barcodes on receipts and talons to be programmable in the range of 5-20 mm in 1mm intervals. The default height is 20mm Trace code The trace code is a six digit numerical code printed at the end...
-
Page 114: Adjusting The Display Brightness
5 Machine Set-up 5.6 Adjusting the display brightness Adjusting the display brightness You can adjust the brightness level (contrast) for the vendor and customer displays independently. The brightness level increments with each key press until it reaches the maximum value. Any further key presses will cause it to restart from the lowest value. -
Page 115: Machine Operating Modes
5.7 Machine operating modes 5 Machine Set-up Machine operating modes Floating vendor mode In vendor mode you can have up to 99 `floating' operators logged on to the network at any time. You can serve customers and produce receipts or labels at any machine. Machine 1 Operator Customer... - Page 116 5 Machine Set-up 5.7 Machine operating modes Manager Mode 1....1..... 4 Machine Setup 5....5 Machine Mode 1 Disabled 6 ....2 Enabled 3 ChkOut -No Float Figure 5.12 Enabling Checkout mode ChkOut -No Float If the machine is in ChkOut -No Float mode the operator may only be logged on at one machine at a time.
- Page 117 5.7 Machine operating modes 5 Machine Set-up If you select TK/Item Keyboard, any numeric entry at the lower keyboard will be treated as the number of items not the PLU number. Make sure that the machine is set up or configured to print labels before enabling self-service mode.
- Page 118 5 Machine Set-up 5.7 Machine operating modes Enter manager mode see To enter Manager Mode, page Press Assigning keys You can assign any programmable key to the TK keyboard in the same way that you assign keys to the sales keyboard. See section 5.2, page 91.
-
Page 119: Setting Alarms
5.8 Setting alarms 5 Machine Set-up Setting alarms Cash drawer detect If the cash drawer alarm is enabled the machine cannot be used while the cash drawer is open. An audible alarm will sound and the message Close Drawer will be displayed until the drawer is closed. -
Page 120: Trade Transactions (Stock Mode)
5 Machine Set-up 5.9 Trade transactions (stock mode) Trade transactions (stock mode) In stock mode the machine is used solely for data entry and capture. Any transactions performed in this mode do not update sales totals. Transactions are stored in the audit buffer and can be collected by suitable PC applications. - Page 121 5.9 Trade transactions (stock mode) 5 Machine Set-up Payment keys In stock mode you can only use stock movement type of payment keys and the ‘Recvd.On Account’ key. To be able to use stock movement keys you must: • set up and assign to the keyboard keys for each of the different stock functions you require For example, stock write off, orders, delivery notes, trade accounts.
- Page 122 5 Machine Set-up 5.9 Trade transactions (stock mode) ******Stock Mode****** ******Stock Mode****** 12-08-2003 13:25 12-08-2003 13:25 Operator Num Operator Num Sandra Sandra Stock Write Off Int 002 Stock Write Off Int 002 Greengrocery Greengrocery Total £162.35 Transactions Transactions Customer Customer Signature Signature 0001#0017...
- Page 123 5.9 Trade transactions (stock mode) 5 Machine Set-up ******Stock Mode****** ******Stock Mode****** 12-08-2003 18:25 12-08-2003 18:25 Served by Sandra Operator Num Sandra Melon £ 50.40 Delivery Note T 001 42 Items @ £ 1.40/01 Gourmet Restaura Transactions Total £ 50.40 Customer Transactions Signature...
-
Page 124: Re-Pricing Goods
5.10 Re-pricing goods Re-pricing is when a new price label is issued and stuck over the original price label on the pack. This label is not PLU assigned. The label format usually includes: • barcode • total price • unit/item price •... - Page 125 5.10 Re-pricing goods 5 Machine Set-up Weigh pack Weigh pack allows you to decide whether packs that are being re-priced should be weighed or the weight entered by hand. Weigh Pack Yes The packs that are being re-priced can be weighed. Weigh Pack No The weight of the pack must be entered by hand using the numeric keys.
- Page 126 5 Machine Set-up 5.10 Re-pricing goods Mseries User Instructions Part One...
-
Page 127: Programming Products
6 Programming Products 6.1 Selecting PLUs by barcode 6.2 Customising the menus 6.3 Changing prices 6.4 Creating and Editing PLUs 6.5 Deleting PLUs 6.6 Copying PLUs 6.7 Promotions Creating a nutritional panel 6.9 Creating voucher records Mseries User Instructions Part One... - Page 129 6.1 Selecting PLUs by barcode 6 Programming Products Programming Products A Product Look Up (PLU) is a record of the information stored about a product available for sale in the store. The most frequently used PLUs may have their own commodity key. This chapter describes how you can: •...
-
Page 130: Customising The Menus
6 Programming Products 6.2 Customising the menus Customising the menus The Create/Edit PLU menu can be customised so that options which are not required do not appear on the display in Create/ Edit PLU. The options that can be disabled or enabled are: •... - Page 131 6.2 Customising the menus 6 Programming Products Example:Disabling an option Customize menu ENTER Press option until you see the number option you want select Disabled ENTER Mseries User Instructions Part One...
-
Page 132: Changing Prices
6 Programming Products 6.3 Changing prices Changing prices Only the first, second or third price (PLUs programmed with a promotion) of a PLU can be changed. To change any other PLU data see page 131. For the each price, the display will highlight unit price, item price or neg. -
Page 133: Creating And Editing Plus
6.4 Creating and Editing PLUs 6 Programming Products Creating and Editing PLUs You can create closed, open or negative PLUs. The options available when creating or editing a PLU are described in this section. The flow chart on page 133 shows all the possible system prompts to guide you through creating a PLU. - Page 134 6 Programming Products 6.4 Creating and Editing PLUs • PLU Number • Label Format • Tax References • Group Number • Tare Reference • Net Weight Reference • Promotion Batch Number • Promo/Sales Message • Voucher Reference • Information Label Reference •...
- Page 135 6.4 Creating and Editing PLUs 6 Programming Products System prompts Create & Edit Dept Number (00) Enter PLU or barcode number 000000000000 Label Format (00) Display Text (60) PLU Text 1 (2000) PLU Text 2 (2000) PLU Text 3 (2000) Tax Ref 1 (0 - 9) Tax Ref 2 (0 - 9) 1 By Weight...
- Page 136 6 Programming Products 6.4 Creating and Editing PLUs Prop. Tare Net Weight Date 1 Disabled Date 1 Disabled Date 1 Days Date 1 Months Date 1 Hours Date 2 Disabled Date 2 Disabled Date 2 Days Date 2 Months Date 2 Hours Sales Text 1 Sales Text 2 Logo Disabled...
- Page 137 6.4 Creating and Editing PLUs 6 Programming Products Departments When you assign a department to a machine, it becomes the default department for that machine. If a department has been assigned to the machine you are using, when you enter the PLU number to select a product, the selected product will be the one assigned to the default department for the machine.
- Page 138 6 Programming Products 6.4 Creating and Editing PLUs Note: You can enter up to 60 characters over two lines, a maximum of 30 characters on each line. PLU text 1 (2000 characters) If no text has been previously programmed in PLU text 1 and the PLU display text area has been left blank, you will see the message PLU Text 1.
- Page 139 6.4 Creating and Editing PLUs 6 Programming Products PLU texts 5 and 6 (2000 characters) You will see the prompts for PLU texts 5 and 6 at the end of Create & Edit if it has been enabled in Customise Menus and if Nutri Panel is off.
- Page 140 6 Programming Products 6.4 Creating and Editing PLUs Used for nonweighed items requiring an item price. By Count Neg. Used for negative PLUs in receipt mode that require a negative item price to enable an operator to reimburse a customer for a nonweighed item. Fixed Weight Used for products with fixed net weight requiring an item price.
- Page 141 6.4 Creating and Editing PLUs 6 Programming Products • Set the item price to £1.60 and the price multiple to 4. • Select price promotion and set the second price to £1.40 and the trip value to 4. If a smaller quantity than the default number is purchased, the items will be charged at the higher price.
- Page 142 6 Programming Products 6.4 Creating and Editing PLUs Date 1 Date 2 Figure 6.2 Sell by dates Net weights Net weight is a description printed on a label to identify the weight of a non-weighed product sold on a normal or average weight basis.
- Page 143 6.4 Creating and Editing PLUs 6 Programming Products Receipts and talons Barcodes will only be printed if you enable them on the machine. PLUs for dry or branded goods PLUs for dry or branded goods can be created in two ways: Using a PLU number.
-
Page 144: Deleting Plus
6 Programming Products 6.5 Deleting PLUs Deleting PLUs You should delete PLUs that are no longer required to reduce the size of the PLU file. In some cases you will delete a range of products (for example all products in a department) or sometimes the complete product file to ensure that no obsolete products exist in the scale. -
Page 145: Copying Plus
6.6 Copying PLUs 6 Programming Products Copying PLUs This function enables you to copy the data from an existing PLU to a new one. The new PLU has a different PLU number and barcode number, and can also be in a different department. -
Page 146: Promotions
6 Programming Products 6.7 Promotions Promotions You can program PLUs with a promotional price or offer. If you select a PLU with a promotion the PLU description on the commodity display flashes. There are five types of promotion available: • price promotion •... - Page 147 6.7 Promotions 6 Programming Products Create & Edit Price Promotion Frequent Shopper Wgt Free Promo/Items Discount Promo Voucher Promo Free Promo Promo Batch No.. Promo Batch No. Promo Batch No. Promo Batch No. Promo Batch No. Second Price Second Price Voucher Ref.
- Page 148 6 Programming Products 6.7 Promotions Price promotion You can program a PLU with a second and third unit or item price and two different weighed quantities or number of items that enable the second and third prices, • The promotional price is enabled when the pre- programmed weight or quantity is purchased.
- Page 149 6.7 Promotions 6 Programming Products There are three types of Frequent Shopper promotion available. • Price You can program a second price for the PLU which applies if the customer is part of the frequent shopper program. • % Discount This type of promotion calculates the discount as a percentage of the original unit price or of the total price for the PLU.
- Page 150 6 Programming Products 6.7 Promotions Weight free promotion Figure 6.6 Free weights graph Mseries User Instructions Part One...
- Page 151 6.7 Promotions 6 Programming Products Normal Price Promotional message Always printed for amount free promotions Figure 6.7 Weight free promotion receipt Item free promotion Item free promotions can be applied to weighed goods and nonweighed items. They can be used for products such as hamburgers which are priced by weight but generally sold by number.
- Page 152 6 Programming Products 6.7 Promotions Normal Price Promotional message Always printed for amount free promotions Figure 6.8 Typical item free promotion receipt Discount promotion A discount promotion applies a percentage reduction on the normal selling price. It is applied automatically when the quantity of weighed goods or the number of items equals or exceeds the trip value set in the PLU.
- Page 153 6.7 Promotions 6 Programming Products Voucher promotion This type of promotion prints a voucher or coupon giving customers incentives to: • purchase more of the same product • try other products. Printing vouchers Machines operating in label mode: • the voucher label is printed after the standard label. •...
- Page 154 6 Programming Products 6.7 Promotions AZ Supermarket AZ Supermarket 20-07-04 12:17 21-08-04 17:11 Served by Maria Served by Maria Free Coffee Mug £1.00 off your next with every purchase of purchase of Aberdeen 500g Cost Rica High Roast Angus Fillet Steak coffee beans Offer valid until 31-08-04...
- Page 155 6.7 Promotions 6 Programming Products Promo batches You can create batches of promotions where all the products in one batch share the same beginning and end date or time. These times can apply to specific days or every day. The promotional price and type of promotion are specific to each product.
- Page 156 6 Programming Products 6.7 Promotions 6 Edit Promo Batch Promo Batch No. Enter Text Start Date/Time End Date/Time Every Day Selected Days Sunday On\Sunday Off Monday On.......Saturday Off End Date/Time Figure 6.10 Promo batch numbering Deleting promo batches You can assign a promotional (sales) message to any promotion.
- Page 157 6.7 Promotions 6 Programming Products The message text can contain codes, as listed below, or Dewey Decimal codes to print information about the transaction. The codes are: prints the value saved prints the price to pay with promotion prints the price to pay without promotion prints the weight or items given free %%PTXXprints the promo batch text.
-
Page 158: Creating A Nutritional Panel
You will also need to define the information to be printed on the nutri panel. Note: If you want to create your own label format instead of using one of the default formats contact your Avery Berkel centre. Fixed Format You can enter the information required to create a fixed format nutritional label at the end of the Create &... - Page 159 6.8 Creating a nutritional panel 6 Programming Products The format of this label is factory set and cannot be altered. Label rotation can be 0° or 180° and you can select either long label format or short label format, as shown in Figure 6.11, according to the label format number programmed in the PLU.
- Page 160 6 Programming Products 6.8 Creating a nutritional panel Figure 6.11 Fixed nutri panel label Mseries User Instructions Part One...
- Page 161 6.8 Creating a nutritional panel 6 Programming Products Relative Nutrient Amounts Some minerals are sent as a percentage of RDA rather than as absolute values. The nutrient table will indicate whether the nutrient amount is specified in %RDA or as an absolute value.
- Page 162 Note: To print boxes on labels your machine must be configured for printed boxes. Contact your local Avery Weigh- Tronix centre. Per Std Serv Meas Per Std Serv Meas Serving Serving Nutrient Nutrient Measure %RDA %RDA %RDA %RDA Measure Energy 118% Energy 2945kCal...
- Page 163 6.8 Creating a nutritional panel 6 Programming Products Standard nutrient definitions and the associated values, as advised by the UK Food Standards Agency, are already programmed in the machine. You can add to or edit these as required. For a list of the definitions programmed in the machine see section 10.4, Nutrient facts, page 205.
- Page 164 6 Programming Products 6.8 Creating a nutritional panel Auto Num Serving You can choose to allow the scale to calculate the number of servings or you can enter a fixed number. Auto num serving will only be allowed if the serving size and the transaction weight use the same units.
- Page 165 6.8 Creating a nutritional panel 6 Programming Products If the serving size in grams is included in the nutri text and the value %%C, or the equivalent Dewey Decimal code, as the text for servings per container, then provided that Auto Num Servngs is enabled the scale will calculate and print the number of servings for the pack.
-
Page 166: Creating Voucher Records
6 Programming Products 6.9 Creating voucher records Creating voucher records You can program up to 15 different voucher records for use with PLU voucher promotions. The voucher record contains the following information: • the description to be printed on the voucher. •... -
Page 167: Label Format
6.9 Creating voucher records 6 Programming Products The default format for voucher barcodes is EAN13 with prefix 99 and is programmed as 99AAAAAPPPPPC. You can edit the default format using numeric digits.Use the substitution code for promotional saving to embed the voucher value. Printer ID If your machine has more than one printer, you can select the printer at which the voucher will be printed. - Page 168 6 Programming Products 6.9 Creating voucher records Mseries User Instructions Part One...
-
Page 169: Serving Customers
7 Serving Customers 7.1 Basic operations 7.2 Hand pricing 7.3 Using PLUs 7.4 Barcode scanning 7.5 Euro prices 7.6 Overriding prices 7.7 Overriding weight 7.8 Voiding a transaction 7.9 Using tares 7.10 Using the FIX key 7.11 Receipt operations 7.12 Using the ADD key 7.13 Returning products Mseries User Instructions Part One... - Page 171 7.1 Basic operations 7 Serving Customers Serving Customers This section tells you how to use the operations you may need when actually serving customers. Please remember ..Take care when placing large, heavy produce such as water melons on the weigh plate so that they do not roll off the machine.
- Page 172 7 Serving Customers 7.1 Basic operations Operator PIN You may have ben assigned a PIN. Your PIN must be entered when logging on or off. Changing your PIN If your machine has a PIN key you may change your own PIN. ENTER Operator Num.
- Page 173 7.1 Basic operations 7 Serving Customers Max 3/6kg Min 20g e=1/2g 03 Aug 2004 13.42 X 00 Operators Secure Access Manager Mode Authorising Op Maria Sandra Select Operator Fred Max 3/6kg Min 20g e=1/2g 03 Aug 2004 13.42 X 00 Operators Secure Access Void...
- Page 174 7 Serving Customers 7.1 Basic operations Printing labels and receipts If you have a machine that prints labels or receipts you can select whether you want to print labels or receipts. Before selecting label or receipt mode check that: • The correct label or paper roll is loaded.
- Page 175 7.1 Basic operations 7 Serving Customers Printing a label while total price is displayed Label Streaming In pre-pack mode, if you press the print key with a non- weighed product selected, you are prompted for the number of labels you want, and you can print out a number of labels (this is called label streaming).
-
Page 176: Hand Pricing
7 Serving Customers 7.2 Hand pricing Hand pricing Use this function when serving customers with products that do not have a PLU associated with them. If your machine has been set up for PLU selection you will need to select Hand Price mode. If your machine is in PLU mode, press to select Hand Price mode. -
Page 177: Using Plus
7.3 Using PLUs 7 Serving Customers Using PLUs Many of the goods and items you sell will have a unique PLU (Product Look Up) number associated with them. The most frequently used PLUs may have their own commodity key. A commodity key is a programmable key which has been assigned to a specific PLU. - Page 178 7 Serving Customers 7.3 Using PLUs • enter the barcode number Barcode scan If your machine has a scanner • scan the barcode PLU search If your machine has a PLU search key • press then enter the PLU text or number search •...
- Page 179 7.3 Using PLUs 7 Serving Customers Non-weighed items more than 1 item? ENTER 3 Items number of items 1 - 99 Using department keys A department is a group of machines within the store which reflects the way the store operates, for example, produce, bakery, fresh meat, fish.
- Page 180 7 Serving Customers 7.3 Using PLUs Using a general department key Dept ? Dept. Number Complete the transaction. ENTER Using a dedicated department key Dept 3 Fresh meat commodity key Complete the transaction. Mseries User Instructions Part One...
- Page 181 7.3 Using PLUs 7 Serving Customers Promotional PLUs If the PLU you select is programmed with a promotion, the PLU description on the commodity display flashes. Four types of promotion are available: • price promotion • frequent shopper • weight or item free promotion •...
-
Page 182: Barcode Scanning
7 Serving Customers 7.4 Barcode scanning Barcode scanning Barcode scanning is normally used with receipt printing operations. Use the barcode scanner at the machine to read barcodes: • on products • on labels. • on counter receipts • on vouchers When the scanner successfully reads the barcode it bleeps. - Page 183 7.4 Barcode scanning 7 Serving Customers Changing the number of items More than 1 of the same item? 3 Items ENTER number of items 1 - 99 0.35 1.05 ENTER 3 Baked beans Checkout mode At a checkout machine, each time you scan a product barcode the transaction is automatically added to the receipt subtotal.
-
Page 184: Euro Prices
7 Serving Customers 7.5 Euro prices Euro prices If your machine has been programmed with a conversion rate for Euros you will be able to: • display prices in Euros. • print prices in Euros. Displaying euro prices Receipt mode: if the euro convert key has been set up at your machine, you can display the transaction price and the subtotal in euro currency. -
Page 185: Overriding Prices
7.6 Overriding prices 7 Serving Customers Overriding prices 1.23 You can press to enter a price which is different from the programmed price of a PLU. An asterisk is printed to the right of the unit price symbol to indicate an override price. Weighed goods 1.23 Unit Price... - Page 186 7 Serving Customers 7.6 Overriding prices Nonweighed items more than 1 item? ENTER number of items 1 - 99 1.23 receipt mode label mode Item price Mseries User Instructions Part One...
-
Page 187: Overriding Weight
7.7 Overriding weight 7 Serving Customers Overriding weight Pre-packed goods may have the weight printed on the pack label. The weight override key enables you to enter the weight manually. If weight override is used: • the receipt is printed with the message `Manual Weight' indicating the weight override transaction. - Page 188 7 Serving Customers 7.7 Overriding weight CHERRIES £/kg £ 0.250 1.60 0.40 COFFEE £/kg £ 2.50 2.50 APPLES £/kg £ Weight override 0.550 0.90 0.49 Manual Weight Total £21.90 Cash £21.90 Change £0.00 Transactions 05#10041230 Figure 7.2 Receipt with weight override Fixed price key If you have a Fixed Price set up on the sales keyboard you can change the unit price of a weighed PLU to a nonweighed...
-
Page 189: Voiding A Transaction
7.8 Voiding a transaction 7 Serving Customers Voiding a transaction You may cancel (void) an individual, unwanted transaction or all the transactions before printing the customer receipt or an ADD totals label. You cannot use void in normal label mode. Note: If security is set for the void function, the void operation can only be initiated by an operator or supervisor with an equivalent or higher security level. - Page 190 7 Serving Customers 7.8 Voiding a transaction Checkout mode In checkout mode, you do not need to enter your PIN after pressing Subtotal receipts Several subtotal receipts may be linked together to generate the final total receipt. You can use the void function to •...
-
Page 191: Using Tares
7.9 Using tares 7 Serving Customers Using tares The types of tare available for you to use depend on local trading regulations and how your machine has been configured. Free (semi-automatic), cumulative and keyboard entered tares cancel when the load is removed from the weigh plate. Free tare PLU number Mseries User Instructions Part One... - Page 192 7 Serving Customers 7.9 Using tares Cumulative tare PLU number repeat step until you have weighed all the products Mseries User Instructions Part One...
- Page 193 7.9 Using tares 7 Serving Customers Keyboard entered tare If you are using a container with a known weight you can use the numeric keys to enter the weight Note: The weight display must be at zero. container weight PLU number Mseries User Instructions Part One...
- Page 194 7 Serving Customers 7.9 Using tares Using preset tare keys A dedicated tare key selects a previously programmed tare weight value. If your machine has dedicated tare keys you can use these to select the appropriate tare for the container you are using instead of using the numeric keys to enter the container weight.
- Page 195 7.9 Using tares 7 Serving Customers Tare interlock (label mode only) In label mode, if the tare interlock has been enabled, you can only print a label if you have selected a tare. It operates in one of two ways Enabled The manually selected a tare can be overridden by a PLU with a stored tare.
-
Page 196: Using The Fix Key
7 Serving Customers 7.10 Using the FIX key 7.10 Using the FIX key Use the FIX function to: • retain the PLU until the transaction is assigned to the operator. • retain a tare until it is cancelled • retain the PLU until it is cancelled (Label mode) •... - Page 197 7.10 Using the FIX key 7 Serving Customers cancel the tare cancel the FIX Label mode Dept ? Commodity key department PLU number 0 - 99 stick the label on the pack to label more packs containing the same product repeat steps 4 to 6 cancel the PLU cancel the tare...
-
Page 198: Receipt Operations
7 Serving Customers 7.11 Receipt operations 7.11 Receipt operations This section covers functions that are specific to receipt machines or machines operating in receipt mode. It includes the functions you are likely to need when taking payments from customers for purchases. •... - Page 199 7.11 Receipt operations 7 Serving Customers Displaying the operator subtotal Max 3/6kg Min 20g e=1/2g ABC -> 123 03 Aug 2004 13.42 Trans 3 £ Subtotal Maria £8.75 Apples 1.95 Coffee 3.75 Cherries 2.95 Displaying the customers change You can display the change required by a customer if your machine is in receipt mode or you are carrying out add label transactions.
- Page 200 7 Serving Customers 7.11 Receipt operations Sales receipt Machines operating in PoS (Point of Sale) mode will print sales receipts. You must have payment keys assigned to the keyboard to be able to print sales receipts. Counter receipt Machines operating in receipt mode but not in PoS mode will print counter receipts.
- Page 201 7.11 Receipt operations 7 Serving Customers 03-07-2003 12:09 Served by Sandra CHERRIES £/kg £ 0.250 1.60 0.40 COFFEE £/kg £ 2.50 2.50 APPLES £/kg £ 0.550 0.90 0.49 Total £3.39 Cash £3.39 Change £0.00 Rate Value 0.00% 3.39 0.00 Transactions THANK YOU FOR SHOPPING AT AZ SUPERMARKETS 05#10041230...
- Page 202 7 Serving Customers 7.11 Receipt operations Printing a counter or subtotal receipt. Max 3/6kg Min 20g e=1/2g ABC -> 123 03 Aug 2004 13.42 Trans 3 £ Subtotal Maria £8.75 Apples 1.95 Coffee 3.75 Cherries 2.95 Subtotal print while operator subtotal displayed You can print subtotal counter receipts if your machine has a subtotal receipt key or if the total key has been configured for subtotal receipts.
- Page 203 7.11 Receipt operations 7 Serving Customers Adding subtotal receipts At the PoS machine or checkout more than one subtotal receipt can be added together as part of the final sales total receipt. The total receipt may also include other transactions that have not formed part of a subtotal receipt.
- Page 204 7 Serving Customers 7.11 Receipt operations Re-opening a receipt A previously printed subtotal counter receipt can be re- opened by assigning the customer number to an operator. The customer number may be typed in or scanned from the receipt. Customer Number type in or scan customer number assign any further...
- Page 205 7.11 Receipt operations 7 Serving Customers • press while Previous Sale is displayed to print the receipt. ‘Duplicate’ is printed below the total. Reopening receipts You can add or void individual items on a receipt, or void a complete receipt. Note: This function is restricted to authorised personnel only.
- Page 206 7 Serving Customers 7.11 Receipt operations Note: Voided receipts are returned to the software during transaction collection to provide information regarding the number of receipts voided and which operators performed the task. Bag labels If this function has been enabled on your machine, a ‘bag’ label is printed after the itemised receipt has been printed.
- Page 207 7.11 Receipt operations 7 Serving Customers ‘One shot’ labels If this function has been enabled on your machine, you can print a label for an item whilst the machine is in receipt mode. Note: If your machine is a dual printer model (M420), or if you are using continuous sticky tally roll, you will not need to change the paper roll to print the label.
- Page 208 7 Serving Customers 7.11 Receipt operations Paying for goods Printing a sales receipt To print a sales receipt from your machine: • must have PoS (Point of Sale) mode enabled. • must have payment (ECR) keys assigned. • must be in receipt mode. •...
- Page 209 7.11 Receipt operations 7 Serving Customers • net sales • tax value • gross sales. Figure 7.5 Sales receipt (net sales value) Using payment (ECR) keys The payment keys on your machine are only available for use in PoS mode. The keys may also have been set up with restrictions on how you can use them.
- Page 210 7 Serving Customers 7.11 Receipt operations Example:Single payment (security level set) to display subtotal amount tendered Max 3/6kg Min 20g e=1/2g ABC -> 123 03 Aug 2004 13.42 Secure Access Operators Credit Card Card Authorising Op Maria Fred Call Supervisor ENTER ENTER Supervisor operator number...
- Page 211 7.11 Receipt operations 7 Serving Customers Multiple or split payment Customers may pay for goods using more than one type of payment. The receipt will only be printed when the amounts tendered are equal to or greater than the amount to pay. You can press to keep the subtotal on display.
- Page 212 7 Serving Customers 7.11 Receipt operations Paying with foreign currency Customers may pay for goods in a foreign currency or they may use more than one currency. The foreign currency payment may be part of a multiple (split) payment or a single payment.
- Page 213 7.11 Receipt operations 7 Serving Customers Max 3/6kg Min 20g e=1/2g ABC -> 123 03 Aug 2004 13.42 Payment Type £ Payment Maria $2.50 Enter amount tendered in Amount USA Dollar 5.00 To Pay 2.25 local currency Max 3/6kg Min 20g e=1/2g ABC ->...
- Page 214 7 Serving Customers 7.11 Receipt operations Account keys operate in a similar way to cash keys except that you will always be asked for an account reference. • You can only use the account payment key in PoS mode or in stock mode. •...
- Page 215 7.11 Receipt operations 7 Serving Customers **Charged To Account** CHERRIES £/kg £ 03-07-2003 12:09 0.250 1.60 0.40 Served by Sandra COFFEE £/kg £ 2.50 2.50 Account A2B3 J. Smith APPLES Total £21.90 £/kg £ Transactions 0.550 0.90 0.49 Customer Total £21.90 Account A2B3...
- Page 216 7 Serving Customers 7.11 Receipt operations Payments received on account Customers can make payments to their account even when they are not purchasing goods. A customer can over tender and receive change, for example the customer owes £20 on account and wished to pay £5. They can tender a £10 note and get £5 change.
- Page 217 7.11 Receipt operations 7 Serving Customers ENTER Cash amount to pay amount tendered *Received On Account* 13-07-2003 12:19 Operator Num Sandra Account A2B3 J. Smith Total £120.00 £20.00 Cash £100.00 Cheque 05#10041239 ****Report Complete**** Figure 7.7 Received on account slip Mseries User Instructions Part One...
- Page 218 7 Serving Customers 7.11 Receipt operations Sales discount You can discount a receipt or an individual transaction with a pre-programmed fixed discount or with a variable discount. Fixed and variable discounts may be a percentage of the transaction or receipt total or a value. To discount a transaction, you must apply the discount before assigning the transaction.
- Page 219 7.11 Receipt operations 7 Serving Customers Example:Customer loyalty discount 5% Max 3/6kg Min 20g e=1/2g ABC -> 123 03 Aug 2004 13.42 Trans 5 £ Subtotal Sandra Apples 1.95 £15.55 Coffee 3.75 to display subtotal Cherries 2.95 Baguette 0.55 Milk Max 3/6kg Min 20g e=1/2g ABC ->...
- Page 220 7 Serving Customers 7.11 Receipt operations Printing Euro prices If your machine has been set up to print euro price information automatically, the total will be printed in euro currency at the end of the receipt. Printing a euro receipt If a euro print key has been set up on your machine, you can: Euro •...
- Page 221 7.11 Receipt operations 7 Serving Customers Cash drawer operations If your machine is operating in PoS mode you can use this ECR key to carry out operations requiring the use of the cash drawer. Use: to open the cash drawer without entering a sale. A ‘No Sale’...
- Page 222 7 Serving Customers 7.11 Receipt operations Using the FLOAT, PICK UP or PAID OUT key This example shows how to add a cash float to the drawer. You follow the same procedure for pick up except that you remove money from the cash drawer When making a payment (paid out) from the cash drawer you will be prompted to enter a reference code for the payment.
- Page 223 7.11 Receipt operations 7 Serving Customers Refunds The REFUND key is a programmable key that enables you to refund the cost of goods to the customer. Refunds may be made as part of a sales transaction or as a separate operation. The machine shows the amount of cash refunded on the cash report and updates the refund totals values and count.
- Page 224 7 Serving Customers 7.11 Receipt operations Refunding the cost of goods Refund Refnd PLU Hand Price mode more than 1 item? go to ENTER number of items PLU number 1 - 99 Pack Price 0,01 - 9999,99 Cash Refund while operator subtotal displayed Mseries User Instructions Part One...
-
Page 225: Using The Add Key
7.12 Using the ADD key 7 Serving Customers 7.12 Using the ADD key This function is only available if your machine is operating in label mode (see page 172). Pressing enables you to obtain a label with totals printed on it. There are four types of add label available depending on how your machine has been configured: •... - Page 226 7 Serving Customers 7.12 Using the ADD key Printing an ADD label 00.00 0.00 Zero 0.00 Add PLU Dept ? PLU number Commodity key PLU number Commodity key repeat steps 2 to 6 until you have totalised all the products £...
-
Page 227: Returning Products
7.13 Returning products 7 Serving Customers 7.13 Returning products Your machine may have a dedicated key set up for returned goods. Using the Return function: • retains the PLU until the transaction is entered. This acts as a check to ensure that the transaction is entered. •... - Page 228 weighed goods? PLU number Pack Price weighed goods Return If your machine is operating in PoS mode Cash while operator subtotal displayed Printer disable You can assign a printer status key to allow the printer to be enabled/disabled in order to reduce paper output when returning items to stock.
-
Page 229: Pre-Pack Operations
8 Pre-pack Operations 8.1 Setting the machine to pre-pack 8.2 Using PLUs 8.3 Using tares 8.4 Preset tare keys 8.5 Multiple labels 8.6 Returning labels 8.7 Using the NON ADD key 8.8 Using the Re-Wrap key 8.9 Using the Wrapper key 8.10 Using the Re-Price key 8.11 Using the Re-Pack key 8.12 Pack runs... - Page 231 8.1 Setting the machine to pre-pack 8 Pre-pack Operations Pre-pack Operations CAUTION: In certain countries it is illegal to use pre-pack mode for direct trade with the public. Please remember ..Your machine must be in label mode for you to be able to use pre-pack operations.
- Page 232 8 Pre-pack Operations 8.1 Setting the machine to pre-pack • or, if your machine allows receipt and label printing, to ENTER select Pre-Pack press followed by while the display shows Label (see section 7.1, page 169, Selecting label or receipt mode). Pressing again while the display shows Label will select Pre-Pack OFF.
- Page 233 8.1 Setting the machine to pre-pack 8 Pre-pack Operations 0.000 8.55 Zero 0.00 Beef Stir Fry more labels? Go to 0.000 Zero Enter PLU Mseries User Instructions Part One...
-
Page 234: Using Plus
8 Pre-pack Operations 8.2 Using PLUs Using PLUs PLUs and tares are retained in pre-pack mode until cancelled. A label is printed after each change in weight. If you use 1.23 you must enter the unit price before placing the goods on the pan. - Page 235 8.2 Using PLUs 8 Pre-pack Operations more labels? stick the label on the pack Nonweighed items To set up a label run see section 8.5, page 241. more than 1 item? ENTER number of items 1 - 99 Dept ? Commodity key PLU number department...
- Page 236 8 Pre-pack Operations 8.2 Using PLUs Zero priced, nonweighed labels Pre-pack mode If you press when the total price is zero, an item only label is printed. Press if you want to change the number of items for a ENTER zero price transaction Press when you see Pre-Pack to print a blank...
-
Page 237: Using Tares
8.3 Using tares 8 Pre-pack Operations Using tares In pre-pack mode the PLU and tare are not cancelled when the filled container is removed from the weigh plate. This enables you to pack several containers of the same weight, using the same PLU, without having to select the PLU and set up the tare each time. - Page 238 8 Pre-pack Operations 8.3 Using tares Free tare 0.000 Zero Pre-Pack 0.000 Tare Dept ? department PLU number Commodity key 0 - 99 more labels? Mseries User Instructions Part One...
- Page 239 8.3 Using tares 8 Pre-pack Operations Stored tares If necessary, you can override the stored tare with a different tare value or you can cancel the stored tare. If your machine has dedicated tare reference keys you can press a tare reference key after step 1 to override the stored tare with a different tare value.
- Page 240 8 Pre-pack Operations 8.3 Using tares Keyboard entered tare If you are using a container with a known weight you can use the numeric keys to enter the weight. container weight Dept ? Commodity key PLU number department 0 - 99 ENTER 8 stick the label on the pack more labels?
- Page 241 8.3 Using tares 8 Pre-pack Operations Proportional tare Dept ? PLU number department Commodity key 0 - 99 Prop. Tare ENTER % tare value more labels? Mseries User Instructions Part One...
-
Page 242: Preset Tare Keys
8 Pre-pack Operations 8.4 Preset tare keys Preset tare keys If your machine has dedicated tare keys you can use these to select the appropriate tare for the container you are using.. correct container? Dept ? department PLU number Commodity key 0 - 99 7 stick the label on the pack Mseries User Instructions Part One... -
Page 243: Multiple Labels
8.5 Multiple labels 8 Pre-pack Operations Multiple labels You can set up a label run for up to 999 labels when you wish to print several labels for the same nonweighed item. As the machine prints each label the number of labels displayed decreases by one. - Page 244 8 Pre-pack Operations 8.5 Multiple labels item price 0,01 - 9999,99 ENTER number of labels 1 - 999 end label run? more labels? X 2 (3) Mseries User Instructions Part One...
-
Page 245: Returning Labels
8.6 Returning labels 8 Pre-pack Operations Returning labels You can return several identical nonweighed labels in one operation. The machine displays the number of labels to be returned decreasing by one. When all the labels have been returned the display reverts to showing the number of labels as 1. If you change the number of items from 1, enter the item price at step 7 and the machine will automatically calculate the pack price. - Page 246 8 Pre-pack Operations 8.6 Returning labels number of labels 1 - 999 Mseries User Instructions Part One...
-
Page 247: Using The Non Add Key
8.7 Using the NON ADD key 8 Pre-pack Operations Using the NON ADD key The NON ADD key enables you to perform a single non- totalising transaction and print a test label before starting a pack run. Pre-Pack selected Dept ? Commodity key department PLU number... -
Page 248: Using The Re-Wrap Key
8 Pre-pack Operations 8.8 Using the Re-Wrap key Using the Re-Wrap key enables you to override a pre-programmed price and Rewrap change the number of days or months the product can be displayed. Press when the PLU description is Rewrap displayed. - Page 249 8.8 Using the Re-Wrap key 8 Pre-pack Operations Enter a new price if required. ENTER Non-weighed items? Stick the label on the pack no more labels? more labels? number of labels 1 - 999 Mseries User Instructions Part One...
-
Page 250: Using The Wrapper Key
8 Pre-pack Operations 8.9 Using the Wrapper key Using the Wrapper key If your machine is linked to a wrapping machine, this key will switch on or switch off the wrapper control. Mseries User Instructions Part One... -
Page 251: Using The Re-Price Key
8.10 Using the Re-Price key 8 Pre-pack Operations 8.10 Using the Re-Price key enables you to print a new price label to replace the Re-Price product’s original label. Re-price labels are not PLU specific. For information on setting up the re-price label details see Re- pricing goods on page 122. - Page 252 8 Pre-pack Operations 8.10 Using the Re-Price key Weigh Pack No selected ENTER weight value more labels? Repeat step 5. No more labels New article number Stick the label over the old price label Weigh Pack Yes Nonweighed items Change number of items? More labels? ENTER No more labels...
- Page 253 8.10 Using the Re-Price key 8 Pre-pack Operations Change weight or number of items? 0.000kg £1.50 Zero £0.00 Man Wt 0.000 weight value or items Change article number? 02 0000 VPPPPPC No more labels? Print Totals ? Mseries User Instructions Part One...
-
Page 254: Using The Re-Pack Key
8 Pre-pack Operations 8.11 Using the Re-Pack key 8.11 Using the Re-Pack key allows you to print labels for a product that has been Re-Pack converted from another product, for example, steak converted to minced beef. This means that you can: •... - Page 255 8.11 Using the Re-Pack key 8 Pre-pack Operations Max 3/6kg Min 20g e=1/2g 03 Aug 2004 13.42 X 00 Date 1 Days New Re-pack PLU Change date 1 if required Max 3/6kg Min 20g e=1/2g 03 Aug 2004 13.42 X 00 Date 2 Days Change date 1 if required Max 3/6kg Min 20g e=1/2g...
-
Page 256: Pack Runs
8 Pre-pack Operations 8.12 Pack runs 8.12 Pack runs Use this function to create consignments (pack runs) and to print labels describing the contents of the container. Consignments consist of a ‘pallet’ loaded with a number of ‘cartons’. Each carton contains a number of ‘boxes’ which in turn contain a quantity of ‘packs’. - Page 257 8.12 Pack runs 8 Pre-pack Operations Pack Run Stores Create&Edit PRun Pack Run Ref. (1 - 99) PRun Description Level 2 Closed Pack Run/Open Pack Run Customer Ref. Dept. Number Enter PLU Cartons Origin Country Level 1 Price Label Format Level 2 Automatic/On Request Duplicate No/Duplicate Yes...
- Page 258 8 Pre-pack Operations 8.12 Pack runs Pack run description You can enter the description using alphanumeric keys up to a maximum of 20 characters. Pack run type Closed The PLU is pre-programmed in the pack run set up. Note: You can override the PLU associated with a closed pack run before starting a new pack run.
- Page 259 8.12 Pack runs 8 Pre-pack Operations Duplicates Enter a value between 0 and 9 to print duplicate total labels if you need additional labels for the container. Date 1 You can select Date 1 Days, Date 1 Months, Date 1 Hours or Date 1 Disabled.
- Page 260 8 Pre-pack Operations 8.12 Pack runs Target 2 The data name for the weight target is displayed. The default value is 0. Use the numeric keys to enter a value between 0 and 999,999,999. The number of decimal places is the same as the weighing capacity of the scale.
- Page 261 8.12 Pack runs 8 Pre-pack Operations shown or use the numeric keys to change the level then press ENTER . The display steps through the values for the target Subtotal level selected. To print the subtotal, press again while print the subtotals are displayed.
- Page 262 8 Pre-pack Operations 8.12 Pack runs Limit change Use this option for a quick edit of any of the limits or target values for the pack run. Pack Run Stores Limit Change Pack Run Ref. (1 - 99) Dept. Number Level 1 Packs Weight...
- Page 263 8.12 Pack runs 8 Pre-pack Operations Using pack runs Pack runs on your machine may have been set up with different names for the type of container, and label printing may be automatic or on request for each level. Duplicate labels may have been enabled if a second label is required for the container.
- Page 264 8 Pre-pack Operations 8.12 Pack runs Dept 3 Fresh meat Commodity key department PLU number 0 - 99 Stick the label on the pack Repeat until all the goods are packed for level 1. Print total labels for level 1 and attach to the container Repeat for each level in the pack run.
-
Page 265: Using Stock Mode
8.13 Using Stock Mode 8 Pre-pack Operations 8.13 Using Stock Mode Please remember ..• Stock mode may not be used in the presence of the customer. • Negative PLUs are not allowed. • Stock mode transactions and sales transactions may not be mixed on the same receipt. - Page 266 8 Pre-pack Operations 8.13 Using Stock Mode Stock movement payment keys function in a similar way to sales account keys. When you press the key you will see the message Account Ref.. Your machine will have been set up to allow you either: •...
-
Page 267: Back Calculation
8.14 Back calculation 8 Pre-pack Operations 8.14 Back calculation Back calculation is a pre-pack function that applies to nonweighed products, where the unit price for the product is calculated from the computed total price and the computed net weight. European Both the item price and the computed unit price must be printed on the label. - Page 268 8 Pre-pack Operations 8.14 Back calculation Danish Using Danish back calculation, the item price of a nonweighed product becomes the total price. The actual weight of the product is used to compute the equivalent unit price. Note: If your machine is a non-weigh model you can enter the weight manually.
-
Page 269: Mseries User Instructions Part One
Index Mseries User Instructions Part One... - Page 271 Index Index Date and time Dedicated keys ADD key 19, ‘hot’ keys barcode printing in ADD ECR keys mode generic keys ADD key label hand price keys payment keys pre-pack keys standard keys Back calculation Departments Danish Dual printer machines European label formats Bag labels...
- Page 272 Index legal requirements floating vendor mode levelling operating modes 113, manager mode keyboard self service machines operator keyboard trace code MachineProgramming Machineprogramming creating messages Label printing store name Margin Machine programmimg department keys nonweighed labels Machine Programming counter mode create and edit text pre-pack mode Machine programming Nutritional label...
- Page 273 Index PLU search stored PLUs 127, 131, using the FIX key barcode printing using the NON ADD key barcode scanning using the Re-Price key commodity key using the Re-Wrap key copy wrapper key customising menus Pre-pack PLU lock delete Pre-packPLUs department key 175, nonweighed items department keys...
- Page 274 Index pre-pack print immediate Safety print on request warnings printer 2 Sales discount suppressing symbols Scanning talon counter receipts tare interlock labels Printing products Printing data reports Security listing the PLU file manager functions Printing receipts sales functions sales receipt security levels subtotal receipt Servicng customers...
- Page 275 Index displaying text extended character sets inserting text size of printed text TK keyboard assigning PLUs to keys Total/print key Trace code Void key Voids checkout mode subtotal receipts Vouchers create & edit promotion programming Weight override Zero key Mseries User Instructions Part One...
- Page 278 Avery Berkel - a division of ITW Ltd. Foundry Lane, Smethwick, West Midlands, England B66 2LP Tel: +44 (0)870 903 2000 Fax: +44 (0)870 904 2223 Email: info@averyberkel.com www.averyberkel.com...