Table of Contents
Advertisement
Quick Links
OPERATING INSTRUCTIONS
The Wattage Sport-Bipe EP RTF is distributed
exclusively by Global Hobby Distributors
18480 Bandilier Circle, Fountain Valley, CA 92708
All contents copyright © 2004, Global Hobby
Distributors Version V1.0 April 2004
Kit Product Number: 128313
IMPORTANT
Before beginning assembly, please read and understand the warnings listed on the next page.
Failure to do so could lead to bodily harm and/or injury. The Wattage Sport-Bipe EP RTF is not intended for
those under 12 years of age, unless closely supervised by an adult.
SPECIFICATIONS AND FEATURES:
Wing Span: 32 Inches (Top and Bottom)
Wing Area: 288 Square Inches
Length: 23.75 Inches
Weight RTF: 19.5 Ounces
Wing Loading: 9.75 Ounces Per Square Foot
Elevator, Rudder and Throttle Control
Included Pre-installed 4Ch FM 27Mhz Radio System
Included Rechargeable Flight Battery
Included 2.5 Hour 110V AC Battery Charger
Molded from Durable Plastic and Foam
Replacement Parts Available
1
Advertisement
Table of Contents

Subscribe to Our Youtube Channel
Related Manuals for WattAge SPORT-BIPE EP RTF


Summary of Contents for WattAge SPORT-BIPE EP RTF
- Page 1 Before beginning assembly, please read and understand the warnings listed on the next page. Failure to do so could lead to bodily harm and/or injury. The Wattage Sport-Bipe EP RTF is not intended for those under 12 years of age, unless closely supervised by an adult.
-
Page 2: For Your Information
In no case shall Wattage's liability exceed the original cost of the purchased kit. In that Wattage has no control over the final assembly or material used for final assembly, no liability shall be assumed for any damage resulting from the... -
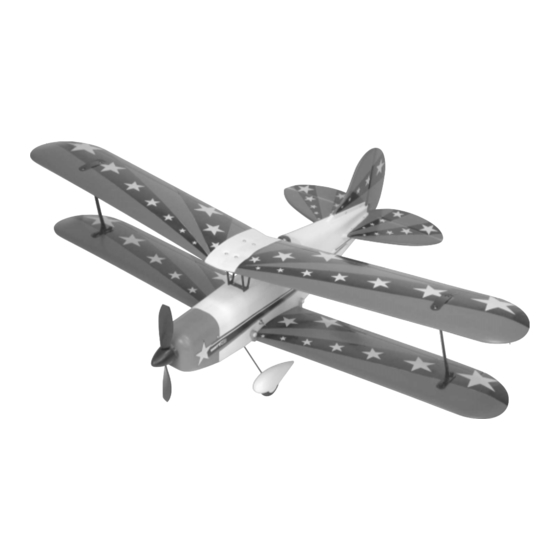
Page 3: Section 1: Parts Identification
The undercambered airfoil produces great lift, even at slow speeds, making the Sport-Bipe EP RTF a blast to fly, even in smaller parks and confined areas. While we recommend flying the Sport-Bipe EP RTF in only light winds, it is still a great outdoor flyer that takes off in a very short distance, turns tightly (makes great snap rolls and spins with the control throws turned up), and makes light slow flyers look boring. -
Page 4: Section 2: Recommended Items
SECTION 2: RECOMMENDED ITEMS This section lists the items you will need to fly your new Sport-Bipe EP RTF. As you can see, there's not much to it! 8 Pack Trinity AA Alkaline batteries for the transmitter Part # 837801... - Page 5 Vertical Tail: Provides stability for the airplane during turns. Wing: The wing has a special airfoil shape and provides the main source of lift for the airplane. The Sport-Bipe EP RTF features a top and a bottom wing.
-
Page 6: Section 4: Assembling Your Sport-Bipe Ep Rtf
SECTION 4: ASSEMBLING YOUR SPORT-BIPE EP RTF STEP 1: INSTALLING THE TRANSMITTER BATTERIES Carefully remove the battery cover from the back of the transmitter by pulling down on it with one hand while holding the transmitter with your other hand. - Page 7 IMPORTANT The horizontal tail is held in place using a combination of double-sided tape and small screws. Do not completely remove the protective backing from the double-sided tape before pushing the horizontal tail into the slot in the fuselage. If you do, the sticky double-sided tape will make it nearly impossible to push the horizontal tail into position. Make sure that when you install the horizontal tail, that the top of the horizontal tail is toward the top of the fuselage.
- Page 8 Carefully push the vertical tail into the slot in the top of the fuselage, making sure that the two pieces of protective backing that you pulled back and creased are sticking out between the vertical tail and the fuselage. Push the vertical tail into position. When aligned properly, the vertical tail should be pushed forward as far as possible and it should be pushed down firmly against the top of the horizontal tail.
- Page 9 Carefully snap the plastic clevis on the pushrod wire into the outermost hole in the vertical tail control horn. PRO TIP We suggest installing the clevis into the outermost hole in the control horn for your first few flights. This will make it easier to control the airplane. Once you're proficient at flying the airplane, you can move the pushrod wire into the middle or inner hole to increase the control response.
- Page 10 Set the bottom wing onto the bottom of the fuselage. Line up the center of the plastic doubler on the bottom of the wing with the center of the fuselage, at both the front and the back of the wing opening. Secure the wing into place using two rubber bands, making sure that the rubber bands pass over the four plastic tabs on the plastic doubler.
-
Page 11: Step 8: Installing The Propeller
STEP 7: INSTALLING THE LANDING GEAR ASSEMBLY IMPORTANT When installing the landing gear assembly in the next procedure, make sure that the front of the wheel pant covers are toward the front of the airplane. Install the landing gear assembly by simply pushing the landing gear wire firmly into the molded plastic slot in the bottom of the fuselage. -
Page 12: Step 9: Installing The Flight Battery
WARNING The Sport-Bipe EP RTF does not have an on/off switch. When you plug in the flight battery, the receiver and servos will be powered up. The motor will not power up until the red arming switch is pressed. -
Page 13: Section 5: Learning To Fly Your Sport-Bipe Ep Rtf
SECTION 5: LEARNING TO FLY YOUR SPORT-BIPE EP RTF STEP 1: BASIC OPERATION Before actually flying your Sport-Bipe EP RTF you should understand how the airplane is controlled. Below we list the four basic flight modes: Climb: Climbing is controlled by pushing the throttle control stick on the transmitter (the left-hand stick) completely forward to turn on the motor, then by pulling back on the elevator control stick (the right-hand stick). - Page 14 Looking from the back of the airplane, push the right-hand control stick completely to the left. The vertical control surface (rudder) should move left. Again, looking from the back of the airplane, push the right-hand control stick completely to the right. The rudder should move right.
-
Page 15: Section 6: Getting Ready To Fly Your Sport-Bipe Ep Rtf
SECTION 6: GETTING READY TO FLY YOUR SPORT-BIPE EP RTF STEP 1: CHARGING THE FLIGHT BATTERY IMPORTANT Before charging the flight battery, the flight battery must be fully discharged. Discharge the flight battery by running the motor until it stops. This will ensure that you don't overcharge the flight battery. -
Page 16: Section 7: Your First Flight
STEP 3: CHOOSING YOUR FLYING FIELD The flying field you choose should be a large, open field with grass. There should not be any vehicles, buildings, power lines, trees, large rocks or anything else that your airplane can crash into. STEP 4: RANGE TESTING THE RADIO SYSTEM After getting out to your flying field, but before you fly for the first time, you must range test the radio system. - Page 17 Double-check that the elevator and rudder control surfaces are centered and that the trim tabs on the transmitter are centered, too. HAND LAUNCHING THE SPORT-BIPE EP RTF With the transmitter turned on and the flight battery installed, carefully extend the transmitter antenna completely.
- Page 18 After some practice, you will learn how to minimize the amount of up and down, and right and left movements of the airplane and be able to control the airplane in a smooth and graceful manner. LANDING THE SPORT-BIPE EP RTF Landing should always be done into the wind with the wings level.
-
Page 19: Section 8: Flight-Trimming The Sport-Bipe Ep Rtf
We suggest ordering directly from your local Wattage dealer. If your local dealer does not stock Wattage products, you can order directly from us at the phone number or address shown on page # 2. -
Page 20: Section 11: Flight Tips And Warnings
SECTION 11: FLIGHT TIPS AND WARNINGS Check before every flight to ensure that the batteries in the transmitter are working properly. The needle in the voltage meter should be in the green "safe" area. Change the batteries when the needle falls into the red "unsafe" area. Before recharging the flight battery, let the motor run until the flight battery is completely drained. -
Page 21: Section 12: Troubleshooting Guide
SECTION 12: TROUBLESHOOTING GUIDE This troubleshooting guide has been provided to help you diagnose and solve most problems that you may encounter with your airplane. Most problems encountered can be solved by carefully following the problem-cause-solution sections below. If you cannot solve the problem using this troubleshooting guide, please feel free to contact us at the address or phone number listed below: On the Web Global Services... -
Page 24: Our Guarantee
OUR GUARANTEE Wattage guarantees this kit to be free from defects in both material and workmanship, at the date of purchase. This does not cover any component parts damaged by use, misuse or modification. In no case shall Wattage's liability exceed the original cost of the purchased kit.
Need help?
Do you have a question about the SPORT-BIPE EP RTF and is the answer not in the manual?
Questions and answers