Table of Contents
Advertisement
Quick Links
Thank you for choosing the Wattage Omega 636 EP Glider as your next airplane. Whether you have built and
flown other electric airplanes in the past, or if this is your first, you will appreciate the high quality, easy final
assembly and excellent flight characteristics of the Omega 636.
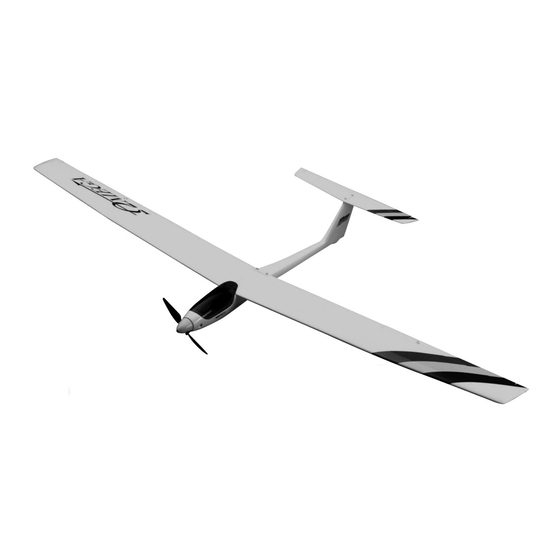
The Omega 636 is a lightweight 72" T-tail electric glider that is ideal for thermal soaring and general sport
flying. The Omega 636 features a white gel-coated fiberglass fuselage, built-up fully-sheeted plug-in wing
panels, and a removable sheet balsa stabilizer. The wing panels and stabilizer are covered with real iron-on
covering material. The wings are removable for easy transport and feature dual aileron servos for crisp, solid
control. The Omega 636 comes with a preinstalled electric motor, a folding propeller assembly and a spinner.
With a seven cell flight battery and 30 amp speed control, the Omega 636 climbs with authority and flies with
ease.
When you open the box, you will notice that you won't have much left to do or to purchase to finish your
new airplane. Most of the airplane has already been expertly preassembled for you. Simply install your radio
system, bolt the stabilizer and wing halves into place and go fly. It doesn't get much easier than that.
We hope you enjoy your new Wattage Omega 636 EP Glider as much as we have enjoyed designing and
building it for you. If you have any questions or comments, please feel free to contact us. We have included a
product survey in the back of this manual. After you have finished assembling the Omega 636, please take a
minute to fill it out and send it to us. We always appreciate hearing the comments and suggestions that you
have.
The Wattage Omega 636 EP Glider is distributed exclusively by Global Hobby Distributors 18480 Bandilier Circle, Fountain Valley, CA 92728
All contents copyright © 2001, Global Hobby Distributors Version V1.0 1/2001
1
Advertisement
Table of Contents

Related Manuals for WattAge omega 636


Summary of Contents for WattAge omega 636
- Page 1 The wings are removable for easy transport and feature dual aileron servos for crisp, solid control. The Omega 636 comes with a preinstalled electric motor, a folding propeller assembly and a spinner. With a seven cell flight battery and 30 amp speed control, the Omega 636 climbs with authority and flies with ease.
-
Page 2: Table Of Contents
(800) 435-9262 www.modelaircraft.org Wattage guarantees this kit to be free from defects in both material and workmanship, at the date of purchase. This does not cover any component parts damaged by use, misuse or modification. In no case shall Wattage's liability exceed the original cost of the purchased kit. -
Page 3: Our Recommendations
The following section describes our recommendations to help you in deciding which types of accessories to purchase for your new Wattage Omega 636. We have tested all of these items with the airplane and found that these products will offer the best in performance, reliability and economy. -
Page 4: Additional Items Required
Automatic Delta Peak Charger such as the Promax Activator Digital Peak Charger (P/N 885650). It is vital to the Omega 636's flying performance that the flight battery be fully peak charged every flight, so using a peak charger is very important. -
Page 5: Kit Contents
{4} Metal Clevises {1} Decal Sheet Wattage carries a complete line of replacement parts for your Omega 636. Listed on page # 17 are the replacement parts that are available, along with their respective part numbers for easy ordering convenience. These replacement parts can be ordered through your local dealer or directly from Wattage by calling 1-714-964-0329. -
Page 6: Motor Break-In
MOTOR BREAK-IN handles using three rubber bands. This will keep the motor secure enough for the break-in procedure. See TOOLS AND SUPPLIES REQUIRED photo # 1 below. # 1 Phillips Head Screwdriver Photo # 1 Adjustable Wrench Needle Nose Pliers Paper Towels Trinity Break-In Drops Performance Plus Motor Spray... -
Page 7: Wing Assembly
WING ASSEMBLY the C/A to wick into the hinges, then turn the aileron over and repeat this procedure on the other side. Let the C/A PARTS REQUIRED dry for about 10 minutes before proceeding. {1} Right Wing Panel w/Aileron & Hinges 3) Slide the aileron and its hinges into the precut {1} Left Wing Panel w/Aileron &... -
Page 8: Installing The Servo Covers
10) Using a modeling knife, carefully cut out the 16) After the epoxy has fully cured, place the servo back of the fairing on each of the two molded plastic servo back onto the servo cover. Using a pencil, mark the loca- covers. -
Page 9: Installing The Aileron Linkage
30) Thread one metal clevis onto the end of one 24) Center the servo cover assembly over the servo 2mm x 300mm threaded pushrod wire. Thread the clevis bay. Use a couple of pieces of masking tape to hold the on far enough to leave room for adjustments later. -
Page 10: Wing Mounting
The aluminum dihedral brace is machined in the shape 37) With the servo horn centered, adjust the clevis of a "V". When installing the dihedral brace make sure until it lines up with the control horn. Snap the clevis into that you install it with the "V"... -
Page 11: Pushrod Installation
3) Push the servo up against the left side of the tray. 2) Remove the elevator and the hinges from the While holding the servo in position, use a drill with a 1/16" horizontal stabilizer and set them aside for now. drill bit to drill pilot holes for the servo mounting screws. -
Page 12: Final Assembly
11) Slide the end of the pushrod assembly into the Photo # 19 nylon pushrod housing preinstalled inside the vertical stabilizer. 12) Push the elevator/pushrod assembly down until you are able to insert the hinges into the hinge slots in the stabilizer. -
Page 13: Applying The Decals
C.G. be located any farther back Photo # 23 than 3" behind the leading edge of the wing. The Omega 636 should be balanced with the flight battery mounted in the fuselage. 2) Install the wing onto the fuselage and place two short pieces of masking tape onto the bottom of the wing, 2-3/4"... -
Page 14: Control Throws
If you are using a four or more channel computer radio the airplane is nose heavy. To correct this, move the with the Omega 636 it presents you with a new and better flight battery back just far enough to bring the airplane way to set up your airplane for superior performance. -
Page 15: Basics Of Thermal Flying
Landings should be done with power off. Put the get the maximum rate of climb. Omega 636 in a gentle descent and glide it onto the field. Think of the air as water. No wind is a calm lake. A... -
Page 16: Notes
Cycling: The act of fully charging and discharging the Trim Lever: A sliding lever on the transmitter that al- flight battery. Cycling the battery increases performance lows you to make small adjustments to the control surfaces and duration. from the transmitter. Dihedral: The upward angle of each wing half. -
Page 17: Replacement Parts
REPLACEMENT PARTS Wattage carries a complete line of replacement parts for your Omega 636. Listed below are the replacement parts that are available along with their respective part numbers for easy ordering convenience. These replacement parts can be ordered through your local dealer or directly from Wattage by calling 1-714-964-0329. -
Page 19: Product Evaluation Sheet
Simply fold this form on the dotted lines, seal with tape and mail it to us. Do not use staples and make sure our address faces out. 1) Kit: Wattage Omega 636 EP Glider 7) Was any of the assembly difficult for you? If yes, please explain. - Page 20 ___________________________ Post Office will ___________________________ not deliver without proper ___________________________ postage (Return Address Here) Global Hobby Distributors Attn: Wattage Customer Care 18480 Bandilier Circle Fountain Valley CA 92728-8610 Fold along dotted line...
Need help?
Do you have a question about the omega 636 and is the answer not in the manual?
Questions and answers