Table of Contents
Advertisement
Quick Links
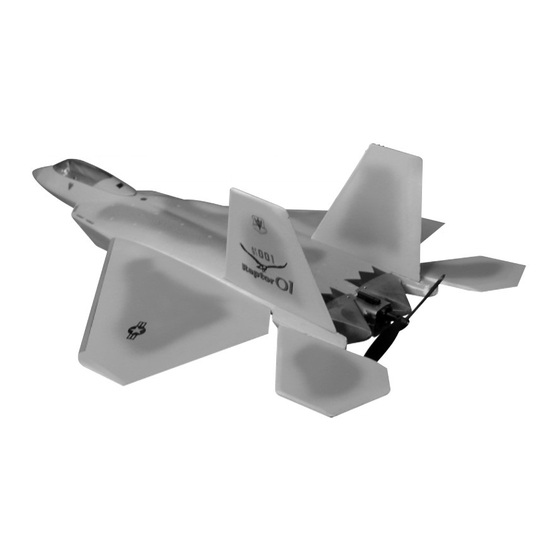
Thank you for choosing the Wattage F-22 Raptor EP for your next project. The F-22 Raptor EP is
a stand-off scale electric-powered sport airplane built specifically to be flown in large parks or fields.
The full-scale F-22 Raptor, developed at Aeronautical Systems Center, Wright-Patterson Air Force
Base, Ohio, is the replacement for the F-15 Eagle air-superiority fighter. It combines stealth design
with the supersonic, highly maneuverable, long-range requirements of an air-to-air fighter.
While the Wattage F-22 Raptor EP won't go supersonic, it is highly maneuverable and lightweight
for its size. Features such as a one-piece molded foam fuselage, molded foam wing panels and
molded foam flying surfaces add up to make a lightweight yet durable airframe that is very easy to
repair in the event of a mishap. And because it is lightweight, performance using the included 370
size motor and gear box is excellent. The airplane is quite fast, yet is very stable throughout the
entire speed range, making it a perfect choice for both the experienced pilot and for those pilots just
graduating from their first sport airplane.
When you open the box, you will notice that you won't have much left to do or to purchase to
finish your new airplane. In addition to the usual nuts and bolts, the F-22 Raptor EP includes a 370
size motor with gear box, a propeller, prebent wire pushrods, prebent stabilator tubes, clear canopy
and a colorful decal sheet. The F-22 Raptor EP kit even includes optional landing gear and wheels
for those of you who want to be able to take off from the ground without hand-launching.
We hope you enjoy your new Wattage F-22 Raptor EP as much as we have enjoyed designing
and building it for you. If you have any questions or comments, please feel free to contact us. We
have also included a product survey in the back of this manual. After you have finished assembling
the airplane, please take a moment to fill it out and send it to us. We always enjoy hearing the
comments and suggestions that you have.
The Wattage F-22 Raptor EP is distributed exclusively by Global Hobby Distributors 18480 Bandilier Circle, Fountain Valley, CA 92728
All contents copyright © 2001, Global Hobby Distributors Version V1.0 Feb. 2001
1
Advertisement
Table of Contents

Subscribe to Our Youtube Channel
Related Manuals for WattAge F-22 Raptor EP


Summary of Contents for WattAge F-22 Raptor EP
- Page 1 When you open the box, you will notice that you won't have much left to do or to purchase to finish your new airplane. In addition to the usual nuts and bolts, the F-22 Raptor EP includes a 370 size motor with gear box, a propeller, prebent wire pushrods, prebent stabilator tubes, clear canopy and a colorful decal sheet.
-
Page 2: Table Of Contents
Wattage guarantees this kit to be free from defects in both material and workmanship, at the date of purchase. This does not cover any component parts damaged by use, misuse or modification. In no case shall Wattage's liability exceed the original cost of the purchased kit. -
Page 3: Our Recommendations
The following section describes our general recommendations to help you in deciding which types of accessories to purchase for your new Wattage F-22 Raptor EP. We have tested all of these items with the airplane and found that these products will offer the best in performance, reliability and economy. -
Page 4: Raptor Ep Setup Information
The F-22 Raptor EP comes prepainted with a base coat of light gray. If you decide to paint camouflage on your airplane, use only a very light coat of paint - only enough to barely cover the base coat. Using more paint than is necessary will only add to the overall weight of the airplane, and excess paint adds up fast. -
Page 5: Additional Items Required
{1} Clear Scotch Tape those part numbers. If you are going to paint the camouflage on the F-22 Raptor EP you will need the following items: Tamiya Dark Sea Gray Acrylic Paint # 335584 Badger Deluxe Airbrush Set # 537126 Tack Rag The F-22 Raptor comes with a prepainted light gray base coat. -
Page 6: Kit Contents
{1} Decal Sheet REPLACEMENT PARTS Wattage carries a complete line of replacement parts for your F-22 Raptor EP. Listed below are the replacement parts that are available along with their respective part numbers for easy ordering convenience. These replacement parts can... -
Page 7: Motor Break-In
MOTOR BREAK-IN 7) With the motor turned off, test the operation of the two servos. Both servos should move when you move TOOLS AND SUPPLIES REQUIRED the control stick. Needle Nose Pliers 8) Carefully spray a couple of light sprays of mo- Paper Towels tor spray inside the motor openings and apply a small drop of racing oil onto each end of the motor shaft. -
Page 8: Wing Installation
Kwik Bond 5 Minute Epoxy Excel Modeling Knife 220 Grit Sandpaper w/Sanding Block Ruler The F-22 Raptor EP uses stabilators for pitch and roll Pencil control. There are no ailerons. Do not cut out the molded hinge line on the bottom of the wing. -
Page 9: Stabilator Installation
STABILATOR INSTALLATION 3) Using a ruler and a pencil, measure back 1/2" from the line you drew across the top of the fuselage, and ITEMS REQUIRED draw a vertical line, on the outside edge of the fuselage, that crosses the mold line. {2} Molded Foam Stabilators {2} Prebent Aluminum Stabilator Tubes 4) Using a 9/64"... -
Page 10: Installing The Stabilators
9) Apply a thin layer of machine oil or Vaseline onto 16) Slide one aluminum stabilator tube through the the long section of the stabilator tube. nylon inserts in the right side of the fuselage. The machine oil or Vaseline will prevent the tube from 17) Turn the fuselage upside down. -
Page 11: Stabilizer Installation
22) Looking from the back of the fuselage, pivot 27) Repeat steps # 14 through # 26 to install the the stabilator so that it is centered, and look to see that it stabilator assembly on the left side of the fuselage. is perpendicular to the fuselage side. -
Page 12: Installing The Stabilizers
PREPARING THE SURFACE FOR PAINT {1} Molded Plastic Nose Cone TOOLS AND SUPPLIES REQUIRED The F-22 Raptor EP comes prepainted with a light gray Kwik Bond 5 Minute Epoxy base coat. You don't have to paint the camouflage, but 220 Grit Sandpaper w/Sanding Block painting it does add more scale realism. -
Page 13: Servo Installation
Note that there is no camouflage painted on the bot- 4) Working with one servo for now, stick one piece tom of the airplane. of double-sided tape onto one side of the servo. SERVO INSTALLATION 5) Stick one foam spacer onto the double-sided tape that is on the servo, then stick the second piece of double- ITEMS REQUIRED sided tape onto the foam spacer. -
Page 14: Motor Installation
ASSEMBLING THE GEAR BOX If you are going to use the optional landing gear on your F-22 Raptor EP, do not install the wire tail skid. 1) Slide the propeller shaft through the two prein- stalled bushings in the front gear box half and push it... -
Page 15: Installing The Pushrods
2) While holding the stabilator in place, use a pen- 8) Install the two prebent pull-pull rods into the cil to draw a mark on the aluminum tube where it and the holes that you enlarged in the servo horn and into the holes nylon insert meet. -
Page 16: Canopy & Motor Cover
CANOPY & MOTOR COVER 5) Install and tighten two 2mm x 5mm wood screws, using a # 0 phillips screwdriver, to hold the canopy firmly ITEMS REQUIRED in place. See photo # 32 below. Photo # 32 {1} Molded Plastic Motor Cover {1} Molded Plastic Canopy {6} 2mm x 5mm Wood Screws TOOLS AND SUPPLIES REQUIRED... -
Page 17: Optional Landing Gear
OPTIONAL LANDING GEAR 2) While holding the plywood plate in place, use a pencil to carefully outline the location of the plate onto ITEMS REQUIRED the fuselage side. {1} Prebent Nose Gear Wire 3) Remove the plate and set it aside. Using 220 grit {2} Prebent Main Gear Wires sandpaper, carefully sand away the paint from inside the outline you drew. -
Page 18: Installing The Nose Gear
INSTALLING THE NOSE GEAR 14) Slide the wheels onto the landing gear axles and use three wheel collars to hold the wheels in place. Check to make sure that the wheels spin without bind- 9) Using Kwik Bond Thick C/A, glue the remain- ing, then tighten the set screws firmly to secure the wheel ing plywood pieces together into the configuration shown. -
Page 19: Installing The Receiver
INSTALLING THE ESC propeller into place to tighten the nut. Use a pair of needle nose pliers to keep the first hex nut from turning while 7) Carefully solder the motor leads from the ESC you tighten the propeller. See photo # 41 below. to the motor leads on the motor, making sure to use heat Photo # 41 shrink tubing to insulate the solder joints. -
Page 20: Applying The Decals
If you have installed the optional landing gear, you The F-22 Raptor EP should be balanced with the flight will need to use a modeling knife to cut a notch in the battery mounted in the cockpit. front of the hatch cover so it does not interfere with the nose gear strut. -
Page 21: Preflight Check
2) After you have become familiar with the flying page # 7 and follow the instructions for motor break-in. characteristics of the F-22 Raptor EP, you may want to Correct break-in will result in higher performance and increase the control throws to the settings listed below. -
Page 22: Flying The F-22 Raptor Ep
5) Don't drink and fly. Consuming alcoholic bev- erages prior to flying, or while you are flying, is a big In the air the F-22 Raptor EP is a very smooth flyer. no-no. Set up with low rate settings, the airplane behaves very gently. - Page 23 Peak Charger: A type of battery charger that uses a mi- croprocessor to sense when the flight battery is fully charged. Once peak charged, the charger shuts off so that the battery does not overcharge. Pushrods: They connect between the control surface and the servo, transferring the movement of the servo directly to the control surface.
-
Page 24: Camouflage Paint Scheme Detail
CAMOUFLAGE PAINT SCHEME DETAIL Use the photos below to help you lay out the camouflage paint scheme on your airplane. Note that there is no camouflage on the bottom of the airplane. -
Page 25: Vertical Stabilizer Alignment Template
VERTICAL STABILIZER ALIGNMENT TEMPLATE This template is provided to make it easy to set the proper angle for both vertical stabilizers. Cut the template out along the outline and adhere it to a piece of heavy cardstock. Cut the cardstock out along the edge of the template and use the heavy cardstock template to set the angle of the vertical stabilizers. -
Page 27: Product Evaluation Sheet
ODUCT EV ODUCT EV A L U A L U A L U A A A A A TION SHEET TION SHEET TION SHEET P R ODUCT EV ODUCT EV ODUCT EV A L U A L U TION SHEET TION SHEET P R ODUCT EV ODUCT EV... - Page 28 _____________________________ Post Office will _____________________________ not deliver _____________________________ without proper postage (Return Address Here) Global Hobby Distributors Attn: Wattage Customer Care 18480 Bandilier Circle Fountain Valley CA 92728-8610 Fold along dotted line...
Need help?
Do you have a question about the F-22 Raptor EP and is the answer not in the manual?
Questions and answers