Table of Contents
Advertisement
Available languages
Available languages
Quick Links
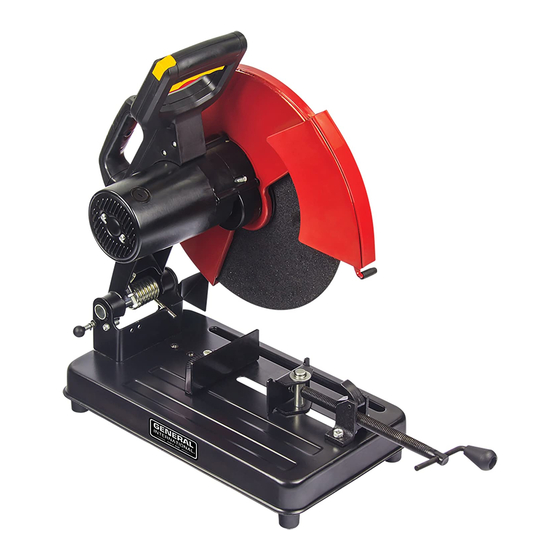
FEATURES
● Comfortable horizontal "D"
handle
● Hold-down lock button and
carry handle
● Arbor lock makes blade
changes easy
● Vise clamp assembly with
quick release
● Fence adjustable 0 to 45º
● Safety interlock trigger
● Cuts material up to
4-1/2 inches
● With correct blade, can be
used to cut conduit, ABS,
copper pipe, tile; even
concrete
● Strong steel base
● Includes 14 inch diam. x
1/8" thick x 1" arbor abrasive
metal-cutting disc
● Net weight: 40 lb. (18 kg)
SPECIFICATIONS
● Motor:
120 V ~ 60 Hz 15 A
● No-load speed:
3600 rpm
● Blade diameter:
14 in. (356 mm)
● Cutting capacity (round):
4-5/16 in. (110 mm)
● Cutting (square):
4-1/2 in. x 4-1/2 in.
(115 mm x 115 mm)
● UL certified
SETUP & OPERATION MANUAL
Metal Cut-Off Saw
Model #
BT8005 man v.141223
14 inch
BT8005
Advertisement
Table of Contents

Related Manuals for General International BT8005


Summary of Contents for General International BT8005
-
Page 1: Specifications
● No-load speed: 3600 rpm ● Blade diameter: 14 in. (356 mm) ● Cutting capacity (round): 4-5/16 in. (110 mm) ● Cutting (square): 4-1/2 in. x 4-1/2 in. (115 mm x 115 mm) ● UL certified Model # BT8005 BT8005 man v.141223... -
Page 2: Year Limited Warranty
2-year warranty period, subject to the “conditions and exceptions” as listed below. Repairs made without the written consent of General International will void the warranty. DISCLAIMER The information and specifications in this manual pertain to the unit as it was supplied from the factory at the time of printing. -
Page 3: Important Safety Instructions
Warranty does not include failures, breakage or defects deemed after inspection by General International to have been directly or indirectly ® caused by or resulting from; improper use, or lack of or improper maintenance, misuse or abuse, negligence, accidents, damage in handling or transport, or normal wear and tear of any generally considered consumable parts or components. - Page 4 WARNINGS 1. KEEP CORD AWAY FROM HEAT, SHARP EDGES OR MOVING PARTS. Replace damaged cords immediately. Damaged cords increase the risk of electric shock. 2. DO NOT EXPOSE THIS TOOL TO DAMP OR WET LOCATIONS. Keep out of rain as it may increase risk of electrical shock. 3.
-
Page 5: Safety Precautions
2. GROUND ALL TOOLS. Grounded tools must be plugged into an outlet properly installed and grounded in accordance with all codes and ordinances. Never remove the grounding pin or modify the plug in any way. Do not use any adapter plugs. Check with a qualified electrician is you are in doubt as to weather the outlet is properly grounded. -
Page 6: Getting Started
GETTING STARTED Before operating your BT8005 14-Inch Cut-Off Saw, check the contents of the box to make sure you have everything you will need. Items included in the box: ●... - Page 7 B. MOTOR BRUSH CAP C. CARRYING HANDLE D. TRIGGER SWITCH - Turn on and off your BT8005 14 inch metal cut-off saw . E. SWITCH INTERLOCK - Push this with your thumb to unlock the switch.
-
Page 8: Operation
Such preventative safety measures reduce the risk of starting the tool accidentally. The BT8005 Abrasive Cut Off Saw can cut an angle up to 45 degrees in either direction. To set your angle: 1. Locate 2 hex bolts which secure the rear vise jaw to the saw table 2. -
Page 9: Maintenance
8. Push on screw handle until the adjustable vise jaw is against work piece. NOTE: The adjustable vise jaw will adjust to the angle that the Rear vise jaw is set at. 9. Place quick-release clamp, threads down, to secure clamp. 10. -
Page 10: Changing Saw Blade
● Never disassemble the tool or try to do any rewiring on the tool’s electrical system. ● Contact General International for all repairs. ● Clean dust and debris from vents. ● Keep the tool handles clean, dry and free of oil or grease. - Page 11 WARNING! Never use flammable or combustible solvents around tools. WARNING! To reduce the risk of injury, electric shock and damage to the tool, never immerse your tool in liquid or allow liquid to flow inside the tool. 141223...
-
Page 12: Schematic Drawing
SCHEMATIC DRAWING... -
Page 13: Parts List
PARTS LIST Description Qty. Description Qty. Description Qty. Bolt STM6 x 12 Lower guard assembly Carbon brush ─ Lower guard outer piece Chip deflector Brush cap ─ Lower guard enclosure Locknut M6 Bolt M5 x 10 ─ sheet Base assembly Rear cover Bolt M8 ─... -
Page 15: Caractéristiques
● Diamètre de la lame : 14 po (356 mm) ● Capacité de coupe (rond) : 4-5/16 po (110 mm) ● Capacité de coupe (carrée) : 4-1/2 po x 4-1/2 po (115 mm x 115 mm) ● Certifiée UL Modèle # BT8005 BT8005 man v.141223... - Page 16 NOUS VOUS REMERCIONS d’avoir choisi une machine de General International. Cette outil a été soigneusement testée et inspectée avant de vous être expédiée, et moyennant une utilisation et un entretien adéquats, elle vous procurera un service fiable pendant de nombreuses années. Afin d’obtenir un rendement optimal et une utilisation sans problème, et d’optimiser...
- Page 17 de réclamation de garantie peut vous être fourni sur demande par General International ou par un distributeur agréé) spécifiant clairement le ® modèle et le numéro de série de l’unité (si applicable), et faisant état de la plainte ou du défaut présumé, doivent être jointes au produit retourné. CONDITIONS ET EXCEPTIONS Cette couverture ne s’applique qu’au premier acheteur.
- Page 18 AVERTISSEMENTS 1. N’EXPOSEZ PAS LE CORDON À UNE SOURCE DE CHALEUR, À DES REBORDS TRANCHANTS OU À DES PIÈCES EN MOUVEMENT. Remplacez immédiatement des cordons endommagés. Un cordon endommagé augmente le risque de décharges électriques. 2. N’EXPOSEZ PAS CET OUTIL À UN ENDROIT HUMIDE OU MOUILLÉ. N’exposez pas à...
- Page 19 15. VÉRIFIEZ S’IL EST ENDOMMAGÉ. Vérifiez votre outil régulièrement. Si une pièce de l’outil est endommagée, elle devrait être soigneusement inspectée pour vous assurer qu’elle peut remplir la fonction pour laquelle elle a été conçue correctement. En cas de doute, la pièce devrait être réparée. Consultez un technicien qualifié...
-
Page 20: Mise En Route
MISE EN ROUTE Avant de faire fonctionner votre scie à tronçonner à la meule BT8005 de 14 po (35,56 cm), vérifiez le contenu de la boîte pour vous assurer que vous avez tout ce dont vous avez besoin. -
Page 21: Branchement À Une Source D'alimentation
B. CAPUCHON DES balais de charbon C. POIGNÉE DE TRANSPORT D. INTERRUPTEUR — Il est utilisé pour mettre en marche ou en arrêt votre scie à tronçonner à la meule de 14 po (35,56 cm) BT8005. E. DISPOSITIF DE VERROUILLAGE de l’interupteur 141223... -
Page 22: Lame De Coupe
La scie à tronçonner à la meule de 14 po (35,56 cm) BT8005 est livrée avec un étau pour sécuriser la pièce de travail. Pour de grosses pièces de travail, recherchez des serres ou serres-joints pour tenir la pièce. Pour tenir en place un article pour le coupage : 1. - Page 23 La scie à tronçonner à la meule BT8005 peut couper jusqu’à un angle de 45 degrés dans les deux directions. Pour régler votre angle : 1. Situez les 2 boulons hexagonaux qui tiennent la plaque arrière de l’étau sur la table de la scie.
-
Page 24: Entretien
3. Appuyez sur le dispositif de verrouillage de l’interupteur et puis sur l’interrupteur à gâchette. 4. Une fois que la lame a atteint sa pleine vitesse, abaissez la lame en appuyant sur la poignée vers le bas. 5. Appuyez jusqu’à ce que la pièce de travail soit coupée à la profondeur désirée. -
Page 25: Entretien Préventive
● Ne désassemblez jamais l’outil ou ne faites jamais de modifications au système électrique de l’outil. ● Contactez General International pour toutes réparations. ● Nettoyez la poussière et les débris sur les conduits de ventilation. ● Gardez les poignées de l’outil sèches, propres et exemptes d’huile ou de graisse. - Page 26 SCHEMA DES PIÈCES...
-
Page 27: Liste Des Pièces
LISTE DES PIÈCES Description Qté. Description Qté. Description Qté. Boulon ST M6 x 12 30 Assemblage de garde 61 Boulon M5 x 10 + rondelle inférieur de ressort 5 + rondelle Couverture ─ Plaque de garde plate 5 anti-poussière inférieur 62 Boulon M4 x 10 Écrou de blocage M6 ─...
Need help?
Do you have a question about the BT8005 and is the answer not in the manual?
Questions and answers