Table of Contents
Advertisement
Quick Links
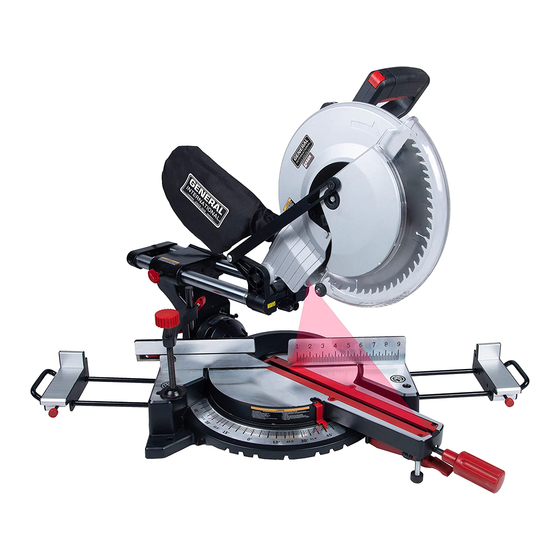
FEATURES
• Precision cuts with laser
alignment system
• Comfortable horizontal D-Handle
• Bevel cuts up to 45°left
• Miter cuts up to 45°
left and right
• 12 in. saw blade with
carbide-tipped teeth
• Powerful 15 A motor
With:
• Adjustable cut-depth for dados
• Shaft lock for trouble-free blade
changes
• Easy-access
motor brushes
Includes:
• Dust bag
• Hold down clamp
• Table side extensions
SPECIFICATIONS
• 120 V ~ 60 Hz 15 A motor
• No-load speed: 4200 rpm
• Maximum cut capacity:
12-1/4" x 4"
(311 x 101.6 mm)
General International Power Products, LLC
6243 Industrial Parkway
Whitehouse, OH 43571 USA
website: www.gipowerproducts.com
SETUP & OPERATION MANUAL
12 Inch Single Bevel
Sliding Compound
Model #
MS3003 man v.200915
Miter Saw
MS3008
Advertisement
Table of Contents

Related Manuals for General International MS3008


Summary of Contents for General International MS3008
- Page 1 • 120 V ~ 60 Hz 15 A motor • No-load speed: 4200 rpm • Maximum cut capacity: 12-1/4" x 4" (311 x 101.6 mm) Model # MS3008 General International Power Products, LLC 6243 Industrial Parkway Whitehouse, OH 43571 USA website: www.gipowerproducts.com MS3003 man v.200915...
-
Page 2: Warranty
2-year warranty period, subject to the “conditions and exceptions” as listed below. Repairs made without the written consent of General International will void the warranty. DISCLAIMER The information and specifications in this manual pertain to the unit as it was supplied from the factory at the time of printing. -
Page 3: Table Of Contents
Warranty does not include failures, breakage or defects deemed after inspection by General International to have been directly or indirectly ® caused by or resulting from; improper use, or lack of or improper maintenance, misuse or abuse, negligence, accidents, damage in handling or transport, or normal wear and tear of any generally considered consumable parts or components. -
Page 4: Warnings And Cautions
WARNINGS AND CAUTIONS 1. KEEP WORK AREA CLEAN. Cluttered areas invite injuries. 2. CONSIDER WORK AREA ENVIRONMENT. Don’t use bench tools in damp, wet, or poorly lit locations. Don’t expose your tool to rain. Keep the work area well lit. Don’t use tools in the presence of flammable gases or liquids. -
Page 5: Safety Precautions For Compound Miter Saw
13. DRESS PROPERLY. Don’t wear loose clothing or jewelry; they can be caught in moving parts. Protective, non-electrically conductive gloves and non-skid footwear are recommended when working. Wear protective hair covering to contain long hair and keep it from harm. 14. -
Page 6: Laser Safety
REPLACE THE KERF PLATE INSERTS WHEN WORN. Excessive ● tear-out increases the likelihood of injury from flying debris. When setting the saw at a new angle, check that due to some mis-alignment, the blade does not cut into the table insert, rear fence, or another part of your saw. -
Page 7: Functional Description
FUNCTIONAL DESCRIPTION Base K K1K2 N O1 Mounting hole Hold down clamp Clamp fine adjustment knob Clamp arm Clamp coarse adjustment knob Depth of cut/dado knob Side extension/carrying handle Extension table with fence Extension table slide lock knob Extension retention screw Fence Sliding fence Sliding fence lock tab... -
Page 8: Specifications
FUNCTIONAL DESCRIPTION Base Mounting hole Hold down clamp Clamp fine adjustment knob Clamp arm Clamp coarse adjustment knob Depth of cut/dado knob Side extension/carrying handle Extension table Extension table slide lock knob Extension retention screw Fence Sliding fence Sliding fence lock tab Right fence Carriage slide lock knob Bevel lock lever... -
Page 9: Assembly
ASSEMBLY REMOVE ALL THE PARTS FROM THE BOX Your Sliding Compound Miter Saw is fully assembled in the carton with the exception of some small accessories. Check to ensure everything you need is included: ● 2 extensions- one for each side ●... -
Page 10: Operating Procedures
the shaft from moving vertically while allowing it to rotate for easy clamp positioning. • You can adjust the height and position of the clamping arm (C2, fig.5 & 6) according to the thickness and shape of the workpiece with the knob at the back top. -
Page 11: Using Your Saw
CAUTION: DO NOT OPERATE THIS TOOL if the ACTUAL power source voltage is less than 105 volts AC or greater than 132 volts AC. Contact a qualified technician if this problem exists. Improper performance, and/or, damage to the tool will result if operated on inadequate, or excessive power. -
Page 12: Modes Of Use
7. After cutting, allow the head to come back up. The blade guard closes automatically. 8. The saw will stop when you release the trigger switch in the handle. 9. Turn the laser off when it is not in use, to conserve the batteries. 10. - Page 13 3. Unlock the cutting head from the upright, 0 degree bevel position using the slip-lock bevel adjustment lever (H, fig.3 & 13) and angle it to any desired positionfrom 0° to 45° left, according to the bevel scale (K, fig.13), then lock it in place. 4.
-
Page 14: Cutting Molding
NOTE: Even though the miter and bevel angles are marked on the machine, it is always a good idea to check them by making a trial cut. SETTING DADO CUTS This saw can be used to cut grooves (dados) in the workpiece, rather than cut right through. - Page 15 CUTTING CROWN MOLDING Your compound miter saw is suited for the difficult task of cutting crown molding. To fit properly, crown molding must be compound-mitered with extreme accuracy. The two surfaces on a piece of crown molding that fit flat against the ceiling and wall are at angles that, when added together, Workpiece equal exactly 90°.
- Page 16 (see fig. 21) COMPOUND MITER SAW MITER AND BEVEL ANGLE SETTINGS- WALL TO CROWN MOLDING ANGLE 52/38° Crown Molding 45/45° Crown Molding 52/38° Crown Molding 45/45° Crown Molding Angle Angle Miter Bevel Miter Bevel Miter Bevel Miter Bevel Between Between Setting Setting Setting...
-
Page 17: Maintenance
MAINTENANCE MOUNTING AND REMOVING THE BLADE WARNING: Before replacing the saw blade always unplug the tool. Make sure that the spindle speed diameter and saw blade bore match. Only use sharp and undamaged saw blades. Cracked or bent saw blades must be replaced immediately. 1. -
Page 18: Replacing The Carbon Brushes
REPLACING THE CARBON BRUSHES WARNING: Prior to inspection or saw maintenance, turn off power switch and disconnect plug from power source. 1. Remove and check the carbon brushes regularly. 2. Use a screwdriver to remove the brush holder caps. 3. Replace brushes when they are excessively chipped or wear down to the limit (1/4) mark (fig.4). -
Page 19: Preventive Maintenance
● An authorized repair center should do any repairs, modification, or maintenance that involve disassembling the saw. ● Any damage to the tool should be corrected at an authorized repair center. Contact General International for all repairs. WARNING! Never use flammable or combustible solvents around tools. -
Page 20: Troubleshooting Guide
TROUBLESHOOTING GUIDE WARNING: To avoid injury from accidental starting, always turn switch OFF and unplug the tool before moving, replacing the blade or making adjustments. TROUBLESHOOTING GUIDE - MOTOR SUGGESTED CORRECTIVE PROBLEM PROBLEM CAUSE ACTION Blade hits table. 1. Misalignment. 1. - Page 21 TROUBLESHOOTING GUIDE TROUBLESHOOTING GUIDE - SAW OPERATION SUGGESTED CORRECTIVE PROBLEM PROBLEM CAUSE ACTION Blade hits table. 1. Misalignment. 1. See ADJUSTMENT- CUTTING ARM TRAVEL section. Angle of cut not 1. Miter table unlocked. 1. See OPERATION - MITER accurate. Can not 2.
-
Page 22: Parts List
PARTS LIST To purchase parts, call 844.877.5234. Ref. Description Qty. Ref. Description Qty. Base Turntable bracket lock pin Foot pad M10 x 70 double-headed screw M4 x 12 Phillips pan head self-tapping lock Small scale (bevel scale) screw φ 2.5 x 4 rivet M10 x 35 Outer hexagonal bolt Depth positioning plate Base scale... - Page 23 PARTS LIST Ref. Description Qty. Ref. Description Qty. M6 x 7 flat head cross non-standard screw 1 144 Handle knob M6 x 10 Phillips pan head screws 145 M5 x 40 Phillips pan head screw Large hood 146 ST3.9 x 16 Phillips pan head self-tapping lock screw M6 x 14 hexagon non-standard screws 147 Handle cover top...
-
Page 24: Exploded Drawing
EXPLODED DRAWING Laser Hold-down clamp... - Page 25 v.200915...
- Page 26 General International Power Products, LLC 6243 Industrial Parkway Whitehouse, OH 43571 USA toll-free (844) 877-5234 or (419) 877-5234 Canada toll-free (888) 949-1161 or (604) 420-2299 website: www. gipowerproducts.com...
Need help?
Do you have a question about the MS3008 and is the answer not in the manual?
Questions and answers