Advertisement
Table of Contents
INSTALLATION INSTRUCTIONS FOR PART 99-3000
Chevrolet/GMC 1988-1994
99-3000/AW-333GM
KIT FEATURES
• DIN head unit provision
• ISO head unit provision
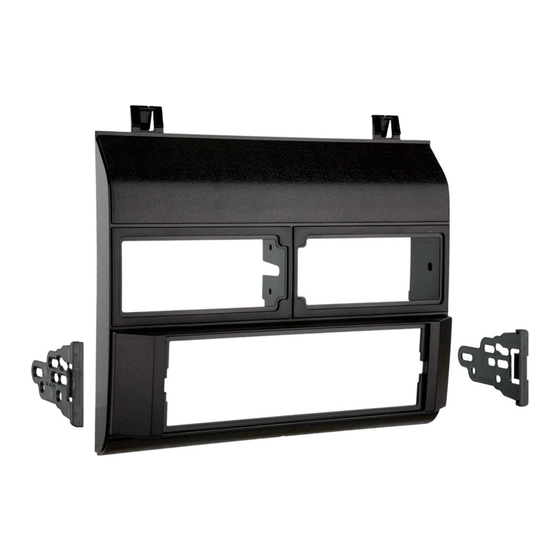
KIT COMPONENTS
• A) Radio housing • B) ISO brackets
A
B
METRA. The World's best kits.
APPLICATIONS
See application list inside
™
1-800-221-0932
WIRING & ANTENNA CONNECTIONS (sold separately)
Wiring Harness:
• 70-1858 - GM harness 1987-2005
Antenna Adapter:
• 40-GM10 - GM antenna adapter
TOOLS REQUIRED
• Panel removal tool • Phillips screwdriver
• Small flat blade screwdriver • Cutting tool • Scribe
CAUTION: Metra recommends disconnecting the
negative battery terminal before beginning any
installation. All accessories, switches, and especially
air bag indicator lights must be plugged in before
reconnecting the battery or cycling the ignition.
NOTE: Refer to the instructions included with the
aftermarket radio.
metraonline.com
© COPYRIGHT 2004-2011 METRA ELECTRONICS CORPORATION
Advertisement
Table of Contents

Related Manuals for Metra Electronics 99-3000


Summary of Contents for Metra Electronics 99-3000
- Page 1 INSTALLATION INSTRUCTIONS FOR PART 99-3000 APPLICATIONS See application list inside WIRING & ANTENNA CONNECTIONS (sold separately) Chevrolet/GMC 1988-1994 Wiring Harness: 99-3000/AW-333GM • 70-1858 - GM harness 1987-2005 Antenna Adapter: KIT FEATURES • 40-GM10 - GM antenna adapter • DIN head unit provision • ISO head unit provision TOOLS REQUIRED • Panel removal tool • Phillips screwdriver • Small flat blade screwdriver • Cutting tool • Scribe KIT COMPONENTS • A) Radio housing • B) ISO brackets CAUTION: Metra recommends disconnecting the negative battery terminal before beginning any installation.
- Page 2 99-3000 Applications Table of Contents Dash Disassembly - Chevrolet Suburban 1992-1994 .........2 Chevrolet Full size Blazer ............. 1992-1994 - GMC C-Series 1988-1994 ..........2 Full size pickup ............. 1988-1994 - GMC Suburban 1992-1994 ..........2 Suburban .............. 1992-1994 - GMC Yukon 1992-1994 ............2 Kit Assembly C-Series ............... 1988-1994 - DIN head unit provisions .............3 Suburban .............. 1992-1994 - ISO head unit provisions .............3 Yukon ..............1992-1994 (Figure A)
-
Page 3: Kit Preparation
99-3000 Kit Preparation Kit Assembly Kit Assembly 1. Remove the A/C vents from the factory dash panel DIN head unit provision ISO head unit provision by releasing the spring fastening clips securing 1. Slide the DIN cage into the radio housing and 1. Mount the ISO brackets to the radio using the them to the panel. secure by bending the metal locking tabs outward. screws supplied with the radio. (Figure A) (Figure A) 2. Mount the vents to the radio housing by inserting 2. Slide the radio into the radio housing until the ISO the inner edge of the vent into the center inside 2. Slide the aftermarket radio into the cage until it brackets snap into place. (Figure B) pivot hole and the outer edge of the vent into the snaps into place. (Figure B) outer pivot hole. 3. Locate the factory wiring harness in the dash. 3. Locate the factory wiring harness in the dash. - Page 4 INSTALLATION INSTRUCTIONS FOR PART 99-3000 NOWLEDGE IS OWER Enhance your installation and fabrication skills by enrolling in the most recognized and respected mobile electronics school in our industry. Log onto www.installerinstitute.com or call 800-354-6782 for more information and take steps toward a better tomorrow.
Need help?
Do you have a question about the 99-3000 and is the answer not in the manual?
Questions and answers