HP StoreOnce 4900 Backup Installation And Configuration Manual
Hide thumbs
Also See for StoreOnce 4900 Backup:
- Service and maintenance manual (53 pages) ,
- Start here (2 pages)
Table of Contents
Advertisement
Quick Links
HP StoreOnce
4900 Backup system
Installation and Configuration Guide
Abstract
This document describes how to install and configure HP StoreOnce 4900 Backup systems. These systems are also sometimes
referred to as single-node StoreOnce products and they run StoreOnce software version 3.10.0 or later.
HP Part Number: BB903-90915
Published: June 2014
Edition: Second
Advertisement
Table of Contents
Troubleshooting

Related Manuals for HP StoreOnce 4900 Backup


Summary of Contents for HP StoreOnce 4900 Backup
- Page 1 Installation and Configuration Guide Abstract This document describes how to install and configure HP StoreOnce 4900 Backup systems. These systems are also sometimes referred to as single-node StoreOnce products and they run StoreOnce software version 3.10.0 or later. HP Part Number: BB903-90915...
- Page 2 Revision History Revision 1 December 2013 This is the first edition of the guide for HP StoreOnce 4900 Backup systems, issued with the 3.10.0 or later version of HP StoreOnce software. Revision 2 June 2014 This is the second edition of the guide, issued with the 3.1 1.0 version of HP StoreOnce software.
-
Page 3: Table Of Contents
Supported Fibre Channel connections...................19 Software requirements......................20 Recommended web browser settings..................20 StoreOnce CD contents......................20 3 Installing and cabling the HP StoreOnce 4900 Backup system......21 Rack warnings........................21 Important safety information.....................21 Installing the rails, locking nuts and 1U support shelf..............21 Installing the disk enclosure......................23 Installing the head server ......................25... - Page 4 To reset the password for the local Admin user to default............79 9 Fibre Channel installation and configuration..........80 Fibre Channel connection......................80 Port assignment for StoreOnce Backup systems...............81 Zoning..........................81 Diagnostic Fibre Channel Device....................82 10 Configuring backup servers to work with HP StoreOnce.......83 Configuring Data in Flight encryption on Windows media servers..........83 Contents...
- Page 5 Manual iSCSI initiator installation..................93 The iSCSI Initiator and Authentication...................93 The Microsoft iSCSI Initiator ....................94 1 1 Understanding LEDs................102 Front view of the HP StoreOnce 4900 Backup system..............103 Front view of the disk enclosure....................104 Rear view of the disk enclosure....................105 Hot-plug drive LEDs.......................107 Server units........................107...
-
Page 6: Checklists For Completion Prior To Installation
Additional cabling requirements and make sure they are pre-laid Location Before placing an order, consult the product specification, available at http://www.hp.com/go/ StoreOnce, and identify a suitable location in your data center with sufficient access and space to install the product. -
Page 7: Backup Strategy
StoreOnce appliances. If using Symantec NetBackup or Backup Exec, the HP StoreOnce Catalyst OST plugin is required. It must be installed on each Media Server required to write data to the StoreOnce Catalyst stores. The latest version of the OST plugin is recommended (currently 3.0), OST Plugin 2.1 is a minimum requirement for Backup Exec. - Page 8 Do you wish to create Local Administrators for the CIFS server only, Y/N? ..... Do you wish to create AD (External) users or groups with access to all StoreOnce features, Y/N?....Provide details if you wish HP Support to configure these users..............................
-
Page 9: Network Requirements
The Security Pack license is required. If you wish to configure encryption for a subnet, you will need to know the client IP address and password. Do not record those details here, but ask the HP Support engineer to demonstrate how to use StoreOnce CLI commands to configure IP security (IPSEC) after initial network configuration. - Page 10 Table 2 Subnet details Portset number/name Ports used (eth0, eth1, eth2, eth3, eth4, eth5) Bonding mode (1, 4 or 6) Subnet details Name and type (Phys or Tag ID if VLAN IP address VLAN) subnet range Subnet mask Gateway Domain name Portset name Ports used (eth0, eth1, eth2, eth3, eth4, eth5) Bonding mode (1, 4 or 6)
- Page 11 Table 2 Subnet details (continued) Portset number/name Ports used (eth0, eth1, eth2, eth3, eth4, eth5) Bonding mode (1, 4 or 6) Portset name Ports used (eth0, eth1, eth2, eth3, eth4, eth5) Bonding mode (1, 4 or 6) Subnet details Name and type (Phys or Tag ID if VLAN IP address...
-
Page 12: Fibre Channel
StoreOnce Catalyst over Fibre Channel uses the same settings. This feature is available with StoreOnce software version 3.1 1.0, but can only be enabled by HP Support. Have you connected the required number of physical FC connections; 4 per server are available? Fibre Channel connection (page 80) of this guide. -
Page 13: Miscellaneous
Remote Support, IRS. However, please note that IRS should not be used at the same time as the StoreOnce Remote Support feature. For information about the free HP Remote Insight Remote Support service go to the IRS Remote Support web page at: http://h18004.www1.hp.com/products/servers/management/insight-remote-support/... - Page 14 The label on the server head unit contains the iLO4 password and IP address for the system. Make a note of this information before you install the HP StoreOnce Backup system in the rack. Changing the passwords for the default user accounts (Administrator, Operator, HPresetpassword and iLO) after installation is strongly recommended.
-
Page 15: Before You Start
Network-Attached Storage (NAS), Catalyst Stores or Virtual Tape Library (VTL) targets for backup applications. This guide describes how to install and carry out the initial configuration of your HP StoreOnce Backup system. The following documents are also available at http://www.hp.com/support/... -
Page 16: Hp Storeonce 4900 Backup
Drawer 1 (left-hand side of enclosure) WARNING! If a second disk enclosure is to be installed, HP recommends installing the second disk enclosure below the head server unit. If the second disk enclosure is installed above the head server unit, the 1U support shelf supplied with the disk enclosure should be installed immediately... -
Page 17: Rear View Of The Hp Storeonce 4900 Backup
Rear view of the HP StoreOnce 4900 Backup Figure 2 Rear view of the head server RAID card 1 FC card 1 FC card 2 RAID card 2 10GbE card 1 10GbE card 2 Power supply 1 Power supply 2... -
Page 18: Software And Hardware Requirements
NAS shares and StoreOnce Catalyst stores across ethernet. The HP StoreOnce Backup system supports IPv4 only. The HP StoreOnce Backup system may be connected to a virtual LAN and supports VLAN tagging. DHCP and static IP addressing are supported. -
Page 19: Ilo 4 Functionality
Ethernet port, but one Ethernet port must always be connected, even if you are only using the FC ports to back up and restore data to the HP StoreOnce Backup system. The port connection is required because the network is used to access the StoreOnce Management Console remotely and for replication. -
Page 20: Software Requirements
Systems Insight Manager, so that information from the StoreOnce Backup system can be transmitted to and interpreted by the management host. Useful links: This will take you to the HP website to find out further information about your product. Open Source documentation: This provides relevant Open Source documentation. -
Page 21: Installing And Cabling The Hp Storeonce 4900 Backup System
Use extreme caution when installing and pulling units from the rack; they can slip and fall, causing damage to the HP StoreOnce Backup system or injury. HP is not responsible for any damage or injury caused by the mishandling of the HP StoreOnce Backup system. - Page 22 To locate the correct position for the locking nuts, count up 4U from the location of the rails (1). The nuts are placed on either side of the +4U position on each rack column (2). Installing and cabling the HP StoreOnce 4900 Backup system...
-
Page 23: Installing The Disk Enclosure
Figure 5 Inserting the locking nuts Install the 1U support shelf immediately below the location for the disk enclosure. Installing the disk enclosure Leave the base storage disks in the enclosure, but do not add any further expansion disks (if purchased) until the disk enclosure is fully installed. - Page 24 Figure 6 Installing the second disk enclosure and tightening the thumbscrews Attach the retaining brackets (1) to either side of the rear of the disk enclosure and secure them to the rack. Figure 7 Attaching the retaining brackets Installing and cabling the HP StoreOnce 4900 Backup system...
-
Page 25: Installing The Head Server
Backup system in the rack. See also Password best practices (page 34). Slide the HP StoreOnce Backup system into position in the rack and secure it to the rack rails using thumbscrews on the unit's front bezel. Attaching SFPs The Accessory Kit supplied with the HP StoreOnce 4900 Backup system contains four 8Gb Short Wave FC SFP+ and four 10Gb SR SFP+. - Page 26 Connect the supplied 0.5m SAS cables as follows: Drawer 1, I/O module A, port 2 to Drawer 2, I/O module A, port 1 Drawer 2, I/O module B, port 1 to Drawer 1, I/O module B, port 2 Installing and cabling the HP StoreOnce 4900 Backup system...
-
Page 27: Licensing And Storage Expansion
Drawer 2, I/O module B, port 1 to Drawer 1, I/O module B, port 2 If you have purchased additional HP StoreOnce 44TB Capacity Expansion kits for the disk enclosure(s), install the sets of 1 1 disks in the sequence described in the next section. -
Page 28: Installing Disks From The 44Tb Capacity Expansion Kit
35 and eleven disks in slots 23-33. The disks in HP StoreOnce 4900 44 TB Capacity Expansion kits must be added to specific bays in the drawers within the disk enclosure according to the sequence in which the disk set is being added. -
Page 29: To Install The Drives
Table 5 Populating disk bays with Capacity Expansion kits (continued) + Expansion kit 4 Add eleven disks to slots 1- 1 1 Do not change + Expansion kit 5 Do not change Add eleven disks to slots 1- 1 1 To install the drives WARNING! To reduce the risk of personal injury or damage to the equipment, extend only one... - Page 30 CAUTION: To prevent improper cooling and thermal damage, do not operate the disk enclosure unless all bays are populated with either a component or a blank Installing and cabling the HP StoreOnce 4900 Backup system...
- Page 31 Additional storage is not pre-configured or licensed at installation. See Expanding storage (page 65). Installing disks from the 44TB Capacity Expansion kit...
-
Page 32: Powering On And Managing The Storeonce Management System
Powering on the HP StoreOnce Backup system Press the Power on button (1) on the front of your HP StoreOnce Backup system. The normal boot sequence takes approximately 5 minutes. On power up the HP StoreOnce Backup system runs its fans at high speed for approximately 10 seconds before returning to normal speed. -
Page 33: Discovering The Hp Storeonce Backup System On The Network
StoreOnce GUI or the StoreOnce CLI; other tasks, such as network configuration, SNMP configuration and date and time configuration, can only be performed through the StoreOnce CLI. See the HP StoreOnce Backup system CLI Reference Guide for more information about the StoreOnce CLI commands and their syntax. -
Page 34: User Roles And Accounts
It is good practice to determine what other users will be required and what access to the system they should have as part of the planning process. In particular, will the HP StoreOnce Backup system be added to an Active Directory Domain? The following AD domain details will be required to configure AD. -
Page 35: User Account And Password Requirements
This command does not save the password details, so passwords for additional users should also be saved offline and kept in sync with the details held on the HP StoreOnce Backup system. User account and password requirements Local accounts can be between 1 &... -
Page 36: Configuration Using The System Set Config Wizard
5 Configuration using the system set config wizard The StoreOnce CLI command set provides two configuration wizards: The system set config command sequence packages a number of commands, some of which you may skip, if required. This wizard is recommend if you wish to configure time and license settings at the same time as network settings and run a health check. -
Page 37: Configure Licenses
Finish Configuration (and reboot) Choose either Finish Configuration and reboot or Finish Configuration. If you have reset the time of the HP StoreOnce Backup system so that it has moved backwards, the configuration must be completed with a reboot. This performs a couple of tasks: Save the configuration details Two configurations, devconfig<timestamp>.txt containing network and other device... -
Page 38: Network Configuration, Understanding The Storeonce Networking Concepts
6 Network configuration, understanding the StoreOnce networking concepts If you are new to the StoreOnce networking environment, read this chapter. For examples of using the StoreOnce CLI commands to configure the network go to Network configuration, how to use StoreOnce CLI commands (page 45). -
Page 39: Configuration Guidelines
StoreOnce CLI to create a configuration save and restore file. Refer to the HP StoreOnce CLI Reference Guide for the full range of network and save and restore commands. This guide only describes those commands that should be used for initial configuration. -
Page 40: Identifying Network Ports Available
If you select a bonded configuration for your network, the network wizard provides a number of permutations for a portset, depending upon the availability and number of 10GbE ports. The example below is for an HP StoreOnce 4500 or 4700 Backup system, which has two 10GbE ports, and only one 10 Gig bonding option.. -
Page 41: Network Bonding Modes
eth0 1 Gig eth1 1 Gig eth2 1 Gig eth3 1 Gig eth4 10 Gig eth5 10 Gig eth6 10 Gig eth7 10 Gig Bonding Modes Supported 1: Active Passive Bonding 4: Link Aggregate Control Protocol (LACP) Bonding 6: Active Load Balance Bonding Command Successful Network bonding modes Each set of network ports on the appliance can be configured either on separate subnets or in a... -
Page 42: Vlan Subnets With Hp Storeonce Backup
VLAN subnets with HP StoreOnce Backup There is a fixed number of available physical NIC ports on the HP StoreOnce Backup system, defined by the number of 1GbE ports plus 10GbE ports, therefore there is a limit on the number of physical subnets to which the HP StoreOnce Backup system can be directly connected. -
Page 43: Vlan Guidelines
20 VLANs, each with its own subnet and, typically, use the 10GbE bonded link to the HP StoreOnce Backup system as a trunk. To do this, the network administrator sets up the switches with the necessary VLANs and identifies 20 tags. - Page 44 Figure 19 Network example NOTE: For a worked example on configuring this network see Network configuration, how to use StoreOnce CLI commands (page 45). Network configuration, understanding the StoreOnce networking concepts...
-
Page 45: Network Configuration, How To Use Storeonce Cli Commands
TIP: Even if you intend to use solely VLANs to connect to your system, HP recommends configuring one physical subnet to test the initial installation. The easiest way to do this is to use the default Quick Install connection to LAN port 1 over DHCP. - Page 46 Gateway IP address Domain name, such as mycompany.com The preceding information is sufficient to configure the network and once entered, the wizard will display and ask you to confirm the specified settings. At this point, do you wish to configure another subnet? For example, you may wish to dedicate one network to StoreOnce Catalyst Copy and replication.
- Page 47 Figure 20 Network configuration flowchart Before running net set wizard...
-
Page 48: Network Configuration Using Net Set Wizard
CLI commands, as described in Modifying a network configuration (page 56) and the HP StoreOnce Backup system CLI Reference guide. NOTE: If you wish to configure encryption on a subnet, you can only do this using the StoreOnce CLI commands. - Page 49 Figure 21 Network configuration example NOTE: The wizard runs continuously. You cannot interrupt it and save the configurations already specified. However, for the purposes of this example, we have split it into sections to add notes. First, we shall specify the DNS servers and create Portset1 on eth0. We shall keep this as DHCP in line with the Quick Install option.
- Page 50 Select the type of configuration for this subnet (Selecting "bonded" here will create a "portset" consisting of two separate NICs bonded together) : 1 = Single port (default) 2 = Bonded ports (note ports must be the same speed to bond) -->1 <--Bonded/Single: Single port Select network adapter :...
- Page 51 1 = No (default) 2 = Yes - on a new physical port set At this point, you have configured the network sufficiently to enable access to the StoreOnce Management CLI and GUI. If preferred, you could complete the network wizard and carry out the rest of the network configuration using the StoreOnce CLI commands.
- Page 52 Do you want to configure a static default gateway for this subnet or get the gateway information from DHCP? 1 = Gateway obtained from DHCP server (default) 2 = Set gateway manually (this may be blank if no gateway is required) -->2 <--Gateway: Set gateway manually (this may be blank if no gateway is required) -----------------------------------------------------...
- Page 53 <--Bonding: eth4, eth5 (10 Gig) Select the desired bonding mode : ----------------------------------------------------------------- Note that if you select bonding mode 6, you will not subsequently be able to add VLAN networks to this portset. ----------------------------------------------------------------- 1 = Mode 1 - Active Passive Bonding (default) 2 = Mode 4 - Link Aggregate Control Protocol (LACP) Bonding 3 = Mode 6 - Active Load Balance Bonding -->2...
- Page 54 Domain Name: uk.mycompany.net Gateway: 172.1.1.1 VLAN tag: Port Set: portset_3 with these interfaces: eth2 eth3 Encryption Links: Bonding Mode: 6 (Active Load Balance Bonding) Is this configuration correct? 1 = Yes (default) 2 = No -->1 <--Configuration okay: Yes ------------------------------------------------------------- If you have added all subnets, then you may proceed: you will then be shown a summary of the configuration and be given the option to validate it, and then a further option to apply it.
- Page 55 Gateway: dhcp VLAN tag: Port Set: portset_1 with these interfaces: eth0 Encryption Links: Bonding Mode: Not applicable ---------------------- Network: subnet_2 ---------------------- IP Addresses: 10.1.1.16 Net Mask: 255.255.255.0 Domain Name: rnd.mycompany.net Gateway: 10.1.1.1 VLAN tag: 22 Port Set: portset_2 with these interfaces: eth4 eth5 Encryption Links: Bonding Mode: 4 (Link Aggregate Control Protocol (LACP) Bonding) ----------------------...
-
Page 56: Modifying The Current Network Configuration
The StoreOnce CLI commands that you use will depend upon the type of modification that you are making, whether you are adding to or modifying a configuration. See examples below for syntax. For more details of individual commands refer to the HP StoreOnce Backup system CLI Reference guide. -
Page 57: To Add Vlan Subnets
To add VLAN subnets VLAN subnets may only be added to portsets that are VLAN enabled. In our example, portSet2 is VLAN enabled. We shall add the new subnet, SalesSubnet with a VLAN tag ID of 23. This will not be the default gateway. Copy the current config that has just been created and activated by the wizard to a new config name that can be edited: # net copy config from current to ACMECorpNetwork1... - Page 58 ipaddr 10.2.1.55 gateway 10.2.1.1 netmask 255.255.0.0 domain sales.mycompany.net default no vlantag 23 Command Successful Check the configuration again. # net show config ACMECorpNetwork1 ---------------------- Network Name: ACMECorpNetwork1 Network Description: Created by wizard on: Wed Apr 30 15:26:40 2014 Write Protected: no DNS Servers: 172.1.1.100 172.1.2.100 Port Sets: portset_1 portset_2 portset_3 ----------------------...
-
Page 59: To Add Data In Flight Encryption
Validate the configuration: # net validate config ACMECorpNetwork1 Command Successful Activate the configuration: # net activate config ACMECorpNetwork1 To add Data in Flight Encryption IP packets have no in-built security measures, which means that access to the network enables packet content to be viewed and, because there is no verification, there is no indication whether a packet has been viewed or the content modified. -
Page 60: License Requirements
Figure 22 IPsec pairs for Data in Flight Encryption License requirements If you wish to use the IPsec feature, you must first install the Security pack license. Configuring the StoreOnce Backup system The syntax for the StoreOnce CLI command is: net add encryption myconfig mysubnet ipAddr clientip passPhrase mypassword In the following example, we have created a copy of the configuration called config_with_ipsec that adds encryption to subnet_2. -
Page 61: Encryption With Replication
The IPsec pair and rule must be configured on both the backup media server and the StoreOnce Backup appliance. See the HP StoreOnce Backup system Linux and UNIX Configuration guide for information about configuring Linux media servers. Configuration of Windows media servers is... - Page 62 For example, we have one 1GbE port unassigned, eth1. To add it after initial configuration we would use the following procedure. NOTE: We will not configure this subnet with the default gateway. Create a new portset for the copied configuration. The StoreOnce CLI command is in the format: net create portset ACMECorpNetwork1 portset_4 ports eth1 vlansupport Add a subnet to the portset.
-
Page 63: Completing The Installation
Managing and resetting the password for the HPresetpassword account (page 78). For other tasks, such as user account configuration, email configuration, and device configuration for backup/replication targets using VTL, NAS or StoreOnce Catalyst refer to the HP StoreOnce Backup system user guide. Setting up time and date... -
Page 64: Configuring Licenses
90–day license for all licensable features. See the HP StoreOnce Backup system CLI Reference Guide for more information. Applying a full license There is a separate full license for each purchased licensable function, including capacity expansion. -
Page 65: Expanding Storage
<string> to key in the license directly. If you used email or a temporary file, cut and paste the string exactly as you obtained it from the HP Licensing website. It is not advised to try and key in the LTU manually. - Page 66 NOTE: When expanding capacity, additional pools are created for each set of disks. As there is a separate Storage Cluster for each disk enclosure and associated RAID controller, the pools under Storage Cluster 1 are expanded first. This is the first disk enclosure that is attached to the RAID card in PCI slot 1 and the pools are identified from Pool (C1_P1) to Pool (C1_P6).
- Page 67 After LUNs are created, parity initialization starts. This can take up to 10 hours to complete. Log on to the StoreOnce User Interface to check the status of this process. Check the Pools and Volumes information for each storage cluster. There are up to 6 pools for each storage cluster.
-
Page 68: Accessing The Storeonce Backup System Over Sftp
Accessing the StoreOnce Backup system over SFTP There are a number of occasions when you may need to access the HP StoreOnce Backup system over SFTP: To transfer software update packages to the correct location in the StoreOnce folder structure. -
Page 69: Software Update Process
Identify the version of software currently installed on the system from the StoreOnce page of the GUI or by using the StoreOnce CLI command, system show packages. Locate the latest software on the HP Support pages — go to http://www.hp.com/support and search for your product. -
Page 70: Configuring Remote Support
Remote Support and warranty details Even if you do not intend to use the Remote Support feature, HP strongly recommends that you use the Remote Support pages in the GUI to record warranty serial numbers and product numbers. -
Page 71: To Set Up Remote Support
Log on to the StoreOnce GUI for the appliance and select Remote Support. Click Modify. Select Passive: Automatically send log files to HP and provide the details for the proxy server that enables internet access for Remote Support. If required for the network environment, check the Enable Authentication box and provide authentication name and password details. - Page 72 Select Customer Information. Click Modify and enter technical contact details for the customer site. HP Support will use this information to provide feedback and instructions on resolving any issues. Information is required for all fields marked with an asterisk. Completing the installation...
- Page 73 Select Server. Click Modify and enter the warranty details for the server. You must provide the serial number and product number in the Customer Entered fields. You will find this information on the toe tag attached to the server; see also Remote Support and warranty details (page 70).
- Page 74 Select Storage. If you cannot see all storage enclosures, click Rescan devices. Select a storage device, click Modify and enter the warranty details for that storage device. You must provide the serial number and product number. See also Remote Support and warranty details (page 70).
- Page 75 Select Status to confirm that everything has been configured. There should not be an X against any field on the screen. NOTE: A missing serial number will prevent a test event being sent. Click Send Test Event on the Remote Support page. Configuring Remote Support...
- Page 76 Call up HP support and ask to verify a remote support event has been received. The HP Support person will check on the database portal that the event has been received and will also verify that warranty/serial/part numbers are valid and under warranty (or have valid care packs).
-
Page 77: Configuring Snmp
Configuring SNMP This feature enables an HP StoreOnce Backup system to act as a Network Element in an SNMP network so that it can communicate effectively with Network Management Stations using SNMP (Simple Network Management Protocol). You use the StoreOnce CLI to enable this feature and configure various settings, as described below. -
Page 78: Restoring The Configurations
The StoreOnce CLI command config save keystore that backs up the key store, also encrypts it, ensuring that it can only be decrypted by the HP StoreOnce backup system, should you need to restore it. -
Page 79: To Reset The Password For The Local Admin User To Default
Once logged in a list of available commands will be presented. reset: Reset the 'Admin' password to 'admin'manage: Change the 'HPresetpassword' user's passwordhelp: List available commandsexit: Log out Run the command manage to change the password for the HPresetpassword user. At the prompts provide: (current) UNIX password: the default at installation is hpresetpassword New UNIX password: the new password should be strong and memorable;... -
Page 80: Fibre Channel Installation And Configuration
The HP Brocade SAN Switches support NPIV natively but the Cisco SAN Switches require that it be turned on each port used. Fibre Channel connection The HP StoreOnce Backup system is supplied with the correct FC cards pre-installed. It does not include FC cables. Connect to the appropriate SAN port. -
Page 81: Port Assignment For Storeonce Backup Systems
After creating the library, it is possible to change the drive assignments using the edit function on the Interface Information tab for the selected library. See the HP StoreOnce Backup system user guide for more details.. -
Page 82: Diagnostic Fibre Channel Device
SN of an appliance/node. At this time these devices are part of the StoreOnce VTL implementation and are not an error or fault condition. HP recommends removing these devices from the switch zone that is also used for virtual drives and loaders. -
Page 83: 10 Configuring Backup Servers To Work With Hp Storeonce
10 Configuring backup servers to work with HP StoreOnce This chapter describes how to configure Tape drivers and iSCSI on Windows backup servers. If working in a Linux or UNIX environment, refer to the separate HP StoreOnce Backup systems Linux and UNIX Configuration guide. - Page 84 In the left hand navigation tree right click on Windows Firewall with Advanced Security and select Properties. To make sure the firewall is switched on for the profile on which your network interface is running go to the IPSec Settings tab. Configuring backup servers to work with HP StoreOnce...
- Page 85 Under IPsec defaults click Customize. Under Key exchange (Main Mode), select Advanced and click Customize. Under Key Lifetimes, set Minutes to 480. Click OK Configuring Data in Flight encryption on Windows media servers...
- Page 86 Under Data Protection (Quick Mode), select Advanced. Click Customize. Under Data Integrity algorithms and Data Integrity and Encryption Algorithms, select a protocol and click Edit. Configuring backup servers to work with HP StoreOnce...
- Page 87 Under Key lifetimes set the value of KB to 100,000,000 and click OK. 10. Click OK three times to close the Properties boxes and return to the main Windows Firewall with Advanced Security window. 1 1. In the left hand navigation tree first click and then right click on Connection Security Tools. 12.
- Page 88 13. For Rule Type select Server-to-server. 14. Click Next to move to Endpoints. 15. Under Which computers are in Endpoint 1, select These IP addresses and click Add. Configuring backup servers to work with HP StoreOnce...
- Page 89 17. Under Which computers are in Endpoint 2, select These IP addresses and click Add. 18. Enter the IP address of the remote machine, which is the HP StoreOnce Backup system. Multiple IP addresses on the HP StoreOnce Backup system can be configured here to connect to the IP address specified for the media server.
- Page 90 20. Click Next to move to the Authentication Method step. 21. Select Advanced and click Customize. 22. In the Customize Advanced Authentication Methods window, click Add in the left hand side under Fist authentication methods. Configuring backup servers to work with HP StoreOnce...
- Page 91 23. Select Preshared key. 24. Enter the same key that you provided when configuring the StoreOnce Backup system using the StoreOnce CLI command, net add encryption (see To add Data in Flight Encryption (page 59)). Click OK. 25. Click OK and click Next. 26.
-
Page 92: Driver Installation (Optional, Vtl Only)
The tape drive is configurable as an LTO-2, LTO-3, LTO-4, LTO-5 or LTO-6 device. This is the default behavior of the tape drive and there is no need and no way to change it on the HP StoreOnce Backup system. It is important not to confuse emulation type with cartridge size. Emulation type is independent from cartridge size. -
Page 93: Iscsi Initiator (Optional, Vtl Only)
If the host does not have an iSCSI initiator, it will not be able to connect to the library configured on the HP StoreOnce Backup system and will not be able to perform backups. -
Page 94: The Microsoft Iscsi Initiator
The Microsoft iSCSI initiator contains a number of tabs. This section describes the information that must be provided in order to connect the host to a device on the HP StoreOnce Backup system. It does not provide a comprehensive description of all the tabs; please download the “User Guide”... - Page 95 Click Discover Portal... You must enter the IP address or fully qualified domain name of the HP StoreOnce Backup system (for example, mystoreonce.mydomain.com) to add it as a target portal for the host on the Discovery tab. Do not change the Port; it should be 3260.
- Page 96 You must log on to the appropriate targets for your host. Remember that each library has at least two devices and you must log onto each one separately. If the emulation type you have selected allows more drives, there will be a target device for each drive. Configuring backup servers to work with HP StoreOnce...
- Page 97 Select the first target in the list and click on Connect. We recommend that you enable the first checkbox to make the connection a Favorite target, so that you do not have to manually connect to it in the future. NOTE: If you wish to use CHAP authentication, click Advanced...
- Page 98 Configuring backup servers to work with HP StoreOnce...
- Page 99 12 and 16 alphanumeric characters. It should be the same string as you enter for the Initiator CHAP Secret and the Name is used for Initiator User Name on the StoreOnce Management Interface. See the HP StoreOnce Backup system user guide for more information.
- Page 100 Remove it. (To disconnect the device without rebooting, go back to the Targets tab, select the device, and click Disconnect.) 100 Configuring backup servers to work with HP StoreOnce...
- Page 101 iSCSI Initiator (optional, VTL only) 101...
-
Page 102: 1 Understanding Leds
1 1 Understanding LEDs If an LED indicates an error condition, HP recommends reviewing the StoreOnce Event log for more information. For hardware-related errors the Hardware page of the StoreOnce GUI provides valuable information. In this chapter: Front view of the HP StoreOnce 4900 Backup system (page 103) -
Page 103: Front View Of The Hp Storeonce 4900 Backup System
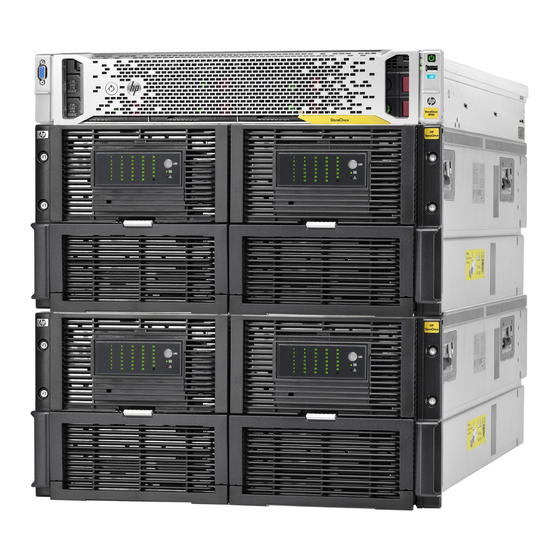
Front view of the HP StoreOnce 4900 Backup system The HP StoreOnce 4900 Series Backup system consists of a head server unit (with two disks) and one disk enclosure with 15 disks on which storage has already been expanded. It supports additional disks in the first disk enclosure (44TB Expansion Kits) and connection of an additional disk enclosure (60TB Capacity Expansion Kit). -
Page 104: Front View Of The Disk Enclosure
Front view of the disk enclosure Figure 25 Disk enclosure LEDs 1. Hard drive LEDs Normal mode (UID LED is solid) Green = The drive is online, but is not currently active. Flashing irregularly green = The drive is active and it is operating normally. -
Page 105: Rear View Of The Disk Enclosure
Off = UID LED is disabled 3. Internal health LED Green = System health is good Off = System is off 4. GSI LED Amber = Enclosure requires service check: I/O, fan and power supply LEDs, and AC power cables to power supplies. - Page 106 Item Description Status Power supply failed Power supply exceeded current limit System fan LED Green = Normal operation Amber flashing = Fault Off = Fan unseated from connector or I/O module LED Green = System activity Amber = Fault Off = Enclosure is powered off. 7-segment display* 1 = SES overall warning 2 = Temperature sensor warning...
-
Page 107: Hot-Plug Drive Leds
If more than two disks fail in the same pool, the system will fail and data will be lost. See the HP StoreOnce 4900 Backup system Maintenance and Service guide for more detailed information. - Page 108 Figure 28 Drive in enclosure LEDs Fault/UID LED (amber/blue) Online LED (green) Table 8 Hard disk LED sequences Online Activity LED (green) Fault/UID LED (amber/blue) Interpretation On, off or flashing Alternating amber and blue The drive has failed, or a predictive failure alert has been received for this drive;...
-
Page 109: 1Gbe Lan Port Leds
The drive is offline, a spare, or not configured as part of an array. 1GbE LAN port LEDs The 1GbE LAN ports have two LEDs, as illustrated on the rear of an HP StoreOnce Backup system below. Figure 29 1GbE LAN port LEDs 1. - Page 110 Figure 30 10GbE card LEDs 1. Link Off: No link to the adapter is established. The adapter is not receiving power or the cable connection is faulty On (yellow): Link to the adapter is established. The adapter is receiving power and the cable connection is good. 2.
-
Page 111: Fibre Channel Card Leds
Fibre Channel card LEDs There are three LEDs adjacent to each FC port. Table 9 FC card LEDs Yellow LED Green LED Amber LED Activity Power Off (OK) Power on before or after software initialization. Awaiting HBA software initialization. Flashing Flashing Flashing Power on after software initialization. -
Page 112: 12 Troubleshooting
If no LEDs are flashing, there is no network connection – check the Ethernet cable or consult your network administrator. If LEDs are flashing, check that you have the correct IP address for your HP StoreOnce Backup system. Are you using DHCP or Static IP addressing for your HP StoreOnce Backup... -
Page 113: Connecting To The Storeonce Backup System From The Backup Application
Or use iLO to monitor the network ports. Network For iSCSI devices the HP StoreOnce Backup system is designed to be run on a 1Gb or 10Gb (if model has 10GbE card installed) network. Performance will be reduced if a 100BaseT network is used. -
Page 114: Powering Off
Power On/Off Problems HP StoreOnce Backup system shuts down automatically If the HP StoreOnce Backup system has found a problem with the internal hardware which requires the device to shutdown to avoid further hardware problems, the system Health LED on the front panel will probably be flashing RED. -
Page 115: Capacity Expansion
Capacity expansion When expanding capacity, it is very important not only to install the expansion kits in the correct sequence, but also to install the licenses for the expansion kits in the correct sequence. The HP StoreOnce 4900 Backup system requires: The first disk enclosure to be expanded first. - Page 116 Reboot the host Linux system and the connection will work again. 1 16 Troubleshooting...
-
Page 117: About This Guide
Using the HP StoreOnce Backup system Troubleshooting the HP StoreOnce Backup system Intended audience This guide is intended for users who install, operate and maintain the HP StoreOnce Backup system. Related documentation In addition to this guide, the following documents provide related information: ‘Start here' poster for an overview of the installation information in this guide (available in... -
Page 118: Hp Technical Support
HP customer self repair (CSR) programs allow you to repair your StorageWorks product. If a CSR part needs replacing, HP ships the part directly to you so that you can install it at your convenience. Some parts do not qualify for CSR. Your HP-authorized service provider will determine whether a repair can be accomplished by CSR. -
Page 119: Hp Websites
Subscription service HP recommends that you register your product at the Subscriber's Choice for Business website: http://www.hp.com/go/e-updates After registering, you will receive e-mail notification of product enhancements, new driver versions, software updates, and other product resources. HP websites For additional information, see the following HP websites: http://www.hp.com... -
Page 120: A Regulatory Information
Hewlett-Packard Company, 3000 Hanover Street, Palo Alto, California 94304, U.S. Local Representative information Russian: HP Russia: ЗАО “Хьюлетт-Паккард А.О.”, 125171, Россия, г. Москва, Ленинградское шоссе, 16А, стр.3, тел/факс: +7 (495) 797 35 00, +7 (495) 287 89 05 HP Belarus: ИООО «Хьюлетт-Паккард Бел», 220030, Беларусь, г. Минск, ул. - Page 121 HP Enterprise Servers http://www.hp.com/support/EnterpriseServers-Warranties HP Storage Products http://www.hp.com/support/Storage-Warranties HP Networking Products http://www.hp.com/support/Networking-Warranties Warranty information...
-
Page 122: Index
1 18 hot-plug drive customer self repair, 1 18 LEDs, technical support, 1 18 data in flight encryption HP LTO driver, description of, HP-SIM, in network configuration, hpresetpassword, demo license, devices fibre channel, iLO, diagnostic fibre channel device,... - Page 123 1 17 remote support, warranty details, configuration, warranty information testing, HP Enterprise servers, warranty details, HP Networking products, HP ProLiant and X86 Servers and Options, HP Storage products, security license, web browser SFPs recommended settings, installing, web management interface,...
- Page 124 1 18 HP , 1 19 HP Subscriber's Choice for Business, 1 18 product manuals, 1 17 Windows iSCSI initiator, zoning, 124 Index...
Need help?
Do you have a question about the StoreOnce 4900 Backup and is the answer not in the manual?
Questions and answers