Table of Contents
Advertisement
Quick Links
Advertisement
Table of Contents

Related Manuals for Insportline IN 4342


Summary of Contents for Insportline IN 4342
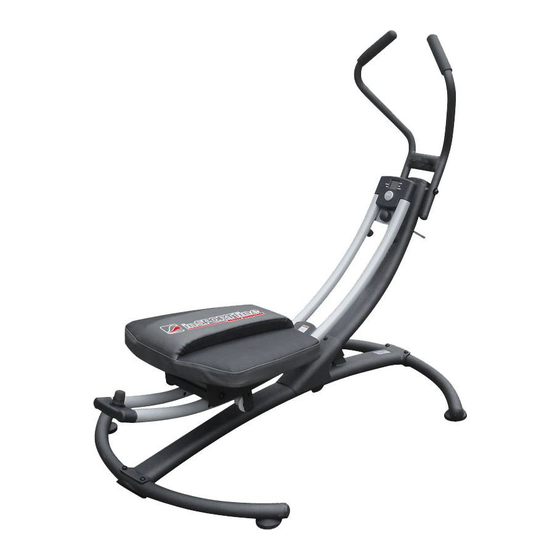
- Page 1 USER MANUAL – EN IN 4342 Exerciser inSPORTline AB lifter...
-
Page 2: Table Of Contents
CONTENTS IMPORTANT PRECAUTIONS ........................ 3 BEFORE YOU BEGIN ..........................4 ASSEMBLY ............................. 5 HOW TO USE THE ABDOMINAL EXERCISER ..................9 CONSOLE INSTRUCTIONS ......................... 11 EXERCISE GUIDELINES ........................12 PARTS LIST ............................15 EXPLODED DRAWING ......................... 17 ORDERING REPLACEMENT PARTS ....................18 TERMS AND CONDITIONS OF WARRANTY, WARRANTY CLAIMS .......... -
Page 3: Important Precautions
WARNING DECAL PLACEMENT This drawing shows the location(s) of the warning decal(s). If a decal is missing or illegible, see the front cover of this manual and request a free replacement decal. Apply the decal in the location shown. NOTE: The decal(s) may not be shown at actual size. WARNING WARNING Read and follow all warnings... -
Page 4: Before You Begin
12. Keep hands and feet away from moving parts. 13. For your own safety, always ensure that there is at least 0.6 meter of free space in all directions around your product while you are exercising. 14. Over exercising may result in serious injury or death. If you feel faint or if you experience pain while exercising, stop immediately and cool down. -
Page 5: Assembly
ASSEMBLY To hire an authorized service technician to assemble the abdominal exerciser. Assembly requires two persons. Place all parts of the abdominal exerciser in a cleared area and remove the packing materials. Do not dispose of the packing materials until assembly is completed. TOOLS: Multi spanner + screwdriver As you assemble the abdominal exerciser, use the drawings below to identify small parts. - Page 6 1. Attach a Base (2) to the Frame (1) with four M8 x 15mm Button Screws (29) and four M8 Washers (34). Then, attach a Frame Foot (11) to the underside of the Frame (1) with an M4 x 16mm Screw (31).
- Page 7 3. Attach the Handlebar (5) to the Upright (4) with an M10 x 157mm Button Bolt (30), two M10 Curved Washers (39), and an M10 Locknut (38). Secure the Handlebar (5) with the Handlebar Knob (37). 4. Apply a small amount of the included grease to both sides of a Pivot Washer (43) and to the axle on the Pivot Frame (3).
- Page 8 5. Orient the Knee Pad (7) and the Roller Carriage (6) as shown. Attach the Knee Pad (7) to the Roller Carriage (6) with four M6 x 15mm Button Screws (28) and four M6 Washers (35). 6. Orient the Roller Carriage (6) as shown. Slide the Roller Carriage onto the Pivot Frame (3). Tighten the Roller Stop (16) into the Pivot Frame (3).
-
Page 9: How To Use The Abdominal Exerciser
HOW TO USE THE ABDOMINAL EXERCISER HOW TO MOUNT AND DISMOUNT THE ABDOMINAL EXERCISER The pivot frame can swivel from side to side, and the knee pad can move forward and backward; to avoid losing your balance, use extreme caution while mounting and dismounting the abdominal exerciser. - Page 10 HOW TO USE THE ABDOMINAL EXERCISER The abdominal exerciser can be used with the pivot frame in the locked position or the unlocked position (see HOW TO LOCK THE PIVOT FRAME on page 9). In addition, the abdominal exerciser can be used with the knee pad in the locked position or in the unlocked position (see HOW TO LOCK THE KNEE PAD on page 9).
-
Page 11: Console Instructions
FEATURES OF THE CONSOLE The console features five modes that provide instant exercise feedback during your workouts: Scan - Displays the Time, Calorie, and Reps/Min modes in a repeating cycle Time - Displays the elapsed time Count - Displays the number of repetitions completed during the current workout Calorie - Displays the approximate number of calories you have burned Reps/Min - Displays the number of repetitions completed per minute HOW TO INSTALL A BATTERY... -
Page 12: Exercise Guidelines
5. When you are finished exercising, the console will turn off automatically. If you do not move the knee pad and do not press the Mode button for a few minutes, the console will turn off automatically. EXERCISE GUIDELINES WARNING: Before beginning this or any exercise program, consult your physician. This is especially important for persons over age 35 or persons with pre- existing health problems. - Page 13 Training Zone Exercise - Exercise for 20 to 30 minutes with your heart rate in your training zone. (During the first few weeks of your exercise program, do not keep your heart rate in your training zone for longer than 20 minutes.) Breathe regularly and deeply as you exercise-never hold your breath. Cooling Down - Finish with 5 to 10 minutes of stretching.
- Page 14 4. Quadriceps Stretch With one hand against a wall for balance, reach back and grasp one foot with your other hand. Bring your heel as close to your buttocks as possible. Hold for 15 counts, then relax. Repeat 3 times for each leg. Stretches: Quadriceps and hip muscles. 5.
-
Page 15: Parts List
PARTS LIST Key No. Qty. Description Frame Base Pivot Frame Upright Handlebar Roller Carriage Knee Pad Console Pivot Cover Base Foot Frame Foot Bumper Pivot Frame Cap Upper Handlebar Cap Upright Cap Roller Stop Foam Grip Reed Switch Upper Roller Lower Roller Roller Carriage Cap Long Magnet Bracket... - Page 16 M10 Washer Handlebar Knob M10 Locknut M10 Curved Washer Bushing Large Washer Lower Handlebar Cap Pivot Washer Base Cap M13 Washer M8 Locknut M8 x 55mm Button Bolt M4 Washer M5 Washer M5 x 16mm Screw Multi spanner + screwdriver Grease User's Manual...
-
Page 17: Exploded Drawing
EXPLODED DRAWING... -
Page 18: Ordering Replacement Parts
ORDERING REPLACEMENT PARTS To order replacement parts, please be prepared to provide the following information when contacting the model number and serial number of the product the name of the product the key number and description of the replacement part(s) (see the PART LIST and the EXPLODED DRAWING near the end of this manual) TERMS AND CONDITIONS OF WARRANTY, WARRANTY CLAIMS General Conditions of Warranty and Definition of Terms... - Page 19 VAT ID: CZ26847264 Phone: +420 556 300 970 E-mail: eshop@insportline.cz reklamace@insportline.cz servis@insportline.cz Web: www.insportline.cz INSPORTLINE s.r.o. Headquarters, Warranty & Service centre: Elektricna 6471, 911 01 Trencin, Slovakia CRN: 36311723 VAT ID: SK2020177082 Phone: +421(0)326 526 701 E-mail: objednavky@insportline.sk reklamacie@insportline.sk servis@insportline.sk...
- Page 20 Web: www.insportline.sk Date of Sale: Stamp and Signature of Seller:...
Need help?
Do you have a question about the IN 4342 and is the answer not in the manual?
Questions and answers