Table of Contents
Advertisement
Advertisement
Table of Contents

Related Manuals for thomann Millenium HD-50


Summary of Contents for thomann Millenium HD-50
- Page 1 HD-50 e-drum set user manual...
- Page 2 Musikhaus Thomann Thomann GmbH Hans-Thomann-Straße 1 96138 Burgebrach Germany Telephone: +49 (0) 9546 9223-0 E-mail: info@thomann.de Internet: www.thomann.de 28.07.2015, ID: 297858...
-
Page 3: Table Of Contents
Table of contents Table of contents General notes..........................4 Safety notes..........................5 Features............................7 Scope of delivery........................8 Assembly............................. 9 Installation..........................12 Connections and controls....................14 Operation..........................17 8.1 Functions......................... 17 8.2 Factory settings......................20 Technical data........................23 Cleaning............................ 24 Protecting the environment................... -
Page 4: General Notes
General notes General notes This user manual contains important information on safe operation of the device. Read and follow all safety notes and all instructions. Save this manual for future refer‐ ence. Make sure that it is available to all persons using this device. If you sell the device, include the manual for the next owner. -
Page 5: Safety Notes
Safety notes Safety notes Intended use Drum modules are intended to be used for converting digital trigger signals from drum pads to various percussion sounds. Use the unit only as described in this manual. Any other use or use under other operating conditions is considered to be improper and may result in personal injury or property damage. - Page 6 Safety notes NOTICE! External power supply The device is powered by an external power supply. Before connecting the external power supply, ensure that the input voltage (AC outlet) matches the voltage rating of the device and that the AC outlet is pro‐ tected by a residual current circuit breaker.
-
Page 7: Features
Features Features 193 sounds 10 preset drum kits, 1 user kit 10 songs Metronome Recording and playback function Flexible assignment of pad sounds Headphones, AUX IN and USB-MIDI interface HD-50... -
Page 8: Scope Of Delivery
Scope of delivery Scope of delivery Verify before assembling the e-drum set that the entire delivery is included, as listed below. Bottom case with bass-drum pedal and hi-hat controller 2 × stand tube (left-hand stand tube with snare drum support) Drum module with three toms 2 ×... -
Page 9: Assembly
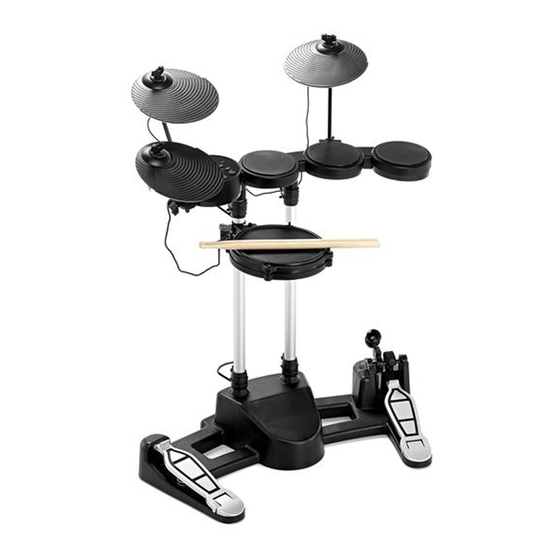
Assembly Assembly Loosen the wing nuts on the holder clamps before inserting the tubes. Mount the various elements in the specified sequence as shown in the illustration below. Put the bottom case with the bass-drum pedal and the hi-hat controller (1) on the floor. - Page 10 Assembly Place the two ride and crash cymbals (8) and (9) onto the cymbal holders (5) and (6) as shown in the illustration and tighten the corresponding wing nuts. Place the hi-hat cymbal (10) onto the holder (7) as shown in the illustration and tighten the corresponding wing nut.
- Page 11 Assembly Place the snare drum (12) onto the shorter end of the L-piece snare drum sup‐ port and tighten the wing nut on the holder clamp. The assembled e-drum set should now look like the following illustration: HD-50...
-
Page 12: Installation
Installation Installation Set-up and cabling Set up the pads and cymbals according to your needs. In a next step, the drum module needs to be connected to the rear of the bottom case and and all triggers need to be cabled with the drum module. Please observe the labelling on the rear of the drum module and the labelling on the individual cable ends. - Page 13 Installation Connecting USB devices Connect your PC (Windows Vista/XP® or Windows7, Mac) to the USB port (12) on the rear of the drum module. Connecting audio devices Connect audio devices like CD or MP3 players, etc. to the AUX IN input (13) on the rear of the drum module.
-
Page 14: Connections And Controls
Connections and controls Connections and controls Drum module top view MASTER VOLUME Knob control for adjusting the overall volume of the drum module. LED display KIT mode SONG mode PA D name Displays the Song, Kit and Pad numbers and various setting parameters. In the SONG mode, the song number appears on the display. - Page 15 Connections and controls [SONG] button Controls the selection and playback of songs. [–] / [+] buttons Buttons to navigate through the ten drum kits, select parameters, sounds, etc. Rear of the drum module CONNECT TO BASE 6-pole input for connecting the bass-drum pedal and hi-hat controller to the drum module using the included cable.
- Page 16 Connections and controls Rear of the bottom case POWER ON / OFF Main switch to turn the device on/off. DC 9V Connecting socket for power supply unit. CONNECT TO MODULE 6-pole input for connecting the bass-drum pedal and hi-hat controller to the drum module using the included cable.
-
Page 17: Operation
Operation Operation 8.1 Functions Power on Before switching on the device, check all cables for proper connection. Before switching on, turn the [MASTER VOLUME] control of the drum module to minimum. Use the [POWER ON/OFF] switch on the rear of the bottom case to switch on the drum module. - Page 18 Operation KIT button Press the [KIT] and[+] or[–] buttons simultaneously to adjust the pad volume. You also can select the individual pads by hitting them. Value range: ‘0’ to ‘127’ . Selecting a sound Press [KIT] and [REC/PLAY] simultaneously, then hit a pad for which you want to change the sound and use the [+] or [–] button to select the sound.
- Page 19 Operation Click volume When the click is deactivated press and hold [CLICK], then use the [+] or [–] buttons to select the click volume. Value range: ‘001’ to ‘032’ . REC/PLAY button Recording Press and hold [REC/PLAY] for two seconds. The metronome does a one-bar precount before recording starts.
-
Page 20: Factory Settings
Operation Song volume In the SONG mode, press and hold [SONG], then use the [+] or [–] buttons to select the song volume. Value range: ‘000’ to ‘032’ . TEMPO/TAP button There are two way you can adjust the tempo using the [TEMPO/TAP] button: Press [TEMPO/TAP]. - Page 21 Operation 8.2.2 Setup mode In this setup mode, you can adjust some global parameters according to your wishes and expectations. To enter the setup mode, switch off the drum module, then press and hold [KIT] while you switch it on again. Press [TEMPO/TAP] and use the [+] or [–] buttons to set the sensitivity.
- Page 22 Operation Press [CLICK] and use the [+] or [–] buttons to set the cross-talk value ‘XTALK’ . Value range: ‘001’ to ‘080’ . Press [REC/PLAY] to save your settings. e-drum set...
-
Page 23: Technical Data
Technical data Technical data Pads Seven drum pads with touch response including bass-drum pedal and hi- hat controller Sounds Drum kits 10 preset drum kits 1 user kit Songs Connections CONNECT TO BASE (connection to bass-drum pedal and hi-hat controller) RIDE, CRASH, HI-HAT, SNARE (connection for included pad cables) USB-MIDI AUX IN ( (3.5-mm stereo mini jack)) -
Page 24: Cleaning
Cleaning Cleaning Device parts Clean the accessible parts of the device regularly. The frequency of cleaning depends on the operating environment: moist, smoky or particularly dirty environments may cause a higher accumulation of dirt on the components of the device. Use a dry soft cloth for cleaning. -
Page 25: Protecting The Environment
Protecting the environment Protecting the environment Disposal of the packaging material For the transport and protective packaging, environmentally friendly materials have been chosen that can be supplied to normal recycling. Ensure that plastic bags, packaging, etc. are properly disposed of. Do not just dispose of these materials with your normal household waste, but make sure that they are collected for recycling. -
Page 26: Appendix
Appendix Appendix 12.1 Kit list Name Name Acoustic_kit_1 Electronic_kit Acoustic_kit_2 Analog_kit Room_kit NL Latin_kit Rock_kit Modern R&B Dance_club_kit User kit Jazz_kit 12.2 Song-style list Name Name Rock Shuffle Pop Bossa Surf Pop 80's Rock Techno 16 Beat 60's Rock Pop Shuffle Hard Rock Guitar Pop 12.3... - Page 27 Appendix Group 2: Snare Drums Acoustic_snr_01 Reggae-pop_snr Dance_club_snr+2 SPic_snr_01c Brush_snr_01 9-oh_snr_+2-5 SPic_snr_02f Early_RnB_snare Drum_box_snr+5 Room_snr_01_6L Pop_snr_01 Acoustic_xstick_01 Room_snr_02 Latin_snr+tambourine SPic_xtk-01 Rock_snr_01 Electro-pop_snr Rock_xstick_01 Rock_snr_06 Rap-hop_snr Jazz_xstick_01 Cpmpressed_snr_6L Analog-snr_01 Room_xstick Jazz_snr_01 Modern_RnB_snr Modern_RnB_xstick Acoustic_snr_02 Rock_snr_03 Electronic_xstick_01 Boom_snap_snr Electronic_snr_01 Crunch_xstick Trash_snare Drum_machine_snr_01+1 Analog_xstick Pop_snr_02 8-oh_snr_+1...
- Page 28 Appendix Group 3: Toms Latin_tom+conga_M Electronic_tom_H_02 Analog_tom_L Latin_tom+conga_L Electronic_tom_M_02 Drum_machine_tom_H Electronic_tom_H_01 Electronic_tom_L_02 Drum_machine_tom_M Electronic_tom_M_01 Analog_tom_H Drum_machine_tom_L Electronic_tom_L_01 Analog_tom_M Group 4: Cymbals cr_49_crash Cym_splash_03+6 Room_ride cr_49_crash_1L 9-oh_crash Acoustic_ride_02 Rap-hop_crash Boom_snap_crash Latin_ride+cowbell Brush_crash_-3 Dance_club_ride Electronic_ride_02 Rock_crash_02 Analog_crash Analog_ride Crunch_crash-7 Electronic_crash_01 Drum_machine_ride Cym_crash_18 Sizzle_ride+bell Electronic_ride_01 Cym_crash_18_-4...
-
Page 29: Midi Implementation
Appendix Group 6: Percussion Agogo_H Timbale_L Shaker_01 Agogo_L Triangle_mute Tambourine_down Latin_tom_agogo_H Triangle_open Tambourine_up Conga_H Triangle_op+mt Tambourine_up+down Conga_L Woodblock_H Cowbell Hand-claps Woodblock_L 8-oh_cowbell Timbale_H Latin_xstick_woodblocks 12.4 MIDI implementation Function Transmitted Recognized Remarks Basic Channel Default 1-16 1-16 Memorized Changed 1-16 each 1-16 each Mode Default... - Page 30 Appendix Function Transmitted Recognized Remarks 0,32 Bank Select Modulation Portamento Time Data Entry Volume Expression Control Change Sustain Portamento Sostenuto Soft Pedal 80, 81 DSP Type 91, 93 DSP Depth 100, 101 RPN LSB, MSB Yes (*1) Reset All Controllers Program Change True # 0 –...
- Page 32 Musikhaus Thomann · Hans-Thomann-Straße 1 · 96138 Burgebrach · Germany · www.thomann.de...
Need help?
Do you have a question about the Millenium HD-50 and is the answer not in the manual?
Questions and answers