Table of Contents
Advertisement
Quick Links
Advertisement
Table of Contents

Related Manuals for thomann HITMAN HD-30 Marauder


Summary of Contents for thomann HITMAN HD-30 Marauder
- Page 1 HD-30 Marauder e-drum set user manual...
- Page 2 Musikhaus Thomann Thomann GmbH Hans-Thomann-Straße 1 96138 Burgebrach Germany Telephone: +49 (0) 9546 9223-0 E-mail: info@thomann.de Internet: www.thomann.de 09.02.2021, ID: 429329...
-
Page 3: Table Of Contents
Table of contents Table of contents General information......................4 1.1 Further information......................4 1.2 Notational conventions....................4 1.3 Symbols and signal words................... 5 Safety instructions......................... 6 Features............................8 Scope of delivery........................9 Assembly..........................10 Installation..........................14 Connections and controls....................16 Operating.......................... -
Page 4: General Information
1.1 Further information On our website (www.thomann.de) you will find lots of further information and details on the following points: Download This manual is also available as PDF file for you to download. -
Page 5: Symbols And Signal Words
General information Instructions The individual steps of an instruction are numbered consecutively. The result of a step is indented and highlighted by an arrow. Example: Switch on the device. Press [Auto]. ð Automatic operation is started. Switch off the device. Cross-references References to other locations in this manual are identified by an arrow and the speci‐... -
Page 6: Safety Instructions
Safety instructions Safety instructions Bestimmungsgemäßer Gebrauch E-drum sets consist of a drum module and drum pads. The drum module converts the digital trigger signals from the drum pads into various drum sounds. Use the unit only as described in this manual. Any other use or use under other operating condi‐ tions is considered to be improper and may result in personal injury or property damage. - Page 7 Safety instructions NOTICE! External power supply The device is powered by an external power supply. Before connecting the external power supply, ensure that the input voltage (AC outlet) matches the voltage rating of the device and that the AC outlet is pro‐ tected by a residual current circuit breaker.
-
Page 8: Features
Features Features Special features of the device: 1022 sounds, 128 user sounds 50 preprogrammed drum kits, 25 user kits 2 preprogrammed demo songs 1 × 10" Snare mesh head pad, 3 × 8" Tom mesh head pad, 2 × 10" Crash cymbal pad with choke function, 1 ×... -
Page 9: Scope Of Delivery
Scope of delivery Scope of delivery Before you assemble your drum set, make sure the contents of package is complete according to the following list. Frame with 4 × stand tube and 4 × cross strut 4 × cymbal holder 3 ×... -
Page 10: Assembly
Assembly Assembly Loosen the screws of the clamps before sticking the tubes together. Mount the var‐ ious elements in the specified sequence as shown in the illustration below. Attach the cymbal holders to the frame as shown. Attach the cymbals to the holders as shown. e-drum set... - Page 11 Assembly Attach the angle pieces to the brackets. Insert the snare pad and the tom pads into the angle pieces and tighten the wing nuts. Attach the pads to the frame on the locations shown in the illustration. HD-30 Marauder...
- Page 12 Assembly Insert the rod of the drum module holder into the clamp on the frame and tighten the wing nut. Place the hi-hat controller pedal on the left side and the bass drum pedal (not included) in the middle. Connect the cable harness to the interface on the bottom and the cables from the crash cymbal pad and the tom pads to the side of the drum module.
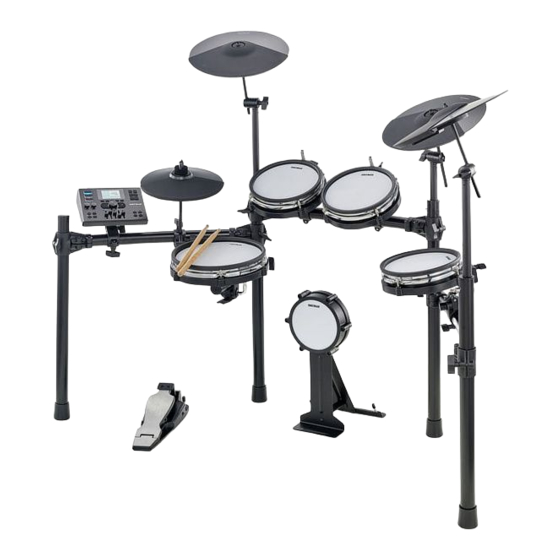
- Page 13 Assembly The assembled e-drum set should now look like the following illustration: 1 Drum module 2 Hi-Hat cymbal pad 3 Crash cymbal pads 4 Ride cymbal pad 5 Tom pads 6 Snare pad 7 Bass Drum 8 Hi-hat controller pedal HD-30 Marauder...
-
Page 14: Installation
Installation Installation Set-up and cabling Set up the pads and cymbals according to your needs. Connect the cable harness to the interface on the bottom and the cables from the crash cymbal pad and the tom pads to the side of the drum module. Wire all triggers to the pads, cymbals and the bass drum. - Page 15 Installation Connecting USB storage medium Connect a USB storage medium to the USB host input on the side of the drum module. Connecting headphones Connect your stereo headphones to the output on the side panel of the drum module. Connecting an external MIDI device Connect external MIDI devices to the [MIDI OUT] or [MIDI IN] socket of the drum module.
-
Page 16: Connections And Controls
Connections and controls Connections and controls Drum module top view [KIT] Opens the drum kit selection menu [SONG] Opens the song selection menu [UTILITY] Opens the menu for all other settings Scrolls forward or backward through menus [ENTER] Confirms a selected value or parameter. Activates the next submenu level. [EXIT] Returns to the parent menu level without changing the displayed value [MAIN VOLUME]... - Page 17 Connections and controls [HEADPHONE VOLUME] Adjusts the volume of the signal present at the headphone output [BANK] Changes the fader assignment, which is indicated by the bank LED (20). To reset all settings to the default values, press and hold [BANK]. [DRUM ON/OFF] Turns the drum track on or off during song playback.
- Page 18 Connections and controls Sides of the drum module [CRASH 2] Input socket for connecting the second crash cymbal [TOM 4] Input socket for connecting an additional tom pad (not included) [USB] Connection for a USB storage medium for loading samples or storing songs Headphones (3.5-mm stereo mini jack) e-drum set...
- Page 19 Connections and controls Rear panel of the drum module [OUTPUTS] Output sockets for monitor system. For mono operation, use the [LEFT/MONO] socket on the left. [AUX IN] Input socket for smartphones, tablets and other audio sources [AUX LEVEL] Adjusts the volume of the signal present at the AUX IN input [MIDI IN] / [MIDI OUT] Connection sockets for an external MIDI device [USB]...
-
Page 20: Operating
Operating Operating 8.1 Functions Switching on Check all cable connections for correct fit before turning on Before switching on, turn the [MAIN VOLUME] control of the drum module to minimum. Use the main switch [POWER] on the rear panel to turn the drum module on. Use the buttons [KIT], [SONG] or [UTILITY] to select a menu. - Page 21 Operating 8.2.2 Setting the drum kit to select the setting to be changed: ‘KIT VOLUME’ , ‘EQ’ , ‘HIGH GAIN’ , ‘LOW GAIN’ and ‘REVERB’ . Use [+] or [–] or the jog wheel to select the desired value and confirm with [ENTER].
- Page 22 Operating Setting pattern Press [F4] ( ‘PATTERNS’ ) to set a pattern for the selected pad. Use [+] or [–] or the jog wheel to select a pattern. To do this, select one of the following settings with or : ‘Pattern’...
- Page 23 Operating to select one of the basic settings for the pad: ‘PITCH’ Pitch setting ‘PITCH FINE Pitch fine adjustment TUNE’ ‘VELOCITY TO ‘on’ / ‘off’ PITCH’ Activates or deactivates the control of the pitch by the touch velocity. Is only available when ‘PITCH’ and ‘PITCH FINE TUNE’...
- Page 24 Operating Confirm the name entry with [ENTER]. ð The ‘DRUM’ start page with the entered name is displayed again. 8.2.5 Saving preprogrammed kits Preprogrammed kits can also be changed. Depending on the setting of ‘Preset Memory Protect’ in the ‘UTILITY’ menu, a kit can be saved ( ‘off’ ) or the changes are discarded when turning off the drum module ( ‘on’...
-
Page 25: Song' Menu
Operating 8.3 ‘SONG’ menu In ‘SONG’ menu, you can play along with audio files or be accompanied live. You can also record your own playing and play it later. MIDI recordings can also be used as a pattern. There are two demo tracks that appear as the first two tracks in the ‘SONG’ menu. The tempo cannot be adjusted for demo tracks. - Page 26 Operating MIDI recording Press [F5] ( ‘MIDI PLAY/REC’ ) to open the MIDI recorder. ð The list of available MIDI files appears on the display. If there are no MIDI files yet, ‘Record 01’ is shown at the top of the display. Press [F2] ( ‘RECORD’...
- Page 27 Operating Audio recording Insert a USB storage medium into the USB slot on the side of the drum module. Press [F4] ( ‘AUDIO PLAY/REC’ ) to open the audio player and press [USB FILE] on the panel. Press [F2] ( ‘RECORD’ ) and [REC] on the panel to start recording. ð...
-
Page 28: Utility' Menu
Operating 8.4 ‘UTILITY’ menu The ‘UTILITY’ menu contains all other settings that do not appear in the ‘KIT’ or ‘SONG’ . Press [UTILITY] to call up the ‘UTILITY’ menu. on the start page to select one the following settings: ‘AutoPower’ ‘on’... - Page 29 Operating Press [F1] ( ‘TRIGGER’ to display the trigger settings. to select one the following settings: ‘Follow ‘on’ / ‘off’ Trigger’ Allows you to select a pad or cymbal for editing by striking it. ‘Current Manual selection of a trigger pad for editing. Trigger’...
- Page 30 Operating 8.4.2 Metronome Press [F2] ( ‘METRO’ to display the metronome settings. to select one the following settings: ‘Measure Determines the metronome sound (click) Sound’ ‘Measure Controls the click volume Sound Volume’ ‘Beat Sound’ Determines the tone of the beat ‘Beat Sound Controls the beat volume Volume’...
- Page 31 Operating 8.4.4 Saving settings Press [F4] ( ‘BACKUP’ ) to call up the menu for saving settings. Press [F1] ( ‘LOAD SETTINGS’ ) to load the settings. Press [F1] ( ‘SAVE SETTINGS’ ) to save the settings. Press [F3] ( ‘USER KIT & VOICE’ ) to save or load the custom kits and sounds. Press [F1] ( ‘LOAD’...
-
Page 32: Technical Specifications
Technical specifications Technical specifications Input connections Voltage supply Connector socket for plug-in power supply USB port USB 2.0 type A USB 2.0 type B Combined trigger connection 1 × sub-D connector Crash cymbal pad 1 × 1/4" jack socket Tom pad 1 ×... -
Page 33: Cleaning
Cleaning Cleaning Device components Clean the externally accessible device parts regularly. The frequency of cleaning depends on the operating environment: wet, smoky or particularly dirty surround‐ ings can cause more accumulation of dirt on the device parts. Clean with a soft dry cloth. Stubborn dirt can be removed with a slightly dampened cloth. -
Page 34: Protecting The Environment
Protecting the environment Protecting the environment Disposal of the packaging material For the transport and protective packaging, environmentally friendly materials have been chosen that can be supplied to normal recycling. Ensure that plastic bags, packaging, etc. are properly disposed of. Do not just dispose of these materials with your normal household waste, but make sure that they are collected for recycling. -
Page 35: Appendix
Appendix Appendix 12.1 Sound list Kick Acoustic kick 1 Electronic k 1 Acoustic kick_2 Electronic k 2 Room kick 1 Analog kick Room kick 2 Drum box kick 1 Rock kick 1 Drum box kick 2 Jazz kick 1 Crunch kick Early R&B kick Electro-pop kick Compressed kick... - Page 36 Appendix Snare Acoustic snare 1 Crunch snare 1 Piccolo snare 1 Electronic sn 2 Piccolo snare 2 Analog snare 2 Room snare 1 Crunch snare 2 Room snare 2 Drum box snare 3 Rock snare 1 Noise snare Rock snare 2 Reso-snare Rock snare 3 Bubble snare...
- Page 37 Appendix Snare Drum box rt 2 MD16_Stick_2 Electro-pop rt MD16_Stick_3 Piccolo snare 3 MD16_SD_Ska_3 Piccolo rt 2 MD16_Clap_1 Rock snare 6 Studio CenterA Rock rimshot 3 Studio CenterB SD_DP50_Fatso Snare Rim Stick SD_DP50_Tape Acoustic snare 2 Sn_warm_Fatso Acoustic snare 3 Sn_DP50_warm_Tap Standard Snare1 MD16_SD_Fusion_1...
- Page 38 Appendix Toms Acoustic tom 1 h Rock tom 3 (mid) Acoustic tom 1 m Rock tom 3 (low) Acoustic tom 1 l Rock tom 4 h Acoustic tom 2 h Rock tom 4 (mid) Acoustic tom 2 m Rock tom 4 (low) Acoustic tom 2 l Rock tom 5 Room tom 1 h...
- Page 39 Appendix Toms Trash tom (low) Dance club t(h) Crunch tom (h) Dance club t(m) Crunch tom (mid) Dance club t(l) Crunch tom (low) Tom_Dp50_1_Fatso Rap-hop tom (h) Tom_Dp50_2_Fatso Rap-hop tom (m) Tom_Dp50_3_Fatso Rap-hop tom (l) Tom_DP50_1_Tape Elec tom 1 (h) Tom_DP50_2_Tape Elec tom 1 (mid) Tom_DP50_3_Tape...
- Page 40 Appendix Toms MD16_Timb_3 MD16_Cow_02 MD16_Cow_03 Crash&Ride Crash cymbal 1 Low ride Crash cymbal 2 Early R&B ride Rap-hop crash Ride crash Mid crash 1 Brush ride Mid crash 2 ride plus bell 3 Dark crash ride & cowbell 18" crash 1 ride plus bell 1 18"...
- Page 41 Appendix Crash&Ride MD16_Shaker Trash ride_Rim Ride crash_Rim Trash splash_Rim 18" crash _Rim ride plus bell_R ride plus bell_R Mid splash_Rim Mid crash 1_Rim Brush ride_Rim Low ride_Rim Elec ride 3_Rim Crash 1_Rim Elec ride x_Rim 9-oh ride crashR 95 DP50_Fatso_R Crispy splash_R 96 DP50_Fatso_R Cymbal ride Rim...
- Page 42 Appendix Hi-hat Brush hat1 c Snappyhat splash Brush hat1 foot Trash hat closed Brush hat1 open Trash hat foot Brush hat1 spl Trash hat open Brush hat2 c Trash hat splash Brush hat2 foot R&B hat closed Brush hat2 open R&B hat foot Brush hat2 spl R&B hat open...
- Page 43 Appendix Hi-hat Elec hat 2 foot HHo_DP50_Fatso Elec hat 2 open HH_DP50_Fatso Elec hat 2 spl HHo_DP50_Tape Analog hat c HH_DP50_Tape Analog hat foot TriOpen_DP50_F Analog hat open TriClosed_DP50_F Drum box hat 1 c MD16_HH_2 Drum box hat 1 f MD16_HH_1 Drum box hat 1 o MD16_HH_pedal...
- Page 44 Appendix Percussion 1 Agogo (high) Triangle (open) Agogo (low) Woodblock (high) Agogo (high/low) Woodblock (low) Conga (high) Woodblock (high/low) Conga (low) Shaker Hand claps Tambourine(d) Timbale (high) Tambourine(up) Timbale (low) Tambourine(down) Triangle mute Cowbell Triangle open 8-oh cowbell Percussion 2 DP_Fatso_Tom_04 Acoutom2 low r DR_Tom1...
- Page 45 Appendix Percussion 2 Early R&B(m) rim Trashtom(low) r Early R&B(l) rim Rocktom2 (hig) r Electrtom (h) r Rocktom2 (mid) r Electom (m) rim Rocktom2 (low) r Electrtom (l) r Reggae-pop tom r Crunchtom (h) r Reggae-pop tom r Crunchtom (m) r Reggae-pop tom r Crunchtom (l) r Brushtom (hig) r...
- Page 46 Appendix Percussion 2 DPX WarmTom1 Rim MD TomB 4 DPX WarmTom2 Rim MD TomB 5 DPX WarmTom3 Rim Studio Tom Low Fatso CongaH Rim Studio Tom Mid Fatso CongaL Rim Studio Tom Hi Fatso Tom 4 rim Acoustic R MD Tom1 Elec Rim Pop Tom1 MD Tom2 Elec Rim Pop Tom2...
- Page 47 Appendix Percussion 3 Rm_Tom2 Rm_Tom3Rim St_Tom3 Pop Tom1 Rim Rm_Tom3 Pop Tom2 Rim St_Tom1Rim Pop Tom3 Rim Rm_Tom1Rim Punk Tom 1 Rim St_Tom2Rim Punk Tom 2 Rim Rm_Tom2Rim Punk Tom 3 Rim St_Tom3Rim Percussion 4 Studio_Kick Studio_Tom2 LaMetal_Kick Studio_Tom3 Studio_Snare LaMetal_Tom1 Studio_SnareRim LaMetal_Tom2...
- Page 48 Appendix Percussion 4 Rock_rim_4 LaMetal_Tom4Rim OH_Snare_Rim Studio_Tom4Rim Rock_Rim_5 LaMetal_Tom4 DrumboxsnareRim2 Studio_Tom4 Jazz snare Rim2 DAS_Tom4 Rap-hop snare R DRS_Tom4 KEarlyR&Bsnare R DAV_Tom4 Electronicsn 1 R DSD_Tom4 Crunch snare 1 R Tom4_BG CompressedsnareR 073 Tom4_SADF Electronic sn2 R Tom4_SDFS Analog snare 1 R Tom4_EWRQ Danceclubsnare R Tom4_GFDS...
- Page 49 Appendix Percussion 4 DPX_warm_Tom4 Standard Tom4 DP_Fatso_Tom4 Room Tom4 MD_Elec_Tom4 Pop Tom4 MD_Tom4 Punk Tom4 MD_Timb_Tom4 Percussion 5 Acoustic tom 4 R Metal_Tom4Rim Acoustic2tom 4 R Studio_Tom4Rim Room tom4 Rim 18" crash 2 K9-oh tom4 Rim Mid crash 2 Rock tom4 Rim Crash cymbal 2 Drum box tom4 R Crispy splash 2...
- Page 50 Appendix Percussion 5 Dance club crash Crispy splash2 18" crash 3 18" crash 3 Electro crash 2 Fatso_Crash2_Rim Ele-pop crash 2 Tape_Crash2_Rim Trash splash 2 MD_Crash2 Mid crash 3 MD_Crash2Rim Mid splash 3 Standard Crash2 Mid crash 4 StandardCrash2 R Electro crash 3 Room Crash2 Low crash 3...
- Page 51 Appendix Percussion 6 Rockhat1 open_r 8-ohhatclosed_r Rockhat1splash_r 8-ohhatf_rim Rockhat2closed_r 8-ohhatopen_rim Rockhat2foot_rim Dance club c_rim Rockhat2open_rim Dance club riM Rockhat2splash_r Dance club openR Smallhat1closedR Rap-hop hat c_r Smallhat1foot_r Rap-hop hat rim Smallhat1open_r Rap-hop hat o_r Smallhat1splashR Rap-hop hat s_r Smallhat2closedR Elec hat 1 c rim Smallhat2foot_r Elec hat 1 rim Smallhat2open_r...
- Page 52 Appendix Percussion 6 Elec-pop hat f_R 1003 MD16_HHo_Rim Elec-pop hat o R 1004 CYM Hihat Closed Elec-pop hat s_r 1005 CYM Hihat Foot ModernR&Bhat c R 1006 CYM Hihat Open ModernR&Bhat f_R 1007 StandardOpen H R ModernR&Bhat o R 1008 RoomOpenHihat R ModernR&Bhat s_R 1009...
-
Page 53: Kit List
Appendix 12.2 Kit list Name Name Acoustic 1 Latin 3 Acoustic 2 Electronic 1 Room Standard 3 Nine-oh Jazz 1 Rock Jazz 2 Dance Club MuteElecYc jazz Standard Rap-hop Synth Pop Early R&B Bali Electronic 1 Poycheddie Crunch Electro Rock 1 Compressed Hard Rock 1 Electronic 2... -
Page 54: Pattern List
Appendix 12.3 Pattern list Name Time sig‐ Assigned to nature Africa 1 West Africa Tom 1 Rim Africa 2 Son Clave Salsa Tom 3 Rim PartidoAlto Mambo Rhumba Flm Flamenco 12/8 Samba Regg Brazil Tom 1 Rim BollyHood India India Tom 1 Rim MidEast 1 MidEast 2... -
Page 55: Midi Implementation
Appendix 12.4 MIDI implementation Function Sent Received Notes Basic Channel Default 10 CH 1-16 CH Changed 1-16 CH Mode Default Mode 3 Mode 3 Messages Altered ********** Note Number 0…127 0…127 True voice ********** 0…127 Velocity Note ON Yes 9nH, Yes 9nH, v = 0…127 v = 0…127... - Page 56 Appendix Function Sent Received Notes Song Select Tune Aux Messages Local on/off All Notes Off Active Sense Reset Mode 1: OMNI ON, POLY. Mode 2: OMNI ON, MONO. Mode 3: OMNI OFF, POLY. Mode 4: OMNI OFF, MONO *1: Registered parameter number: #0: Pitch sensitivity, #1: Fine tuning, #2: Coarse tuning in half-tones e-drum set...
- Page 57 Notes HD-30 Marauder...
- Page 58 Notes e-drum set...
- Page 60 Musikhaus Thomann · Hans-Thomann-Straße 1 · 96138 Burgebrach · Germany · www.thomann.de...
Need help?
Do you have a question about the HITMAN HD-30 Marauder and is the answer not in the manual?
Questions and answers