Table of Contents
Advertisement
Quick Links
Advertisement
Table of Contents

Related Manuals for thomann Hitman HD-7 Sonic


Summary of Contents for thomann Hitman HD-7 Sonic
- Page 1 HD-7 Sonic e-drum set user manual...
- Page 2 Musikhaus Thomann Thomann GmbH Hans-Thomann-Straße 1 96138 Burgebrach Germany Telephone: +49 (0) 9546 9223-0 E-mail: info@thomann.de Internet: www.thomann.de 08.01.2019, ID: 429325...
-
Page 3: Table Of Contents
Table of contents Table of contents General information......................4 1.1 Further information......................4 1.2 Notational conventions....................4 1.3 Symbols and signal words................... 5 Safety instructions......................... 6 Features............................8 Scope of delivery........................9 Assembly..........................10 Drum seat assembly (option)..................14 Installation..........................15 Connections and controls.................... -
Page 4: General Information
Our products are subject to a process of continuous development. Thus, they are subject to change. 1.1 Further information On our website (www.thomann.de) you will find lots of further information and details on the following points: Download This manual is also available as PDF file for you to download. -
Page 5: Symbols And Signal Words
General information Instructions The individual steps of an instruction are numbered consecutively. The result of a step is indented and highlighted by an arrow. Example: Switch on the device. Press [Auto]. ð Automatic operation is started. Switch off the device. Cross-references References to other locations in this manual are identified by an arrow and the speci‐... -
Page 6: Safety Instructions
Safety instructions Safety instructions Bestimmungsgemäßer Gebrauch E-drum sets consist of a drum module and drum pads. The drum module converts the digital trigger signals from the drum pads into various drum sounds. Use the unit only as described in this manual. Any other use or use under other operating condi‐ tions is considered to be improper and may result in personal injury or property damage. - Page 7 Safety instructions NOTICE! External power supply The device is powered by an external power supply. Before connecting the external power supply, ensure that the input voltage (AC outlet) matches the voltage rating of the device and that the AC outlet is pro‐ tected by a residual current circuit breaker.
-
Page 8: Features
Features Features Special features of the device: 355 sounds 24 preset drum kits, 16 user kits 30 songs 4 × 8" snare and tom pads, 3 × 10" crash, ride and hi-hat cymbal pads 2 × pedals for bass drum and hi-hat Metronome Record and playback function Flexible assignment of pad sounds... -
Page 9: Scope Of Delivery
Scope of delivery Scope of delivery Before you assemble your drum set, make sure the contents of package is complete according to the following list. Frame with 3 × stand tube 3 × cymbal holder 3 × tom drum 3 × cymbal (ride, crash and hi-hat) Snare drum Sound module Hi-hat controller pedal... -
Page 10: Assembly
Assembly Assembly Loosen the screws of the clamps before sticking the tubes together. Mount the var‐ ious elements in the specified sequence as shown in the illustration below. Attach the cymbal holders to the frame as shown. Attach the cymbal to the holders as shown. e-drum set... - Page 11 Assembly Insert the rods of the snare drum pad and the three tom drum pads as shown into the holders on the stand tubes and tighten the wing nuts. Attach the pads to the frame on the locations shown in the illustration. HD-7 Sonic...
- Page 12 Assembly Insert the rod of the sound module holder into the clamp on the frame and tighten the wing nut. Place the hi-hat controller pedal on the left side and the bass drum pedal on the right side. Connect the wiring harness to the interface on the rear panel of the sound module.
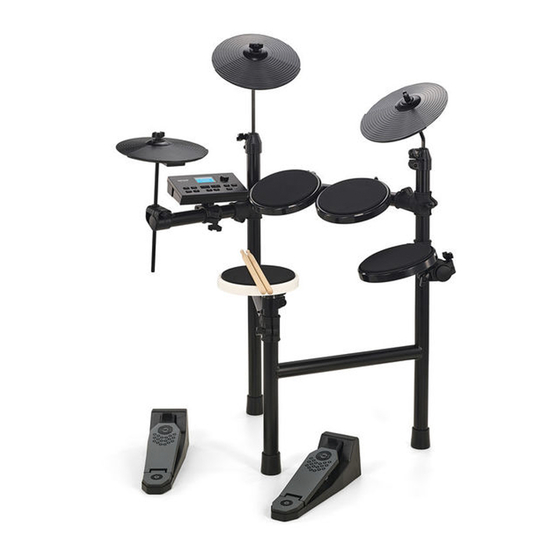
- Page 13 Assembly 1 Sound module 2 Hi-hat cymbal 3 Crash Cymbal 4 Tom drums 5 Ride Cymbal 6 Snare drum 7 Bass drum pedal 8 Hi-hat controller pedal HD-7 Sonic...
-
Page 14: Drum Seat Assembly (Option)
Drum seat assembly (option) Drum seat assembly (option) Pull out the legs of the seat and secure them with the wing nut. Attach the drum seat to the height-adjustable pole and secure the seat with the wing nut. Adjust the seat to the desired height as shown. e-drum set... -
Page 15: Installation
Installation Installation Set-up and cabling Set up the pads and cymbals according to your needs. Connect the drum module and wire all triggers to the drum module. Please observe the labelling on the rear of the drum module and the labelling on the individual cable ends. Finally check that all cables between the pads and the drum module have been properly connected. - Page 16 Installation Connecting USB devices Connect your computer to the USB port on the rear panel of the drum module. Connecting audio devices Connect audio devices like CD or MP3 player etc. to the AUX IN input socket on the rear panel of the drum module. Connecting headphones Connect your stereo headphones to the PHONES output on the rear panel of the drum module.
-
Page 17: Connections And Controls
Connections and controls Connections and controls Drum module top view [Click] Turns the metronome on and off. Simultaneously pressing [Click] and [Tempo/Tap]: Opens the metronome configuration. [Tempo/Tap] Adjusts the tempo of the metronome and song playback. Simultaneously pressing [Click] and [Tempo/Tap]: Opens the metronome configuration. [Kit Edit] Opens the drum kit selection. - Page 18 Connections and controls [Start / Stop] Starts and stops song playback or recording. LED [Trigger] Lights up when trigger pulses are generated. Scrolls forward through drum kits, parameters, sounds, etc. [Enter] Confirms a selected value or parameter. Activates the next submenu level. By simultaneously pressing [Back]: Back to drum kit selection menu.
- Page 19 Connections and controls Rear of the drum module [POWER ON/OFF] Main switch. Turns the device on and off. Connection socket for the 9 V power supply unit [USB TO HOST] USB port for connecting a computer with USB-MIDI interface. Serial interface for connecting the pads and cymbals [PHONES] Headphones (3.5-mm stereo mini jack) 28, 29...
-
Page 20: Operating
Operating Operating 9.1 Functions Switching on Check all cable connections for correct fit before turning on Before switching on, turn the volume control [MASTER VOLUME] on the drum module to minimum. Turn the drum module on using the main switch [POWER ON/OFF] on the rear panel. - Page 21 Operating Selecting an instrument Press [Kit Edit] to call up the menu for editing the drum kits. The display shows ‘INST’ . Confirm the selection with [Enter]. Press [+] or [–] repeatedly until the display shows the desired instrument. The following instruments are available: Display Instrument...
- Page 22 Operating Setting the reverb Press [Kit Edit] to call up the menu for editing the drum kits. The display shows ‘INST’ . Press [ +] or [–] repeatedly until the display shows ‘RSND’ and confirm with [Enter]. Press [ +] or [–] repeatedly until the display shows the desired value for the reverb effect (display shows ‘000’...
- Page 23 Operating Press [ +] or [–] repeatedly until the display shows the desired chorus type (dis‐ play shows ‘CHR1 … 4’ , ‘FBAK’ , ‘FLG1’ , ‘SDLY’ , ‘DLFY’ , ‘FLG2’ , ‘FLG3’ , ‘CLS1 … 3’ . Press again [Enter] to save the selection. With [Back] to return to the previous menu level without saving the settings.
-
Page 24: Setup
Operating 9.3 Setup Configuring the triggers The trigger function lets you set how the e-drum set responds to your playing style. You can set the parameters for sensitivity, threshold, velocity curve, and crosstalk. Press [Setup] to call up the menu for editing the settings. The display shows ‘TRIG’... - Page 25 Operating Press [Enter] and use [ +] or [–] to select the desired MIDI channel (display shows ‘0001’ … ‘016’ , ‘OFF’ ). Press again [Enter] to save the selection. With [Back] to return to the previous menu level without saving the settings. Using a drum pad as MIDI trigger By hitting a pad, external audio sources can be triggered via USB without the pad (Local Off)
-
Page 26: Songs
Operating Press [Enter] and press [ +] or [–] repeatedly until the display shows ‘KITS’ . Press [Enter]. ð The display shows ‘DONE’ . The values for all drum kits except the trigger settings ‘TRGS’ are reset to factory defaults. Enabling sleep mode Press [Setup] to call up the menu for editing the settings. -
Page 27: Metronome
Operating Press [Song] to call up the song list. The display shows ‘S001’ . Press [Enter] and press [ +] or [–] repeatedly until the display shows ‘DVOL’ . Press [Enter] and use [ +] or [–] to adapt the drum track volume. Simultaneously press [ +] and [–] to reset the volume of the drum track to factory settings (value 028). -
Page 28: Tempo
Operating Setting the metronome time signa‐ ture Simultaneously press [Tempo/Tap] and [Click] to call up the menu for editing the metronome. Press [Enter] and press [ +] or [–] repeatedly until the display shows ‘TSIG’ . Press [Enter] and use [ +] or [–] to select the desired time signature (display shows ‘1–4’... -
Page 29: Record And Playback
Operating 9.7 Record and playback Record Press [Rec/Play] and press [ +] or [–] until the display shows ‘RECD’ . Press [Start / Stop] to start recording. Press [Start / Stop] again to stop recording. Playback Press [Rec/Play] and press [ +] or [–] until the display shows ‘PLAY’ . Press [Start / Stop] to start playback. -
Page 30: Technical Specifications
Technical specifications Technical specifications Connections Headphones ( (3.5-mm stereo mini jack) AUX IN (3.5 mm jack socket) Main output left (1/4" phone socket) Main output right (1/4" phone socket) 1 × combined trigger connection (sub D plug-in con‐ nector) USB port Voices Effects Reverb, Chorus... -
Page 31: Cleaning
Cleaning Cleaning Components Clean the externally accessible device parts regularly. The frequency of cleaning depends on the operating environment: wet, smoky or particularly dirty surround‐ ings can cause more accumulation of dirt on the device parts. Clean with a soft dry cloth. Stubborn dirt can be removed with a slightly dampened cloth. -
Page 32: Protecting The Environment
Protecting the environment Protecting the environment Disposal of the packaging material For the transport and protective packaging, environmentally friendly materials have been chosen that can be supplied to normal recycling. Ensure that plastic bags, packaging, etc. are properly disposed of. Do not just dispose of these materials with your normal household waste, but make sure that they are collected for recycling. -
Page 33: Appendix
Appendix Appendix 13.1 Kit list Name Name Acoustic 1 Rock 2 Acoustic 2 Reggae-pop Room Brush Nine-oh Modern R&B Rock 1 User 1 Dance Club User 2 Jazz User 3 Rap-hop User 4 Early R&B User 5 Electronic 1 User 6 Crunch User 7 Compressed... -
Page 34: Sound List
Appendix Name Name Pop Shuffle Big Band Guitar Pop Country 8 Beat Modern 6/8 3/4 Gospel Swing Funk Soul Piano Ballad 8 Beat Two Reggae 16 Beat Ballad Swing Reggae Pop Ballad English Waltz 8 Beat Dance Tango 8 Beat Modern Rhythm &... - Page 35 Appendix Group 2: Snare Drums Acoustic snare 1 Crunch snare 1 Piccolo snare 1 Electronic snare 2 Piccolo snare 2 Analog snare 2 Room snare 1 Crunch snare 2 Room snare 2 Drum box snare 3 Rock snare 1 Noise snare Rock snare 2 Reso-snare Rock snare 3...
- Page 36 Appendix Drum box rimshot 2 Piccolo rimshot 2 Electro-pop rimshot Rock snare 6 Piccolo snare 3 Rock rimshot 3 Group 3: Toms Acoustic tom 1 (high) D-dub tom (mid) Acoustic tom 1 (mid) D-dub tom (low) Acoustic tom 1 (low) Rock tom 3 (high) Acoustic tom 2 (high) Rock tom 3 (mid)
- Page 37 Appendix Electro-pop tom (low) Analog tom (mid) Electro-pop tom 2 (high) Analog tom (low) Electro-pop tom 2 (mid) 9-oh tom (high) Electro-pop tom 2 (low) 9-oh tom (mid) Trash tom (high) 9-oh tom (low) Trash tom (mid) 9-oh tom 2 (high) Trash tom (low) 9-oh tom 2 (mid) Crunch tom (high)
- Page 38 Appendix Electro crash 1 Cymbal ride plus bell 1 Electro crash 2 Cymbal ride plus bell 2 Falling crash Trash ride Submarine crash Electronic ride 1 Sizzle ride Electro-pop ride Sizzle ride plus bell High ping ride Cimbal ride bell 1 Drum box ride Cimbal ride bell 2 9-oh ride crash...
- Page 39 Appendix Trash hat open Electronic hat 2 closed Trash hat splash Electronic hat 2 foot Early R&B hat closed Electronic hat 2 open Early R&B hat foot Electronic hat 2 splash Early R&B hat open Analog hat closed Early R&B hat splash Analog hat foot Boom snap hat closed Analog hat open...
-
Page 40: Midi Implementation
Appendix Triangle mute Tambourine (up/down) Triangle open Cowbell Triangle (open/mute) 8-oh cowbell Woodblock (high) Side H Woodblock (low) Side L Woodblock (high/low) Wood Block H Shaker Wood Block L Tambourine (down) Agogo H Tambourine (up) Agogo L 13.4 MIDI implementation Function Sent Received... - Page 41 Appendix Function Sent Received Notes 0.32 Bank Select Modulation Portamento Time Data Entry Volume Expression Control Change Sustain Portamento Sostenuto Soft Pedal 80, 81 DSP Type 91, 93 DSP Depth 100, 101 RPN LSB, MSB = (*1) Reset All Controllers Program Change True 0 …...
- Page 42 Notes e-drum set...
- Page 44 Musikhaus Thomann · Hans-Thomann-Straße 1 · 96138 Burgebrach · Germany · www.thomann.de...
Need help?
Do you have a question about the Hitman HD-7 Sonic and is the answer not in the manual?
Questions and answers