Table of Contents
Advertisement
Quick Links
INSTALLATION GUIDE FOR THE
2/4/8-PORT DVI VIDEO/AUDIO
SWITCH
SE-DVI-2A / SE-DVI-4A / SE-DVI-2ARS /
SE-DVI-4ARS/SE-DVI-8ARS
INTRODUCTION
The VIDMUX® DVI/HDMI video/audio switch (VIDMUX) enables one DVI/HDMI display and speakers to be switched between up
to eight single-link digital DVI/HDMI video sources.
•
Supports DVI interface for crisp and clear video quality on flat panel display.
•
Supports HDTV resolutions up to 1080p and computer resolutions to 1920x1200 (WUXGA).
•
Eliminates redundant video displays.
•
Compliant with HDMI 1.3 and HDCP standards.
•
Supports the DDC2B protocol.
•
3.5mm stereo audio input for each channel.
•
Passes HDMI audio signal through DVI-I port.
o
Transmit audio and video over a single cable with the DVI-HDMI-xx-MM male DVI-D to male HDMI cable.
•
Control via push button, infrared remote (IR) control, or optional RS232.
•
IR remote control includes power ON/OFF, mute function, and break-away audio (switch audio independent of video).
Optional: RS232 Control in models with "RS" (i.e. SE-DVI-2ARS).
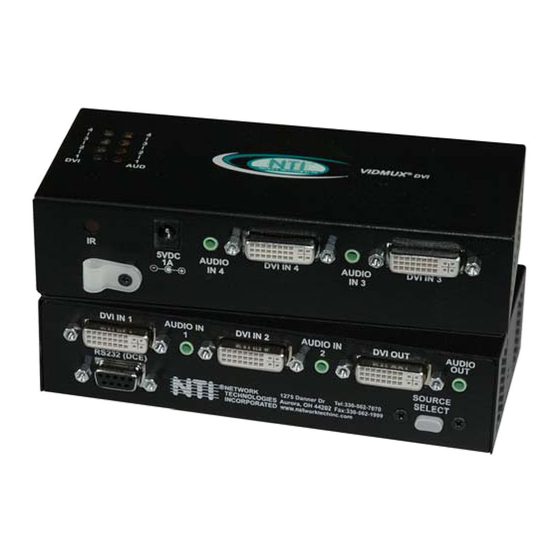
Front and Rear View of
1
SE-DVI-4ARS
Advertisement
Table of Contents

Related Manuals for NTI SE-DVI-2A


Summary of Contents for NTI SE-DVI-2A
- Page 1 INSTALLATION GUIDE FOR THE 2/4/8-PORT DVI VIDEO/AUDIO SWITCH SE-DVI-2A / SE-DVI-4A / SE-DVI-2ARS / SE-DVI-4ARS/SE-DVI-8ARS Front and Rear View of SE-DVI-4ARS INTRODUCTION The VIDMUX® DVI/HDMI video/audio switch (VIDMUX) enables one DVI/HDMI display and speakers to be switched between up to eight single-link digital DVI/HDMI video sources.
- Page 2 MATERIALS Models SE-DVI-2/4A(RS) Materials supplied with this kit • VIDMUX DVI/HDMI Video/Audio Switch • 110-240VAC, 50 or 60Hz-5VDC/1A AC Adapter • 6” Male-to-Male stereo audio cables (2pcs-2 port, 4pcs-4 port) • Infrared Remote Control (RS models only) • CD containing a pdf of this manual and an RS232 program Model SE-DVI-8ARS Materials supplied with this kit •...
-
Page 3: Installation
INSTALLATION 1. Turn OFF power to video source(s), display and speakers. FOR MODEL SE-DVI-2/4A 2. Connect the video port of one DVI video source to the “DVI IN 1” port on the unit using a DVI-IS-xx-MM cable (xx= 3, 6, and 10 foot lengths- sold separately.) Repeat for each video source, connecting to each “DVI IN x”... - Page 4 Apply power to the video and audio sources and display. Figure 2- Connect AC adapter to VIDMUX FOR MODEL SE-DVI-8ARS 2. Connect the video port of one DVI video source to the “DVI” port in any of the numbered port groups 1-8 using a DVI-IS-xx- MM cable (xx= 3, 6, and 10 foot lengths- sold separately.) Repeat for each video source, connecting to any remaining numbered “DVI-I”...
- Page 5 Figure 3- Connections to an SE-DVI-8ARS...
-
Page 6: Switch Control
The push button on the VIDMUX (“AV Sync” or “Source Select” depending upon your model) will change the connected input to the next consecutive input (video and audio together) with each press. To switch video or audio separately, use the infrared control. “AV Sync” “Source Select” Button Button SE-DVI-2A SE-DVI-4ARS Front View Front View “Audio” and “Video” Buttons SE-DVI-8ARS... -
Page 7: Infrared Control
INFRARED CONTROL The infrared remote control can be used to change connections or disconnect video and audio altogether. 2/4 Port Models Press “Power Off” to blank the video to the DVI OUT port and mute the AUDIO OUT signal. Press “Power On” to restore video and audio connections. Press “Mute”... - Page 8 • write a program that runs on a PC using the Command Protocol (below) • use the NTI Switch Control Program (page 10) provided on the CD • use the SerTest program (page 10) provided on the CD If your VIDMUX includes the RS option, a terminal can be connected to it to control the VIDMUX using RS232 control from a separate user terminal or CPU with a terminal program.
- Page 9 (see note below) RS 01 *<CR> Internal Reset (2 and 4 port models only) RV 01 *<CR>string\0<CR> Read NTI Version String RU 01 *<CR>IP,01<CR> Read Unit Size SY 01 sync audio and video port changes together (toggle function) (8 port model only)
-
Page 10: Sertest- Rs232 Interface Test Program
Follow the installation instructions on the screen The NTI Switch Control Program performs best on monitors set to a screen resolution of at least 800 X 600. Instruction for using the NTI Switch Control Program is available by opening "MSCP Help" in the "NTI" program group once the program has been installed and is open on the screen. -
Page 11: Setup Options
Selection Description Change Volume for Audio Output/User - change Audio port output volume Read Connection for Video Output/User -read the connection of a specific video output (COMMON (01)) Read Connection for Audio Output/User -read the connection of a specific audio output Read Mute and Volume for Audio Output/User - read the volume and the mute status of the specified audio output Save I/O Connections into Unit Memory... -
Page 12: Specifications For Straight-Through Rs232 Serial Cable
SPECIFICATIONS FOR STRAIGHT-THROUGH RS232 SERIAL CABLE VIDMUX to PS2 CPU (9 PIN) VIDMUX PS/2 CPU 9 pin Signal 9 pin Function Pin # Direction Pin # Function Mating Face of a 9DB Male Terminals 7 and 8 are jumpered together and terminals 4 and 6 are jumpered together. TECHNICAL SPECIFICATIONS Video Input Female DVI-I connectors- supports single link DVI sources...
Need help?
Do you have a question about the SE-DVI-2A and is the answer not in the manual?
Questions and answers