Table of Contents
Advertisement
Integrated ceramic glass cooking hob
Dear Customer!
Instructions for use
Connection instructions
Rating plate
Fire hazard protection
22
Your integrated ceramic glass cooking hob is manufactured
exclusively for household use.
Materials used for packaging are friendly to the environment
and can be reused (recycled), disposed of or disintegrated
without any threat to the nature. All such materials are marked
accordingly.
When you decide that your appliance is no longer of use to
you, act responsibly and deliver it to the authorized household
appliance scrap dealers.
Instructions for use have been prepared for the user. They
describe the appliance features and proper handling.
These instructions are intended for various types of the
appliance, so you may fi nd some descriptions for the functions
that your particular appliance may not have.
All connections must be carried out in accordance with the
instructions supplied with the appliance, and in compliance with
the recognized standards.
Connections must be performed by qualifi ed personnel only.
Rating plate with basic information is fi xed to the bottom side of
the hob.
The appliance can be installed adjacent to a kitchen cabinet
higher than the appliance on one side, while the kitchen unit on
the other side must not exceed the height of the appliance.
Important warnings ................................................. 23
Ceramic glass cooktop surface .............................. 24
Energy saving tips..................................................... 26
Hob controls .............................................................. 27
Special warnings and error reporting...................... 32
Mounting the built-in cooktop ................................. 35
Connection to the power supply .............................. 37
Technical information ............................................... 38
GB
IE
MT
Advertisement
Table of Contents

Subscribe to Our Youtube Channel
Related Manuals for Gorenje SVK61SS


Summary of Contents for Gorenje SVK61SS
-
Page 1: Table Of Contents
Integrated ceramic glass cooking hob Dear Customer! Your integrated ceramic glass cooking hob is manufactured exclusively for household use. Materials used for packaging are friendly to the environment and can be reused (recycled), disposed of or disintegrated without any threat to the nature. All such materials are marked accordingly. -
Page 2: Important Warnings
Important warnings • The appliance may be built-in and connected to the power supply only by a qualifi ed technician. • Particular areas of the cooktop surface (adjacent to the hotplates) are hot during operation. Prevent the children to hang around the appliance and warn them properly against the danger of burns. -
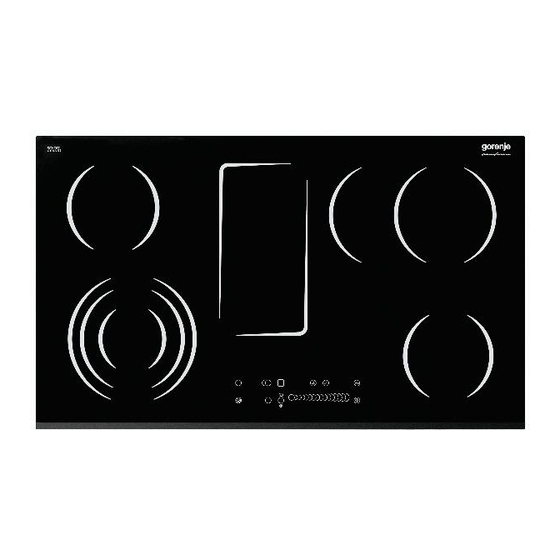
Page 3: Ceramic Glass Cooktop Surface
Ceramic glass cooktop surface 1. Rear left hotplate 4. Rear right hotplate 2. Front left hotplate 5. Front right hotplate 3. Hob control module 6. Warming-up hotplate (certain models only) Hob control elements Mains ON/OFF sensor Safety lock on/off and child lock sensor B1 Safety lock /child lock indicator LED Timer setting sensor Slide control sensor... - Page 4 Slide control power medium power full power Ceramic-glass cooktop is equipped with four hotplates designed as cooking zones. The surface of the hob is fl at, without any edges for eventual gathering of dirt. • Hotplates quickly reach the selected heating power while the adjacent area around the hotplates remains cool.
-
Page 5: Energy Saving Tips
The cooking zone may be damaged: • If it is left in operation without any cookware being placed on top, or if covered with empty cookware. • If improper cookware is used: unevenly fl at bottom or small diameter (traditional Turkish coffee kettle). •... -
Page 6: Hob Controls
Hob controls • The hob is fi tted with electronic sensors which are activated if you touch the marked surface with your fi ngertip and keep it for at least one second. • Each touch of the sensors is confi rmed by sound signal. •... -
Page 7: Switching The Hob Off
Switching hotplates off • Selected hotplate must be activated. • To select a particular hotplate, touch the sensor (H). Power indicator is fl ashing. • By touching the slide sensor (D) at the start, bring the power setting to “00”. Short beep confi rms the OFF position. Switching the hob off •... - Page 8 Automated cooking When automatic cooking mode is activated the hotplate will mode operate at maximum power for a limited period of time and then automatically switch to the reduced power level to resume cooking (see chart). It may be switched on in any of the hotplates for all power settings except for setting “18”...
- Page 9 Extended hotplate ring Switch on • Press the sensor (F) to switch the extended hotplate ring on for a particular hotplate (power indicator 1-18 is fl ashing). Signal lamp (H1) adjacent to the sensor is on. • Power setting is selected for both rings together. Switch off •...
- Page 10 Timer operation Turning timer on Use of timer facilitates cooking by setting the time of hotplate operation. • Select the hotplate to be timer controlled - power setting is fl ashing. Power setting should be preset to be able to use the timer at all (see section ‘Switching hotplates on’).
-
Page 11: Special Warnings And Error Reporting
When preset time elapses, a beep signals the end, and the hotplate is switched off. Switch off the alarm by pressing the sensor of switch-off timer ( C ) or warning sensor ( E ) , or it switches off automatically after elapse of certain time. If you want to switch the timer prior preset time: •... - Page 12 Important Important A visit by a service technician during the warranty period will be charged if the appliance is not functioning because of improper use. Store these instructions in a place where they are always readily accessible; if pas the appliance on to another person, the instructions should also be included.
-
Page 13: Cleaning And Maintenance Of Ceramic-Glass Hob
Cleaning and maintenance of ceramic-glass hob Cleaning Ceramic glass hob should be cleaned only when completely cooled down, preferably after each use, otherwise even the slightest stains remaining after cooking may burn into the hob surface with each following use. For regular maintenance of ceramic-glass hob use special cleansing agents, produced in such way to create protective fi... -
Page 14: Mounting The Built-In Cooktop
Mounting the built-in cooktop Caution ! • To avoid any possible hazard, the appliance may be installed by qualifi ed personnel only. • Panels and furniture lining of the kitchen cabinet receiving the hob must be treated with temperature resistant adhesives (100°C), otherwise they might be discoloured or deformed because of inadequate temperature resistance. - Page 15 Integrated hob opening dimensions *(…) – SVK7… - 750 mm **(…) – SVK8… - 850 mm • The appliance may be installed into any 30 to 50 mm thick worktop. • Minimum distance between the built-in cooktop and rear wall is indicated at the illustration for the installation of the built-in cooktop.
-
Page 16: Connection To The Power Supply
Connection to the power supply • Connections may be carried out by a qualifi ed technician only. The earthing protection must comply with the standing regulations. • Connection terminals are revealed when the connection box cover is removed. • Prior any attempted connection check that the voltage indicated on the rating plate is in line with your home power supply. -
Page 17: Technical Information
• rubber coated connection cables, model H05 RR-F 4x1,5 with yellow-green earthing cable; • PVC insulated connection cables, model H05 VV-F 4x1,5 with yellow-green earthing cable; or any other suitable cables. Technical information Type SVK61SS SVK71SS SVK81SS Width 600 mm... - Page 19 SVK61,71,81 SS P2 134422/01 (11-10)
Need help?
Do you have a question about the SVK61SS and is the answer not in the manual?
Questions and answers