Table of Contents
Advertisement
Available languages
Available languages
Quick Links
RADIO CONTROLLED 3D HELICOPTER
011640_anl_507013_airbeast_6k.in1 1
011640_anl_507013_airbeast_6k.in1 1
Instruction Manual Page
Betriebsanleitung
Mode d'emploi
Instrucciones
Istruzioni d'uso
CARSON Helicopter Airbeast 507013
2 - 20
Seite
22 - 41
Page
42 - 61
Página
62 - 81
Pagina
82 - 101
08.01.2008 9:00:53 Uhr
08.01.2008 9:00:53 Uhr
Advertisement
Chapters
Table of Contents

Related Manuals for Carson Airbeast 507013


Summary of Contents for Carson Airbeast 507013
- Page 1 Instruction Manual Page 2 - 20 Betriebsanleitung Seite 22 - 41 Mode d‘emploi Page 42 - 61 Instrucciones Página 62 - 81 Istruzioni d‘uso Pagina 82 - 101 CARSON Helicopter Airbeast 507013 011640_anl_507013_airbeast_6k.in1 1 011640_anl_507013_airbeast_6k.in1 1 08.01.2008 9:00:53 Uhr 08.01.2008 9:00:53 Uhr...
-
Page 2: Preface
Germany Tel.: +49/(0)911/9765-03 We wish you good luck and a lot of fun with your CARSON model helicopter! Before driving your new model carefully read these instructions! CARSON Helicopter Airbeast 507013 011640_anl_507013_airbeast_6k.in2 2... -
Page 3: Table Of Contents
• LiPo-Balance charger with power supply • 2 servos, already installed • Gyro, integrated into the receiver • 4 piece replacement rotor blades • Operating Manual CARSON Helicopter Airbeast 507013 011640_anl_507013_airbeast_6k.in3 3 011640_anl_507013_airbeast_6k.in3 3 08.01.2008 9:00:56 Uhr 08.01.2008 9:00:56 Uhr... -
Page 4: Safety Precautions
Lay the antenna wire in such a way that it cannot get into movable parts. Ensure for traction relief by fixing the wire to a location on the fuselage with adhesive tape. CARSON Helicopter Airbeast 507013 011640_anl_507013_airbeast_6k.in4 4 011640_anl_507013_airbeast_6k.in4 4 08.01.2008 9:00:57 Uhr... -
Page 5: Battery Charger
• Ensure for sufficient ventilation of the battery charger while charging. • When charging the batteries pay attention to the correct polarity. CARSON Helicopter Airbeast 507013 011640_anl_507013_airbeast_6k.in5 5 011640_anl_507013_airbeast_6k.in5 5 08.01.2008 9:00:57 Uhr 08.01.2008 9:00:57 Uhr... - Page 6 Check with your local solid waste • Wash the affected locations immediately with clear water officials for details in your area for recycling options or proper disposal. • consult a physician. CARSON Helicopter Airbeast 507013 011640_anl_507013_airbeast_6k.in6 6 011640_anl_507013_airbeast_6k.in6 6 08.01.2008 9:00:57 Uhr 08.01.2008 9:00:57 Uhr...
- Page 7 24. When the battery has rust, bad smell or something abnormal at first-time-using, do not use the equipment and go to bring the battery to the shop which it was bought. CARSON Helicopter Airbeast 507013 011640_anl_507013_airbeast_6k.in7 7 011640_anl_507013_airbeast_6k.in7 7 08.01.2008 9:00:58 Uhr...
-
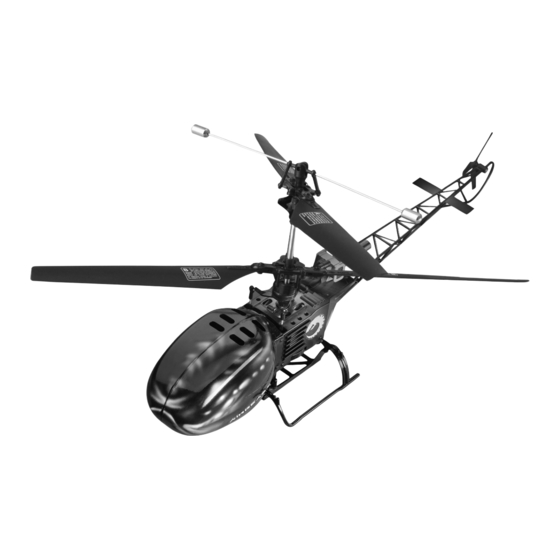
Page 8: The Micro Helicopter With More Functions
• With lipo battery 7.4V/1000mAh and lipo “balance” charger • Body made from polycarbonate (printed) Bearing rotor Paddle bar Rotor shaft Rotorblade holder Body Steering rotor Battery box Landing gear CARSON Helicopter Airbeast 507013 011640_anl_507013_airbeast_6k.in8 8 011640_anl_507013_airbeast_6k.in8 8 08.01.2008 9:00:58 Uhr 08.01.2008 9:00:58 Uhr... -
Page 9: Rc Functions Of The Helicopter
Principal rotor diameter 340 mm Weight 225 g Battery charger „Lipo Balance II“ Input: 100-240 V / AC, 50-60 Hz Output: 7.4 V und 11.1 V/ 0.8A CARSON Helicopter Airbeast 507013 011640_anl_507013_airbeast_6k.in9 9 011640_anl_507013_airbeast_6k.in9 9 08.01.2008 11:38:15 Uhr 08.01.2008 11:38:15 Uhr... -
Page 10: Four Channel Remote Control Transmitter
Trim lever tail ON/OFF switch Transmitter crystal Servo reverse switches to change the reaction direction Functions on the back of the transmitter: • Charging socket • Battery chamber CARSON Helicopter Airbeast 507013 011640_anl_507013_airbeast_6k.in10 10 011640_anl_507013_airbeast_6k.in10 10 08.01.2008 9:01:00 Uhr 08.01.2008 9:01:00 Uhr... - Page 11 If the model reacts precisely the opposite to one or more control functions, you can press the corresponding servo reverse switches on the front of the transmitter to change the reaction direction. CARSON Helicopter Airbeast 507013 011640_anl_507013_airbeast_6k.in11 11 011640_anl_507013_airbeast_6k.in11 11 08.01.2008 9:01:00 Uhr...
-
Page 12: Conversion Instructions From Mode 2 To Mode 1
Having opened the housing, the spring for the steering lever and the metal clip for the throttle lever can be removed by using a small box spanner. Picture 2 CARSON Helicopter Airbeast 507013 011640_anl_507013_airbeast_6k.in12 12 011640_anl_507013_airbeast_6k.in12 12 08.01.2008 9:01:04 Uhr... - Page 13 Jumper upwards mode1 Jumper downwards mode 2 Caution – do not to damage the plate! CARSON Helicopter Airbeast 507013 011640_anl_507013_airbeast_6k.in13 13 011640_anl_507013_airbeast_6k.in13 13 08.01.2008 9:01:07 Uhr 08.01.2008 9:01:07 Uhr...
- Page 14 Your rnodel and your transrnitter have now been converted to mode 1. This means: Rotation leftlrlght and forwardsfbackwards left joystick Throttle upidown and roll leftiright right joystick CARSON Helicopter Airbeast 507013 011640_anl_507013_airbeast_6k.in14 14 011640_anl_507013_airbeast_6k.in14 14 08.01.2008 11:40:32 Uhr 08.01.2008 11:40:32 Uhr...
-
Page 15: Preparations
• connect to the battery with the flight controller. If you run the battery cable above the fuselage, the cabin hood can only be attached with difficulty. To dismantle the battery, proceed in the opposite sequence. CARSON Helicopter Airbeast 507013 011640_anl_507013_airbeast_6k.in15 15 011640_anl_507013_airbeast_6k.in15 15 08.01.2008 9:01:15 Uhr... -
Page 16: Flight Operation
• Pull the left remote control lever (pitch) totally back. • Take care that the pitch function of the trim lever is approximately in the middle position. • Switch the transmitter on. CARSON Helicopter Airbeast 507013 011640_anl_507013_airbeast_6k.in16 16 011640_anl_507013_airbeast_6k.in16 16 08.01.2008 9:01:17 Uhr... - Page 17 • Repeat the process until the helicopter no longer shows a tendency to turn to the right. CARSON Helicopter Airbeast 507013 011640_anl_507013_airbeast_6k.in17 17 011640_anl_507013_airbeast_6k.in17 17 08.01.2008 9:01:18 Uhr...
- Page 18 • Do not move the control lever too jerkily, because otherwise especially the touchdown can be very hard. • Develop a feeling for the controls by repeatedly lifting off, floating and landing again. CARSON Helicopter Airbeast 507013 011640_anl_507013_airbeast_6k.in18 18 011640_anl_507013_airbeast_6k.in18 18 08.01.2008 9:01:19 Uhr...
-
Page 19: Ground Effect
• Always fly the model in front of you or allow it to circle above you. If you allow the model to fly behind your back, you could lose your orientation and thereby the control over the helicopter. CARSON Helicopter Airbeast 507013 011640_anl_507013_airbeast_6k.in19 19 011640_anl_507013_airbeast_6k.in19 19 08.01.2008 9:01:21 Uhr... -
Page 20: How To Change Frequencies
If this is not the case, vibrations arise which adversely affect the flight behaviour. CARSON Helicopter Airbeast 507013 011640_anl_507013_airbeast_6k.in20 20 011640_anl_507013_airbeast_6k.in20 20 08.01.2008 9:01:21 Uhr... -
Page 21: Troubleshooting
3. The velocity of rotation of the upper and lower rotor Correct the trim on the transmitter revolution is uneven; CARSON Helicopter Airbeast 507013 011640_anl_507013_airbeast_6k.in21 21 011640_anl_507013_airbeast_6k.in21 21 08.01.2008 9:01:22 Uhr 08.01.2008 9:01:22 Uhr... -
Page 22: Vorwort
Ansprüche abgeleitet werden. Garantiebedingungen Von der Garantie ausgeschlossen sind: Für dieses Produkt leistet CARSON eine Garantie von 24 • Beschädigung oder Ausfall durch Nichtbeachten der Sicher- Monaten betreffend Fehler bei der Herstellung in Bezug auf heitsanweisungen oder der Bedienungsanleitung, höhere Material und Fertigung bei normalem Gebrauch ab dem Kauf Gewalt, Unfall, fehlerhafte oder außergewöhnliche... -
Page 23: Lieferumfang
• Lipo Akku 7,4V/ 1000 mAh • Lipo-Balance Ladegerät mit Netzteil • 2 Servos, bereits eingebaut • Gyro, im Empfänger integriert • 4 Stück Ersatzrotorblätter • Bedienungsanleitung CARSON Helicopter Airbeast 507013 011640_anl_507013_airbeast_6k.in23 23 011640_anl_507013_airbeast_6k.in23 23 08.01.2008 9:01:23 Uhr 08.01.2008 9:01:23 Uhr... -
Page 24: Sicherheitsanweisungen
Verlegen Sie den Antennendraht so, dass er nicht in beweg- liche Teile gelangen kann. Sorgen Sie für eine Zugentlastung, indem Sie den Draht an einer Stelle mit Klebestreifen am Rumpf fixieren. CARSON Helicopter Airbeast 507013 011640_anl_507013_airbeast_6k.in24 24 011640_anl_507013_airbeast_6k.in24 24 08.01.2008 9:01:24 Uhr... - Page 25 • legen Sie auch den Akku während des Ladens auf eine nicht entflammbare Unterlage • Achten Sie beim Laden der Akkus auf die richtige Polarität. • Sorgen Sie für ausreichende Belüftung des Ladegerätes während des Ladens. CARSON Helicopter Airbeast 507013 011640_anl_507013_airbeast_6k.in25 25 011640_anl_507013_airbeast_6k.in25 25 08.01.2008 9:01:24 Uhr 08.01.2008 9:01:24 Uhr...
- Page 26 • Waschen Sie die betroffenen Stellen sofort mit klarem Was- (Sammelstellen) zuzuführen. ser ab und Eine Entsorgung über den Hausmüll ist untersagt! • suchen Sie einen Arzt auf. CARSON Helicopter Airbeast 507013 011640_anl_507013_airbeast_6k.in26 26 011640_anl_507013_airbeast_6k.in26 26 08.01.2008 9:01:25 Uhr 08.01.2008 9:01:25 Uhr...
- Page 27 24. Sollte der Akku vor dem ersten Gebrauch Rost aufweisen, verdächtig riechen oder auf andere Weise ungewöhnlich erscheinen, verwenden Sie ihn nicht und bringen Sie ihn zurück in das Geschäft, in dem Sie ihn gekauft haben. CARSON Helicopter Airbeast 507013 011640_anl_507013_airbeast_6k.in27 27 011640_anl_507013_airbeast_6k.in27 27 08.01.2008 9:01:25 Uhr...
-
Page 28: Der Mikro-Helikopter Mit Mehr Funktionen
• inkl. Ersatzrotorblätter • inkl. Lipo Akku 7,4V/1000 mAh und „Lipo Balance“ Ladegerät • Rumpf aus bedrucktem Lexan Rotorblatt A Paddelstangen Rotorwelle Rotorblatthalter Rumpf Rotorblatt B Akkuschacht Landegestell CARSON Helicopter Airbeast 507013 011640_anl_507013_airbeast_6k.in28 28 011640_anl_507013_airbeast_6k.in28 28 08.01.2008 9:01:25 Uhr 08.01.2008 9:01:25 Uhr... -
Page 29: Rc-Funktionen Des Helikopters
360 mm Hauptrotordurchmesser 340 mm Gewicht 225 g Ladegerät „Lipo Balance II“ Eingang: 100-240 V / AC, 50-60 Hz Ausgang: 7,4 V und 11,1 V/ 0,8A CARSON Helicopter Airbeast 507013 011640_anl_507013_airbeast_6k.in29 29 011640_anl_507013_airbeast_6k.in29 29 08.01.2008 9:01:26 Uhr 08.01.2008 9:01:26 Uhr... -
Page 30: Ihr 4-Kanal Fernsteuersender
Roll (Querruder) Heck (Seitenruder) Trim-Hebel Roll Trim-Hebel Heck Ein-Aus-Schalter Senderquarz Reverse-Schalter Kehrt die Reaktionsrichtung der Steuerung um Funktionen auf der Rückseite des Senders: • Ladebuchse • Batteriefach CARSON Helicopter Airbeast 507013 011640_anl_507013_airbeast_6k.in30 30 011640_anl_507013_airbeast_6k.in30 30 08.01.2008 9:01:27 Uhr 08.01.2008 9:01:27 Uhr... - Page 31 Roll rechts nach rechts Wenn das Modell bei einer oder mehreren Steuerfunktionen genau entgegengesetzt reagiert, können Sie mit den entsprechenden Servo-Reverse Schaltern auf der Vorderseite des Senders die Reaktionsrichtung umschalten. CARSON Helicopter Airbeast 507013 011640_anl_507013_airbeast_6k.in31 31 011640_anl_507013_airbeast_6k.in31 31 08.01.2008 9:01:27 Uhr...
-
Page 32: Umbauanleitung Von Mode 2 Auf Mode 1
Nach dem Öffnen des Gehäuses können Sie das Federelement (A) für den Steuerhebel und den Metallraster (B) für den Gashe- bel mit einem Kreuzschlitz-Schraubendreher demontieren. Bild 2 CARSON Helicopter Airbeast 507013 011640_anl_507013_airbeast_6k.in32 32 011640_anl_507013_airbeast_6k.in32 32 08.01.2008 9:01:28 Uhr 08.01.2008 9:01:28 Uhr... - Page 33 Jumper, den Sie vorsichtig in die gewünschte Position bringen müssen. Jumper nach oben – Mode 1 Jumper nach unten – Mode 2 Bitte unbedingt darauf achten, dass die Platine nicht beschädigt wird. CARSON Helicopter Airbeast 507013 011640_anl_507013_airbeast_6k.in33 33 011640_anl_507013_airbeast_6k.in33 33 08.01.2008 9:01:29 Uhr 08.01.2008 9:01:29 Uhr...
- Page 34 Senders in die obere Position gebracht werden. Ihr Modell und Ihre Fernsteueranlage ist nun auf Mode 1 umge- baut. Das heißt: Nick und Heckrotorfunktion Linker Steuerhebel Gas(Pitch) und RollFunktion Rechter Steuerhebel CARSON Helicopter Airbeast 507013 011640_anl_507013_airbeast_6k.in34 34 011640_anl_507013_airbeast_6k.in34 34 08.01.2008 9:01:34 Uhr 08.01.2008 9:01:34 Uhr...
-
Page 35: Vorbereitungen
• verbinden Sie den Akku mit dem Flugregler. Wenn Sie das Akkukabel oberhalb des Rumpfes entlangführen, lässt sich die Kabinenhaube nur schwer aufsetzen. Für den Ausbau verfahren Sie in umgekehrter Reihenfolge. CARSON Helicopter Airbeast 507013 011640_anl_507013_airbeast_6k.in35 35 011640_anl_507013_airbeast_6k.in35 35 08.01.2008 9:01:36 Uhr... -
Page 36: Flugbetrieb
• Nehmen Sie den linken Fernsteuerhebel (Pitch) ganz erst jetzt den zurück. frisch geladenen • Achten Sie darauf, dass der Trimmhebel der Pitch-Funktion Flugakku an den ungefähr in Mittelstellung steht. Empfänger an. CARSON Helicopter Airbeast 507013 011640_anl_507013_airbeast_6k.in36 36 011640_anl_507013_airbeast_6k.in36 36 08.01.2008 9:01:36 Uhr 08.01.2008 9:01:36 Uhr... - Page 37 Sie, ob die Korrektur ausreichend war, ggf. verschieben Sie die Trimmung weiter nach links. • Wiederholen Sie den Vorgang so lange, bis der Helikopter keinerlei Tendenz mehr zeigt, nach rechts zu drehen. CARSON Helicopter Airbeast 507013 011640_anl_507013_airbeast_6k.in37 37 011640_anl_507013_airbeast_6k.in37 37 08.01.2008 9:01:38 Uhr...
- Page 38 • Bewegen Sie die Steuerhebel nicht zu ruckartig, da sonst insbesondere die Landung sehr hart ausfallen kann. Entwickeln Sie ein Gespür für die Steuerung, indem Sie wiederholt abheben, schweben und wieder aufsetzen. CARSON Helicopter Airbeast 507013 011640_anl_507013_airbeast_6k.in38 38 011640_anl_507013_airbeast_6k.in38 38 08.01.2008 9:01:38 Uhr...
-
Page 39: Ground Effect
• Fliegen Sie das Modell immer vor sich oder lassen Sie es über sich kreisen. Wenn Sie das Modell hinter Ihrem Rücken fliegen lassen, könnten Sie die Orientierung verlieren und damit die Kontrolle über den Heli. CARSON Helicopter Airbeast 507013 011640_anl_507013_airbeast_6k.in39 39 011640_anl_507013_airbeast_6k.in39 39 08.01.2008 9:01:39 Uhr... -
Page 40: Wechseln Der Sendefrequenz
Einfluss auf das Flugverhalten. Bei korrektem Spurlauf Höhe (2). laufen beide Rotorblätter eines Rotorkreises exakt in einer Ebene. Ist dies nicht der Fall, entstehen Vibrationen, die das Flugverhalten beeinträchtigen. CARSON Helicopter Airbeast 507013 011640_anl_507013_airbeast_6k.in40 40 011640_anl_507013_airbeast_6k.in40 40 08.01.2008 9:01:39 Uhr 08.01.2008 9:01:39 Uhr... -
Page 41: Problembehandlung
Reibung auf der Rotorwelle kreise leicht drehen lassen 3. Die Rotationsgeschwindigkeit des oberen und Tauschen Sie den Motor aus. Korrigieren Sie unteren Rotorkreises ist ungleichmäßig die Trimmung am Sender CARSON Helicopter Airbeast 507013 011640_anl_507013_airbeast_6k.in41 41 011640_anl_507013_airbeast_6k.in41 41 08.01.2008 9:01:40 Uhr 08.01.2008 9:01:40 Uhr... -
Page 42: Préface
Conditions de garantie La garantie ne couvre pas: CARSON vous garantit pour 24 mois à partir de la date d‘achat • tout dommage ou défaillance causé par force majeure, (pièces justificatives à l‘appui) que la voiture est exempte de abus, accident, utilisation abusive, erronée ou anormale, non... -
Page 43: Périmètre De Livraison
• Chargeur „LiPo-Balance“ avec alimentation stabilisée incluse • 2 servos, montés • Gyroscope, monté dans le récepteur • 4 pales de rotor de rechange • Mode d’emploi CARSON Helicopter Airbeast 507013 011640_anl_507013_airbeast_6k.in43 43 011640_anl_507013_airbeast_6k.in43 43 08.01.2008 9:01:40 Uhr 08.01.2008 9:01:40 Uhr... -
Page 44: Consignes De Sécurité
Positionner l’antenne de telle manière qu’elle ne puisse pas entrer en contact avec des pièces mobiles. La soulager en traction en fixant le fil à la carlingue avec une bande de ruban adhésif. CARSON Helicopter Airbeast 507013 011640_anl_507013_airbeast_6k.in44 44 011640_anl_507013_airbeast_6k.in44 44 08.01.2008 9:01:41 Uhr... - Page 45 • Ne charger que des batteries de même modèle et capacité. support ininflammable. • Lors de la charge, veiller à la bonne polarité. • Durant la charge, le chargeur doit être dans un local suffisamment ventilé. CARSON Helicopter Airbeast 507013 011640_anl_507013_airbeast_6k.in45 45 011640_anl_507013_airbeast_6k.in45 45 08.01.2008 9:01:42 Uhr 08.01.2008 9:01:42 Uhr...
- Page 46 Si de l’électrolyte s’écoule : • éviter tout contact avec les yeux et la peau, • rincer sans tarder les zones touchées à l’eau pure, • faire appel à un médecin. CARSON Helicopter Airbeast 507013 011640_anl_507013_airbeast_6k.in46 46 011640_anl_507013_airbeast_6k.in46 46 08.01.2008 9:01:42 Uhr...
- Page 47 24. Si lors de la première utilisation, la batterie est corrodée, dégage une mauvaise odeur ou a un comportement anormal, ne pas l‘utiliser mais la rapporter chez le revendeur. CARSON Helicopter Airbeast 507013 011640_anl_507013_airbeast_6k.in47 47 011640_anl_507013_airbeast_6k.in47 47 08.01.2008 11:43:06 Uhr...
-
Page 48: Le Micro-Hélicoptère Avec Plus De Fonctions
• Batteries Li-Po 7,4V/1000 mAh et chargeur Li-Po « balance » fournis • Fuselage en polycarbonate décalqué Pales superieures Barre de bell Axe rotor principal Tete de rotor Fuselage Pales inférieures Support batterie Train d‘attérissage CARSON Helicopter Airbeast 507013 011640_anl_507013_airbeast_6k.in48 48 011640_anl_507013_airbeast_6k.in48 48 08.01.2008 9:01:43 Uhr 08.01.2008 9:01:43 Uhr... -
Page 49: Fonctions De Base De L'hélicoptère
Diamètre du rotor principal 340 mm Poids 225 g Chargeur avec adaptateur enfichable Entrée : 100-240 V / AC, 50-60 Hz Sortie : 7,4 V und 11,1 V/ 0,8A CARSON Helicopter Airbeast 507013 011640_anl_507013_airbeast_6k.in49 49 011640_anl_507013_airbeast_6k.in49 49 08.01.2008 9:01:43 Uhr 08.01.2008 9:01:43 Uhr... -
Page 50: Radiocommande 4 Canaux
Quartz émetteur Inverseur de commande pour inverser le sens de la réaction. Fonctions sur l‘arrière de l‘émetteur : • Prise de chargement • Logement pour les piles CARSON Helicopter Airbeast 507013 011640_anl_507013_airbeast_6k.in50 50 011640_anl_507013_airbeast_6k.in50 50 08.01.2008 9:01:44 Uhr 08.01.2008 9:01:44 Uhr... - Page 51 Si pour une ou plusieurs fonctions de commande le modèle réduit réagit de manière exactement contraire, vous pouvez utiliser l‘inverseur de commande sur la face avant de l‘émetteur pour inverser le sens de la réaction. CARSON Helicopter Airbeast 507013 011640_anl_507013_airbeast_6k.in51 51 011640_anl_507013_airbeast_6k.in51 51...
-
Page 52: Instructions Pour La Conversion Du Mode 2 Vers Le Mode 1
Avec l‘émetteur ouvert, le ressort du manche de direction et la plaquette en métal du manche des gaz peuvent être rétirés à l‘aide d‘un petit outil. Illustration 2 CARSON Helicopter Airbeast 507013 011640_anl_507013_airbeast_6k.in52 52 011640_anl_507013_airbeast_6k.in52 52 08.01.2008 9:01:46 Uhr 08.01.2008 9:01:46 Uhr... - Page 53 Cavalier vers le haut mode1 Cavalier vers le bas mode 2 Attention ne pas endommager la platine! CARSON Helicopter Airbeast 507013 011640_anl_507013_airbeast_6k.in53 53 011640_anl_507013_airbeast_6k.in53 53 08.01.2008 9:01:48 Uhr 08.01.2008 9:01:48 Uhr...
- Page 54 Votre modèle et votre émetteur sont maintenant convertis en mode 1. Ceci implique: Virages à gauche/droite et avant/arriière manche gauche Gaz et inclinaisons gauche/droite manche droit CARSON Helicopter Airbeast 507013 011640_anl_507013_airbeast_6k.in54 54 011640_anl_507013_airbeast_6k.in54 54 08.01.2008 9:01:52 Uhr 08.01.2008 9:01:52 Uhr...
-
Page 55: Préparatifs
• Raccorder la batterie au bloc de commande. Si le câble de la batterie passe en haute du fuselage, le capot de la cabine sera difficile à monter. Procéder dans l’ordre inverse pour le démontage. CARSON Helicopter Airbeast 507013 011640_anl_507013_airbeast_6k.in55 55 011640_anl_507013_airbeast_6k.in55 55 08.01.2008 9:01:54 Uhr... -
Page 56: Vol
à l’aide d’une bande adhésive sur le fuselage • Mettre l’émetteur pour soulager en traction la fixation. en marche. • Ne raccorder qu’à ce moment- là la batterie de vol chargée au récepteur. CARSON Helicopter Airbeast 507013 011640_anl_507013_airbeast_6k.in56 56 011640_anl_507013_airbeast_6k.in56 56 08.01.2008 9:01:55 Uhr 08.01.2008 9:01:55 Uhr... - Page 57 échéant glisser le correcteur encore un peu plus vers la gauche. • Répéter cette procédure jusqu’à ce que l’hélicoptère ne tourne plus vers la droite. CARSON Helicopter Airbeast 507013 011640_anl_507013_airbeast_6k.in57 57 011640_anl_507013_airbeast_6k.in57 57 08.01.2008 9:01:56 Uhr...
- Page 58 • Ne pas actionner les manettes de manière trop brusque, l’atterrissage peut autrement s’avérer brutal. Bien s’habituer aux différents mouvements en répétant plusieurs fois le décollage et l’atterrissage. CARSON Helicopter Airbeast 507013 011640_anl_507013_airbeast_6k.in58 58 011640_anl_507013_airbeast_6k.in58 58 08.01.2008 9:01:56 Uhr 08.01.2008 9:01:56 Uhr...
-
Page 59: Effet De Sol
• Toujours piloter avec le modèle réduit devant soi ou le faire tourner en rond au-dessus de soi. Avec le modèle réduit derrière soi, il est possible de perdre son orientation et donc le contrôle sur l’hélicoptère. CARSON Helicopter Airbeast 507013 011640_anl_507013_airbeast_6k.in59 59 011640_anl_507013_airbeast_6k.in59 59 08.01.2008 9:01:57 Uhr... -
Page 60: Changement De La Fréquence D'émission
Si ce n‘est pas le cas, des vibrations se forment, qui peuvent affecter le comportement en vol. CARSON Helicopter Airbeast 507013 011640_anl_507013_airbeast_6k.in60 60 011640_anl_507013_airbeast_6k.in60 60 08.01.2008 9:01:57 Uhr... -
Page 61: Elimination Des Erreurs
3. La vitesse de rotation des rotors supérieur et inféri- Remplacer le moteur. Corriger l’équilibrage eur est irrégulière sur l’émetteur CARSON Helicopter Airbeast 507013 011640_anl_507013_airbeast_6k.in61 61 011640_anl_507013_airbeast_6k.in61 61 08.01.2008 9:01:58 Uhr 08.01.2008 9:01:58 Uhr... -
Page 62: Prólogo
• Cualquier reparación no efectuada por un servicio de prueba de adquisición a cualquier tienda autorizada CARSON. reparaciones autorizado CARSON; CARSON podrá a su elección y salvo que las leyes dispongan • Consumibles como fusibles o baterías; otra cosa: • Daños estéticos;... -
Page 63: Contenido Del Kit
• Cargador LiPo con equilibrador y fuente de alimentación • 2 servos, ya ensamblados • Giroscopio, con receptor integrado • 4 unidades de palas de rotor de cambio • Instrucciones CARSON Helicopter Airbeast 507013 011640_anl_507013_airbeast_6k.in63 63 011640_anl_507013_airbeast_6k.in63 63 08.01.2008 9:01:59 Uhr 08.01.2008 9:01:59 Uhr... -
Page 64: Precauciones De Seguridad
Coloque el alambre de la antena de tal manera que no entre en contacto con piezas móviles. Para lograr una descarga de tracción, debe sujetar el alambre al fuselaje en con cinta adhesiva. CARSON Helicopter Airbeast 507013 011640_anl_507013_airbeast_6k.in64 64 011640_anl_507013_airbeast_6k.in64 64 08.01.2008 9:02:00 Uhr... - Page 65 • Preste atención a la correcta polaridad de las baterías una base no inflamable recargables durante la carga. • Preocúpese de preservar que el cargador reciba suficiente ventilación durante la carga. CARSON Helicopter Airbeast 507013 011640_anl_507013_airbeast_6k.in65 65 011640_anl_507013_airbeast_6k.in65 65 08.01.2008 9:02:00 Uhr 08.01.2008 9:02:00 Uhr...
- Page 66 Pregunte a las autoridades locales responsables sobre las opciones adecuadas de reciclado o deshecho. CARSON Helicopter Airbeast 507013 011640_anl_507013_airbeast_6k.in66 66 011640_anl_507013_airbeast_6k.in66 66 08.01.2008 9:02:00 Uhr...
- Page 67 24. Cuando la batería tenga herrumbre, huela mal o presente alguna anomalía al usarla por primera vez, no utilice el equipo y devuelva la batería a la tienda donde la compró. CARSON Helicopter Airbeast 507013 011640_anl_507013_airbeast_6k.in67 67 011640_anl_507013_airbeast_6k.in67 67 08.01.2008 9:02:01 Uhr...
-
Page 68: El Micro Helicóptero Con Más Funciones
• Fuselaje fabricado en policarbonato pintado Rotor de impulso Vara de palas Eje de rotor Soporte de palas Fuselaje Rotor de mando Caja de batería Tren de aterrizaje CARSON Helicopter Airbeast 507013 011640_anl_507013_airbeast_6k.in68 68 011640_anl_507013_airbeast_6k.in68 68 08.01.2008 9:02:01 Uhr 08.01.2008 9:02:01 Uhr... -
Page 69: Funciones Rc Del Helicóptero
Diámetro del rotor principal 340 mm Peso 225 g Entrada: 100-240 V / AC, 50-60 Hz Salida: 7,4 V und 11,1 V/ 0,8A del cargador con adaptador de enchufe CARSON Helicopter Airbeast 507013 011640_anl_507013_airbeast_6k.in69 69 011640_anl_507013_airbeast_6k.in69 69 08.01.2008 9:02:02 Uhr 08.01.2008 9:02:02 Uhr... -
Page 70: Emisora De Mando A Distancia De Cuatro Canales
Conmutadores de reversa servo para invertir el sentido de reacción. Funciones en la parte trasera de la emisora: • Toma de carga • Compartimiento para baterías CARSON Helicopter Airbeast 507013 011640_anl_507013_airbeast_6k.in70 70 011640_anl_507013_airbeast_6k.in70 70 08.01.2008 9:02:02 Uhr 08.01.2008 9:02:02 Uhr... - Page 71 Cuando el modelo reacciona en una o más funciones de mando exactamente en el sentido contrario, con los respectivos conmutadores de reversa servo, ubicados en la parte delantera de la emisora, es posible invertir el sentido de reacción. CARSON Helicopter Airbeast 507013 011640_anl_507013_airbeast_6k.in71 71 011640_anl_507013_airbeast_6k.in71 71...
-
Page 72: Instrucciones De Conversión De Modo 2 A Modo 1
Una vez abierta la carcasa, el muelle de la palanca de dirección y el clip metálico de la palanca de acelerador pueden ser retirados utilizando un destornillador de estrella. Imagen 2 CARSON Helicopter Airbeast 507013 011640_anl_507013_airbeast_6k.in72 72 011640_anl_507013_airbeast_6k.in72 72 08.01.2008 9:02:04 Uhr... - Page 73 Jumper arriba modo1 Jumper abajo modo 2 Por favor, tenga cuidado de no dañar la placa! CARSON Helicopter Airbeast 507013 011640_anl_507013_airbeast_6k.in73 73 011640_anl_507013_airbeast_6k.in73 73 08.01.2008 9:02:06 Uhr 08.01.2008 9:02:06 Uhr...
- Page 74 Ahora su modelo y su emisora han sido convertidos a modo 1. Esto quiere decir: Rotor de cola (direcclön) y profundidad palanca lzquierda Acelerador y alabeo palanca derecha CARSON Helicopter Airbeast 507013 011640_anl_507013_airbeast_6k.in74 74 011640_anl_507013_airbeast_6k.in74 74 08.01.2008 9:02:10 Uhr 08.01.2008 9:02:10 Uhr...
-
Page 75: Preparativos
• Conecte la batería recargable con el regulador de vuelo. Cuando usted hace pasar el cable de la batería recargable por encima del fuselaje, la cubierta de la cabina sólo se podrá colocar con dificultad. CARSON Helicopter Airbeast 507013 011640_anl_507013_airbeast_6k.in75 75 011640_anl_507013_airbeast_6k.in75 75 08.01.2008 9:02:12 Uhr... -
Page 76: Operación De Vuelo
• Retire lo más posible el cable de mando izquierda vuelo cargada. (inclinación). • Cerciórese de que la palanca de compensación de la fun- ción de inclinación se encuentre aproximadamente en una ubicación intermedia. CARSON Helicopter Airbeast 507013 011640_anl_507013_airbeast_6k.in76 76 011640_anl_507013_airbeast_6k.in76 76 08.01.2008 9:02:13 Uhr 08.01.2008 9:02:13 Uhr... - Page 77 • Repita esto hasta que el helicóptero deje de presentar tendencias de giro hacia la derecha. CARSON Helicopter Airbeast 507013 011640_anl_507013_airbeast_6k.in77 77 011640_anl_507013_airbeast_6k.in77 77 08.01.2008 9:02:14 Uhr...
- Page 78 • No mueva la palanca de mando muy bruscamente, de ser así, sobre todo el aterrizaje puede ser demasiado duro. Trate de desarrollar una sensibilidad para el control, despegando, flotando y aterrizando repetidamente. CARSON Helicopter Airbeast 507013 011640_anl_507013_airbeast_6k.in78 78 011640_anl_507013_airbeast_6k.in78 78 08.01.2008 9:02:14 Uhr...
-
Page 79: Ground Effect
• Maneje el modelo siempre frente a usted o deje que gire en torno a usted. Si usted deja que el modelo vuele a sus espaldas, usted podría perder la orientación y consecuentemente el control del helicóptero. CARSON Helicopter Airbeast 507013 011640_anl_507013_airbeast_6k.in79 79 011640_anl_507013_airbeast_6k.in79 79 08.01.2008 9:02:15 Uhr... -
Page 80: Como Cambiar Frecuencias
Si no fuera el caso, surgen vibraciones, que pueden disminuir perjudicar el comportamiento de vuelo. CARSON Helicopter Airbeast 507013 011640_anl_507013_airbeast_6k.in80 80 011640_anl_507013_airbeast_6k.in80 80 08.01.2008 9:02:15 Uhr... -
Page 81: Guía De Problemas
3. La velocidad de rotación del circuito superior e Remplace el motor. Corrija el equilibrio en la inferior no es uniforme emisora CARSON Helicopter Airbeast 507013 011640_anl_507013_airbeast_6k.in81 81 011640_anl_507013_airbeast_6k.in81 81 08.01.2008 9:02:16 Uhr 08.01.2008 9:02:16 Uhr... -
Page 82: Prefazione
Dalla garanzia sono esclusi: Danni o guasti causati da eventi naturali, normale usura, abusi, Questo prodotto è garantito da CARSON, da difetti di fabbrica- incidenti, utilizzo non corretto, inosservanza delle istruzioni, zione nei materiali e lavorazioni, riscontrati nel normale utilizzo montaggio non corretto, imperizia dell’utilizzatore, mancanza... -
Page 83: Contenuti Del Kit
• Carica batteria bilanciato con alimentatore • 2 servosterzi, già montati • Giroscopio, integrato nell’apparecchio ricevente • 4 pezzi di ricambio per le pale del rotore • Istruzioni d´uso CARSON Helicopter Airbeast 507013 011640_anl_507013_airbeast_6k.in83 83 011640_anl_507013_airbeast_6k.in83 83 08.01.2008 9:02:17 Uhr 08.01.2008 9:02:17 Uhr... -
Page 84: Misure Di Sicurezza
Collocare il filo dell’antenna in modo tale che non sia d’intralcio alle parti in movimento. Creare uno scarico della trazione, fissando il filo con del nastro adesivo alla fusoliera. CARSON Helicopter Airbeast 507013 011640_anl_507013_airbeast_6k.in84 84 011640_anl_507013_airbeast_6k.in84 84 08.01.2008 9:02:18 Uhr... - Page 85 • Durante il caricamento delle batterie prestare attenzione alla terreno non infiammabile giusta polarità • Far sì che vi sia una ventilazione sufficiente del caricabatteria durante il caricamento. CARSON Helicopter Airbeast 507013 011640_anl_507013_airbeast_6k.in85 85 011640_anl_507013_airbeast_6k.in85 85 08.01.2008 9:02:18 Uhr 08.01.2008 9:02:18 Uhr...
- Page 86 • consutate un medico singolo stato di appartenenza, riporre la batteria nel cassonetto della spazzatura potrebbe essere illegale, chiedete notizie sullo smaltimento al locale ufficio di nettezza urbana. CARSON Helicopter Airbeast 507013 011640_anl_507013_airbeast_6k.in86 86 011640_anl_507013_airbeast_6k.in86 86 08.01.2008 9:02:19 Uhr 08.01.2008 9:02:19 Uhr...
- Page 87 24. Quando la batteria al primo utilizzo presenta segni di ruggine, cattivo odore o altre anomalie, non usare l’apparecchio e portare la batteria al negozio dove è stata acquistata. CARSON Helicopter Airbeast 507013 011640_anl_507013_airbeast_6k.in87 87 011640_anl_507013_airbeast_6k.in87 87 08.01.2008 9:02:19 Uhr...
-
Page 88: Il Micro Elicottero A Più Funzioni
• Batteria 7,4V/1000mAh ai polimeri di litio e caricabatteria “balance” • Capottina in polycarbonato (stampato) Palette superiori Aletta zavorrata Albero rotore principale Testa rotore Fusoliera Pale inferiori Supporto batterie Carrello CARSON Helicopter Airbeast 507013 011640_anl_507013_airbeast_6k.in88 88 011640_anl_507013_airbeast_6k.in88 88 08.01.2008 9:02:19 Uhr 08.01.2008 9:02:19 Uhr... -
Page 89: Funzioni Di Base Dell'elicottero
340 mm Peso 225 g Caricabatteria „Lipo Balance II“ con ingresso per adattatore: 100-240 V / AC, 50-60 Hz Uscita: 7,4 V und 11,1 V/ 0,8A CARSON Helicopter Airbeast 507013 011640_anl_507013_airbeast_6k.in89 89 011640_anl_507013_airbeast_6k.in89 89 08.01.2008 9:02:20 Uhr 08.01.2008 9:02:20 Uhr... -
Page 90: Radiocomando A 4 Canali
Interruttore di accensione e di interruzione Quarzo Interruttori reversibili per invertire la direzione di reazione. Funzioni sul retro del trasmettitore: • Jack di ricarica • Vano batteria CARSON Helicopter Airbeast 507013 011640_anl_507013_airbeast_6k.in90 90 011640_anl_507013_airbeast_6k.in90 90 08.01.2008 9:02:21 Uhr 08.01.2008 9:02:21 Uhr... - Page 91 Se il modello reagisce in senso opposto a una o più funzioni di comando, utilizzando gli interruttori reversibili posti sul lato anteriore del trasmettitore è possibile invertire la direzione di reazione. CARSON Helicopter Airbeast 507013 011640_anl_507013_airbeast_6k.in91 91 011640_anl_507013_airbeast_6k.in91 91 08.01.2008 9:02:21 Uhr...
-
Page 92: Istruzioni Conversione Da Mode 2 A Mode 1
Una volta aperto il coperchio del trasmettitore, rimuovere la molla dello stick di direzione e la barretta dello stick acceleratore, aiutandosi con un piccolo cacciavite a stella. Immagine 2 CARSON Helicopter Airbeast 507013 011640_anl_507013_airbeast_6k.in92 92 011640_anl_507013_airbeast_6k.in92 92 08.01.2008 9:02:22 Uhr... - Page 93 (figura 5). Jumper in alto – Mode 1 Jumper in basso – Mode 2 Attenzione a non danneggiare la piastra radio. CARSON Helicopter Airbeast 507013 011640_anl_507013_airbeast_6k.in93 93 011640_anl_507013_airbeast_6k.in93 93 08.01.2008 9:02:24 Uhr 08.01.2008 9:02:24 Uhr...
- Page 94 Adesso il vostro modello ä configurato in mode 1. Questo significa che per il movimento destra/sinistra e avanti/ dietro utilizzate lo stick sinistro, mentre per il gas. CARSON Helicopter Airbeast 507013 011640_anl_507013_airbeast_6k.in94 94 011640_anl_507013_airbeast_6k.in94 94 08.01.2008 9:02:29 Uhr...
-
Page 95: Preparativi
• collegare la batteria con il regolatore del velivolo. Se si accompagna il cavo della batteria al di sopra della fuso- liera, la calotta dell’abitacolo si chiuderà con difficoltà. Per lo smontaggio procedere nell’ordine inverso. CARSON Helicopter Airbeast 507013 011640_anl_507013_airbeast_6k.in95 95 011640_anl_507013_airbeast_6k.in95 95 08.01.2008 9:02:30 Uhr... -
Page 96: Volo
• Portare la leva di destra del radiocomando (pitch) in posizione completamente arretrata. • Verificare che la leva del trimmer della funzione pitch si trovi più o meno in posizione centrale. CARSON Helicopter Airbeast 507013 011640_anl_507013_airbeast_6k.in96 96 011640_anl_507013_airbeast_6k.in96 96 08.01.2008 9:02:31 Uhr... - Page 97 è stata sufficiente. In caso contrario, spostare nuovamente il trimmer verso sinistra. • Ripetere la procedura sino a quando l’elicottero perderà la tendenza a ruotare verso destra. CARSON Helicopter Airbeast 507013 011640_anl_507013_airbeast_6k.in97 97 011640_anl_507013_airbeast_6k.in97 97 08.01.2008 9:02:32 Uhr...
- Page 98 • Se osservate delle incongruenze in fase di comando o una irregolarità nel rotore, CARSON Helicopter Airbeast 507013 011640_anl_507013_airbeast_6k.in98 98 011640_anl_507013_airbeast_6k.in98 98 08.01.2008 9:02:32 Uhr 08.01.2008 9:02:32 Uhr...
-
Page 99: Ground Effect - Effetto Suolo
• Il modello deve volare sempre davanti a voi. In alternativa potete farlo volare circolarmente sopra di voi. Facendo volare il modello alle vostre spalle, potreste perdere l’orientamento e di conseguenza il controllo del velivolo stess. CARSON Helicopter Airbeast 507013 011640_anl_507013_airbeast_6k.in99 99 011640_anl_507013_airbeast_6k.in99 99 08.01.2008 9:02:33 Uhr 08.01.2008 9:02:33 Uhr... -
Page 100: Cambio Della Frequenza Radio
In caso contrario le due punte si troveranno ad altezze piano. Ove ciò non sia possibile, si svilupperanno vibrazioni diverse (2). che possono influire sul volo. CARSON Helicopter Airbeast 507013 011640_anl_507013_airbeast_6k.in100 100 011640_anl_507013_airbeast_6k.in100 100 08.01.2008 9:02:34 Uhr 08.01.2008 9:02:34 Uhr... -
Page 101: Soluzioni Problematiche
3. La velocità di rotazione del rotore superiore e di Sostituire il motore. Correggere il trimmer quello inferiore non è omogenea del trasmettitore CARSON Helicopter Airbeast 507013 011640_anl_507013_airbeast_6k.in101 101 011640_anl_507013_airbeast_6k.in101 101 08.01.2008 9:02:34 Uhr 08.01.2008 9:02:34 Uhr... -
Page 102: Spare Parts
Exploded drawing • Explosionszeichnung • Vue éclatée • Vista desarrollada • Disegno esploso 102 CARSON Helicopter Airbeast 507013 011640_anl_507013_airbeast_6k.in102 102 011640_anl_507013_airbeast_6k.in102 102 08.01.2008 9:02:35 Uhr 08.01.2008 9:02:35 Uhr... - Page 103 508041 Servo Servo Servo Servo Servocomando 508156 RX Empfängereinheit Unité récepteur RX RX unidad receptora Unità ricevitore RX CARSON Helicopter Airbeast 507013 011640_anl_507013_airbeast_6k.in103 103 011640_anl_507013_airbeast_6k.in103 103 08.01.2008 9:02:38 Uhr 08.01.2008 9:02:38 Uhr...
-
Page 104: Ricambi
2x Servo tie bar Zahnrad Landegestell 2x Servogestänge 508031 508142 508143 Electric motor 1 Servo holder 2x Low rotor chuck Elektromotor 1 Servohalter 2x Untere Rotorblatthalter 104 CARSON Helicopter Airbeast 507013 011640_anl_507013_airbeast_6k.in104 104 011640_anl_507013_airbeast_6k.in104 104 08.01.2008 9:02:39 Uhr 08.01.2008 9:02:39 Uhr... - Page 105 Tail rotor Swashplate-Set Heckrotor Taumelscheiben-Set 508144 Canopy Kabine 508144 Engine decorations Motorattrappe 508148 Outer gear set 508145 Bearing bushing Zahbnrad Set Lagerbuchse 508145 Motor fin Motorkühler CARSON Helicopter Airbeast 507013 011640_anl_507013_airbeast_6k.in105 105 011640_anl_507013_airbeast_6k.in105 105 08.01.2008 9:02:46 Uhr 08.01.2008 9:02:46 Uhr...
- Page 106 106 CARSON Helicopter Airbeast 507013 011640_anl_507013_airbeast_6k.in106 106 011640_anl_507013_airbeast_6k.in106 106 08.01.2008 9:02:48 Uhr 08.01.2008 9:02:48 Uhr...
- Page 107 CARSON Helicopter Airbeast 507013 011640_anl_507013_airbeast_6k.in107 107 011640_anl_507013_airbeast_6k.in107 107 08.01.2008 9:02:48 Uhr 08.01.2008 9:02:48 Uhr...
- Page 108 For Germany: Service-Hotline: Mo - Do 8.00 – 17.00 Uhr 8.00 – 14.30 Uhr 01805–73 33 00 12 ct/min CARSON-Model Sport Abt. Service Mittlere Motsch 9 96515 Sonneberg CARSON-Model Sport Werkstraße 1 • D-90765 Fürth / Germany www.carson-modelsport.de 011640_anl_507013_airbeast_6k.in108 108 011640_anl_507013_airbeast_6k.in108 108...
Need help?
Do you have a question about the Airbeast 507013 and is the answer not in the manual?
Questions and answers