Sirius XM RAdio commander touch User Manual
Hide thumbs
Also See for commander touch:
- Instruction manual (62 pages) ,
- Quick start manual (21 pages)
Table of Contents
Advertisement
Advertisement
Table of Contents

Subscribe to Our Youtube Channel
Related Manuals for Sirius XM RAdio commander touch


Summary of Contents for Sirius XM RAdio commander touch
- Page 1 USER GUIDE USER GUIDE...
-
Page 3: Table Of Contents
Table of Contents Commander Touch User Guide Introduction . . . . . . . . . . . . . . . . . . . . . . . . . . . . . . . . . . . . . . . . . . . . . . . . . . . . . . . . . . . . . . . . . . . . . . . . . . 4 Features . -
Page 4: Introduction
• Connects to any radio with either an AUX input or FM connection • Professional installation recommended for best results • Commander Touch can easily be updated by a USB flash drive (not included) to add new features and capabilities as they become available • Works on the XM Network... -
Page 5: Safety And Care Information
Introduction Commander Touch User Guide Safety and Care Information IMPORTANT! Self installation instructions and tips are provided for your convenience . It is your responsibility to determine if you have the knowledge, skills, and physical ability required to properly perform an installation . SiriusXM shall have no liability for damage or injury resulting from the installation or use of any SiriusXM or third party products . -
Page 6: What's In The Box
Introduction Commander Touch User Guide What’s in the Box? Commander Touch Display Controller Commander Touch Tuner Module Aux Audio Cable FMDA25 FM Direct Adapter Flush Mount Antenna Alcohol Preparation Pad Screws (4) Mounting Brackets and Magnetic Mount Antenna Wiring Harness... -
Page 7: Commander Touch Connections
Display Controller Pigtail Cable: Connects to the DISP connection on the Tuner Module . Micro USB Port: SiriusXM may occasionally release a system software update for Commander Touch . The update can be installed by connecting a USB Flash Drive with the software update to the micro USB port located at the bottom of the Display Controller . -
Page 8: Step 1: Install The Commander Touch Display Controller
Commander Touch User Guide Step 1: Install the Commander Touch Display Controller WARNING! DO NOT attempt to install Commander Touch while driving . Park your vehicle in a safe location before beginning installation . The Commander Touch Display Controller can be mounted in a variety of ways . - Page 9 Introduction Commander Touch User Guide 4. Bend each of the two Mounting Brackets into a U shape . If needed, the ends of the Mounting Brackets can be trimmed using metal shears to accommodate thicker dash material . 5. Attach the Mounting Brackets to the rear of the Flush Mount, using the provided 4 screws .
- Page 10 Introduction Commander Touch User Guide 6. Once the Flush Mount is secured in place, insert the Commander Touch Display Controller into the Flush Mount . First, route the cable from the left side of the Display Controller into the opening...
-
Page 11: Step 2: Install The Commander Touch Tuner Module
Step 2: Install the Commander Touch Tuner Module The Commander Touch Tuner Module should be installed and secured behind the dash or center console using wire ties (not included) . Keep in mind that you will need to route several cables to the Tuner Module, so allow enough clearance for the cable connections . -
Page 12: Step 3: Install The Magnetic Mount Antenna And Route The Antenna Cable
Introduction Commander Touch User Guide Step 3: Install the Magnetic Mount Antenna and Route the Antenna Cable Proper placement of the Magnetic Mount Antenna is very important . Consult a professional installer if you are uncomfortable with installing the antenna yourself . More detailed installation instructions can be found at siriusxm .ca/install . - Page 13 Introduction Commander Touch User Guide CAUTION! Don’t mount the antenna close to another antenna . Mount it at least 3 inches away . Route the Antenna Cable Before you begin routing the antenna cable, read these general instructions for how to route and hide the antenna cable .
- Page 14 Introduction Commander Touch User Guide Route cable out from under rear windshield moulding and tuck into weatherstripping around trunk opening Avoid sharp bends by running cable through Pull weatherstripping weatherstripping for several inches from trunk opening Tuck cable into weatherstripping.
- Page 15 Introduction Commander Touch User Guide Use a blunt plastic putty knife or similar blunt tool to lift edge of interior trim and tuck cable Route cable under under trim. Continue trim or upholstery towards front of vehicle Continue routing cable...
- Page 16 Introduction Commander Touch User Guide Sedan/Coupe With Antenna Placed at the Rear of the Roof: 1. Feed the antenna cable from the antenna underneath the rubber molding around the rear window . Use a blunt plastic putty knife or similar blunt tool to lift the rubber molding around the rear window and tuck the antenna cable underneath the molding .
- Page 17 Introduction Commander Touch User Guide 5. Connect the antenna connector to the ANT connection of the Tuner Module . Note: Use only SiriusXM approved antennas . Sport Utility Vehicle (SUV) 1. Feed the antenna cable underneath the rubber weather stripping of the Antenna rear tailgate window/door and route the cable along the rear hatch .
- Page 18 Introduction Commander Touch User Guide Pickup Truck 1. Use a blunt plastic putty knife or similar blunt tool to lift the rubber molding around the windshield and tuck the antenna cable underneath it . 2. Continue tucking the cable underneath the windshield molding around the windshield to the lowest corner .
-
Page 19: Step 4: Install The Wiring
Introduction Commander Touch User Guide Step 4: Install the Wiring Refer to the wiring diagram below and install the Power Wiring Harness, and the AUX In or FM Input audio connection . Display Controller 6 ft. Pigtail Cable ANTENNA Tuner Module... - Page 20 . Install the Audio Connection There are two ways to connect the audio for the Commander Touch: using the AUX Audio Cable, or using the FMDA25 FM Direct Adapter . Both audio connection solutions are included with the Commander Touch, and both audio solutions can be active at the same time .
- Page 21 Audio Level adjust the audio output level The installation is complete and you are now ready to activate your Commander Touch . Continue with “Step 5: Subscribe” on page 23 . Connecting the Audio Using the FMDA25 FM Direct Adapter Certain vehicle models will require adapters to connect the vehicle’s AM/FM antenna to the FMDA25,...
- Page 22 FM channel . Swipe left or right to Settings Change the FM Channel page and tap FM The installation is complete and you are now ready to activate your Commander Touch . Continue with “Step 5: Subscribe” on page 23 .
-
Page 23: Step 5: Subscribe
Activation usually takes 10 to 15 minutes after you have completed the subscription process, but may take up to an hour . We recommend that your Commander Touch remain on until subscribed . Once subscribed, the Commander Touch will receive, and you can tune to, the channels in your subscription... -
Page 24: Step 6: Update The Commander Touch Software
Prerequisites for a Software Update Before you attempt to update the software in your Commander Touch, be sure you can meet the following prerequisites . If you cannot meet all of the prerequisites, do not attempt a software update . - Page 25 Introduction Commander Touch User Guide update, the process cannot be interrupted . 6. You can provide uninterrupted power to your Commander Touch for the duration of the software update . Software Update Instructions Commander Touch must remain on during the entire software update process . If power is interrupted during the software update process your Commander Touch will become damaged .
- Page 26 The following is a list of flash drives which may be used for updating the software in your Commander Touch . There may be many other USB flash drives that will work, however they have not been tested by SiriusXM . If you have trouble using your own USB flash drive, please try one from this list .
- Page 27 Introduction Commander Touch User Guide USB Flash Drives which require a OTG (On the Go) Adapter or OTG Adapter Cable that have been validated by SirusXM: Brand Capacity Drive Type Product Name Model No . 32 GB Regular PNY - Micro Metal Attaché 32GB USB 2 .0...
-
Page 28: Using Commander Touch
Turning the Commander Touch On and Off Press the Power button to turn the Commander Touch on . Press and hold the Power button for one second to turn off . The display may stay on for a second or two after you press and hold for one second;... -
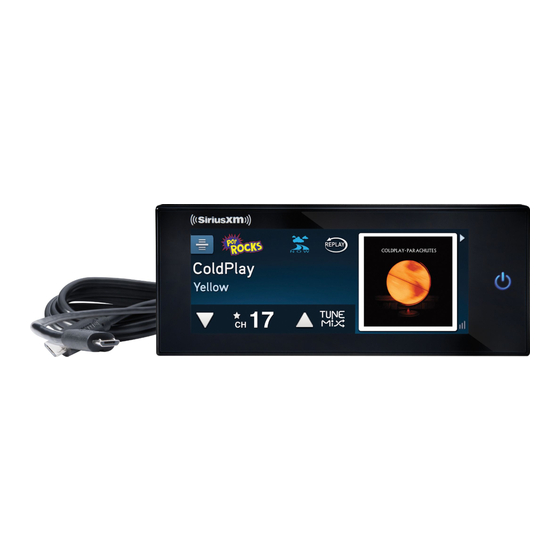
Page 29: The Main Display Screen
Using Commander Touch Commander Touch User Guide The Main Display Screen The following is a brief description of the main display screen and swipe area pages . Swipe Area 1 . Channel/Category List . Tap for a list of channels with channel content . - Page 30 Power Options: Adjust the delayed power off mode, and the Power button mode . Factory Reset: Reset the Commander Touch to the factory settings . Demo Mode: Turn the Demo Mode on or off, and manually start the Demo Mode .
-
Page 31: Understanding The Swipe Area Carousel
Understanding the Swipe Area Carousel The swipe area on the Commander Touch main display screen is a circular carousel which contains Album Art, Favourites, Replay List, and Settings . You can swipe left or right in the Swipe Area to change what is displayed in the Swipe Area . -
Page 32: Tuning Channels
Using Commander Touch Commander Touch User Guide Tuning Channels Tuning Channels 1. Tap the Channel Up/Down icons q p to immediately tune to the next or previous channel . 2. Tap and hold to quickly scroll through the channels . Release to tune to the channel that is displayed . -
Page 33: Favourite Channels
Commander Touch Features Commander Touch User Guide Favourite Channels You can set up to 18 of your Favourite channels (6 each in three pages) so you can easily access those channels . Channels saved as Favourites remember up to 30 minutes of content that played on those Favourite channels, so that when you tune a Favourite channel you can rewind up to 30 minutes . - Page 34 Commander Touch Features Commander Touch User Guide 3. Swipe up and down to display the page containing the Favourite channel you want to delete or replace . 4. Tap the Favourite channel button you want to delete or replace .
-
Page 35: Channel Lock
. You can also use the Channel Lock On/Off feature to temporarily disable Channel Lock . When you turn Channel Lock off, Commander Touch will remember the channels you had locked . When you turn Channel Lock on again, the channels will again be locked . - Page 36 Commander Touch Features Commander Touch User Guide individual channels to lock the channel . A lock icon will be displayed to the left of the channel number to indicate it is now a locked channel . (Tap a locked channel to unlock .) 5.
- Page 37 4. If you have entered the correct lock code the channel will be tuned . Note that all locked channels are now unlocked, and will remain unlocked until you power Commander Touch off and on again . Also refer to “Directly Tuning Channels” on page 32 .
-
Page 38: Pause & Replay
ACC (accessory) power connection is used, and the power option mode is set to Standby mode, and the delayed power mode is not set to Off, Commander Touch will continue to store content for the amount of time that was selected for delayed power mode, 10, 20, or 30 minutes . - Page 39 TIP! Pressing and holding Fast-Forward moves forward through the stored audio in 10 second intervals . Returning to the Live Broadcast Pressing and holding the Replay icon while Commander Touch is in pause & replay exits pause & replay and resumes playing the live broadcast, and the channel controls are displayed .
-
Page 40: Tunestart
In order for a TuneStart to occur, the beginning of the song must be present in the TuneStart memory . If Commander Touch is powered on after a song has already begun to be broadcast, a TuneStart will not be possible for that song . -
Page 41: Tunemix
While these music channels can be saved as Favourites, they will not be included in TuneMix . TuneMix only uses qualified music channels . • If you turn Commander Touch off while TuneMix is playing, Commander Touch will resume playing TuneMix when turned back on . - Page 42 Commander Touch Features Commander Touch User Guide 5. When in Bank mode, you can change the TuneMix channel by changing the Favourites page . Swipe to Favourites, and swipe up or down to change the current Favourites page . 6. To end TuneMix and continue listening to the channel currently playing in TuneMix tap the TuneMix icon .
-
Page 43: Software Information
Commander Touch . Subscription Status This is the status of the SiriusXM subscription for your Commander Touch . Possible statuses are: • Unsubscribed: Your Commander Touch is not subscribed to the SiriusXM service . Go to siriusxm .ca/activate to subscribe to the service, and activate your Commander Touch, or call 1-888-539-7474 . -
Page 44: Settings
. FM is used when your Commander Touch has been installed using the FMDA25 FM Direct Adapter . The FM setting allows you to turn the FM transmitter on and off, and to set and select FM channels and presets . -
Page 45: Display Options
Changing the Display Mode The display mode can be set three different ways: • Auto: Commander Touch will automatically adjust the screen brightness to the brightness setting you have selected for day and for night if the Illumination wire has been connected to your vehicles lighting system . -
Page 46: Audio Level
Settings Commander Touch User Guide Changing the Day/Night Brightness Level 1. In the Swipe Area, swipe to Settings, swipe up or down if necessary, and tap Display Options . 2. Tap Brightness Level - Day or Brightness Level - Night . -
Page 47: Feature Settings
Settings Commander Touch User Guide Feature Settings Feature Settings allows you to turn the TuneStart, Traffic and Weather Now*, and Audible Beep features on and off, and also change the TuneMix listening mode to Bank or All Channels . Turning TuneStart On and Off Refer to “TuneStart”... -
Page 48: Signal Indicator
• ACC power connection does not have power (when you turned the vehicle’s ignition off): If the Delayed Power Off Mode is set to Off, Commander Touch will turn off . You will need to press the Power button to turn it on again . - Page 49 . The delayed power off timer protects your vehicle from a dead battery by turning Commander Touch off if you are unable to return to the vehicle within 10, 20, or 30 minutes .
-
Page 50: Factory Reset
. If desired, you can also manually put Commander Touch in demo mode . You can exit demo mode at any time by tapping the main display screen . - Page 51 Settings Commander Touch User Guide entering the Demo Mode . 4. Tap the screen to exit Demo Mode . 5. You will be prompted whether you want to exit Demo Mode . Tap Confirm to exit Demo Mode . 6. Tap the Back icon in the upper left corner to exit .
-
Page 52: Troubleshooting
Troubleshooting Commander Touch User Guide Commander Touch has been designed and built to be trouble-free but if you experience a problem, try this: • Check that all connections are firm and secure . • Make sure you have installed Commander Touch as described in this User Guide . - Page 53 Call 1-888-539-7474 for further assistance . Audio sounds too soft Raise the volume of your stereo system or increase the audio output level of Commander Touch until the sound quality improves . Refer to “Audio Level” on page 46 .
-
Page 54: Product Specifications
Product Specifications Commander Touch User Guide System Power Requirements . . . . . . . . . . . . . . . . . . . . . . . . . 11 - 16 VDC (12 V nominal), 2 A (max) Operating Temperature . -
Page 55: Product Specifications
Product Specifications Commander Touch User Guide Screws Quantity . . . . . . . . . . . . . . . . . . . . . . . . . . . . . . . . . . . . 4 each Type . -
Page 56: Patent And Environmental Information
) except in compliance with applicable export laws, rules and regulations . The user of this or any other software contained in a Sirius XM Radio Inc is explicitly prohibited from attempting to copy, decompile, reverse engineer, hack, manipulate or disassemble the object code, or in any other way convert the object code into human-readable form . -
Page 57: Ic Statement
IC Statement Commander Touch User Guide IC Statement The user is cautioned that changes or modifications not expressly approved by SiriusXM Operation is subject to the following two conditions: (1) this device may not cause interference, and (2) this device must accept any interference, including interference that may cause undesired operation of the device . -
Page 58: Important Legal Information
©2016 Sirius XM Canada Inc ., all rights reserved . “SiriusXM”, “SiriusXM Satellite Radio”, “XM”, “Sirius”, the SiriusXM logo, channel names and logos are trademarks of Sirius XM Radio Inc . and are used under license . All other trademarks, service marks, images and logos are property of their respective owners . . -
Page 59: Owners Record
Owners Record Commander Touch User Guide The Radio model number is located below and the XM Radio ID is located on the label on the back of Commander Touch . Record the XM Radio ID in the space provided below . Refer to these numbers whenever you call your dealer regarding this product . - Page 60 Sirius XM Canada Inc . 400-135 Liberty Street Toronto, ON M6K 1A7 1-888-539-7474 siriusxm .ca © 2016 Sirius XM Canada Inc . SXVCT1UG 160210a...
Need help?
Do you have a question about the commander touch and is the answer not in the manual?
Questions and answers