Sirius XM RAdio Onyx User Manual
Radio & vehicle kit
Hide thumbs
Also See for Onyx:
- Quick start manual (93 pages) ,
- User manual (88 pages) ,
- Quick start manuals (2 pages)
Table of Contents
Advertisement
Advertisement
Table of Contents

Related Manuals for Sirius XM RAdio Onyx


Summary of Contents for Sirius XM RAdio Onyx
- Page 1 User Guide Onyx Radio & Vehicle Kit...
-
Page 3: Table Of Contents
Radio ID ......72 Onyx Functions ..... 10 Find Available FM Channels in Your PowerConnect Vehicle Dock . -
Page 6: Introduction
Introduction Features Congratulations on your purchase of the Onyx! The Onyx has these exciting features to enhance your overall experience: • Large color display: View artist name, song title, and channel information on a colour display. • Customize your display: Choose the backlight colour theme that matches your mood or your vehicle dash lights. -
Page 7: Safety And Care Information
Safety and Care Information IMPORTANT! Always read and understand all the instructions to avoid injury to yourself and/or damage to your device. XM Radio Inc. disclaims all responsibility for damage from data loss due to breakdown, repair, or other causes. • Do not expose to extreme temperatures (above 60˚C or below -20˚C, or above 140˚F or below -4˚F). - Page 8 Introduction Warning! • Opening the case may result in electric shock. • If the liquid crystal fluid comes in contact with your skin, wipe the skin area with a cloth and then wash the skin thoroughly with soap and running water.
-
Page 9: What's In The Box
What’s in the Box? menu jump Dash Mount direct PowerConnect Vehicle Dock Onyx Radio Aux In Cable Vent Mount and Extended Vent Clamps Screws (4) Antenna & Dash Mount PowerConnect Power Magnetic Mount Alcohol Preparation Pads Adapter Antenna... -
Page 10: Onyx Functions
Introduction Onyx Functions Up and Down Arrows Left and Right Arrows Scroll through lists and Search for channels by preview channels; also category. Power Button highlight menu options. Turn radio on and off. Select Button Press to confirm selection for channel and menu items. -
Page 11: Powerconnect Vehicle Dock
PowerConnect Vehicle Dock Colour-Coded Connections The PowerConnect Vehicle Dock has colour-coded connectors to assist you in connecting the cables to the correct connector. Rear View AUDIO ANT (Silver) PWR (Red) FM (Blue) AUDIO (Green) Connection for Connection for Connection for Aux In Connection for the Magnetic PowerConnect... - Page 12 Introduction Wire Guide The PowerConnect Vehicle Dock has a wire guide at the top rear that can help you to organize the cables and wires connected to the dock. If you need to bring a cable or wire from one side of the dock to the other, utilize the wire guide by looping the cable though the wire guide as shown.
-
Page 14: Vehicle Installation
Several examples of the Onyx mounted in a vehicle are shown: A is the on dash method using the Dash Mount, and B is the vent clip method using the Vent Mount. - Page 15 Option 3 Option 4 Option 5...
-
Page 16: Step 2: Install The Dash Or Vent Mount
Follow the instructions on the next several pages for the mounting method you have selected. NOTE! The PowerConnect Vehicle Dock included with Onyx is compatible with the T-slot style Dash and Vent Mounts. If you have an existing Dash Mount or Vent Mount in your vehicle, you can continue to use it with this dock, and skip this step. - Page 17 vehicle. When the orientation is correct, tighten the knob. Knob Adhesive Foot Dock Mounting Plate 4. Attach the Dash Mount to the PowerConnect Vehicle Dock using the 4 provided screws. 5. Before you attach the Dash Mount to the dash, skip ahead and finish the remainder of the vehicle installation so that the cables are attached to the dock.
- Page 18 1. Locate a vent with horizontal louvers Extended Vent Clamps sturdy enough to hold your PowerConnect Vehicle Dock and Onyx Radio. 2. If the vent louvers in your vehicle are recessed, you may need to use the longer Short Vent Clamps vent clamps with the Vent Mount.
- Page 19 3. Attach the Vent Mount to the PowerConnect Vehicle Dock using the 4 provided screws. 4. Before you attach the Vent Mount to the vent, skip ahead and finish the remainder of the vehicle installation so that the cables are attached to the dock.
-
Page 20: Antenna
Vehicle Installation Step 3: Mount the Magnetic Mount Antenna The Magnetic Mount Antenna contains a strong magnet which will stick to any metal part of your vehicle, but will not damage the vehicle. To install the Magnetic Mount Antenna: 1. Choose the best location for your antenna considering your vehicle type. - Page 21 SUV: We recommend mounting the antenna at the rear of the roof as shown. Convertible: We recommend mounting the antenna at the leading edge of the trunk as shown. Pickup Truck: We recommend mounting the antenna just above the front windshield as shown.
- Page 22 Vehicle Installation 3. Place the antenna in the location you selected. Follow the Tips and Cautions shown on the next several pages. TIP! Mount the antenna on the roof (for most vehicles) or trunk (for convertibles) where it has a clear view of the sky in all directions.
- Page 23 CAUTION! Don’t mount the antenna inside the vehicle, for example, on the dashboard. CAUTION! Don’t mount the antenna on any of the vehicle’s front, back or side pillars. CAUTION! Don’t mount the antenna close to a roof rack. Adjust the rack so it’s further away from the antenna or move the antenna closer to the center of the roof.
- Page 24 Vehicle Installation CAUTION! Don’t mount the antenna close to another antenna. Mount it at least 7.5 cm (3 inches) away.
-
Page 25: Step 4: Route The Magnetic Mount Antenna Cable
Step 4: Route the Magnetic Mount Antenna Cable Before you begin routing the antenna cable, read these general instructions for how to route and hide the antenna cable. Then route your antenna cable according to the instructions which follow for your specific type of vehicle. Use a blunt plastic putty knife, a credit card, a plastic knife, or a similar blunt tool to lift the rubber window moulding... - Page 26 Vehicle Installation Route cable out from under rear windshield moulding and tuck into weatherstripping around trunk opening Avoid sharp bends by running cable through Pull weatherstripping weatherstripping for several inches from trunk opening Tuck cable into weatherstripping. Route cable through weatherstripping several inches to avoid sharp bends Pull cable out of weatherstripping and route through trunk to cabin...
- Page 27 Bring cable out of weatherstripping and into trunk Route cable along trunk wall and into cabin through gap or conduit, along existing wiring harness Route cable along trunk wall and into cabin...
- Page 28 Vehicle Installation Use a blunt plastic putty knife or similar blunt tool to lift edge of interior trim and tuck cable Route cable under under trim. Continue trim or upholstery towards front of vehicle Continue routing cable under trim or carpet towards front of vehicle Route cable from trunk under interior trim, into...
- Page 29 Continue routing cable under carpet or console to radio location Coil excess cable under Pull carpet carpet or mat or mat back Bring cable out from trim Bring cable out from trim and route under carpet to dashboard or console TIP! Always be careful to include enough slack in your cable to accommodate open doors or trunk lids.
- Page 30 Vehicle Installation • Sedan/Coupe With Antenna Placed at the Rear of the Roof: 1. Feed the antenna cable from the antenna underneath the rubber molding around the rear window. Use a blunt plastic putty knife or similar blunt tool to lift the rubber molding around the rear window and tuck the antenna cable underneath the molding.
-
Page 31: Step 5: Connect The Magnetic Mount
careful not to crimp or cut the cable. 5. Bring the cable out from the trim near the front of the cabin and route it under the carpet toward the dashboard or console. Coil any excess cable in a hidden location, such as under the carpet, keeping it away from any vehicle pedals or controls. -
Page 32: Antenna And Powerconnect Power
Vehicle Installation • Sedan/Coupe With Antenna Placed at the Front of the Roof: 1. Feed the antenna cable from the antenna underneath the rubber molding around the windshield. Use a blunt plastic putty knife or similar blunt tool to lift the rubber molding around the windshield and tuck the antenna cable underneath the molding. -
Page 33: Step 5: Connect The Magnetic Mount
• SUV: 1. Feed the antenna cable underneath the rubber weather stripping of the rear tailgate window/door and route the cable along the rear hatch. Lift the weather stripping from the opening and tuck the cable inside it, then replace the weather stripping. Pull the cable out from weather stripping and route it into the cabin under the interior trim. - Page 34 Vehicle Installation • Convertible: 1. Bring the antenna cable from the antenna into the trunk at the front edge of the trunk lid. Keep any bends in the cable loose. Tape or tie the cable along the inside of the trunk lid to the trunk lid hinge strut.
-
Page 35: Step 5: Connect The Magnetic Mount
connector of the dock. 6. Continue with “Step 5: Connect the Magnetic Mount Antenna and PowerConnect Power Adapter” on page 37 . • Pickup Truck: 1. Use a blunt plastic putty knife or similar blunt tool to lift the rubber molding around the windshield and tuck the antenna cable underneath it. -
Page 36: Step 5: Connect The Magnetic Mount
Vehicle Installation 5. Bring the end of the cable out at the PowerConnect Vehicle Dock location. Leave yourself enough cable so you can easily connect it to the antenna connector of the dock. 6. Continue with “Step 5: Connect the Magnetic Mount Antenna and PowerConnect Power Adapter”... -
Page 37: Adapter
Step 5: Connect the Magnetic Mount Antenna and PowerConnect Power Adapter 1. Plug the Magnetic Mount Antenna into the silver ANT connector on the AUDIO FM OUT PowerConnect Vehicle Dock. 2. Insert the PowerConnect Power Adapter into your vehicle’s cigarette lighter or power adapter socket. -
Page 38: Step 6: Connect The Audio
Cassette Adapters are sold separately and can be purchased from an electronics retailer, or go to siriusxm.ca. • Option 3: Good: Use the PowerConnect feature in the Onyx. PowerConnect plays the audio through your vehicle’s FM radio. - Page 39 4. Insert your Onyx into the dock. 5. Power on your Onyx by pressing the Power button. 6. Be sure the vehicle is outside and the antenna has a clear view of the sky. Verify that you are receiving the XM signal. There should at least be...
- Page 40 Dash or Vent Mount. Then the installation is complete. 11. The audio level output of the Onyx can be increased or decreased as necessary to match the audio levels of other sources in your vehicle. Refer to “Set Audio Level” on page 80.
- Page 41 3. Insert the dock into the mount. 4. Insert your Onyx into the dock. 5. Power on your Onyx by pressing the Power button. 6. Be sure the vehicle is outside and the antenna has a clear view of the sky.
- Page 42 Dash or Vent Mount. Then the installation is complete. 11. The audio level output of the Onyx can be increased or decreased as necessary to match the audio levels of other sources in your vehicle. Refer to “Set Audio Level” on page 80.
- Page 43 Option 3: PowerConnect Installation Instructions 1. Insert the dock into the mount. 2. Insert your Onyx into the dock. 3. Power on your Onyx by pressing the Power button. 4. Be sure the vehicle is outside and the antenna has a clear view of the sky.
- Page 44 107.9. 6 Ensure Onyx is tuned to channel 1. Upon power up, Onyx should tune to channel 1 by default, when it’s not yet activated. If it’s not on channel 1, refer to “Listening to Satellite Radio”...
- Page 45 From the Universal Xpress Car Kit” on page 87 , and complete the additional instructions before continuing with the next step. 8. Set your Onyx to transmit on the same FM channel that you have selected in step 7: 90.1...
- Page 46 FM channels until you find one that allows you to hear XM clearly. Each time, you will need to tune your vehicle’s FM radio to the FM channel and then set your Onyx to transmit on the same FM channel (steps 7 & 8).
- Page 47 If the signal reception is good, but there is no XM audio when tuned to channel 1, verify that both the Onyx and your vehicle’s FM radio are tuned to the same FM channel (steps 7 & 8). Also ensure the chosen FM channel is a suitable one to use in your area (step 5).
-
Page 50: Activation
2. Make a note of your XM Radio ID. You can find it on channel 0, on a label on the bottom of the gift box, and on the label on the back of your Onyx. NOTE! The XM Radio ID does not use the letters I, O, S, or F. -
Page 52: Using Your Onyx
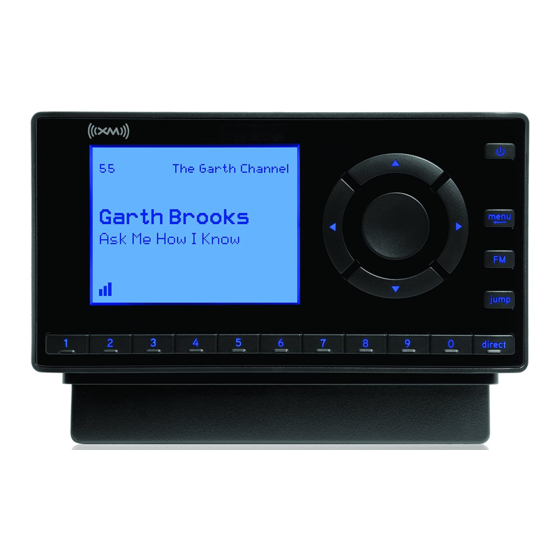
Using Your Onyx The Main Display When listening to a channel, information about the channel is displayed. Lithium Channel Number Channel Name Smashing Pumpkins Artist Name or Talk Show Host Bullet With Butterfly Wings or Sports Teams/Score Antenna Signal Song Title... -
Page 53: Navigation Basics
Navigation Basics Power Button Pressing the Power button turns the Onyx On or Off. Navigation Buttons Use the Left, Right, Up, and Down buttons to navigate through various features and functions of Onyx. • Left or Right button: Displays the channel categories such as Rock, Pop, Sports, Talk/New etc. - Page 54 Using Your Onyx Menu Button menu Pressing menu displays various options to make setup and feature changes. Pressing menu when in menu options returns to the previous menu option screen until menu options is exited. Pressing and holding menu returns to the main display screen in most instances.
-
Page 55: Listening To Satellite Radio
Listening to Satellite Radio Tune a channel: 1. Press and release to immediately tune to the next or previous channel. 2. Press and hold to quickly scroll through the channels. Release to tune to the channel that is displayed. View a category: Channels are organized into categories to make it easier for you to find the ones that suit your taste. - Page 56 Using Your Onyx Direct Tune A channel can be tuned directly by entering the channel number using the number buttons. 1. To directly tune a channel press direct. Direct Tune Enter channel # 6 2 _ 2. Use the number buttons 0-9 to enter the channel number and wait a moment until the channel is tuned, or press the Select button to immediately tune to the channel.
- Page 57 Jump Pressing the jump button tunes the channel which you were previously listening Return to Main Display Screen Pressing and holding menu in most instances will return you to the main display screen. In some cases, you may need to follow the instructions on the display screen.
- Page 58 Using Your Onyx Favourite Channels You can set up to 10 of your favourite channels so you can easily access them. Each favourite channel can be assigned to a number button. To assign a favourite channel to a number button: Favorite Saved 1.
- Page 59 Scanning Channels in a Category You can scan a category and listen to each channel for 10 seconds before the next channel is automatically tuned. If you want to stay tuned to the channel being played and stop the scan, just press the Select button. To scan a category: 1.
-
Page 60: Fm Presets
FM presets make it easy to quickly access stored FM channels and choose a new FM channel from them. Use FM presets when you use PowerConnect to listen to your Onyx through your vehicle’s FM radio. (Refer to “Option 3: PowerConnect Installation Instructions”... - Page 61 TIP! To configure the list of preset FM channels, you need to find available FM channels in your area. Refer to”Find Available FM Channels in Your Area” on page 73. Next, refer to “Set and Select an FM Channel” on page 75.
-
Page 64: Special Features
You can change the colour of the display screen to one of 6 colour themes: Blue, Red, Amber, Yellow, Silver, or Teal. You can coordinate the colour theme with your vehicle dash lights and with the Trim Ring of your choice for your Onyx. The default colour theme is blue. -
Page 65: Parental Controls
All locked channels become unlocked and will remain unlocked until you turn the Onyx Off, and back On. In the category list, the previously locked channels will show an unlocked icon To turn Parental Controls On (or Off): 1. - Page 66 Special Features For each digit, press one of the 0-9 keys and then press advance to the next digit. (Press if you need to go back and edit a previous digit.) Enter Parental Code ii. When you have selected all 4 digits of your code press the Select button.
- Page 67 4. Press and hold menu to return to the main display screen. To lock (or unlock) channels or categories: 1. Press menu. 2. Press to scroll to and highlight Parental Controls. Press the Select button. 3. You will be prompted to enter the 4-digit code. For each digit, press one of the 0-9 keys and then press to advance to the next digit.
- Page 68 Special Features Locked Channels Locked Categories Locked Channels Locked Channels Rock Rock Deep Tracks Deep Tracks Hair Nation Hair Nation xL Liquid Metal xL Liquid Metal SIRIXM U SIRIXM U 8. You can continue to lock and unlock as many channels or categories as you wish.
- Page 69 6. At the “Parental Controls” screen, Press to scroll to and highlight Change My Code. Press the Select button. 7. You will be prompted to enter a new 4-digit code. For each digit, press one of the 0-9 keys and then press to advance to the next digit.
- Page 70 If your code is correct the channel will be tuned. All locked channels become unlocked and will remain unlocked until you turn the Onyx Off, and back On. In the category list, the previously locked channels will show an unlocked icon...
-
Page 72: Configuring Your Onyx
Configuring Your Onyx Radio ID Your Onyx has an alphanumeric ID which uniquely identifies the radio. This ID is used during the activation process. To display the Radio ID: 1. Press menu. Radio ID 2. Radio ID will be highlighted. If it is... -
Page 73: Area
Find Available FM Channels in Your Area Before attempting any of the procedures below, you should park your vehicle in a safe location. Do not attempt to set up your FM channels or any Onyx function while driving. PowerConnect allows you to listen to XM audio through your vehicle’s FM radio. - Page 74 FM channels along your route for best performance. If this is the case, we recommend saving the best FM channels as presets on your FM radio and Onyx. Then you simply select and match the best channel for the area you are in.
-
Page 75: Set And Select An Fm Channel
Each FM preset is stored in its own storage location. You can easily add or edit the FM preset in any one of the 5 storage locations. IMPORTANT! The Onyx and the vehicle’s FM radio need to be tuned to the same FM channel in order to hear the audio. - Page 76 Configuring Your Onyx If the chosen storage location is empty (denoted by “---“), or if the storage location contains the FM preset currently being used (denoted by “current”), then the FM channel tuning screen is displayed. ii. If the chosen storage location has an FM preset that is not currently being used, and you want to edit it, Edit Channel is highlighted.
- Page 77 7. The chosen FM channel will be confirmed on the display screen 99.3 FM and the Onyx will tune to that FM channel. Set your vehicle radio to the 8. Set your vehicle’s FM radio to same above channel to enable audio.
- Page 78 Configuring Your Onyx To quickly select an FM channel from the preset list: 1. Press FM to display the current FM preset. 99.3 FM 2. To display and select the next FM preset, press FM. The radio will tune Set your vehicle radio to the to the displayed FM channel.
-
Page 79: Set Brightness
Set Brightness To change the display’s brightness: 1. Press menu. 2. Press to scroll to and highlight Set Brightness Brightness and press the Select button. 3. Press to decrease or increase the brightness of the display. 4. Press the Select button to confirm Press arrow keys to adjust the brightness setting. -
Page 80: Set Audio Level
Audio level is used to adjust the Onyx’s volume level to match the volume of other audio sources you may use, such as a CD player, other FM stations, or an MP3 player. -
Page 81: Signal Indicator
XM satellites. In large cities, there are terrestrial transmitters (ground repeaters) to help increase the signal coverage. Your Onyx can display the received strength of the satellite and terrestrial signals being received. To display the signal strength: 1. -
Page 82: Factory Settings
Factory Settings The factory settings menu has two choices, AUX Detect and Restore Defaults. AUX Detect Factory Settings AUX Detect allows the Onyx Radio to AUX Detect automatically detect a connection made to the enabled AUDIO connector of the PowerConnect Vehicle Restore Defaults Dock by an Aux In Cable or Cassette Adapter. - Page 83 3. AUX Detect should be highlighted and show as enabled. Press the Select button to toggle the setting. 4. A warning screen will be displayed. Press the Select button to confirm that you want to disable AUX Detect. 5. If you want to cancel press menu to return to Factory Settings.
- Page 84 4. A warning screen will be displayed. If you are certain that you want to reset your Onyx to the default settings, press the Select button to confirm. 5. If you want to cancel, press menu to return to Factory Settings.
-
Page 85: Demo Mode
If desired, you can also manually put the Onyx in demo mode. The ability for Onyx to enter demo mode is enabled by default. If you don’t want Onyx to ever enter the demo mode, you can disable the demo feature. You can enable it again at another time if desired. - Page 86 Configuring Your Onyx main display screen. If you have selected enabled continue with step 5. 5. Press to scroll to and highlight Enter Demo Mode and press the Select button. The demo mode will start in 10 seconds. 6. To exit demo mode at any time, press and hold the Select button for 10 seconds.
-
Page 87: Using The Vehicle Dock From The Universal Xpress Car Kit
1. Disable the AUX Detect feature. Refer to “AUX Detect” on page 82, and disable AUX Detect. 2. Turn the FM Transmitter in the Onyx On. Refer to “Turn FM Transmitter On/Off” on page 88, and turn the FM Transmitter On. -
Page 88: Turn Fm Transmitter On/Off
4. The FM Channels menu item will now be accessible, allowing you to tune the Onyx and the FM radio in your vehicle to the same FM channel. TIP! Onyx is programmed with FM channel 97.9 as the default setting. - Page 89 Aux In Cable or a Cassette Adapter as the audio connection option, you’ll have to turn the FM Transmitter under the FM Settings menu in the Onyx Radio Off, if it was previously turned On. 1. Press menu.
-
Page 92: Troubleshooting
Troubleshooting Onyx has been designed and built to be trouble-free but if you experience a problem, try this: • Check that all connections are firm and secure. • Make sure the vehicle power socket is clean and free of corrosion. - Page 93 PowerConnect Vehicle Dock. Make sure the cable is not bent or broken. • Turn Onyx Off, then On, to reset this message. • If the message persists, most likely the Magnetic Mount Antenna cable has been damaged. Replace the antenna.
- Page 94 • If you are using the Vehicle Dock that came with the Universal Xpress Car Kit, ensure that the FM Transmitter in the Onyx is turned Off, and increase the audio level of the Onyx. Refer to “Set Audio Level” on page 80. Audio sounds too soft • Raise the volume of your stereo system or increase...
- Page 95 • If you are using the Vehicle Dock that came with the Universal Xpress Car Kit, ensure that the FM Transmitter in the Onyx is turned On. Refer to “Turn FM Transmitter On/Off” on page 88 . No song title or artist name is • The information may not be available or updates...
-
Page 98: Product Specifications
Product Specifications Dimensions Onyx 115 mm (W) X 61 mm (H) X 18 mm (D) 4.5 in (W) X 2.4 in (H) X 0.71 in (D) Weight Onyx 93 g (3.28 oz) Audio Outputs 3.5 mm diameter mini stereo jack... -
Page 99: Patent Information
Patent and Environmental Information Patent Information It is prohibited to, and you agree that you will not, copy, decompile, disassemble, reverse engineer, hack, manipulate, or otherwise access and/or make available any technology incorporated in this product. Furthermore, the AMBE voice ª... - Page 100 FCC and IC Statement The user is cautioned that changes or modifications not expressly approved by XM Radio Inc. can void the user’s authority to operate this device. This device complies with Part 15 of the FCC Rules and is certified to Industry Canada’s RSS- 210 specifications.
- Page 101 © 2012 Sirius XM Canada Inc. “SiriusXM”, the SiriusXM logo, channel names and logos are trademarks of Sirius XM Radio Inc. and are used under license. “NFL” and the NFL Shield design are trademarks of the National Football League. NASCAR® is a registered trademark of the National Association for Stock Car Auto Racing, Inc.
-
Page 102: Owners Record
Owners Record Owner’s Record The radio model number is located below and the XM Radio ID is located on the label on the back of the Onyx. Record the XM Radio ID in the space provided below. Refer to these numbers whenever you call your dealer regarding this product. - Page 104 .siriusxm .ca Sirius XM Canada Inc . 135 Liberty St . - 4th floor Toronto, Ontario, M6K 1A7 1-877-438-9677 © 2012 Sirius XM Canada Inc . Onyx User Guide 120830a...
Need help?
Do you have a question about the Onyx and is the answer not in the manual?
Questions and answers