Table of Contents
Advertisement
Quick Links
Advertisement
Table of Contents

Related Manuals for Unitron Z730 series


Summary of Contents for Unitron Z730 series
- Page 1 Distributed By:...
-
Page 2: Table Of Contents
COMPONENTS DIAGRAM ....................4 ASSEMBLY .......................... 5 DETAILED ASSEMBLY PROCEDURE ................6 ADJUSMENT AND OPERATION ADJUSTING BINOCULAR VIEWING HEAD ..............8 FOCUS ADJUSTMENT ....................9 SPECIFICATIONS ......................10 TROUBLESHOOTING ......................11 MAINTENANCE........................12 SERVICE ..........................12 WARRANTY ........................12 ® UNITRON... -
Page 3: Safety Notes
A regular schedule of preventative ® maintenance by qualified personnel is highly recommended. Your authorized UNITRON distributor can arrange for this service. -
Page 4: Introduction
Z730 STEREO MICROSCOPE INTRODUCTION ® ® Congratulations on the purchase of your new UNITRON microscope. UNITRON microscopes are engineered and manufactured to the highest quality standards. Your microscope will last a lifetime if ® used and maintained properly. UNITRON microscopes are carefully assembled, inspected and tested by our staff of trained technicians in our New York facility. -
Page 5: Assembly
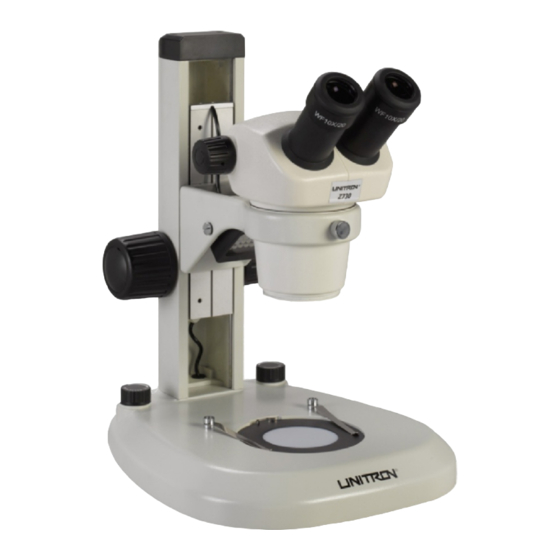
The diagram below shows how to assemble the various modules. The numbers indicate the order of assembly. When assembling the microscope, make sure that all parts are free of dust and dirt, and avoid scratching any parts or touching glass surfaces. Binocular Head & Zoom Body Eyepieces Lock-screw Power Cord ® UNITRON... -
Page 6: Detailed Assembly Procedure
3 Avoid placing the instrument in a dusty environment. When not in use, cover the microscope with the dust cover. 4 Keep the microscope on a flat and stable surface. Fig. 3 ® UNITRON... - Page 7 Input Rating : 100V ~ 240V. Optional trinocular head is available for camera or imaging accessories. Video/Photography Accessories Assembly Thread the C-mount video adapter ④ onto the camera ⑤ and insert into the trinocular port. Secure with lock screw. ⑥ ® UNITRON...
-
Page 8: Adjusment And Operation
97mm (the distance between the microscope objective to the top of the specimen), the binocular head bracket ⑤ can be mounted onto higher or lower positions according to your needs by removing the clamping bolt with the Allen wrench provided. ® UNITRON... -
Page 9: Focus Adjustment
④ is used to adjust the top illumination. Each knob has its own on/off. Rotate counterclockwise to increase the power and brightness. Rotating clockwise would decrease the brightness until the power is off. ® UNITRON... -
Page 10: Specifications
Visual Field Visual Field Total Visual Field (mm) (mm) Magnification Magnification (mm) Magnification 7-30X 25.7-6 10.5-45X 20.0-4.7 14-60X 15.7-3.7 0.5X 3.5-15X 51.4-12 5.2-22.5X 40.0-9.4 7-30X 31.4-7.4 0.63X 4.4-18.9X 43.9-10.6 6.6-28.3X 31.7-7.4 8.8-37.8X 24.9-5.8 14-60X 12.8-3 21-90X 10.0-2.3 28-120X 7.9-1.8 ® UNITRON... -
Page 11: Troubleshooting
6 . Zoom microscope body Tension adjustment Tighten it properly. 9 – Fig 8 ring is too loose. drops or specimen goes out of focus during observation. ® UNITRON... -
Page 12: Maintenance
Unitron Ltd. This warranty expressly excludes any liability by Unitron Ltd. for consequential loss or damage on any grounds, such as (but not limited to) the non-availability to the End User of the product(s) under warranty or the need to repair work processes.
Need help?
Do you have a question about the Z730 series and is the answer not in the manual?
Questions and answers