
Related Manuals for Unitron LX Microscopes MIDAS


Summary of Contents for Unitron LX Microscopes MIDAS
- Page 1 MIDAS ® Digital Microscope 5MP -User Manual- 73 Mall Drive, Commack, NY 11725 unitronusa.com • info@unitrousa.com • 631-543-2000 REV.C...
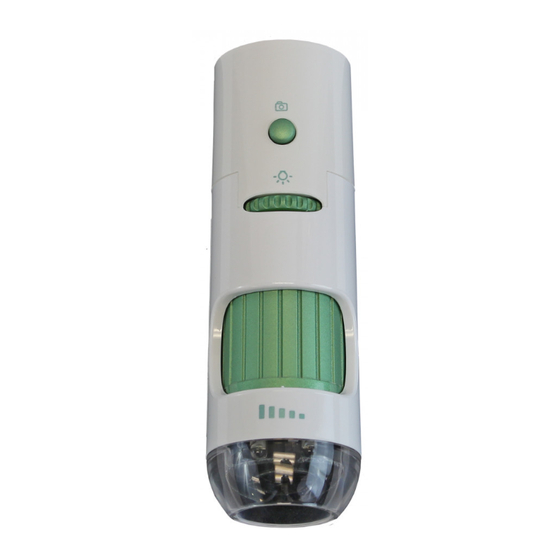
- Page 2 Digital Microscope 5MP ● Pentium 4 3.0G CPU or equivalent AMD Phenom II above ● 1024 MB DDR RAM or above The 200X digital microscope provides a 10~200X adjustable magnification range, and the ● Northbridge Intel i945GZ or above 500X microscope provides 500X magnification. The built-in high-performance LEDs can ●...
-
Page 3: Install Software
b.) Press the holder, pull up and down to adjust the distance between the microscope and the object. c.) Place the microscope on the stand holder. 2. Insert the software installation CD into the CD-ROM drive. The software will install automatically.(fig.1) Install Software 1. - Page 4 4. Double Click the【MicroViewer 5MP】software, and the image will show up.(fig.3) 10. When magnifingan object, adjust the focus knob slightly to the left and move the 5. Place the camera on or above the object to be viewed.(fig.4) digital microscope up and down until a clear image is obtained.(fig.9) 11.
-
Page 5: Software Application
Function Key lists: Software application 1. Double click the “MicroViewer 5MP” icon on your desktop. Snapshot: Zoom in / out: Note:1.Be make sure to connect the Digital Microscope USB cable to the USB port. Select the zoom-in and zoom-out Take a picture. Note:2. - Page 6 Compare Compare - Second Microscope Function Key List 1. Please click the Compare button, and the compare window will appear on the screen. Camera 2: Save clipboard: Warning: For the best results screen resolution requirement should be at least 1440x900 Enable/Disable the image of the Copy the live image to clipboard.
-
Page 7: Video Setup
Video Setup Crosshair Click the Setup button and the following window will appear: 1. On the live mode, click the crosshair button and the crosshair will appear(fig.15): Source:Allows a user to choose the image source 2. You can position the crosshair by clicking the right button.(fig.16) if there is more than one microscope connected to the Video Format:Supports three options: 640x480 / 1024x768 / 2048x1536. -
Page 8: Measurement Function
Measurement Function Measurement-Calibrate 1. Place the camera on a ruler and adjust the Click the Measurement button, and the measurement window will appear. The image will focus knob untill the image is sharp. be frozen. You can calibrate or measure the frozen image. 2. - Page 9 4. Drag to the lower right of the object. 3. Drag to the left side and release the right button of the mouse. PS. You can aim easily by aligning the X axis cross line with the bottom of the object and 4.
- Page 10 Measurement-Line 3.Drag to the lower right of the object. 1. Check the “Measure” box, then select the “Line” Mode. 4.Release the right button of the mouse and the rectangle will show up. 2. Hold the right button of the mouse at the left side of the object. The number means the length x width = area.
- Page 11 5. Release the right button of the mouse, and the arc measurement will appear. 5. Release the right button of the mouse, and the Rectangle measurement will appear. The “R” means radius , “A” means angle, and the “L” means arc. The number means the base x length / 2 = area.
Need help?
Do you have a question about the LX Microscopes MIDAS and is the answer not in the manual?
Questions and answers