Table of Contents
Advertisement
Quick Links
®
STEINDORFF
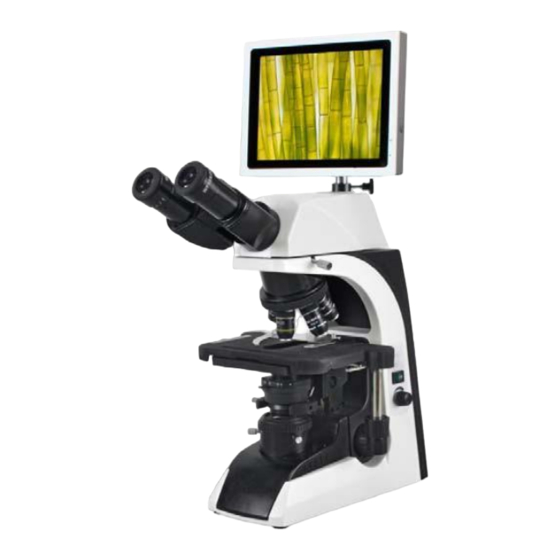
LCD Digital Microscope
NYMCS-1262
Instruction Manual
This manual is for LCD digital microscope NYMCS-1262. To ensure the safety, obtain optimum performance and
to familiarize yourself fully with the use of this microscope, it is strongly recommended that you study this manual
thoroughly before operating the microscope.
Advertisement
Table of Contents

Related Manuals for STEINDORFF NYMCS-1262


Summary of Contents for STEINDORFF NYMCS-1262
- Page 1 NYMCS-1262 Instruction Manual This manual is for LCD digital microscope NYMCS-1262. To ensure the safety, obtain optimum performance and to familiarize yourself fully with the use of this microscope, it is strongly recommended that you study this manual thoroughly before operating the microscope.
-
Page 2: Table Of Contents
® STEINDORFF Content Safety Notice …………………………………………………………………………………..Optical Parts 1. Components ………………………………………………………………………………..7 2. Technical parameter and specification ………………………………………………..9 3. Configuration ………………………………………………………………………………. 4. Assembly ……………………………………………………………………………………. 12 5. Operation …………………………………………………………………………………… 18 6. Troubleshooting …………………………………………………………………………..7. Maintenance ……………………………………………………………………………..Digital Parts 8. Introduction ………………………………………………………………………………... -
Page 3: Safety Notice
® STEINDORFF Safety notice 1. Transportation As microscope is a precision instrument, handle with care, avoiding impact or abrupt movement during transportation. Do not push or pull the microscope during using, otherwise the precision for image will be reduced. (1). Hold the curve and keep the microscope in balance Curve (2). - Page 4 ® ® STEINDORFF STEINDORFF 4. Clamp The clamps fix the microscope firmly during transportation, please remove them before using. Clamp 5. Do not take the microscope apart As it will be damaged. Such operations might have bad effect on the performance and make user get an electric shock or injured.
- Page 5 ® STEINDORFF 8. Mounting the bulb Never touch the surface of bulb with your hand directly. Please use gloves or cloth material when you mount the bulb to avoid leaving fingerprints. Fingerprints or stains should be wiped off with a tissue moistened with a small amount of alcohol.
- Page 6 ® STEINDORFF 12. Operating the microscope only indoor and under the altitude 2000m, IP52 grads. If the equipment is used in manner not specified by the manufacturer, the equipment may be impaired.
-
Page 7: Optical Parts
® STEINDORFF Optical Part 1. Components 10X eyepiece Binocular head Nosepiece Head fix screw Objective Microscope body Specimen holder Mechanical stage Switch Condenser Collector Brightness adjust knob Electronic cord Fine focus knob Stage movement knob (X-axis) Stage movement knob (Y-axis) - Page 8 ® STEINDORFF Condenser movement knob Coarse focus knob Fine focus Condenser diaphragm knob...
-
Page 9: Technical Parameter And Specification
® STEINDORFF 2. Technical parameter and specification 2.1 Specification 1. Optical system: Infinite optical system 2. Illumination: Inserted transmitted illumination, 12V20W halogen bulb(standard outfit) Input voltage: 100V~240V 50/60Hz Voltage undulation Rating 100V~240V 50/60Hz 0.8A Fuse 250V 1A delayed model, mini type fuse 2pcs 3. - Page 10 ® STEINDORFF 8. Working environment: Temperature: 0 ~40 , Humidity: max. 85%, no dew 2.2 Optical parameter 1. Optical parameter Objectives: infinite plan achromatic objectives Objectives N.A. Cover glass thickness(mm) W.D. mm Dry/Oil 0.17 0.25 0.17 0.65 0.17 2. Eyepiece: WF10X/22mm 2.3 Nomenclature...
-
Page 11: Configuration
® STEINDORFF Resolution= 2N.A. stands for wavelength ( = 0.55 m) Working distance The distance between the object surface to the first surface of optical system when you get the sharpest image. The W.D. will become more short when the magnification for the objective is bigger. -
Page 12: Assembly
® STEINDORFF Blue filter 1 set Electronic cord 1 pc Immersion oil 1 bottle Dust cover 1 pc Instruction and quality certificate 1 pc Halogen bulb ( 12V20W) 2 pcs Wrench 2.5, 1.5 Optional Item Content Piece Dark field condenser... - Page 13 ® STEINDORFF 4.1. Checking the input voltage There is correct input voltage in the label on microscope. Make sure the voltage in your position is right. Improper input voltage may cause short circuit and fire. The microscope will be damaged. Turn off the power supply (turn the switch to “O”...
- Page 14 ® STEINDORFF Clamps of Y axis Focusing adjustment Pull out the collector. The bracket is fixed by one clamp. Please remove the bolts and clamps. Clamps of stage Fixing screw for binocular head 4.3. Mount the binocular head Loosen the fixing screw in the eye tubes and insert the binocular head into the eye tubes.
- Page 15 ® STEINDORFF 4.5. Adjustment and replacement (1). Condenser The condenser is mounted in the microscope before shipment. Remove or replace the condenser according to the following steps. Handle the grooves of the condenser and pull it out. Turn the lifting knob for condenser and make the bracket in a suitable position.
- Page 16 ® STEINDORFF The clip has been mounted in the stage before shipment. Loosen two screws by wrenches supplied by manufacturer to remove the clip. (4). Eyepieces 10X eyepieces have been in the foam box before shipment. Insert the eyepiece into the eyepiece tubes and tighten the fixing screws by wrench.
- Page 17 ® STEINDORFF ★Notice: The 10X eyepiece should touch the end of eye tube. The “o” scale should be consistent with standard line when the eyepieces are inserted in or pulled out of the eye tubes. (5). Other attachments Replace other attachments (eg, camera) according to the instruction.
-
Page 18: Operation
® STEINDORFF 5. Operation 5. 1. Illumination Turn on the power supply (turn the switch to “-”) then the bulb will be on. The lightness can be adjusted by turning the adjusting knob. 5.2. Interpupillary range Adjust the siendentopf binocular to make sure that view field in the right and left eyepiece is consistent. - Page 19 ® STEINDORFF Turn the stage and focusing knob according to the direction shown in the picture. There is no coarse focusing knob in one side of stage’s moving knob and in the other side there are both coarse and fine focusing knob.
- Page 20 ® STEINDORFF and fine focusing knob to do focusing. Put the 10X objective (or 4X objective) in the optic path. Let your left eye observe through the left eyepiece and do focusing by the diopter adjusting ring in left eyepiece.
- Page 21 ® STEINDORFF edge of view field. Please do the centering again if the image of the diaphragm does not touch the edge of view field. e. Open the view field diaphragm and make its image a little bigger than the view field in practice.
- Page 22 ® STEINDORFF 100X same value to the objective’s magnification 5. 10. Observing with oil immersion There is “oil” marked in the oil immersion objective. Please use the oil immersion, which supplied by the manufacturer, between the objective and cover glass.
- Page 23 ® STEINDORFF ★ Do not expose the oil immersion in the sun or ultraviolet radiation directly. As the air bubble in the oil immersion will make bad affect to the quality of image, please make sure that there is no air bubble in the oil immersion before use. Please check the air bubble as following, remove the eyepieces and open the view field diaphragm and aperture diaphragm entirely then observe the exit pupil which is light and in nummular shape.
- Page 24 ® STEINDORFF 5.11.Adjusting the coarse focusing knob The tension of coarse focusing knob is adjustable. Please turn the tension controlling ring of the coarse focusing knob clockwise then the tension will be increased. This ring is near the coarse focusing knob. If you want decrease the tension, please turn the ring withershins.
-
Page 25: Troubleshooting
® STEINDORFF 6. Troubleshooting The performance of the microscope can be made fully by unfamiliar using and this table will give some advice. Please see the following table and please contact with manufacturer if the troubles could not be solved. - Page 26 ® STEINDORFF Revolving nosepiece not in click Revolve to click-stop position Image shift on one side Floating specimen Fasten securely Specimen rise from stage surface Place it stable Insufficient illumination Revolving nosepiece not in brightness Revolve to click-stop position Image tinged yellow...
-
Page 27: Maintenance
® STEINDORFF Replace with specified lamp Unspecified lamp bulb used or input bulb. If the same symptom Sudden lamp failure voltage too high occurs after replacing the lamp, contact your dealer Replace with specified lamp Unspecified lamp bulb used Insufficient... -
Page 28: Digital Parts
® STEINDORFF 7.3. When not in use When the microscope is not in use, cover it up with dust cover, and store in a dry place not subject to mold. We especially recommend that the objectives and eyepieces be kept in a container (such as a plastic bottle). - Page 29 ® STEINDORFF 1. Embedded OS Android 4.2.2, can link mouse and keyboard, just like a micro computer. 2. 8 inch IPS LCD screen with clear and bright vivid vision. 3. Friendly human-machine interface, can use the mouse, keyboard or touch screen to operate.
- Page 30 ® STEINDORFF Interface Built-in 2GB memory. Supports external extension SD card. Camera video interface Support external USB camera. 5 million pixels camera to image when using LCD. Frame rate: 10-15 fps. Man-machine interface 8.0 inch (Diagonal)IPS screen, resolution:1024*768.
- Page 31 ® STEINDORFF USB 2.0 OTG interface at the back HDMI interface Mini USB interface Audio module Stereo speaker with double channels Network module Supports WI-FI access Supports bluetooth Power management Power mode: ordinary, sleep (lock screen) and power off. System default ...
- Page 32 ® STEINDORFF Video player software, picture viewer software. 1.4 Camera Specification Sensor size (diagonal) 1/2.5-inch (4:3) Effective image size 5.70mm(H)x4.28mm(V) 7.13mm(diagonal) Effective pixels 2592H x 1944V Pixel size 2.2um x 2.2um Dynamic range 66.5dB S/N (maximum) 40.5dB A/D conversion resolution...
-
Page 33: Structure
® STEINDORFF Software TouchScope Software function Capture, Video and dynamic measure . Structure Structure is shown as below: Power lock key USB interface of connecting camera Supply HDMI interface... - Page 34 ® STEINDORFF Mini USB interface SD card slot USB interface When booting, Please long press the power key until the screen appear image. When shutting down, please long press the power key, popping up a box as below: Then click “OK”.
-
Page 35: Usage And Operation
® STEINDORFF . Usage and Operation 3.1 Software-TouchScope TouchScope is a special software of microscope system that apply to android platform. Using this software, you can finish the image capture, video and dynamic image calibration and measurement. 3.1.1 Main Function... - Page 36 ® STEINDORFF Photo files Tool Capture Preview video Video 3.2.1 Capture Icon Instruction Click”capture”icon, start to capture and display image on the photo viewing thumbnails...
- Page 37 ® STEINDORFF 3.2.2 Video Icon Instruction Click ”video” icon, the software is in video mode. Then click” ”, software starts to video. If want to stop video, please click” ”and will end the function of video. Then click” ”,software interface will restore to the original state.
- Page 38 ® STEINDORFF RGB : manual white balance adjustment Click icon, software performs incandescent lamp mode. Click icon, software performs fluorescent lamp mode Click icon, software performs sunny mode Click icon, software performs cloudy mode 3.2.4 Dynamic Calibration and Dynamic Measurement TouchScope provides a variety of measurement tools and supports calibration and dynamic measurement.
- Page 39 ® STEINDORFF Icon Instruction Spot measurement Circle measurement Line measurement Rectangle measurement Cross measurement Angular measurement Tool for modifying the color and thickness of lines and tag text. Export graphics to images Delete the specified measurement graphic Delete all measurement graphics...
- Page 40 ® STEINDORFF Click“ ”,enter the setting interface of software: As shown in the red box, check the mode of using mouse, which is a convenient way to measure. The measurement data will be more accurate. A. Calibration Before measuring, please do calibration.
- Page 41 ® STEINDORFF 1. Put a micro ruler on the stage. select the objective (here is 10X), focus the microscope, and make the micro ruler display clearly on the LCD screen. 2.Set calibration value Click button“ ”, pop up a box:...
- Page 42 ® STEINDORFF Click “ ”, pop up a box::...
- Page 43 ® STEINDORFF Enter the name of the calibration item and choose a unit. Then click “Yes”. There will come out an adjustable calibrating line. 3. Move the line by mouse and set the starting point.
- Page 44 ® STEINDORFF Click “ ”, enter the physical length of this line. Click “ ”, save the result of calibration. Then click return key, back to the video. Line measurement Click the icon “ ”on the control panel. Select the line on the video, move line, click one side of line and adjust the start point and end point of line.
- Page 45 ® STEINDORFF Here the length is 0.413mm. It is matched with the physical length. Rectangle measurement Click the icon “ ”and display the Rectangle tool on the screen. Click the center of Rectangle can move Rectangle. Click four corners of rectangle can adjust the size of rectangle.
- Page 46 ® STEINDORFF Reticle ruler Click the reticle button. There will be a reticle tool on the image, click the center of the reticle with the mouse, there will be a little white reticle in the center of the reticle, drag the reticle, the reticle will move.
- Page 47 ® STEINDORFF Click the color selection bar of line, pop up a box: Click and choose one color you wanted on the annulus. Then click inner circle and you can get the choosed color successfully. Click the button “ ”, add the width of line.
- Page 48 ® STEINDORFF 1. Camera Control panel ◆ Preview size: choose one preview resolution of video. Two resolutions: 640*480;1024*768. ◆ Capture size: choose one capture resolution. Three resolutions: 2592*1944;1600*1200;2048*1536. Function ◆ Camera state: check the option to show the state of camera.
- Page 49 ® STEINDORFF Control panel ◆ Storage location: Choose the storage path of image and video. Three paths: internal storage, SD card, USB flash disk. ◆ JPEG compression quality: inferior quality (50%), medium Function quality (70%), high quality (80%), ultra quality (90%) ◆...
- Page 50 ® STEINDORFF Initial set When measuring, it is more advantageous to improve the accuracy of measurement after choosing the mouse mode. 4. Interface Control panel ◆ Autohide: check the autohide mode to set delay time to hide Function the widget on the interface of software.
- Page 51 ® STEINDORFF Function ◆ Feedback: feedback suggestion to developer of software. ◆ About: software version ◆ Please don’t easily remove the data of software. Initial set 3.2.6 Image Processing Module Click the button “ ” and process the captured image 1.
- Page 52 ® STEINDORFF Straighte Drag the image by finger to change image size. You can select the proportion to crop the image, also can Crop drag the white border by finger to cut the size of image. Drag the image by finger to rotate...
-
Page 53: Common Failure And Solution
® STEINDORFF Open bluetooth function in the setting of system and Bluetooth send image by bluetooth. Gmail Through the gmail to send image Picasa Share image to the Google web photo album. Common Failure And Solution 4.1 Software Crash Phenomenon: Software crash, point out “Camera error: 100”. - Page 54 ® STEINDORFF Solutions: 1) Press the “Power Button” for more than 2 seconds, 2) Click the small “Rst” hole with a needle (or other things that have a small, sharp-point) to reset your system, as the picture below. 4.3 Can Not Switch On The System Phenomenon: Can not switch on the system or the system can not work.
Need help?
Do you have a question about the NYMCS-1262 and is the answer not in the manual?
Questions and answers