Datavideo SE-2800 Instruction Manual
Hide thumbs
Also See for SE-2800:
- Instruction manual (45 pages) ,
- Instruction manual (43 pages) ,
- Quick start manual (25 pages)

Related Manuals for Datavideo SE-2800


Summary of Contents for Datavideo SE-2800
-
Page 1: Instruction Manual
DIGITAL VIDEO SWITCHER SE-2800 ( 8 / 12 CHANNEL ) Instruction Manual w w w . d a t a v i d e o . c o m... -
Page 2: Welcome To The Se-2800 Instruction Manual
DIGITAL VIDEO SWITCHER Welcome to the SE-2800 Instruction Manual Thank you for choosing a Datavideo product, please visit the support pages on our website for the latest version of the instruction manual. http://www.datavideo.info/Mixer+-+Switchers/SE-2800 Don’t forget to register your product online to qualify for an additional free one year extension to the standard warranty, and to receive information from Datavideo on service &... -
Page 3: Table Of Contents
SE-2800 Contents Welcome to the SE-2800 Instruction Manual Warranty Disposal Warnings and Precautions Product Overview Features Connections & Controls Control Panel Overview Main Unit – Rear Panel Rear Panel Connections Main Unit – Rear Panel HDMI Multi-view How to change the Multi-view output Keyboard Controls –... - Page 4 Disclaimer of Product and Services The information offered in this instruction manual is intended as a guide only. At all times, Datavideo Technologies will try to give correct, complete and suitable information. However, Datavideo Technologies cannot exclude that some information in this manual, from time to time, may not be correct or may be incomplete.
-
Page 5: Warnings And Precautions
AC adapter. If you are not sure of the f.When the product exhibits a distinct change in type of power available, consult your Datavideo performance, indicating a need for service. dealer or your local power company. -
Page 6: Product Overview
The SE-2800 is a cost effective HD/SD switcher featuring eight* or twelve channels. Thanks to a 2RU 19” form factor and 12V DC input the SE-2800 is ideal for use in portable rack units or outside broadcast vehicles. The SE-2800 produces superb 10 bit 4:2:2 broadcast quality pictures while also offering flexible input and output configurations. -
Page 7: Features
Or Aux output of a selected video input channel composite black & burst or HD Tri-Level sync. (single Aux). • SE-2800 can be configured over an Ethernet network using a supplied Windows 7 PC • User defined and positioned dual picture in application. -
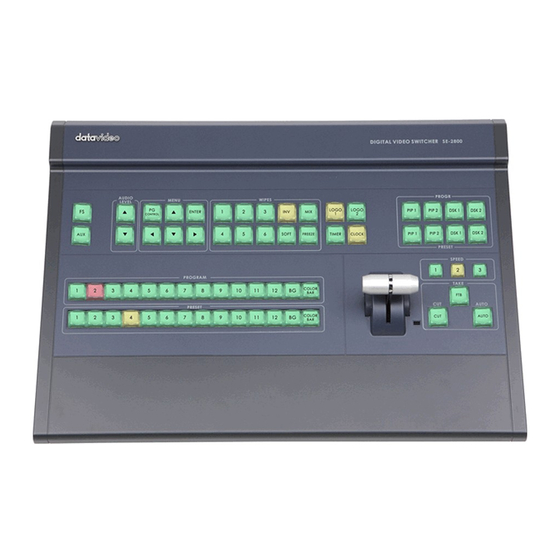
Page 8: Connections & Controls
Input 9 – SD / HD-SDI / CVBS GPI connector ** Please note inputs 9 to 12 are not present if you have purchased the eight channels SE-2800. Eight channels unit can be upgraded to twelve inputs, please talk with your local dealer. -
Page 9: Rear Panel Connections
SE-2800 Rear Panel Connections Video Input Modules The SE-2800 can be supplied with eight or twelve video input channels. An SE-2800 with eight input channels has two video input 1920x1080i HD-SDI modules fitted. An SE-2800 with twelve input channels has... -
Page 10: Main Unit - Rear Panel
DIGITAL VIDEO SWITCHER The front panel on the SE-2800 main unit has a grille for two airflow cooling fans. Please do not block or cover this grille as the unit may overheat. This grille should also be kept free of dust. The front panel can be removed by using the four thumbscrews. -
Page 11: Hdmi Multi-View
SE-2800 HDMI Multi-view SE-2800 Multi-view monitoring is available across one or two HDMI monitors (not supplied). These HDMI outputs can be used to monitor video and audio in a number of different configurations. For each set up, embedded audio level indication is also available on all inputs as well as the Preview and Program windows. -
Page 12: Keyboard Controls-Video Switching
DIGITAL VIDEO SWITCHER Keyboard Controls-Video Switching Program and Preset rows The Program row of buttons is the active channel, this is the live output. The active channel will appear as the Program Output (PGM). You can switch or CUT from one video source to another directly on the Program row. -
Page 13: Keyboard Controls-Video Transitions
SE-2800 Keyboard Controls-Video Transitions Transition Selection The SE-2800 features six user defined wipe buttons, an WIPES A/B dissolve or MIX button, an INV or Invert wipes button and a FREEZE button. F I X A I V All wipes can have an optional colour border applied. The wipe border width and colour are chosen within the menu system. -
Page 14: Keyboard Controls-Logo 1, Logo 2, Clock And Timer
DIGITAL VIDEO SWITCHER Keyboard Controls-LOGO 1, LOGO 2, CLOCK and TIMER The SE-2800 has the ability to store six static logos and one dynamic logo. The logo files are transferred to the SE-2800 from a Windows PC using the LOGO LOGO Ethernet connection and the supplied SEConfig software. -
Page 15: Keyboard Controls-Pip1, Pip2, Dsk1 And Dsk2
SE-2800 Keyboard Controls-PIP1, PIP2, DSK1 and DSK2 PIP Preset and PIP Program When looking at the top right corner of the SE-2800 Control Panel / PIP 1 PIP 2 Keyboard there are four PIP keys. These are labelled Program and Preset. -
Page 16: Keyboard Controls-Frame Store, Aux And Audio Level
This still image can be called into the production by using the FS button located at the top left corner of the SE-2800 Control Panel / Keyboard. The FS button allows the user to toggle between the still image of the Frame Store or the live video input also connected to that same video channel. -
Page 17: Menu Options
This section covers the Menu options in the order that they appear on the ENTER SE-2800 HDMI 1 Multi-view. These settings may also appear in more detail elsewhere in this instruction manual. Options may vary depending on the firmware version in use. - Page 18 DIGITAL VIDEO SWITCHER Speed1 Speed Buttons Setting Speed2 Range 1 to 127 (Frames) Speed3 Wipe 1 to 8 (See page 13 also) Soft Edge 0 to 4 Wipe Buttons Setting Buttons 1 to 6 Color 1 to 8 1=White, 2=Yellow, 3=Cyan, 4=Green, 5=Magenta, 6=Red, 7=Blue, 8=Black OUT 1 is an HD SDI only user choice of Program...
-
Page 19: Se-2800 Video Layers
SE-2800 SE-2800 Video Layers The SE-2800 is a Standard Definition or High Before attempting to use the SE-2800’s PIP, DSK Definition Digital Video Switcher and as well as LUMA KEY and LOGO functions it may help to mixing video and audio sources it has additional... -
Page 20: Pip-Picture In Picture Function
Before trying to activate the PIP function it is best to understand how to set up or choose the right options for your production. Press the ENTER Key in the MENU area of the SE-2800 keyboard. Navigate to the PIP Settings option using the down arrow key. The PIP menu options provided here... -
Page 21: Dsk Function (Cg / Luma Key)
DSK function (CG / LUMA KEY) The SE-2800 has two Down Stream Keyers (DSK1, DSK2). This means it is able to take a key source video input and replace the white or black parts of this image with the video from another source. If the input video carries an alpha channel it is also possible to key in this way too. -
Page 22: Example Se-2800 And Cg-350 Set Up
3rd party PCIe video card such 3. The Fill signal from the Decklink card is then as Blackmagic Design’s Decklink HD Extreme fed to input 10 on the SE-2800 (see diagram 3D+ card. below). 4. Now go into the multi-view menu by pressing 1. -
Page 23: Switcher Configuration Using A Computer-Seconfig Software
Switcher configuration using a computer- SEConfig software It is possible to configure the SE-2800 with a Windows 7 computer using an Ethernet connection. 1. Switch off or shut down the SE-2800 and Computer in the normal way. 2. Connect the Ethernet cable between the SE-2800 rear panel and the Windows 7 Computer. -
Page 24: Profiles
This first tab can be used to choose the method of connection between the computer and the switcher. In this case the SE-2800 is connected using selected Ethernet IP addresses. Note that the first three numbers in the IP addresses of the switcher and computer should be the same. -
Page 25: Multi Screen Window Signs (Labels) Tab
Logos tab The SE-2800 can store up to seven still logos in its memory. Using the logos tab you can use the LOAD button to browse for a logo stored on the computer. This logo is then loaded into the application window. -
Page 26: Dynamic Logo Tab
DIGITAL VIDEO SWITCHER Dynamic Logo tab The SE-2800 can store one dynamic moving logo in its memory. The dynamic logo can be a targa (TGA) sequence, GIF or AVI. It must be no longer than 75 frames/images long. Using the Dynamic logo tab you can use the LOAD button to browse for a logo sequence of images stored on the computer. -
Page 27: Setting Up With The Se Remote Software
Setting up with the SE Remote software It is possible to control the SE-2800 with The SE-2800 then needs to be placed into PC a Windows 7 computer using an Ethernet Control mode. To do this press the PC Control connection. -
Page 28: Controlling The Switcher With A Computer-Se Remote Software
DIGITAL VIDEO SWITCHER Controlling the switcher with a computer-SE Remote software It is possible to control the SE-2800 with Panel. Once launched the Remote software a Windows 7 computer using an Ethernet displays an image of the SE-2800’s keyboard as connection. -
Page 29: Audio Function
XLR outputs of the switcher to a separate Program SDI and HDMI outputs. Audio Menu Options – De-embedding SDI or HDMI audio Using the following SE-2800 menu options audio can be selected from the SDI or HDMI video inputs. 1,2,3 or 4 Group User choice of SDI Embedded Audio Set. - Page 30 DIGITAL VIDEO SWITCHER SDI Embedded Audio Group Stereo Pair Channel Embedded Channel No. left Stereo pair 1 right Group 1 left Stereo pair 2 right left Stereo pair 3 right Group 2 left Stereo pair 4 right left Stereo pair 5 right Group 3 left...
-
Page 31: Audio Menu Options - Monitoring The Audio Levels
SE-2800 Audio Menu Options – Monitoring the audio levels The SE-2800 can confirm the incoming audio levels by showing audio peak meters on the HDMI multi-view. Audio Level is shown Tick selection ON or OFF It is also possible to hear the preview or program audio from the multi-view HDMI outputs using the menu option below. -
Page 32: Working With A Fixed Or Single Audio Source
FIX / A+V button in the wipes A I V area of the keyboard. each camera, HD-SDI, to the SE-2800 switcher. If we want to hear the audio from each camera as the video channels are switched, audio follows video, then we Select the AUDIO-F-VIDEO status with this button would set up in the following way. -
Page 33: Audio Delay
Inner contacts on the jack plug will trigger a user to the chosen record or playback device as they selected event. Power is supplied by the SE-2800 are not all the same. The cabling required can and is less than 5V DC. -
Page 34: Se-2800 Tally Outputs
DIGITAL VIDEO SWITCHER SE-2800 Tally Outputs Dielectric strength: Max. DC 24V The SE-2800 has a D-sub 25 pin female tally output port. These connections provide bi-colour tally information to a number of Current: Max. 50mA other Datavideo products, such as the ITC-100 eight channel talkback system and the TLM range of LCD Monitors. -
Page 35: How To Obtain Software Or Firmware For The Se-2800
SE-2800 The latest Firmware updates and Software applications for this switcher can be obtained by contacting your local Datavideo office or dealer. A list of regional Datavideo offices is provided at the rear of this manual. How to update the SE-2800 Firmware... - Page 36 NEXT. NEXT. 8. The following window will be displayed. You 10. Click the Yes button to confirm you wish to perform the firmware update. can now POWER ON the SE-2800 and it will be discovered by the Computer.
- Page 37 The firmware is now updated, but please continue with the following steps in order to complete the switcher’s update process. 13. When the SE-2800 has restarted. Install the SEConfig software on to the Computer. 17. Select Ethernet to display the Computer’s IP Address.
-
Page 38: How To Re-Calibrate The Se-2800 T-Bar
AUTO TAKE 8. To exit the calibration procedure, press the CLOCK button. 4. Power ON the SE-2800 switcher while still holding down the buttons in step 3. CLOCK 5. The switcher will start but the keyboard lights will remain dead except for the T-Bar progress 9. -
Page 39: How To Change The Se-2800 Video Standard
SE-2800 How to change the SE-2800 video standard As well as a working SE-2800 you will need: 7. The following window will be displayed. Select Device is connected via Ethernet then click The latest Firmware update file for the SE-2800. - Page 40 DIGITAL VIDEO SWITCHER 10. Click the Yes button to confirm you wish to 13. Click NEXT at the bottom of the flash update proceed. window. Then click the Yes button to confirm you wish to proceed. 11. The Video can now be changed to the desired 14.
-
Page 41: Example Se-2800 Set Up
SE-2800 Example SE-2800 Set Up MULT-IMAGE PREVIEW HD-SDI HD-SDI PREVIEW HD-SDI HD-SDI 42” LCD TV/ MONITOR 42” LCD TV/ MONITOR RS-232 HD-SDI HDMI HDMI HD-SDI HDMI LOOP SDI datavideo SE-2800 VS-150 HD-SDI datavideo TLM-700HD HD/SD 12通道切換台 向量示波器 7吋螢幕監視器 HD-SDI AUDIO... -
Page 42: Specifications
DIGITAL VIDEO SWITCHER Specifications ( Below based on SE-2800 12 channel unit ) • Maximum 12 inputs, can be configurable to Inputs 12 HD SDI, 12 SD SDI, 6 CVBS or 3 HDMI • Possible combination, for example 10 HD SDI + 2 HDMI, or 3 HD SDI + 3 HDMI + 6 CVBS •... - Page 43 SE-2800 Notes INSTRUCTION MANUAL...
-
Page 44: Service & Support
Service & Support It is our goal to make owning and using Datavideo products a satisfying experience. Our support staff is available to assist you to set up and operate your system. Contact your local office for specific support requests. Plus, please visit www.datavideo.com to access our FAQ section.
Need help?
Do you have a question about the SE-2800 and is the answer not in the manual?
Questions and answers