
Subscribe to Our Youtube Channel
Related Manuals for Datavideo SE-500MU


Summary of Contents for Datavideo SE-500MU
- Page 1 HD 4-CHANNEL VIDEO SWITCHER SE-500MU Instruction manual w w w . d a t a v i d e o . c o m...
-
Page 2: Table Of Contents
Table of Contents FCC COMPLIANCE STATEMENT ......................5 WARNINGS AND PRECAUTIONS ......................5 WARRANTY ............................6 ..........................6 TANDARD ARRANTY ..........................6 HREE ARRANTY DISPOSAL ............................6 CHAPTER 1 INTRODUCTION ......................7 ............................7 EATURES CHAPTER 2 CONNECTIONS AND CONTROLS ..................8 ............................ - Page 3 SERVICE AND SUPPORT ........................40 Disclaimer of Product & Services The information offered in this instruction manual is intended as a guide only. At all times, Datavideo Technologies will try to give correct, complete and suitable information. However, Datavideo Technologies cannot exclude that some information in this manual, from time to time, may not be correct or may be incomplete.
- Page 4 Further advice on the content of this manual or on the product can be obtained by contacting your local Datavideo Office or dealer.
-
Page 5: Fcc Compliance Statement
7. This product should only be operated from the type of power source indicated on the marking label of the AC adapter. If you are not sure of the type of power available, consult your Datavideo dealer or your local power company. -
Page 6: Warranty
• Your statutory rights are not affected. Three Year Warranty • All Datavideo products purchased after July 1st, 2017 are qualified for a free two years extension to the standard warranty, providing the product is registered with Datavideo within 30 days of purchase. -
Page 7: Chapter 1 Introduction
Chapter 1 Introduction The Datavideo SE-500MU is an HD/SD digital video switcher and can be flexibly controlled using a free downloadable APP on your laptop, MACBOOK, and Tablet via Ethernet. SE-500MU offers 4 HDMI inputs, a program output and a quad view output. The switcher supports video resolutions up to Full HD 1080p and provides functions such as Cut, Mix, Wipe Transitions, Fade to Black, PIP, Split, and Luma Keying. -
Page 8: Chapter 2 Connections And Controls
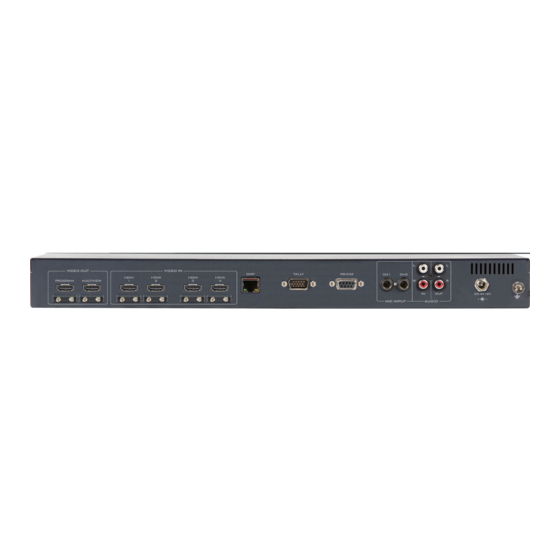
The SE-500MU provides four HDMI video input channels for connecting HDMI video sources. 3. DVIP Port This port allows the SE-500MU to connect directly to the PC or an Ethernet switch or router. 4. TALLY Output Port Sends Red, and Green tally signals to each channel. - Page 9 7. Audio Output – Stereo RCA (Left/Right) Unbalanced analog audio output (stereo) for monitoring the selected audio input source. 8. RS-232 Port A remote control interface allowing the user to connect the SE-500MU to a remote PC or remote controller.
-
Page 10: Front Panel
2.3.1 Installation Before installing the User Interface, the user should first download the latest software from the Datavideo SE-500 MU product page by visiting www.datavideo.com. Extract the zip file to an easily accessible location. In the extracted folder, locate the executable file called se500MuControl.exe. -
Page 11: Connect On Dvip Interface
1. Connect one end of the Ethernet cable to SE-500MU and another end to the PC. 2. Turn ON the PC power and since the SE-500MU has a default IP of 192.168.100.101, we have set the PC’s IP address to 192.168.100.102 as shown in the diagram below. - Page 12 7. Click the Interface pull-down menu to select DVIP. 8. Click the EtherNetCard pull-down menu to select the IP of the Network Interface Card connected to the SE-500MU’s DVIP port. After that, click the Scan button to scan the network for all the connected DVIP devices.
- Page 13 11. Finally, scroll the Connect tab page back up to the top and select Connect; click the Apply button to establish the connection between the PC and the SE-500MU. A dialog box displaying the message of “Connection to machine success” will appear if the connection is successfully established.
-
Page 14: Connect On Rs-232 Interface
Another alternative to connect to the SE-500MU is via the RS-232 interface. Follow the procedure below to establish connection. 1. Connect one end of the RS-232 cable to the SE-500MU and another end to the PC. Make sure the SE-500MU is powered ON. - Page 15 Switcher Transition Menu PIP/Keyer Effects Settings Program/Preview Transition Switcher Settings Luma Keyer Enable/Disable buttons Lumakey Source button Split selection button PIP Source button Transition Methods User Memory T-Bar (manual transition) Shift button CUT button Transition Effects AUTO transition button WIPE transition effect selection Program/Preview MIX Enable/Disable button Program row...
-
Page 16: Transition Effects
The white represents the current Program image and the black represents the WIPE-IN image. There are a total of 2 WIPE presets available on the SE-500MU PC APP panel; the WIPE buttons allow the user to make a selection directly from the control panel for the first two which are Left Right and Top Bottom wipes. - Page 17 PIP / Keyer Enable/Disable buttons for PIP Keyer Picture in Picture puts the selected Sub Video Source in a window on the Main Program view, with control over window size and placement. For PIP configuration, please refer to the section. PIP PGM: Shows the configured PIP on the PGM output after transition, however, the PIP cannot be previewed on the QUAD split view display.
- Page 18 Transition Methods T-Bar (Manual Transition) T-Bar is used for performing a transition manually. The T-Bar can be either all the way up, all the way down or anywhere in between. When the T-Bar is moved to halfway between the topmost position and the bottommost position, the PC APP Panel functions will be disabled.
- Page 19 Preview Source Row Clicking the number buttons along the PREVIEW row selects a video source. BKG button: Clicking the BKG button will switch the background to the Matte background or color bars. BLK button: Clicking the BLK button places a black screen on the monitor.
-
Page 20: Chapter 3 Setting Parameters
Chapter 3 Setting Parameters The SE-500MU’s Software Menu allows the user to perform several configurations of image effects, such as picture-in-picture, luma key and etc. The user can also configure the audio settings in the Audio option. In addition, in the setup option, the user is allowed to set video output resolution, reset to factory default, and selects the interface language. -
Page 21: Transition Type
3.1.3 Wipe Effect On the SE-500MU, there are three wipe effects available for the user to choose. The three wipe effects are LEFT RIGHT, TOP BOTTOM and CENTER. The default is LEFT RIGHT. 3.1.4 WIPE Border Size The WIPE Border Size generally allows the user to select an appropriate border width. -
Page 22: Pip / Split
• Red Blue • Black 3.2 PIP / Split Picture-In-Picture (P-In-P) places a sub window on the PGM or Multiview screen. This option (PIP/Split) allows you to configure various parameters of the PIP window. Note: When PIP and Lumakey features are enabled at the same time, the lumakey source will be the upper layer and the PIP source will be the lower layer. -
Page 23: Pip Source
Background Color Bar Small Small Border Size Middle Large White Yellow Cyan Green Border Color Magenta Blue Black 3.2.1 PIP Source In this option, the user will be allowed to assign the PIP source; the available sources are listed as follows: •... -
Page 24: Border Size
• Black • Input 1 • Input 2 • Input 3 • Input 4 • Background • Color Bar 3.2.6 Border Size The Border Size generally allows the user to select an appropriate PIP border width. Setting the Border Size to OFF turns the PIP border off. Setting this parameter to small selects a thin border; middle will yield a medium size width;... -
Page 25: Lumakey
The parameter value will be displayed in the text box next to the slider. 3.4 Lumakey Keyer of the SE-500MU provides the user with the capability of luma keying. Note: When PIP and Lumakey features are enabled at the same time, the lumakey source will be the upper layer and the PIP source will be the lower layer. -
Page 26: Lumakey Source
Black Black Mode White Cleanup Level 0 – 100 Transparency 0 – 64 3.4.1 Lumakey Source Lumakey source is where you can select the image for luma keying. The available sources are listed as follows: • Black • Input 1 •... -
Page 27: Mute
OFF. 3.5.2 HDMI Input In this option, you can select the audio source. Selection of inputs 1-4 allows the SE-500MU to play the enabled audio source. If “Follow” is selected, the audio will enter Audio follow Video mode, i.e. playback of the audio of the output video. -
Page 28: User Mems
“apply” button. 3.7 Setup In the “Setup” menu, the user can change the output resolution, reset the SE-500MU to its Factory Default values, choose the preferred OSD menu language, view the current firmware and software versions (mainboard firmware and PC APP) and perform a firmware upgrade. - Page 29 Option Parameters Parameter Value or Range Default Value 1080p/60 1080p/59.94 1080p/50 1080i/60 1080i/59.94 PGM Out Res. 1080i/50 720p/60 720p/59.94 720p/50 576i 480i 1080p/60 Setup 1080p/59.94 1080p/50 1080i/60 MV Out Res. 1080i/59.94 1080i/50 720p/60 720p/59.94 720p/50 Save Setup [Save] Factory Default [Reset] Language English...
-
Page 30: Pgm Out Res
Traditional Chinese MB Software Firmware Version Software Version PC APP Version Firmware Upgrade 3.7.1 PGM Out Res. In PGM Out RES., the user is allowed to select an appropriate PROGRAM output resolution. The available resolutions are listed as follows: • 1080p/60 •... -
Page 31: Factory Default
3.7.4 Factory Default The Factory Default button, once clicked, allows the user to restore the factory default settings. The device will start the factory reset process in 2 to 3 seconds after the “Factory Default” button is clicked. 3.7.5 Language The available OSD menu languages are English, Traditional Chinese and Simplified Chinese. -
Page 32: Connect
3.8 Connect The “Connect” Menu allows you to configure remote connection settings on the SE-500MU. Click the “Interface” pull-down menu to select DVIP or RS-232 interface and then configure the connection accordingly. Please make sure the correct IP or COM Port is selected so that the connection can be successfully established. -
Page 33: Connection
RS-232 Com Port Pull-down menu Ethernet Card Pull-down menu Scan Click to scan the network IP Select Pull-down menu Host Name SE-500MU Model Name SE-500MU MAC Address Address Mode Fixed IP DHCP IP Address Enter manually Network Mask Enter manually... -
Page 34: Chapter 4 Applications
4.1 Placing a logo on the video using the lumakey function The SE-500MU allows the user to place a logo on the video using the lumakey function. First of all, create a 1920x1080 (16:9) logo against a black or white background on a laptop. Once the logo is created, please follow the steps outlined as follows to insert the logo layer. -
Page 35: Chapter 5 Appendices
Appendix 1 Tally Outputs The SE-500MU has a D-sub 15 pin female tally output port. These connections provide bi-colour tally information to a number of other Datavideo products, such as the ITC-100 eight channel talkback system and the TLM range of LCD Monitors. The ports are open collector ports and as such do not provide power to tally light circuits. -
Page 36: Appendix 2 Firmware Upgrade
Remark 1: If the firmware upgrade process is interrupted, you may see nothing displayed on your screen after the machine is rebooted but connection to the SE-500MU can still be established. On the PC APP, you will see that the switcher is working in the Bootloader mode. At this point, do not operate the switcher but click the Firmware Upgrade button to re-run the firmware upgrade process. - Page 37 9. After the machine is rebooted, you will immediately see images of the four inputs being displayed on the MV monitor. Reconnect to the SE-500MU via the RS-232 interface. On the Setup tab page, confirm that MB Software displays the correct version number of the firmware installed.
-
Page 38: Appendix 3 Dimensions
Appendix 3 Dimensions All measurements in millimeters (mm) -
Page 39: Specifications
Appendix 4 Specifications Interfaces Video Inputs 4 x HDMI (HDMI1.4) 2 x HDMI (HDMI 1.4) Video Outputs 1 Multiview and 1 Program 1 x Stereo RCA (L/R) Audio Inputs 2 x Mono Microphone De-embedded Digital Audio (2 CH) 1 x Stereo RCA (L/R) Audio Outputs 1 x Stereo headphone (Mini Jack with volume control) Embedded Digital Audio (2 CH / Channel 1 &... -
Page 40: Service And Support
Service & Support It is our goal to make owning and using Datavideo products a satisfying experience. Our support staff is available to assist you to set up and operate your system. Contact your local office for specific support requests. Plus, DATAVIDEO WORLDWIDE OFFICES please visit www.datavideo.com to access our FAQ section.
Need help?
Do you have a question about the SE-500MU and is the answer not in the manual?
Questions and answers