Table of Contents
Advertisement
Quick Links
Download this manual
See also:
Instruction Manual
Advertisement
Table of Contents

Related Manuals for Datavideo SE-3000


Summary of Contents for Datavideo SE-3000
- Page 1 HD/SD Digital Video Switcher SE-3000 Quick Start Guide www.datavideo-tek.com...
-
Page 2: Table Of Contents
Table of Contents Warnings and Precautions ............................2 Warranty..................................3 Disposal ..................................3 Packing List ................................3 Introduction ................................4 Features ..................................4 Top View ..................................5 Rear View................................... 5 Control Panel Buttons & Menus ..........................6 AUX Bus Button Group ............................6 Keyer Controls Button Group .......................... -
Page 3: Warnings And Precautions
7. This product should only be operated from the type of power source indicated on the marking label of the AC adapter. If you are not sure of the type of power available, consult your Datavideo dealer or your local power company. -
Page 4: Warranty
Datavideo warrants that the equipment it manufactures shall be free from defects in material and workmanship for a period of 12 months from the date of product purchased. If equipment fails due to such defects, Datavideo will, at its option, repair or provide a replacement for the defective part or product. -
Page 5: Introduction
Introduction This document provides a very quick guide to the SE-3000 operation. Features The Specification for this project is contained in ‘SE-3000 – HD-SDI Video Switcher’ specification document (currently at Version 07b) Up to 16 SD/HD SDI Inputs Built-in frame syncs for each input... -
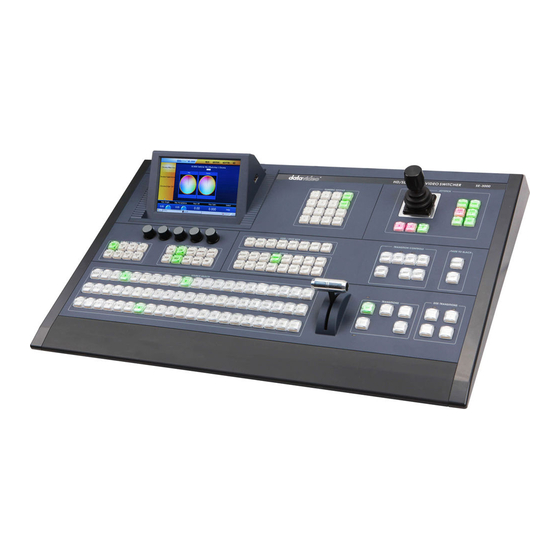
Page 6: Top View
Top View Rear View... -
Page 7: Control Panel Buttons & Menus
Control Panel Buttons & Menus AUX Bus Button Group This allows selection of the key sources for Keyers 1 & 2, and DSK 1 & 2 - The bus delegation is set by the bus delegate buttons (Key1-4) - This bus also allows selection of the Aux Outputs (AUX1-4) Key LUMA: 1. -
Page 8: Keyer Controls Button Group
Keyer Controls Button Group Delegated to the currently selected Keyer - allow control of Keyer State (on/off), Keyer mode (Lin, Luma, Chroma) - Matte Fill Select - Key Priority (Key1-over-Key2 or Key2-over-Key1) - Self Key & Split modes - Mask Enable When you complete the effect setting, please enter this key to enable your effect. -
Page 9: Program / Preset / Aux Bus Button Group
Program / Preset / AUX Bus Button Group These allow selection of the Program / Preset / AUX Bus sources - Source available are Inputs 1-16, Black, Matte, etc CH 1~8 input using HD SDI sources, CH 9~16 can select HD or SD SDI sources BLACK: Enable Program / Preset / AUX Bus source to be black screen. - Page 10 MATTE: 1. Select MATTE key on AUX BUS button group, PROGRAM button group or PRESET button group. 2. Select MATTE key on MENUS button group. 3. Set MATTE Value on LCD menus. For more information please see the Keyer Matte Menu (Page 16). FREEZE: 1.
-
Page 11: User / Shot Box Button Group
User / Shot Box Button Group These buttons allow user memories to be recalled with a single button press. Transition Controls Button Group These control what is in the current Transition BGND - selects Background in the transition Key 1 - selects Key 1 in the Transition Key 2 - selects Key 2 in the Transition Priority - the transition swaps the priority of the keyers Trans Pvw - enables transition Pvw Mode - the transition is previewed out of the Pvw output... -
Page 12: Transitions Button Group
Transitions Button Group This group controls what the transition is to be Mix - selects Mix transition Wipe - selects Wipe transition DVE - selects DVE transition Cut - performs a cut transition Auto - performs the selected transition (Mix, Wipe, DVE) in the M/E Trans time DSK Transitions Button Group Control the DSK transitions DSK1 - enables DSK1 transitions... -
Page 13: Numeric Keypad Button Group
Numeric keypad Button Group This group provides buttons for entering numeric values & loading & saving user memories - The numeric pad is also displayed on the LCD screen Joystick Button Group The button group provides controls for Joystick operation - X, Y, Z enable/disable the X,Y, Z axis of the joystick –... -
Page 14: Lcd Menus
LCD Menus Home Menu The Home Menu provides a basic top-level to the menu system Here you can set the M/E Trans time, the DSK Trans time, & the FTB Trans time Wipe Menu The Wipe menu provides controls for the M/E Wipe generator Main Wipe Menu The Main Wipe Menu allows selection of the current Wipe Pattern 16 wipe pattern icons are displayed at a time. -
Page 15: Soft Balance Control
Soft Balance Control This control allows the ‘inside’ & ‘outside’ edge softness of the Wipe Border to be controlled If the Soft Balance is set to ‘0.0’ then both the Inside & Outside edges have the same softness, as set by the ‘Soft Control’... -
Page 16: Shade Soft
Shade Soft The softness of the edge between the two matte colours is controlled by the Shade Soft Control. Shade Position The position of the edge between the two matte colours is controlled by the Shade Position. When Shade position is set to 0.0, then the edge is in the middle of the border when the Shade Position is changed towards +1.0, the edge is moved towards the Inner Wipe Border Edge when the Shade Position is changed towards -1.0, the edge is moved towards the Outer Wipe... -
Page 17: Keyer Menu
Keyer Menu The Keyer Menu provides controls for the four main Keyers (Key1, Key2, DSK1, DSK2) in the SE3000. The Keyer being controlled is determined by the Keyer selected on the Aux Bus Delegate Buttons. Keyer Control Menu The Keyer Control Menu allows selection of the current Wipe Pattern The Graphic on the LCD Screen shows the effect of the Key Lift &... -
Page 18: Chroma Keyer Menu
Chroma Keyer Menu The Chroma Keyer Menu provides controls for the two Chroma Keyers (Key1, Key2) in the SE3000. To enable the Chroma Keyer in Keyer1 or Keyer2, select the ‘Chroma’ Button in the Keyer Controls section. The Key Lift & Gain controls in the Linear Keyer no longer apply, however, the Opacity control is still used. Chroma Key Main Menu This menu contains the main Key Generating Controls Hue Angle Control... -
Page 19: Transition Control Menu
Transition Control Menu The Transition Control Menu provides controls for the DVE Transition generator. Main Transition Menu The Main Transition Menu allows selection of the current DVE Transition 16 DVE Transition icons are displayed at a time. The current DVE Transition is highlighted You can select a new DVE Transition by touching the appropriate icon. -
Page 20: Specification
Specification Video format SD (480/59.94i, 576/50i), HD (1080/59.94i, 1080/50i, 720/59.94p, 720/50p) Y:Cb:Cr, 4:2:2 10 bit RGB, 4:4:4 8 bit SDI/HD-SDI Specifications Standard SMPTE 259M-C (270 Mbps, 525/625 component video) and SMPTE 292M (1.485, 1.485/1.001 Gbps) Connector BNC (IEC169-8) Impedance 75 ohms Return Loss HD >15dB(5 MHz to 750 MHz), >10dB(750 MHz to 1.5 GHz) SD >15dB(5 MHz to 270 MHz) -
Page 21: Service & Support
It is our goal to make your products ownership a satisfying experience. Our supporting staff is available to assist you in setting up and operating your system. Please refer to our web site www.datavideo-tek.com for answers to common questions, support requests or contact your local office below.
Need help?
Do you have a question about the SE-3000 and is the answer not in the manual?
Questions and answers