
Related Manuals for Digisol DG-WA3000N


Summary of Contents for Digisol DG-WA3000N
- Page 1 RANGER SERIES 300Mbps Wireless LAN Access Point DG-WA3000N 300 Mbps V1.1 2012-02-16...
-
Page 2: Fcc Warning
Please check with your local distributors for the latest information. No part of this document can be copied or reproduced in any form without written consent from the company. Trademarks: DIGISOL is a trademark of Smartlink Network Systems Ltd. All other trademarks are the property of the respective manufacturers. -
Page 3: Package Contents
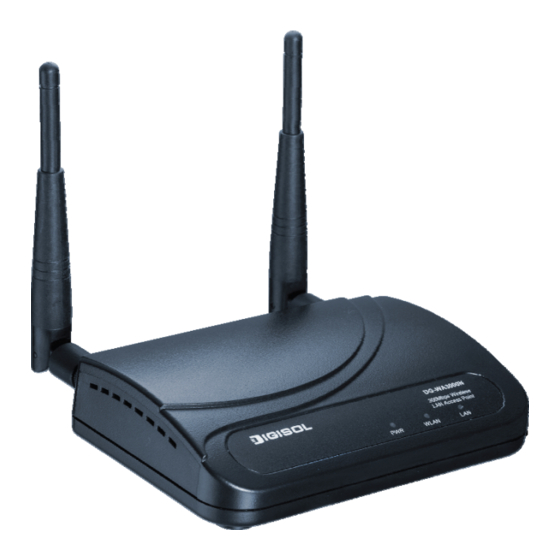
Product Overview Thank you for purchasing DG-WA3000N wireless LAN Access Point! With this high cost-efficiency wireless Access Point, computers and wireless devices which are compatible with IEEE 802.11n can connect to existing wired Ethernet network, at the speed of up to 300Mbps. -
Page 4: Product Features
Product Features Complies with IEEE 802.11b/g/n wireless network standards - works with other 802.11b/g/n wireless devices. High speed wireless network, six times faster than conventional 802.11g wireless network (up to 300Mbps). Allows wireless devices to connect to existing wired network and share network resources. -
Page 5: Front View
Front View Below shown is the product front view. Users can verify Access Point status from the LED indicators on the front panel. Below given is the LED description. LED Name Light Status LED Color Description Green The Access Point is switched on and correctly powered. Wireless WPS mode is enabled. -
Page 6: Hardware Installation
Below given is the Access Point interface description. Interfaces Description Two reverse SMA antenna connectors for screwing detachable Antennas antennas enclosed with the product. Power Power connector, connects to power adapter. Local Area Network (LAN) port. Reset the Access Point to factory default settings (clear all settings) or start WPS function. -
Page 7: Software Installation
Software Installation Insert the Setup CD into your CD-ROM drive of notebook/desktop computer. Explore the CD and execute the “EZWizard.exe” file. Screen given below will be displayed. Click 'Next' to continue. - Page 8 Connect one end of the network cable to the LAN port on the AP and the other end to one of the LAN ports on the router. Power ON the router and the AP. Ensure that all the LED's on the Access Point are ON.
- Page 9 Configure the IP Address of AP for future management. Click 'Next' to continue. Select an operation mode for your Access Point and click 'Next'. The wizard will guide you to finish the following corresponding settings.
- Page 10 Configure the settings for the operation mode you have selected. Access Point Configure the SSID and Channel Number. Click 'Next' to continue. Universal Repeater To configure Root AP's SSID Click on 'Site Survey', a “Wireless Site Survey” window will appear. Select the wireless router or AP you wish to repeat and click 'Connect'.
- Page 11 AP Client Click on 'Site Survey', “Wireless Site Survey” window will appear. Select the wireless router or AP you wish to connect and click 'Connect', or enter your wireless network's SSID manually. Click 'Next' to continue. Point-to-Point / Point-to-MultiPoint / WDS Bridge Note: Same setup procedure applies to Point-to-Point Bridge, Point- to-MultiPoint Bridge and WDS Bridge modes.
- Page 12 Configure the wireless security settings. It is recommended to use WPA2-PSK (AES) which is the most secured encryption for general users. Then Click 'Next'. Verify the settings you have configured and click 'Restart'...
- Page 13 This will take 60 Seconds. Then Press 'OK' Click 'Finish' to complete the installation Congratulations! Your Access Point installation is now finished.
- Page 14 Connect to the Access Point Wirelessly Users must configure their wireless notebook/desktop computer in order to establish a wireless connection to the Access Point. The following instructions help in establishing a wireless connection between a Windows XP computer and the Access Point. Right click the wireless icon in the system tray and click on “View Available Wireless Networks”.
- Page 15 Enter the network security key if the wireless network you wish to connect has wireless encryption enabled. Click ‘Connect’. The connection should now get established. Web Management of the Access Point To access the web configuration of the Access Point, assign a static IP address to your notebook/desktop computer in the subnet 192.168.2.X with the subnet mask 255.255.255.0 and gateway as 192.168.2.1".
- Page 16 Access Point through this web management page. Frequently Asked Qusetions Following are the solutions to problems that may occur during the installation and operation of the DIGISOL DG-WA3000N Wireless LAN Access Point. 1. Cannot get connected to wireless Access Point.
- Page 17 2. Wireless client cannot locate the Access Point. Verify whether ‘Broadcast ESSID’ is set to off in Access Point’s web configuration. Verify whether the antenna is properly connected and in correct direction. Is your wireless client far away from your Access Point ? Try to get closer to the...
Need help?
Do you have a question about the DG-WA3000N and is the answer not in the manual?
Questions and answers