Table of Contents
Advertisement
Advertisement
Chapters
Table of Contents

Related Manuals for AT&T DEFINITY Remote Port Security Device


Summary of Contents for AT&T DEFINITY Remote Port Security Device
- Page 1 AT&T DEFINITY Remote Port Security Device User’s Manual ® Communications System...
- Page 2 © 1991 AT&T All Rights Reserved Printed in USA While reasonable effort was made to ensure that the information in this document was complete and accurate at the time of printing, AT&T can not assume responsibility for any errors. Changes and/or corrections to the information contained in this document may be incorporated into future issues.
-
Page 3: Important Safety Instructions
IMPORTANT SAFETY INSTRUCTIONS To reduce the risk of injury from fire or electric shock, always follow the basic safety precautions when using this product. The safety symbol (exclamation point inside a triangle) on the RPSD Lock or RPSD Key alerts you to the important operating and maintenance instructions below. Read and understand all instructions in this user’s manual. -
Page 4: Save These Instructions
This product should be operated only from the type of power source indicated on the power transformer (see Item 18 below). If you are not sure of the type of power supply to your business or home, consult your local power company. The wiring from the Subscriber (modem) jack should not leave the building premises unless it interfaces to a product providing primary and secondary protection. -
Page 5: Fcc Notices
Part 15, Subpart A This device complies with Part 15 of the FCC Rules. Operation is subject to the following two conditions: (1) This device may not cause harmful interference, and (2) this device must accept any interference received, including interference that may cause undesired operation. Note: This equipment has been tested and found to comply with the limits for a Class A digital device, pursuant to Part 15 of the FCC Rules. -
Page 6: Table Of Contents
Getting Started Getting Started Audience Responsibilities In This Document Typographical Conventions Hotline or Other Service Call Numbers/Addresses Installation Installation Room Layout/Environment Power Supply Location of Administration Terminal or Printer Hardware Components RPSD Lock RPSD Power Monitor Adapter P B X s Other Modems RPSD Lock or Key Administration Terminal... - Page 7 RPSD System Administration RPSD System Administration Time of Day Access System Activity Log Single Point Administration Enable/Disable (Block) AT&T and Other Key Users Force Connect/Disconnect Authorized Keys RPSD System Administrator Command Set A - Add User B - Block User U - Unblock User T - Test User R - Remove User...
- Page 8 RPSD Key Use RPSD Key Use Access Failure Messages Last Call Status Test RPSD Key User Command Set U - Set User ID K - Set Secret Key N - Set Device Number L - List User Information H - History Display D - Date Set C - Clock Set I - Set Log ID...
- Page 9 Figure Protection Process RPSD Lock and Key Configuration Bypass Connections RPSD Lock RPSD Key Common RPSD Lock Configuration RPSD Lock to CO Line (RMATS Channel) RPSD Lock to Modem RPSD Lock to Administration Terminal or Printer DB25 Connections From RPSD Lock or Key to Data Terminal Equipment DB25 Connections From RPSD Lock or Key to Data Communications Equipment...
- Page 10 Table Aux. Port, Terminal, and Printer Pinouts Cables, Connectors, and Ports Access Failure Messages Access Failure Messages Access Failure Messages Cables, Connectors, and Ports RPSD Lock LEDs RPSD Key LEDs List of Tables Page 2-16 2-23...
-
Page 11: Getting Started
1 Getting Started Getting Started Audience Responsibilities In This Document Typographical Conventions Hotline or Other Service Call Numbers/Addresses... -
Page 12: Getting Started
® The DEFINITY Remote Port Security Device (RPSD) is a single line dial-up port protection system that prevents unauthorized access to a host resource. Host resource dial-up ports, called “subscribers,” are protected by the installation of the RPSD Lock hardware unit on the analog interface channel leading to the subscriber port. -
Page 13: Protection Process
The RPSD system protects a port in the following manner: a call into the channel to the protected host activates the RPSD Lock. Without involving the protected host resource or its associated modem, the RPSD Lock performs a verification of the caller’s identity through a set of communications with the RPSD Key using DTMF signaling. -
Page 14: Rpsd Lock And Key Configuration
The RPSD Lock device is approximately the size of a modem and is connected between the PBX modem and the Central Office (CO) line. The RPSD Key device is of similar size and is connected between the client’s (caller’s) modem and CO line. See Figure 1-2. RPSD Lock and Key Configuration In Figure 1-2, the term “AT&T Remote Operations”... -
Page 15: Audience
Audience This document is intended for the following audience: AT&T Technicians RPSD System Administrators RPSD Key Users AT&T Technicians refers to the personnel from AT&T who install the RPSD Lock device at the customer premises. It is assumed that AT&T Technicians are familiar with the technical language used to describe the hardware components, cables, connectors, and ports involved in the installation of the RPSD Lock device. -
Page 16: Cables, Connectors, And Ports Table
In This Document This document comprises the following material: Chapter 1: Getting Started provides an overview of the RPSD system, a description of this document and its intended audience, and an explanation of typographical conventions. Chapter 2: Installation describes the recommended hardware environment and lists the RPSD system hardware and software components. -
Page 17: Hotline Or Other Service Call Numbers/Addresses
Hotline or Other Service Call Numbers/Addresses If assistance is needed with the RPSD Lock, Key, or the PBX, or problems occur in the RPSD Lock or Key that cannot be resolved by using Chapter 5, Troubleshooting, contact the technical support center at: 1 800 242-2121 Getting Started... -
Page 18: Installation
2 Installation Installation Room Layout/Environment Power Supply Location of Administration Terminal or Printer Hardware Components RPSD Lock RPSD Power Monitor Adapter P B X s Other Modems RPSD Lock or Key Administration Terminal RPSD Lock Administration Printer RPSD Key Hardware Installation Procedures Installing the RPSD Lock Connecting the RPSD Lock to the CO Line Connecting the RPSD Lock to the PBX Modem... -
Page 19: Installation
Installation This chapter describes the recommended room layout and environment, hardware components, installation procedures, and testing for the RPSD. In addition to this chapter, you may wish to refer to Appendix A, Cables, Connectors, and Ports Tables for quick reference materials on the installation of the hardware components. - Page 20 Installation...
-
Page 21: Room Layout/Environment
Room Layout/Environment While the location of the RPSD Lock is not critical to its function, it is best if the Lock is kept in an equipment cabinet near the PBX modem. This helps protect the Lock against dust and other precipitate, as well as protecting against physical damaging from being knocked to the floor or having things dropped on it. -
Page 22: Location Of Administration Terminal Or Printer
Location of Administration Terminal or Printer For the purposes of installation, it is simplest if the RPSD Lock or Key administration terminal or printer is co-located with the RPSD Lock or Key. However, this is not always possible. In the event that the terminal or printer must be located at some distance from the RPSD Lock or Key (in another room, on another floor, etc.), the limitations of the EIA-RS232 interface must be considered. -
Page 23: Hardware Components
Hardware Components When you order the RPSD Lock device, you receive the Lock, power supply, a 7-foot cable with modular connectors on each end, and a 14 foot cable with modular connectors on each end. If any other cables or connectors are required, they must be ordered separately. In addition, any peripheral devices, such as the administration terminal or printer, are customer supplied. -
Page 24: Rpsd Power Monitor Adapter
RPSD Power Monitor Adapter The Power Monitor Adapter (PMA) (Comcode 406453662) provides an installation option that allows you to control the behavior of the RPSD during power failure conditions. In the event of a unit failure or a power failure, the RPSD is designed to block incoming and outgoing calls to the port, protecting the port against unauthorized access. -
Page 25: Bypass Connections
A second pair of RJ11 port connections may be installed for simple bypass of the RPSD Lock. To bypass the Lock, the modular connection cords are removed from the RPSD Lock Telco and Subscriber ports and connected to the bypass connection block, which connects the line directly. See Figure 2-1 for the recommended cabling diagram. -
Page 26: Pbxs
PBXs AT&T supports RPSD use on the following types of PBXs: System 75 (R1V2, R1V3) System 85 (R1V1, R1V2, R2V1, R2V2, R2V3, R2V4) DEFINITY Generic 1 (all models) DEFINITY Generic 2 (all models) Dimension® PBX To install the RPSD Lock you must locate the CO line used for RMATS service. This will usually be in a punch block confguration, but may be set up in a number of different ways, including an RJ11 adaptation or a multiple pair gang plug. -
Page 27: Other
Other Other dial-up port applications may be supported. To install an RPSD Lock device for these applications, locate the CO line used to service that port and install the Lock as you would for the remote maintenance and administration application. Modems The RPSD Lock works with any modem that may be used with the PBX. -
Page 28: Rpsd Key
RPSD Key The RPSD Key is similar to the RPSD Lock in size and appearance. Like the RPSD Lock, the RPSD Key has seven LEDs on the front panel and four ports on the back panel. For a detailed description of the front panel LEDs, see Appendix B, Front Panel LEDs. The back panel ports are: an RJ11 port for the CO line, labeled an RJ11 port for the modem connection, labeled... -
Page 29: Hardware Installation Procedures
Hardware Installation Procedures It is absolutely required that the first step in installing the RPSD Lock device is to inform the INADS System Administrator at the local or central technical support center when the installation will take place and that the channel will be down at that time. This ensures that they will not attempt to administer the PBX while the channel is disconnected. -
Page 30: Common Rpsd Lock Configuration
Common RPSD Lock Configuration The Lock is installed between the CO line and the PBX modem. The modem location depends on the type of PBX. The modem is located: on the circuit pack for System 75 and DEFINITY Generic 1 external to the PBX for System 85 and DEFINITY Generic 2 The RPSD Lock must also be connected to the administration terminal via the Aux. -
Page 31: Connecting The Rpsd Lock To The Co Line
You will need the following components to install the RPSD Lock: RPSD Lock device the CO line assigned as the RMATS channel (on customer premises) the PBX modem (on customer premises) 6 position wire (length depends on local configuration) two modular connectors two DB25 connectors (male) RS-232 cable administration terminal... -
Page 32: Rpsd Lock To Co Line (Rmats Channel)
RJ11 Jack CO Line (RMATS Channel) RPSD Lock to CO Line (RMATS Channel) Connecting the RPSD Lock to the PBX Modem The 212A modem has a DB25 input, so the connection to the RPSD Lock must be adapted to connect the tip and ring from a modular plug to a DB25. The two relevant pins for the 212A are pins 7 and 8. -
Page 33: Rpsd Lock To Modem
Modular Plug Connecting the RPSD Lock to the Administration Terminal or Printer You will need the following hardware components to connect the RPSD Lock device to the administration terminal, printer, or modem: RPSD Lock device administration terminal or printer (printer is optional but recommended) one cable with one DB25 connector on one end and the appropriate connector for the serial printer or administration terminal on the other end RS-232 cable... -
Page 34: Aux. Port, Terminal, And Printer Pinouts
To connect the RPSD Lock device to the administration terminal or printer, use the following procedure: Using Table 2-1, make up a DB25 connector with EIA-RS232 cable for the Aux. Port of the RPSD Lock. Make up the appropriate connector for the terminal or printer according to the pin descriptions in Table 2-1. - Page 35 FIGURE 2-7 RPSD Lock to Administratlon Terminal or Printer 2-17 Hardware Installation Procedures...
-
Page 36: Data Terminal Equipment
RPSD (DCE) DB25 Connections From RPSD Lock or Key to Data Terminal Equipment 2-18 Installation Transmit Data Receive Data Request to Send Clear to Send Data Set Ready Signal Ground Data Carrier Detect Data Terminal Ready Ring Indicator Terminal or Printer FIGURE 2-8 (DTE) -
Page 37: Data Communications Equipment
RPSD (DCE) DB25 Connections From RPSD Lock or Key to Data Communications Equipment Obtain further information for the specific terminal or printer in use from the documentation accompanying them. Powering Up the RPSD Lock To power the RPSD Lock, you need: the RPSD Lock Power Supply an AC wall outlet or an available AC outlet on the UPS. -
Page 38: Installing The Rpsd Key
Installing the RPSD Key The RPSD Key is installed between the user’s terminal and modem. To install an RPSD Key device, you need: RPSD Key Terminal Modem two modular connectors 6 position wire one RS-232 connectors one DB25 connector (male) RS-232 cable AC outlet Note:... -
Page 39: Connecting The Rpsd Key To The Terminal
Connecting the RPSD Key to the Terminal The RPSD Key is connected to the terminal via the Aux. Port on the back of the RPSD Key device and the terminal’s RS-232 port. Obtain or make up a cable with the RS-232 wire, the RS-232 connector on one end, and the DB25 connector (male) on the other end. -
Page 40: Testing An Uninitialized Key
Power-Up Behavior of Uninitialized Key With an uninitialized Key, the left four LEDs will all light up upon power-up. If any other behavior occurs, there is a firmware error and the Key should be replaced. Testing an Uninitialized Key Test an RPSD Key that has not been initialized by connecting either a telephone or a terminal to port on the back panel of the Key, then dial the associated RPSD Lock, either Subscriber directly via the telephone or via an application on the terminal. -
Page 41: Cables, Connectors, And Ports Table
Cables, Connectors, and Ports Table Table 2-2 shows the cables, connectors, and ports required to install the RPSD system. This table includes optional connections as well as the basic configuration. Part modular connector 6 position wire modular connector 7 ft. cable with modular connector on each end 14 ft. - Page 42 2-24 Installation...
-
Page 43: Initializing The Rpsd Lock
Software Components The software for the RPSD system is contained within the hardware components and does not need to be loaded separately. Additionally, if you are not installing an RPSD Key or Keys, you need only set the date and time for the RPSD Lock and, in the case of multiple Locks, a Lock ID. If you are installing RPSD Keys, you will need to do some additional initialization on the Lock(s). -
Page 44: Initializing An Rpsd Key
Initializing an RPSD Key Initialization of an RPSD Key involves both the Key and the RPSD Lock. On the Lock, the Key User ID in question must be added using the Add User command. See Chapter 3, System Administrator Command Set for the procedure for using the Add User command. On the Key, the following commands are used for initializing the device: Set User ID Set Secret Key... -
Page 45: Test Rpsd Lock Installation
Test RPSD Lock Installation The Self Check tests the health of the RPSD Lock. If the correct response is received when the test is run, the RPSD Lock is functioning properly. To perform the Self Check, dial the RMATS channel from a touch-tone telephone. When the call is answered, you hear a short tone (indicating a connection to the RPSD Lock). -
Page 46: Rpsd System Administration
3 RPSD System Administration RPSD System Administration Time of Day Access System Activity Log Single Point Administration Enable/Disable (Block) AT&T and Other Key Users Force Connect/Disconnect Authorized Keys RPSD System Administrator Command Set A - Add User B - Block User U - Unblock User T - Test User R - Remove User... -
Page 47: Time Of Day Access
RPSD System Administration The RPSD Lock device prevents unauthorized access to the RMATS channel on your PBX. In administering the RPSD, keep in mind that access via telephone lines is not the only means of breaching the security of your system. A system can be breached, for example, by physically intercepting lines and adding unauthorized equipment. -
Page 48: System Activity Log
System Activity Log The System Activity Log retains a log history of the last 60 status messages generated by the RPSD Lock. As a new message is generated, the oldest message in the buffer is deleted. The most recent twenty messages are sent to the RPSD Lock administration terminal or printer and displayed or printed in real-time. -
Page 49: Access Failure Messages
The fields of the System Activity Log entries are: Log ID provides the ID of the Lock associated with the system activity message. numbers each message in sequence. The sequence goes from 000 to999 Sequence Number and then restarts at 000. Date provides the date of the message. -
Page 50: Single Point Administration
Single Point Administration A single administration terminal or printer can be used to administer multiple Locks. To do so, ® you will need to either administer the Locks from tty ports via the UNIX Operating System, or you can use, in the case of printers, a printer sharing device. Where multiple Locks are used, a Lock ID should be assigned to each Lock. -
Page 51: Authorized Keys
Authorized Keys You may have up to twenty-five RPSD Key user IDs on the RPSD Lock. Ten RPSD Key user IDs are reserved as permanent for AT&T personnel to administer and maintain the PBX, peripheral, or adjunct via the RMATS port. These user IDs cannot be deleted. The permanent user IDs can, however, be blocked by issuing a block command on the RPSD Lock, or by time restrictions if they attempt access during a restricted time. - Page 52 RPSD System Administration...
-
Page 53: Rpsd System Administrator Command Set
RPSD System Administrator Command Set This section describes the commands available on the RPSD Lock and their syntax. The procedures in which the commands are used have been described earlier in this chapter. This material is provided as a quick reference. Also described in this section is the method of accessing the help screens that accompany the Menu of Commands. - Page 54 Optionally, a single Key can be used to access multiple Locks. This is done by entering the information when adding that Key. The same [secret_key] used when adding that Key to other Locks. The information is then used to generate the test responce.
-
Page 55: B - Block User
B - Block User Syntax: b <user_id> RETURN Blocks an RPSD Key user from access to the RMATS channel. Both permanent and non-permanent users may be blocked. In the syntax line above, is the user ID. To determine whether a user is already blocked, or to check the <user_id>... -
Page 56: T - Test User
T - Test User Syntax: t <user_id> RETURN Returns a seven-digit, pseudo-random code to be matched by a code from the specified RPSD Key user. This is used to check whether the RPSD Key has been seeded properly with the secret information. -
Page 57: L - List User Table
L - List User Table Syntax: RETURN l <full_or_partial_user_id> RETURN The List User Table command lists information regarding all users if no user ID is specified. The command lists information regarding a specified user if the full user ID is given, or all users beginning with whichever characters are used, meaning it will list the information for all user IDs beginning with the letter “a”... - Page 58 The fields of the List User Table screen are: User ID Provides the user ID. Blocked? States whether a Block command has been issued for that user. The default is no block. If a user is not blocked, the field is left blank. Blocks can be issued on both permanent and non-permanent users.
- Page 59 Third Sample Command and Response: The following is a sample of the output returned by using the second syntax example, which lists all users beginning with the same characters. > l KEY User ID Blocked? KEY11 KEY12 KEY13 KEY14 KEY15 KEY16 KEY17 KEY18...
-
Page 60: Cr - Change Restriction
CR - Change Restriction Syntax: cr <restr_id,start(hh:mm),end(hh:mm),day_no.> The Change Restriction command is used to set the list of time restrictions that may be placed on a user or users. Time restrictions block access to the RMATS channel for a specified portion of time on a specified day or days. - Page 61 The beginning time of the restriction in 24 hour clock format. In the start(hh:mm) sample above, the beginning time for restriction IDA is which is 8:00PM. Note: You must use the colon (:) as a separator between the hours and minutes or the entry will not work. You must also use a leading zero (0) to enter any time that is less than 10:00, for example, 08:00.
-
Page 62: Lr - List Restrictions
LR - List Restrictions S y n t a x : RETURN lr <restr_id> RETURN The List Restrictions command is used to list the time restrictions that have been administered. Up to 14 separate restrictions maybe created (A-N). The first syntax example above will list the time restrictions for all restriction IDs A to N. In the second example, entering a letter for the specific restriction ID will yield the time restrictions for that restriction ID only. -
Page 63: Ur - User Restrictions
UR - User Restrictions Syntax: ur <full_or_partial_user_id, restr_id(s)> The User Restrictions command is used to assign time restrictions to a user or set of users. The command assigns restrictions to a specified user if the full user ID is given, or all users beginning with whichever characters are used, meaning it will assign the restriction(s) to all user IDs beginning with the letter “a”... -
Page 64: Lh - Log History
LH - Log History Syntax: RETURN Displays the last sixty messages in the System Activity Log. The messages are displayed twenty to a page with a total of three pages. appears at the bottom of the last (third) page. Press [ pages and –... - Page 65 The fields of the Log History screen are: provides the ID of the Lock associated with the system activity message. Log ID numbers each message in sequence. The sequence goes from 000 to 999 Sequence and then restarts at 000. Number provides the date of the message.
-
Page 66: Ah - Access History
AH - Access History Syntax: RETURN The Access History command displays details regarding the last twenty accesses of the RMATS channel for both incoming and outgoing calls. The command takes no arguments. Sample Command and Response: > ah ---Access History --- Date Time User ID... -
Page 67: Fh - Failure History
FH - Failure History Syntax: RETURN The Failure History command displays a log of the last twenty failed access attempts and the details of those calls. The command takes no arguments. Sample Command and Response: > fh -- Failure History User ID Date Time... -
Page 68: St - Status Display
ST - Status Display Syntax: RETURN The Status Display command displays the version, date, time, communications parameters, and current status of the RPSD Lock. Sample Command and Response: > st AT&T RPSD/JPLock01 - V1.1a Firmware V2.Ot Current Date: Mon 11/12/90 Time: 16:11:55 Comms. -
Page 69: Ls - List Statistics
LS - List Statistics Syntax: RETURN The List Statistics command displays a statistical summary of call attempts and failures, both cumulative and since the last time the statistical summary was reset. The summary is reset by the administrator using the Reset Statistics command, described in this section. Sample Command and Response: >... -
Page 70: Rs - Reset Statistics
RS - Reset Statistics Syntax: RETURN Entering r resets the access attempts statistics to zero. This command does not reset cumulative totals. The access attempts statistics are obtained by using the List Statistics command. FC - Force Connect Syntax: RETURN If a call comes in that the administrator wants to go through regardless of whether the caller has a Key, the system administrator can issue the Force Connect command while the Lock is in Verify mode and force the connection to be made. -
Page 71: Fd - Force Disconnect
FD - Force Disconnect Syntax: RETURN The Force Disconnect command disconnects a call in progress. This might be used to clear the channel for a higher priority call. The Lock will request confirmation of a Force Disconnect command. If a Force Disconnect command is issued when no call is in progress, an error message will be returned. -
Page 72: C - Clock Set
C - Clock Set Syntax: c <hh:mm> RETURN Set the clock to local time standards in 24 hour clock format (for example, 16:00 for 4:00 PM). The clock must be set in order to ensure the accuracy of the System Activity Log and also because the clock is used by the RPSD Lock for enabling and disabling time restrictions. -
Page 73: Sc - Set Communications Parameters
SC - Set Communications Parameters Syntax: RETURN sc <speed,length_parity> The Set Communications Parameters command is used to set the communications link speed, character length, and parity on the serial port. The default setting is 9600 baud, 8 bit, no parity. In the syntax above is the command, character length and parity. -
Page 74: Help Screens
Help Screens To obtain a help screen for any command, enter a question mark (?) followed by the command and [ RETURN Sample Help Request and Help Response: > ?i Command: I - ID Set Function: Set ID to precede all log messages from this device. Format: I log id Example: >I LOCK-A... - Page 75 4 RPSD Key Use RPSD Key Use Access Failure Messages Last Call Status Test RPSD Key User Command Set U - Set User ID K - Set Secret Key N - Set Device Number L - List User Information H - History Display D - Date Set C - Clock Set I - Set Log ID...
-
Page 76: Rpsd Key Use
When the RPSD system is working correctly, Key use and authentication should be almost invisible to the RPSD Key user. The user dials the RMATS channel from the user’s terminal, authentication takes place (during which time the LEDs on the front panel of the RPSD Key indicate the status of the call), and the RPSD Key user is corrected to the RMATS channel. -
Page 77: Access Failure Messages
Access Failure Messages Table 4-1 describes the access failure messages and their meanings. Access failure messages do not necessarily mean that an error has occurred. For example, if a Key user fails to gain access to the RMATS channel because the administrator has put a block on that Key, or because access has been restricted for that time of day, then the system is functioning properly. -
Page 78: Rpsd Key User Command Set
RPSD Key User Command Set The RPSD Key device displays a different Menu of Commands to standard output depending on whether the device is in a virgin state. The following shows the Menu of Commands when the Key is in a virgin state: --- Menu of Commands --- L - List User Information H - History Display... -
Page 79: U - Set User Id
U - Set User ID Syntax: u <user_id> RETURN The Set User ID command is used to enter a name that will identify the RPSD Key to the RPSD Lock. This command is only used when initializing a Key in the virgin state. See Chapter 2, Initializing an RPSD Key for a complete description of the procedure which uses this command. -
Page 80: N - Set Device Number
N - Set Device Number Syntax: n <number> RETURN The Set Device Number command enters a number from 100 to 9999999 as an identifier for the RPSD Key device. Use this command when you have two or more RPSD Keys with the same user ID. -
Page 81: H - History Display
H - History Display Syntax: RETURN The History Display command displays a log history of the last twenty messages generated by or sent to the RPSD Key device. See Table 4-1 for an explanation of the status messages sent to the Key by the RPSD Lock when a connection attempt fails. -
Page 82: D - Date Set
D - Date Set Syntax: d <mm/dd/yy> RETURN The Date Set command is used to set the date for the RPSD Key’s internal calendar. You should set the date when you begin using the Key just to be certain that it is correct. To check the date you can use the Status Display command described in this section. -
Page 83: I - Set Log Id
I - Set Log ID Syntax: i <log_id> RETURN The Set Log ID command is used to identify which Key is associated with which status message. This is especially important where multiple devices share a single administration terminal. The command adds the ID to the beginning of each message generated by the Key. In the syntax described above, is the command and is an identifier of up to 8 characters... -
Page 84: S - Status Display
S - Status Display Syntax: RETURN The Status Display command displays the current status of the RPSD Key to the user’s terminal. To use this command, enter s [ Sample Command and Response: >s AT&T RPSD/KEY11 - V1.0 Current Date: Mon 08/14/90 Comms Set to: 9600/8N Current Status: Idle The fields of the Status Display screen are:... -
Page 85: Sc - Set Communications Parameters
SC - Set Communications Parameters Syntax: RETURN sc <speed,length_parity> The Set Communications Parameters command is used to set the communications link speed, character length, and parity on the serial port. The default setting is 9600 baud, 8 bit, no parity. In the syntax above, is the command, character length and parity. -
Page 86: W - Wipe Out
W - Wipe Out Syntax: RETURN The Wipe Out command will erase the user ID, secret key information, and device ID of the RPSD Key and return it to a virgin state. If the Wipe Out command is used, the Key will be unable to access the RPSD Lock unless the entire initialization procedure is performed again. -
Page 87: Troubleshooting
5 Troubleshooting Troubleshooting Access Failure Messages Testing the RPSD Lock Built-in Diagnostics Self Check Last Call Status Test Modem Ring Test Hardware Replacement Replacing the PBX Modem Replacing the Lock or Key Saving the Key Seed Value 5-10 5-11 5-13... - Page 88 This chapter provides a basis for establishing the cause of trouble or access failure with your RPSD system. In the event that you are unable to determine the cause of the problem or resolve the matter to your satisfaction, contact the technical support center at: 1 800 242-2121 Note: The only solution to a hardware or firmware problem in the RPSD Lock or Key is to replace the malfunctioning equipment.
- Page 89 Troubleshooting...
-
Page 90: Access Failure Messages
Access Failure Messages When calls to the RPSD Lock are disconnected without reaching the PBX modem, the Lock generates an access failure message that is sent to standard output and saved in the system activity log. The access failure message is also sent as a reply to the caller whose attempt failed (the message can only be received, however, if the caller has an RPSD Key with an administration terminal or printer attached to it). -
Page 91: Access Failure Messages
Code Message No RPSD/Key No RPSD Key Detected was detected on the caller’s line. No Response No response was returned from the RPSD Key when the RPSD Lock sent the challenge. Invalid User ID The RPSD Key user ID is not in the table of users on the RPSD Lock. - Page 92 Code Message Blocked User administrator placed a block on the caller’s RSPD Key user The RSPD Key Invalid responded to Response the RSPD Lock’s challenge, but the response was incorrect. An outgoing Outgoing Call call is being placed. If a call is connected, the Lock forces a disconnect in...
- Page 93 Code Message Time Restriction Troubleshooting TABLE 5-1 (Continued) Access Failure Messages Meaning The call was No action necessary. This is a deliberate restriction placed on access to the RSPD placed during a Lock by the administrator. If access must time of day when the Lock be permitted at this time, contact the system is restricted...
-
Page 94: Testing The Rpsd Lock
Testing the RPSD Lock There are two ways in which the RPSD Lock can be tested to determine the cause of access failures and whether the Lock or some associated piece of hardware is malfunctioning. Built-in diagnostics Hardware replacement Note: In all cases where a connection fails, if it is important for the caller to get into the RMATs channel, the system administrator can permit the access by using the Force Connect command. -
Page 95: Self Check
Self Check The Self Check tests the health of the RPSD Lock. To perform the Self Check, dial the RMATS channel from a touch-tone telephone. When the call is answered, you hear a short tone (indicating a connection to the RPSD Lock). Press 1 telephone pad. -
Page 96: Modem Ring Test
Modem Ring Test The Modem Ring Test tells you whether the call attempts are getting through to the modem. If there is a problem with the RPSD Lock, the PBX modem, or the cabling, the call will not reach the modem. The likeliest result, in the case of a problem, is a Ring No Answer. To perform the Modem Ring Test, dial the RMATS channel from a touch-tone telephone. -
Page 97: Replacing The Pbx Modem
Replacing the PBX Modem To test whether the problem diagnosed by the Modem Ring Test is in the PBX modem, perform the following procedure: Disconnect the modular telephone plug from the PBX modem and connect a touch-tone telephone to the modem. Call the RMATS channel from a touch-tone telephone and perform the Modem Ring Test described in this chapter. -
Page 98: Replacing The Lock Or Key
Replacing the Lock or Key If an RPSD Lock must be replaced, the service call is classified as the highest priority because a failed Lock prevents all access to or from the RMATS channel. The RPSD Lock may be removed from the line and, to maintain access to the RMATS channel, the modem may be connected directly to the CO line. - Page 99 5-12 Troubleshooting...
-
Page 100: Saving The Key Seed Value
Saving the Key Seed Value All of the secret information used to initialize the RPSD Lock should be saved in a secure location. If a Lock needs to be replaced, you will want to initialize the replacement Lock with the same information as the original. However, it is important to remember that the secret information must be saved in a secure location so as to maintain the security of the system. - Page 101 A Cables, Connectors, and Ports Table Cables, Connectors, and Ports Table...
-
Page 102: A-1 Cables, Connectors, And Ports
Cables, Connectors, and Ports Table Table A-1 shows the cables, connectors, and ports for installing the RPSD system. This table includes optional connections as well as the basic configuration. Part modular connector 6 position wire modular connector 7 ft. cable with modular connector on each end 14 ft. -
Page 103: Rpsd Lock
B Device LEDs Front Panel LEDs RPSD Lock RPSD Key... -
Page 104: B-1 Rpsd Lock Leds
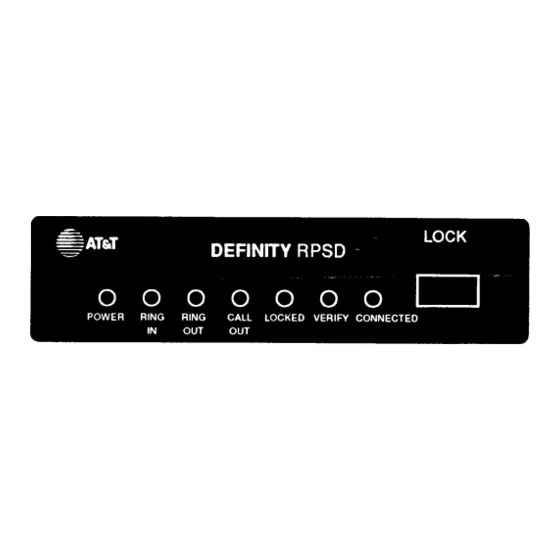
Both the RPSD Lock and the RPSD Key have seven LEDs each on their front panels. The following sections explain the meaning of each LED and their various states. RPSD Lock The first LED on the left is the red Power light. This indicates that the power is on. This LED should remain lit whenever the RPSD Lock is plugged into an electrical outlet. -
Page 105: B-2 Rpsd Key Leds
Table B-1 explains the status of the RPSD Lock when the different LEDs are lit. RPSD Key AT&T POWER RING The first LED on the left is the red Power light. This indicates that the power is on. This LED should remain lit whenever the RPSD Lock is plugged into an electrical outlet. - Page 106 Table B-2 explains the status of the RPSD Key when the different LEDs are lit. TABLE B-2 RPSD Key LEDs Off An incoming call is being processed. Off Should only light when it blinks on power-up. Off An outgoing call is in progress from the modem.
-
Page 107: Rpsd Lock To Administration Terminal Or Printer
AC outlet, 2-3 Access failure messages, 3-3, 4-2, 5-3 RPSD Key, 4-1, 4-2 Access history command, 3-20 screen explained, 3-20 Add user command, 3-7 Administration printer connection, 2-9 location, 2-4 EIA-RS232 limitations, 2-4 reason to have one, 2-5 requirements, 2-9 set link speed, 2-4 Administration terminal connection, 2-9... - Page 108 Last call status test, 4-2, 5-7, 5-8 procedure, 5-8 List Commands, statistics, 3-23 user information, 4-5 user table, 3-11 Log history command, 3-18 Modem ring test, 5-7, 5-9 procedure, 5-9 Modems, 2-9 location on PBX, 2-12 National Parts Sales Center (NPSC), 5-11 telephone number, 5-11 PBXs RPSD Lock connection, 2-8...
- Page 109 Set communications parameters command, 3-27 status display command, 3-22 test user command, 3-10 unblock user command, 3-9 user restrictions command, 3-17 Remove user command, 3-10 Replacing the Lock or Key for customers to, 5-11 for technicians to, 5-11 Reset statistics command, 3-24 Room layout and environment, 2-3 multiple Lock temperature considerations, 2-3 Saving Key seed value, 5-13...
Need help?
Do you have a question about the DEFINITY Remote Port Security Device and is the answer not in the manual?
Questions and answers