Table of Contents
Advertisement
Quick Links
Download this manual
See also:
User Manual
Advertisement
Table of Contents

Related Manuals for Kramer VP-441


Summary of Contents for Kramer VP-441
-
Page 1: User Manual
K R A ME R E LE CT R O N IC S L T D . USER MANUAL MODEL: VP-441 Presentation Switcher/Scaler P/N: 2900-300040 Rev 5... -
Page 4: Table Of Contents
RS-232 Protocol Table Figures F igure 1: VP-441 Presentation Switcher/Scaler Front Panel F igure 2: VP-441 Presentation Switcher/Scaler Rear Panel F igure 3: Connecting the VP-441 Presentation Switcher / Scaler F igure 4: Infrared Remote Control Transmitter VP-441 – Contents... -
Page 5: Introduction
Introduction Welcome to Kramer Electronics! Since 1981, Kramer Electronics has been providing a world of unique, creative, and affordable solutions to the vast range of problems that confront video, audio, presentation, and broadcasting professionals on a daily basis. In recent years, we have redesigned and upgraded most of our... -
Page 6: Getting Started
Avoid interference from neighboring electrical appliances that may adversely influence signal quality • Position your Kramer VP-441 away from moisture, excessive sunlight and dust Recycling Kramer Products The Waste Electrical and Electronic Equipment (WEEE) Directive 2002/96/EC aims to reduce the amount of WEEE sent for disposal to landfill or incineration by requiring it to be collected and recycled. -
Page 7: Overview
Component video is also known as Y, Pb, Pr, or Y, Cb, Cr or YUV; compatible with both SD and HD component The VP-441 is HDTV compatible and the resolution can be up- or down-scaled as follows: Native, VGA, SVGA, XGA, SXGA, UXGA, 480i, 480p, 576i, 576p,... -
Page 8: Defining The Vp-441 Presentation Switcher/Scaler
Remotely, from the infrared remote control transmitter • Via the Ethernet The VP-441 is housed in a 19” 1U rack mountable enclosure, with rack “ears” included, and is fed from a 100-240 VAC universal switching power supply. Defining the VP-441 Presentation Switcher/Scaler This section defines the VP-441. -
Page 9: F Igure 1: Vp-441 Presentation Switcher/Scaler Front Panel
Figure 1: VP-441 Presentation Switcher/Scaler Front Panel Feature Function POWER Switch Illuminated switch for turning the unit ON or OFF IR Receiver Receives signals from the remote control transmitter INPUT Press to select the composite video input SELECTOR Press to select the s-Video input... -
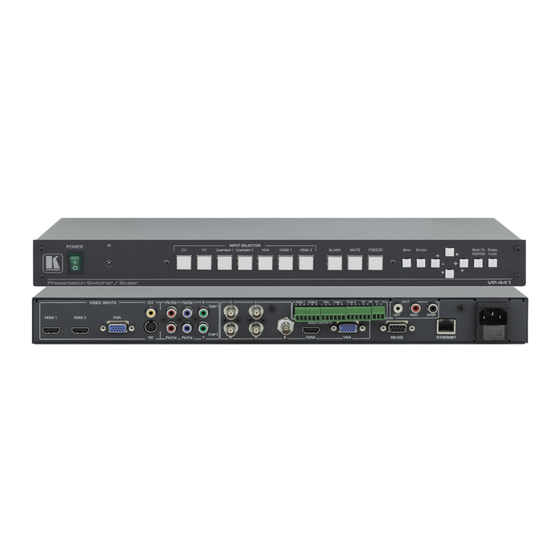
Page 10: F Igure 2: Vp-441 Presentation Switcher/Scaler Rear Panel
Figure 2: VP-441 Presentation Switcher/Scaler Rear Panel Feature Function VIDEO INPUT HDMI Connect to the HDMI source (from 1 to 2) Connectors VGA 15-pin HD Connect to the computer graphics source CV RCA Connect to the composite video source YC 4-pin... -
Page 11: Installing In A Rack
Installing in a Rack This section provides instructions for rack mounting the unit. VP-441 - Installing in a Rack... -
Page 12: Connecting The Vp-441
INPUT connector. Alternatively, you can connect the DVI connector on the DVD player to the HDMI connector on the VP-441 via a DVI-HDMI adapter. When using this adapter, you can connect the audio signal via the terminal block connector 2. Connect a computer graphics source to the VGA 15-pin HD VIDEO INPUT connector. -
Page 13: F Igure 3: Connecting The Vp-441 Presentation Switcher / Scaler
11. Connect the power cord (not shown in Figure 12. If required, connect: A PC via RS-232, see Section 6.3 The ETHERNET port, see Section 6.4 Figure 3: Connecting the VP-441 Presenta ion Switcher / Scaler VP-441 - Connecting the VP-441... -
Page 14: Controlling The Vp-441
The infrared remote control transmitter (see Section 6.5 Controlling via the Front Panel Buttons The VP-441 includes the following front panel buttons: • Input selector buttons for selecting the required input: CV, YC, COMPONENT (1 and 2), VGA or HDMI (1 and 2) •... -
Page 15: Using The Osd Menu
Using the OSD Menu The control buttons let you control the VP-441 via the OSD menu. Press the: • MENU button to enter the menu The default timeout is set to 10 seconds • ENTER button to accept changes and to change the menu settings •... - Page 16 Turn the auto sync ON/OFF. When ON, a short period after not detecting a valid video signal on the selected input, the unit will disable the H and V syncs on the analog outputs until a valid input is again detected EXIT Select to exit the menu VP-441 - Controlling the VP-441...
- Page 17 HDMI (for example, for a DVI input signal) EMBEDDED: the embedded audio in the HDMI signal is selected ANALOG: the analog audio input is selected HDMI AUDIO IN is enabled only when one of the HDMI inputs is selected VP-441 - Controlling the VP-441...
-
Page 18: Connecting To The Vp-441 Via Rs-232
INFO - the information is shown for a few seconds Connecting to the VP-441 via RS-232 You can connect to the VP-441 via an RS-232 connection using, for example, a PC. Note that a null-modem adapter/connection is not required. To connect to the VP-441 via RS-232: •... -
Page 19: Controlling Via The Infrared Remote Control Transmitter
Controlling via the Infrared Remote Control Transmitter You can control the VP-441 from the infrared remote control transmitter: Keys Function SIZE Set the size of the image displayed POWER Turn the VP-441 ON or OFF (the outputs and the front-panel... -
Page 20: Technical Specifications
100-240V AC, 20VA max. DIMENSIONS: 19" x 7" x 1U (W, D, H) rack mountable WEIGHT: 2.7kg (6lbs) approx. ACCESSORIES: Power cord, rack “ears”, IR remote control Specifications are subject to change without notice at http://www.kramerelectronics.com VP-441 - Technical Specifications... -
Page 21: Input Resolutions
Yes (480i30x2 / 576i25x2) 480P/576P 720P@(60/50) 1080I@(60/50) 1080P@(60/50) 1080P@(24/25/30) 480P/576P-RGB 720P@(60/50)-RGB 1080I@(60/50)-RGB 1080P@(60/50)-RGB 1080P@(24/25/30)-RGB VGA@(60/67/72/75/85) SVGA@(56/60/72/75) XGA@(60/70/75) SXGA@(60/75) 1280X960 1600X900@60 UXGA@60 ( 1600X1200 ) WXGA@60(1280x800) WXGA+@60(1440x900) WXGA@60(1366x768) SXGA+@60(1400x1050) WSXGA@60(1680x1050) WUXGA@60(1920x1200) 2K@50 ( 2048X1080) 2K@60 ( 2048X1080) VP-441 - Technical Specifications... -
Page 22: Rs-232 Communication Protocol
When sending a command, a blank character may precede [CR] if desired Example: Example 1: set brightness value as 32 Send: Y11632[CR] Reply: Z11632[CR][LF] Example 2: get current output resolution. (2 = SVGA) Send: Y421[CR] Reply: Z4212[CR][LF] VP-441 - RS-232 Communication Protocol... -
Page 23: Rs-232 Protocol Table
MUTE button on remote control Auto adjust FW V6.12 1: Set 0~100 Color: Red 2: Get 1: Set 0~100 Color: Green 2: Get 1: Set 0~100 Color: Blue 2: Get 1: Set 0~100 Brightness 2: Get VP-441 - RS-232 Communication Protocol... - Page 24 1 : FOLLOW OUTPUT 1: AV 2: YC 3: COMP1 3: Set Select Input Source 4: COMP2 4: Get 5: VGA 6: HDMI1 7: HDMI2 0: Full 3: Set Size 1: Panscan 4: Get 2: Overscan VP-441 - RS-232 Communication Protocol...
- Page 25 2. SVGA 3: XGA 4: SXGA 5: UXGA 6: 480i 7: 480p 4: Get 0 ~ 24 INPUT Resolution 8: 720p60 9: 1080i60 10: 1080p60 11: 576i 12: 576p 13: 720p50 14: 1080i50 15: 1080p50 VP-441 - RS-232 Communication Protocol...
- Page 26 0: Off 6: Set Mute 7: Get 1: On 0: Off 6: Set Key lock 7: Get 1: On 0: clear Auto Tune 6: Set Auto Tune (under fine tune) 7: Get 1: set auto Tune VP-441 - RS-232 Communication Protocol...
- Page 27 VP-441...
- Page 28 For the latest information on our products and a list of Kramer distributors, visit our Web site where updates to this user manual may be found. We welcome your questions, comments, and feedback. Web site: www.kramerelectronics.com E-mail: info@kramerel.com SAFETY WARNING...
Need help?
Do you have a question about the VP-441 and is the answer not in the manual?
Questions and answers