Table of Contents
Advertisement
Quick Links
Advertisement
Table of Contents

Subscribe to Our Youtube Channel
Related Manuals for Kramer Kramer VP-426


Summary of Contents for Kramer Kramer VP-426
-
Page 1: User Manual
USER MANUAL MODEL: VP-426 HDMI-PC Scaler P/N: 2900-300277 Rev 4 www.kramerAV.com... -
Page 3: Table Of Contents
Contents Introduction Getting Started Achieving the Best Performance Safety Instructions Recycling Kramer Products Overview Defining the VP-426 HDMI-PC Scaler Connecting the VP-426 Connecting the Remote Terminal Block Operating the VP-426 Operating the VP-426 from the Front Panel Buttons Using the OSD... -
Page 4: Introduction
Room Connectivity; GROUP 10: Accessories and Rack Adapters and GROUP 11: Sierra Video Products; GROUP 12: Digital Signage; and GROUP 13: Audio, and GROUP 14: Collaboration. Congratulations on purchasing your Kramer VP-426 HDMI-PC Scaler, which is ideal for the following typical applications: ... -
Page 5: Getting Started
Avoid interference from neighboring electrical appliances that may adversely influence signal quality Position your Kramer VP-426 away from moisture, excessive sunlight and dust This equipment is to be used only inside a building. It may only be connected to other equipment that is installed inside a building. -
Page 6: Recycling Kramer Products
Kramer Electronics has made arrangements with the European Advanced Recycling Network (EARN) and will cover any costs of treatment, recycling and recovery of waste Kramer Electronics branded equipment on arrival at the EARN facility. For details of Kramer’s recycling arrangements in your particular country go to our recycling pages at http://www.kramerelectronics.com/support/recycling/. -
Page 7: Overview
Overview The Kramer VP-426 is a high-performance digital scaler for computer graphics/HDTV and HDMI signals. The unit up- or down-scales computer graphics and HDTV signals to resolutions up to WUXGA and 1080p. 22 output resolutions and Native are supported. The user can choose the input – computer graphics/HDTV or HDMI –... -
Page 8: Figure 1: Vp-426 Hdmi-Pc Scaler
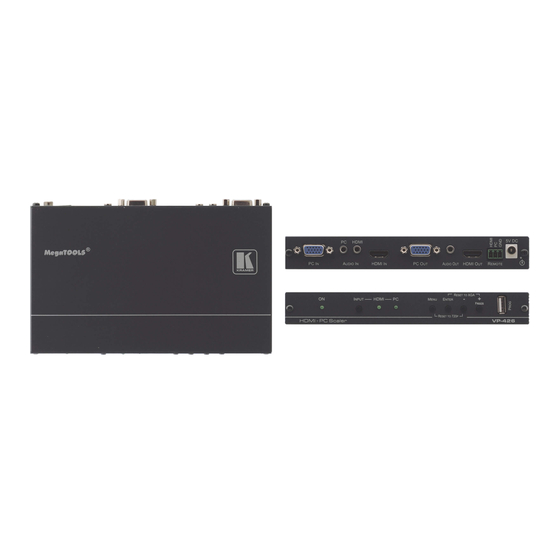
Figure 1: VP-426 HDMI-PC Scaler Feature Function ON LED Lights green when the unit is powered on INPUT Button Press to toggle the input between HDMI and PC HDMI LED Lights when the HDMI input is selected PC LED Lights when the PC input is selected MENU Button Press to enter/escape the on-screen display (OSD) menu. -
Page 9: Connecting The Vp-426
Connecting the VP-426 Always switch off the power to each device before connecting it to your VP-426. After connecting your VP-426, connect its power and then switch on the power to each device. To connect the VP-426 as illustrated in the example in Figure 1. -
Page 10: Connecting The Remote Terminal Block
Figure 2: Connecting the VP-426 HDMI-PC Scaler Connecting the Remote Terminal Block The contact closure remote control pins operate in a similar way to the INPUT SELECT button. Using the contact closure remote control (also known as push-to- make momentary contact) you can select the PC or the HDMI input. To do so, momentarily connect the required input pin (HDMI or PC) on the REMOTE terminal block connector to the G (ground) pin, as shown in Figure... -
Page 11: Figure 3: Connecting The Remote Contact Closure Switches
Figure 3: Connecting the Remote Contact Closure Switches VP-426 - Connecting the VP-426... -
Page 12: Operating The Vp-426
Operating the VP-426 The VP-426 is operated directly using the front panel buttons and the OSD menu (see Section 5.2). Operating the VP-426 from the Front Panel Buttons During normal operation (without the OSD), the front panel buttons perform the following functions: ... - Page 13 As an example of setting parameters, to increase the contrast on the display: 1. From normal operation, press MENU. The OSD main menu appears on the screen. 2. Press the + or – button to highlight CONTRAST. CONTRAST changes to green when highlighted. 3.
- Page 14 Main Menu Submenu Values Notes Input Source PC/YPbPr Select for PC source HDMI Select for HDMI source Exit Select to exit to the Main Menu Output Size Full Select the size of the display Overscan Underscan Letterbox Pan scan Best fit Resolution Select the output resolution from the menu: Resolution:...
- Page 15 Main Menu Submenu Values Notes Display Info/On/Off Select the information shown on the screen during operation: ON - the information is shown permanently OFF - the information is not shown INFO - the information is shown for the time period set in INFO Exit Select to exit to the Main Menu Advanced...
-
Page 16: Upgrading The Firmware
Main Menu Submenu Values Notes Factory Reset Resets the device to its factory default parameters and automatically senses the input and output devices Exit Select to exit to the Main Menu Exit Select to exit the OSD Upgrading the Firmware 1. -
Page 17: Technical Specifications
Technical Specifications INPUTS: 1 PC/HD (RGBHV/YPbPr) on a 15-pin HD connector, 1 HDMI connector, 2 unbalanced stereo audio connectors on 3.5mm mini jacks OUTPUTS: 1 PC (RGBHV) on a 15-pin HD connector, 1 HDMI connector, 1 unbalanced stereo audio connector on a 3.5mm mini jack OUTPUT RESOLUTIONS: NATIVE, 480i, 480p, 720p@60Hz, 1080i@60Hz,... - Page 18 Resolution/Refresh Rate Component HDMI WXGA @60(1366x768) SXGA+ @60(1400x1050) WSXGA @60(1680x1050) WUXGA @60(1920x1200) VP-426 - Technical Specifications...
-
Page 20: Safety Warning
SAFETY WARNING Disconnect the unit from the power supply before opening and servicing For the latest information on our products and a list of Kramer distributors, visit our Web site where updates to this user manual may be found. We welcome your questions, comments, and feedback.
Need help?
Do you have a question about the Kramer VP-426 and is the answer not in the manual?
Questions and answers