
Related Manuals for Pride Jazzy 1113


Summary of Contents for Pride Jazzy 1113
- Page 1 Owner’s Manual 21 Healey Road Dandenong, 3175 Victoria, Australia ACN # 088 609 661 www.pridemobility.com...
- Page 2 Performing a prohibited action can cause injury to personnel and/or damage to equipment (black symbol with red circle and red slash). Copyright © 2004 This product is manufactured by: Pride Mobility Products Corporation 182 Susquehanna Avenue Exeter, PA 18643 INFMANU1395/Rev H/December 2004 www.pridemobility.com...
-
Page 3: Table Of Contents
This owner’s manual is compiled from the latest specifications and product information available at the time of publication. We reserve the right to make changes as they become necessary. Any changes to our products may cause slight variations between the illustrations and explanations in this manual and the product you have purchased. Jazzy 1113 www.pridemobility.com... -
Page 4: Introduction
Pride to enhance or preserve the safe use of this product. -
Page 5: Safety
Pre-Ride Safety Check Get to know the feel of your power chair and its capabilities. Pride recommends that you perform a safety check before each use to make sure your power chair operates smoothly and safely. See IX. “Care and Maintenance.”... - Page 6 Your power chair is rated for a maximum weight capacity. Please refer to the specifications table for this limit. WARNING! Exceeding the weight capacity voids your warranty and may result in personal injury and/or damage to your power chair. Pride will not be held responsible for injuries and/or property damage resulting from failure to observe weight limitations.
- Page 7 Pride recommends that the maximum slope of an incline you attempt to safely ascend or descend on your power chair does not exceed 8.7% (5°). See figure 1.
- Page 8 Your power chair is designed to provide optimum stability under normal driving conditions—dry, level surfaces composed of concrete, blacktop, or asphalt. However, Pride recognises that there will be times when you will encounter other surface types. For this reason, your power chair is designed to perform admirably on packed soil, grass, and gravel.
- Page 9 If you will be traveling with your power chair, you may find it necessary to use a lift/elevation product to aid in transportation. Pride recommends that you closely review the instructions, specifications, and safety information set forth by the manufacturer of the lift/elevation product be- fore using that product.
- Page 10 I I . S A F E T Y To eliminate the possibility of injury, Pride recommends that you or a trained attendant perform the following tasks before attempting a transfer: n Turn the power off. See VII. “Operation.” n Ensure your power chair is not in freewheel mode. See III. “Your Power Chair.”...
- Page 11 Pride recommends that the power chair user determine his/her personal limitations and practice bending and reaching in the presence of a qualified professional.
- Page 12 WARNING! The addition of accessories or components to the electrically-powered mobility vehicle can increase the susceptibility of the vehicle to EMI. Do not modify your power chair in any way not authorised by Pride. WARNING! The electrically-powered mobility vehicle itself can disturb the performance of other electrical devices located nearby, such as alarm systems.
-
Page 13: Your Power Chair
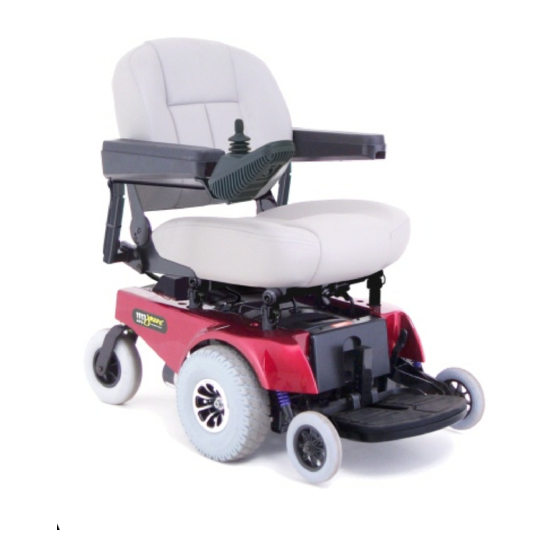
See figures 5, 6, and 7. SEATBACK ARMRESTS JOYSTICK CONTROLLER SEAT ASSEMBLY SEAT BASE SEAT FRAME LATCH RELEASE BUTTONS POWER BASE ASSEMBLY CASTER WHEEL BODY SHROUD FOOTREST DRIVE WHEEL ANTI-TIP WHEELS Figure 5. The Jazzy 1113 Jazzy 1113 www.pridemobility.com... - Page 14 Component Weights: Base: 36 kg Front frame: 1 kg Right frame assembly: 15 kg Left frame assembly: 15 kg Battery well frame: 6 kg Seat: 15 kg Batteries: 11 kg each *Depending on user weight and terrain. www.pridemobility.com Jazzy 1113...
- Page 15 MANUAL FREEWHEEL LEVER REAR SEAT POST MOTOR CONNECTOR MANUAL FREEWHEEL LEVER FRONT BATTERY BOX Figure 6. Power Base Top View CONTROLLER CONNECTOR MAIN CIRCUIT BREAKER CHARGER INHIBIT CONNECTOR CHARGER POWER CORD RECEPTACLE AMMETER (VSI ONLY) Figure 7. Electronics Tray Jazzy 1113 www.pridemobility.com...
- Page 16 Then push in the circuit breaker reset button, turn on the controller, and continue normal operation. If the main circuit breaker trips repeatedly, contact your authorised Pride Provider. Controller Connector: This is where the controller connects to the battery, the motors, and the motor brakes.
- Page 17 WARNING! Do not attempt to use either manual park brake levers to stop your power chair. Serious injury may result. WHEEL WHEEL MOTOR MOTOR MANUAL PARK BRAKE MANUAL PARK BRAKE Figure 10. Manual Park Brake Engaged Figure 11. Manual Park Brake Disengaged Jazzy 1113 www.pridemobility.com...
-
Page 18: Disassembly
ASSEMBLY FOOTREST FRONT FRAME Figure 12. The Jazzy 1113 Component Assemblies To disassemble the Jazzy 1113: Turn off power to the unit, and position the power chair in a location where there is ample working room on all four sides of the unit. We recommend 1 meter or more of clearance on all sides. There are eight component assemblies, some of which take up a great deal of space when disassembled from the chair. - Page 19 Squeeze the connector latch release levers to disconnect. 5. Disconnect the right motor connector from its matching socket located on the right frame assembly. Squeeze the connector latch release levers to disconnect. Figure 15. Seat Removal Jazzy 1113 www.pridemobility.com...
- Page 20 6. Keep pulling upward with your right hand until the locating pin on the bottom of that side of the front frame releases from its slot in the left frame assembly. 7. Carefully let the left frame assembly tilt to a resting position. www.pridemobility.com Jazzy 1113...
-
Page 21: Comfort Adjustments
There are some adjustments you can make to increase your comfort such as seat height and angle, armrest height and angle, the footrest height and angle, and the controller position. WARNING! If your power chair was configured at your authorised Pride Provider or service center, please consult your health care professional before changing seat position or making any other adjustment. - Page 22 You can position the controller for either left-hand or right- hand use. To change the controller position: 1. Disconnect the controller harness from the electronics tray. See figure 7. 2. Cut the wire tie that attaches the controller cable to the armrest. www.pridemobility.com Jazzy 1113...
- Page 23 1. Flip up the footrest and locate the setscrew. See figure 23. 2. Turn the setscrew clockwise to lower the front of the footrest . 3. Turn the setscrew anticlockwise to raise the front of the footrest. Figure 23. Footrest Angle Adjustment Jazzy 1113 www.pridemobility.com...
- Page 24 When coming to a stop your power chair tips forward excessively. n The anti-tip wheels constantly rub the ground. WARNING! Consult your authorised Pride Provider before attempting to change the anti- tip wheel height! Changing the anti-tip wheel height affects handling under deceleration! WARNING! The higher you raise the anti-tip wheels, the more you increase your power chair’s tendency to tilt forward when coming to a stop.
-
Page 25: Assembly
Release the latch release lever to hold the two assemblies together. WARNING! Make certain that the front frame is snapped securely to both the right frame assembly and to the left frame assembly. Figure 27. Fitting the Frames Jazzy 1113 www.pridemobility.com... - Page 26 3. Push the front of the seat frame down until both the left and the right frame sides lock into the front seat post mounts. See figures 29 and 30. www.pridemobility.com Jazzy 1113...
- Page 27 32. Figure 31. Mounting the Footrest WARNING! Do not place the controller cable so that it can be pinched in the seat frame or the power base frame. Figure 32. Controller Connector Jazzy 1113 www.pridemobility.com...
-
Page 28: Operation
WARNING! If your power chair begins to move in an unexpected manner, immediately release the joystick. Unless the joystick is damaged, this action should stop your power chair. KEYPAD The keypad is located in front of the joystick. It contains keys necessary to operate your power chair. See figure 34. www.pridemobility.com Jazzy 1113... - Page 29 If you get “ripple side to side of lights,” turn off the controller, allow the joystick to return to the neutral position, then turn on the controller. NOTE: If you still get “ripple side to side of lights,” contact an authorised Pride Provider. NOTE: When the batteries approach a discharged state, the first red light will begin to slowly flash,...
- Page 30 WARNING! Only chargers with Neutrik NC3MX plugs should be connected to the off-board charger/programming socket. See an authorised Pride Provider for more information. NOTE: The socket may also be used for reprogramming the VSI. Contact an authorised Pride Provider for more information.
-
Page 31: Error Codes
3. Pull the joystick to the full rearward position until the VSI beeps. 4. Release the joystick. There should be a long beep. 5. The VSI is now unlocked. NOTE: If the above procedure fails to either lock or unlock the VSI, contact an authorised Pride Provider. THERMAL ROLLBACK The VSI controller is equipped with a thermal rollback circuit. - Page 32 Unless the joystick is damaged, this action should stop your power chair. KEYPAD The keypad is located directly in front of the joystick. It contains keys that you will use to control your power chair. See figure 36. www.pridemobility.com Jazzy 1113...
- Page 33 If you lose this key, contact your authorised Pride Provider. To enable the lockout system: 1. Hold the magnetic key on or near the key symbol. The system will beep and automatically turn off.
- Page 34 (drive mode and actuator display). NOTE: The drive mode settings are preset at the factory. If your authorised Pride Provider changes these settings, please make note of these changes.
- Page 35 The table below identifies the individual error codes. If your keypad displays one of these codes, contact your authorised Pride Provider. NOTE: You must turn the controller off and then on again to reset the controller, even if the source of the error is removed/corrected.
- Page 36 If you cannot resolve the problem, contact your authorised Pride Provider. Flash Code Sequence Diagnosis Solution •—•—•— DX module fault See your authorised Pride Provider. ••—••—••— DX accessory fault See your authorised Pride Provider. •••—•••— Left motor (or connection) fault Check left motor wiring.
- Page 37 Unless the joystick is damaged, this action should stop your power chair. KEYPAD The keypad is located directly in front of the joystick. It contains keys that you will use to control your power chair. See figure 38. Jazzy 1113 www.pridemobility.com...
- Page 38 NOTE: The speed settings are preset at the factory. If your authorised Pride Provider changes the order of these settings, please make note of these changes. Contact your authorised Pride Provider for more information.
- Page 39 If you get “ripple up and down of lights,” turn off the controller and allow the joystick to return to the neutral position. Then turn on the controller. NOTE: If you still get “ripple up and down of lights,” contact your authorised Pride Provider. NOTE: When the batteries approach a discharged state, the first red light will begin to slowly flash,...
-
Page 40: Sleep Mode
Error codes are displayed as a number of flashing lights. For instance, if the first light is flashing rapidly, the battery voltage is nearly depleted. The table below identifies the individual error codes, probable causes, and possible solutions. If you get one of these error codes, contact your authorised Pride Provider. Flashing Lights... -
Page 41: Batteries And Charging
When the batteries are fully charged, the needle will vibrate on or about the zero mark on the meter scale. 6. When the batteries are fully charged, unplug the power cord from the wall outlet, wind it up, and store it in the seat pouch located on the back of the seat. Jazzy 1113 www.pridemobility.com... -
Page 42: Daily Use
The onboard charger will not be able to charge your batteries after the batteries have been discharged to nearly zero voltage. If this happens, call your authorised Pride Provider for assistance. - Page 43 More importantly, it takes a few “charging cycles” (a partial drain, then a full recharge) to establish the critical chemical balance that is essential to the battery’s peak performance and long life. It is well worth it for you to take the time to break in the batteries properly. Jazzy 1113 www.pridemobility.com...
- Page 44 Provider to determine specific requirements of transportation and packaging. What about shipping? If you wish to use a freight company to ship your power chair to your final destination, repack the unit in the original shipping container and ship its batteries in separate boxes. www.pridemobility.com Jazzy 1113...
-
Page 45: Care And Maintenance
Your power chair is a sophisticated motorised vehicle. Like any motorised vehicle, it requires routine maintenance checks. You can perform some of these checks, but others require assistance from an authorised Pride Provider. Preventive maintenance is very important. If you follow the maintenance checks in this section as scheduled, you can help ensure that your power chair gives you years of trouble-free operation. - Page 46 To calibrate the joystick, power off the unit, place the joystick in the neutral position, and power the unit back on. If a problem still exists with your joystick’s performance, contact your authorised Pride Provider. n Check the brakes. This test should be carried out on a level surface with at least one meter of clearance around your power chair.
- Page 47 Keep your power chair clean and free of foreign material such as hair, food, drink, etc. YEARLY CHECKS Take your power chair to an authorised Pride Provider for yearly maintenance. This helps to ensure that your power chair is functioning properly and helps prevent future complications.
-
Page 48: Battery Replacement
Wear goggles and gloves when handling batteries and wash hands after handling. WARNING! Pride Power Chair batteries are heavy. See specifications table. If you are unable to lift that much weight, be sure to get help. Lifting beyond your capacity can result in personal injury. - Page 49 WHEN TO SEE YOUR PRIDE PROVIDER FOR SERVICE The following symptoms could indicate a serious problem with your power chair. If necessary, contact an authorised Pride Provider. When calling, have the model number, serial number, nature of the problem, and the trouble code if available.
-
Page 50: Warranty
ONE-YEAR LIMITED WARRANTY Your Pride Jazzy is fully guaranteed for twelve (12) months from the date of purchase against faults arising due to defects in manufacture or materials. This warranty does not detract from, but is in addition to your legal rights. - Page 51 Quality Control-Model 1113 Thank you for making the Pride Jazzy your choice in Power Chairs. We have thoroughly inspected your Jazzy. The following check marks indicate that it has been test driven and inspected. Controller Serial # Inclusion of all Parts...
Need help?
Do you have a question about the Jazzy 1113 and is the answer not in the manual?
Questions and answers