Advertisement
Quick Links
Advertisement

Related Manuals for zortrax M200


Summary of Contents for zortrax M200
- Page 1 QUICK START GUIDE ENTER AN ENVIRONMENT OF PROFESSIONAL 3D PRINTING...
- Page 3 MEET THE ZORTRAX M200 Zortrax M200 3D printer transforms virtual projects into three-dimensional reality. It is used to prototype and create various three-dimensional models. 3D printing can be utilized to prototype mechanical elements, structures, industrial molds and templates, objects of everyday use...
- Page 4 M200 PRINTER ENVIRONMENT M200 DEDICATED Z-SUITE TECHNICAL 3D PRINTER FILAMENTS SOFTWARE SUPPORT...
- Page 5 HOW DOES ZORTRAX M200 WORK Preparing the Model Z-Suite Software Transferring the Model Uploading the Filament Initiating the Printing Process Work with the model can Z-Suite is an appliction which In order to export the The following step is to...
- Page 6 Models printed using Z-ABS can be used as prototypes. of the M200 printer to be released. An ideal prototypes of objects created further on using the proportion of polycarbonate and ABS material Perfectly imitates the properties of materials used technology of injection molds.
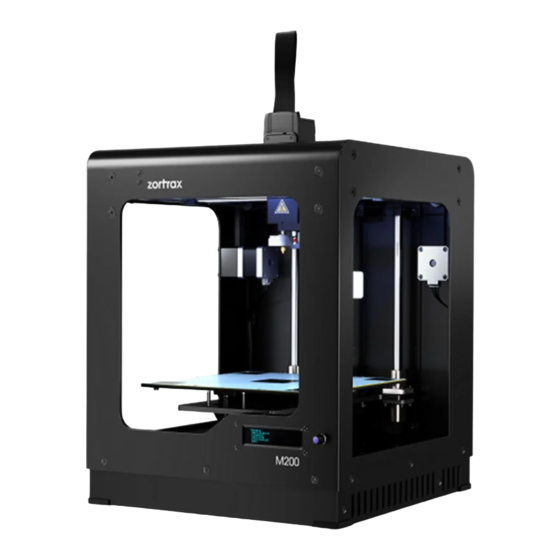
- Page 7 OVERVIEW Extruder Extruder Cable Filament Filament Guide Hotend Build Platform Display Filament Mount Power Connector Z Axis Screw Control and Switch Knob...
- Page 8 IN THE BOX SD Card Z-Suite* Zortrax M200 Filament Spool Build Filament Guide Filament Spool Power Cable & & 3D Printer Holder Platform SD Card Reader Quick Start Guide Cutting Knife Nozzle Key Spatula Safety & Allen Keys & Pliers &...
- Page 9 M200 PRINTER ENVIRONMENT Z- SUITE SOFTWARE INSTALLATION You need a model in .stl file format to print it on Zortrax M200 3D printer. Most CAD and 3D modeling software allows you to convert 3D files to this format. To prepare a file for 3D printing (in the z-code format) install the Z- Suite Software on your computer.
- Page 10 Open the box, pull out the cushioning. Cushioning from the front should be removed as the last one. Now Zortrax M200 is ready to be taken out of the box. Unbox Zortrax M200. Please use gloves. Your Zortrax M200 is now unpacked. While lifting or moving...
- Page 11 SETTING UP Insert the Build Platform and fit magnets marked in the picture. Now connect carefully two connectors to the Build Platform. Install wires using bands. Apply bands on wires and then tighten them to the body. Connect extruder cable to extruder unit. WARNING! Before removing the platform, detach connectors from the Build Platform.
- Page 12 SETTING UP Plug in power cable. Attach the filament tube. Attach the spool holder. Mount the Z-ABS spool onto the filament holder. The spool should rotate anti-clockwise. Lead the filament through the filament tube and into the extruder. WARNING! Always plug the power cord of your printer into a grounded outlet.
- Page 13 Zortrax is heating the extruder. When the display shows the message „Please insert Filament” insert the end of the filament into the extruder. When Zortrax finishes loading filament, printer is ready to print. To remove filament select „Unload Filament”. Zortrax is heating the extruder.
- Page 14 PRINTING When the printing process is finished, turn off the printer using the power switch. Disconnect cables from the Build Platform. Remove Build Platform. Remove printed model using spatula. Please use gloves, also using safety glasses is recommended. Place the Build Platform back in the printer and connect the connectors.
- Page 15 We recommend that the minimum distance betweenthe heat gun nozzle and the model should be 10 In all mentioned above activities we recommend to use safety gloves attached to the set along with the Zortrax M200 3D printer.
-
Page 16: Cleaning The Platform
CLEANING THE PLATFORM While printing, remains of the material may get stuck below printing platform. After a certain time it may affect accuracy of the machine. We recommend to follow these instructions ever few prints. Please put gloves on. Unplug power cord and disconnect the cables from the Build Platform. - Page 17 CLEANING THE PLATFORM Zortrax M200 should be turned off. Insert the Build Platform and fit magnets (Pic. 1). Make sure that nozzle is clean. Connect two connectors to the Build Platform carefully. Tighten the screws (Pic. 3 - No. 1,2,3).
-
Page 18: Specifications
SPECIFICATIONS PHYSICAL DIMENSIONS PRINTING Without Spool 345 x 360 x 430 mm [13.6 x 14 x 17 in] Print technology LPD™ - Layer Plastic Deposition With Spool 345 x 430 x 430 mm [13.6 x 17 x 17 in] Build volume 200 x 200 x 185 mm [7.87 L x 7.87 W x 7.28 H in] Shipping Box... - Page 20 // www.zortrax.pl Technical Support: support@zortrax.com...
Need help?
Do you have a question about the M200 and is the answer not in the manual?
Questions and answers