
Related Manuals for AFG 2.7AT


Summary of Contents for AFG 2.7AT
- Page 1 TREADMILL OWNER’S MANUAL Read the TREADMILL GUIDE before using this OWNER’S MANUAL.
-
Page 3: Important Precautions
IMPORTANT PRECAUTIONS SAVE THESE INSTRUCTIONS When using an electrical product, basic precautions should always be followed, including the following: Read all instructions before using this treadmill. It is the responsibility of the owner to ensure that all users of this treadmill are adequately informed of all warnings and precautions. - Page 4 DANGER TO REDUCE THE RISK OF ELECTRICAL SHOCK: Always unplug the treadmill from the electrical outlet immediately after using, before cleaning, performing maintenance and putting on or taking off parts. WARNING TO REDUCE THE RISK OF BURNS, FIRE, ELECTRICAL SHOCK OR INJURY TO PERSONS: •...
- Page 5 WARNING TO REDUCE THE RISK OF BURNS, FIRE, ELECTRICAL SHOCK OR INJURY TO PERSONS: • At NO time should children under the age of 13 or pets be within 10 feet of the machine. • At NO time should children under the age of 13 use the treadmill. •...
-
Page 6: Grounding Instructions
GROUNDING INSTRUCTIONS This product must be grounded. If a treadmill should malfunction or breakdown, grounding provides a path of least resistance for electrical current to reduce the risk of electrical shock. This product is equipped with a cord having an equipment-grounding conductor and a grounding plug. - Page 7 ENTER YOUR SERIAL NUMBER AND MODEL NAME IN THE BOXES BELOW: SERIAL NUMBER: AFG SPORT 2.7AT TREADMILL MODEL NAME: » Refer to the SERIAL NUMBER and MODEL NAME when calling for service.
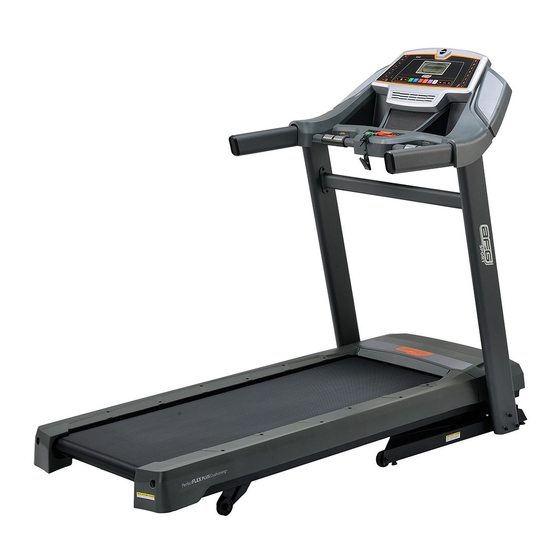
- Page 8 CONSOLE DISPLAY CONSOLE FAN AND CONTROLS READING RACK SPEAKERS HANDLEBARS CONSOLE SAFETY KEY PLACEMENT WATER BOTTLE HOLDER SUPPORT BAR CONSOLE MAST ON/OFF SWITCH MOTOR COVER POWER CORD RUNNING BELT / DECK HEART RATE GRIP BARS REAR ROLLER TENSION / ADJUSTMENT BOLTS TRANSPORT WHEEL FOOT LOCK LATCH SIDE RAIL...
-
Page 9: Pre-Assembly
PRE ASSEMBLY TOOLS REQUIRED: F 6 mm T-Wrench (included) F 6 mm L-Wrench (included) UNPACKING F 4 mm L-Wrench (included) Place the treadmill carton on a level flat surface. It is recommended that you place F Phillips Screwdriver (not included) a protective covering on your floor. -
Page 10: Assembly Step
ASSEMBLY STEP 1 HARDWARE FOR STEP 1 PART TYPE DESCRIPTION HEX SOCKET BOLT M8X1.25PX60L Cut the yellow banding straps and lift the running deck upward to remove all contents from underneath the running deck. Open HARDWARE FOR STEP 1. Attach LEFT CONSOLE MAST (1) to MAIN FRAME (2) using 3 BOLTS (A). - Page 11 ASSEMBLY STEP 2 HARDWARE FOR STEP 2 PART TYPE DESCRIPTION HEX SOCKET BOLT M8X1.25PX60L Pull the CONSOLE CABLE (3) away from the treadmill base frame. Connect the CONSOLE CABLE (3) from the MAIN FRAME (2) to the CONSOLE CABLE (3) in the bottom of the RIGHT CONSOLE MAST (4).
- Page 12 ASSEMBLY STEP 3 HARDWARE FOR STEP 3 PART TYPE DESCRIPTION SCREW 4X10L Open HARDWARE FOR STEP 3. Turn CONSOLE (5) over and align CONSOLE POCKETS (6) with screw holes. NOTE: Before securing the pockets, ensure the snap tabs are outside the pocket recess. Attach CONSOLE POCKETS (6) to CONSOLE (5) using 10 SCREWS (B).
- Page 13 ASSEMBLY STEP 4 HARDWARE FOR STEP 4 PART TYPE DESCRIPTION HEX SOCKET BOLT M8X1.25PX20L Open HARDWARE FOR STEP 4. Gently place CONSOLE (5) on top of CONSOLE MASTS (1 & 4). NOTE: Be careful not to pinch the console cables while attaching the console. Connect the CONSOLE CABLES (3) and ensure cables are tucked inside the CONSOLE (5).
- Page 14 ASSEMBLY STEP 5 HARDWARE FOR STEP 5 PART TYPE DESCRIPTION BUTTON HEAD BOLT M6X1.0PX15L Open HARDWARE FOR STEP 5. Align SUPPORT BAR (7) on top of CONSOLE MASTS (1 & 4). Attach the SUPPORT BAR (7) to the CONSOLE MASTS (1 & 4) using 4 BOLTS (D). ASSEMBLY COMPLETE! Before the first use, lubricate the treadmill deck by following the instructions in the MAINTENANCE...
-
Page 17: Treadmill Operation
TREADMILL OPERATION This section explains how to use your treadmill’s console and programming. The BASIC OPERATION section in the TREADMILL GUIDE has instructions for the following: • LOCATION OF THE TREADMILL • USING THE SAFETY KEY • FOLDING THE TREADMILL •... -
Page 19: Console Operation
CONSOLE OPERATION Note: There is a thin protective sheet of clear plastic on the overlay of the console that should be removed before use. LCD DISPLAY WINDOW: time, distance, speed, calories, incline and heart rate. PROGRAMMING KEYS: Used to cycle through programs and user setup. C) ENTER: used to confirm selection. -
Page 20: Display Window
DISPLAY WINDOW • TIME: Shown as minutes : seconds. View the time remaining or the time elapsed in your workout. • DISTANCE: Shown as miles. Indicates distance traveled or distance remaining during your workout. • CALORIES: Total calories burned or remaining for your workout. •... -
Page 21: Getting Started
GETTING STARTED 1) Check to make sure no objects are placed on the belt that will hinder the movement of the treadmill. 2) Plug in the power cord and turn the treadmill ON. 3) Stand on the side rails of the treadmill. 4) Attach the safety key clip to part of your clothing making sure that it is secure and will not become detached during operation. -
Page 22: Program Information
PROGRAM INFORMATION MANUAL: Adjust your speed and incline manually during your workout. User sets time, starting speed and incline. STEPS: Promotes healthy activity with 10 step-based workouts calculated using average stride length. Choose from 1000, 2000, 3000, 4000, 5000, 6000, 7000, 8000, 9000, and 10,000 step workouts. User sets starting speed and incline. - Page 23 SPEED INTERVALS (10 LEVELS) PEAK INTERVALS (10 LEVELS) Speed changes and segments repeat 90 seconds and 30 seconds Speed and Incline changes, segments repeat 90 seconds and 30 seconds Segment Warm Up Cool Down Segment Warm Up Cool Down Time 4:00 Mins 90 sec 30 sec...
- Page 24 GOAL CENTER ™ Research shows that those who create and track their fitness goals, on average, achieve greater success than those who do not. Because your new treadmill is equipped with Advance Fitness Group’s exclusive GOAL CENTER Performance Tracker, you’ve taken an important step towards achieving your fitness goals. GOAL CENTER is innovative new software, integrated into your console, that will allow you to track your fitness goals over time, without the need for paper journals or logs.
- Page 25 USING YOUR MEDIA PLAYER 1) Connect the included AUDIO ADAPTOR CABLE to the AUDIO IN JACK on the left of the console and the headphone jack on your media player. 2) Use your media player buttons to adjust song settings. 3) Remove the AUDIO ADAPTOR CABLE when not in use.
-
Page 27: Limited Home-Use Warranty
LIMITED HOME-USE WARRANTY... -
Page 28: Exclusions And Limitations
EXCLUSIONS AND LIMITATIONS WEIGHT CAPACITY = 300 lbs (136 kilograms) Who IS covered: FRAME • LIFETIME • The original owner and is not transferable. Advanced Fitness Group warrants the frame against defects in workmanship and materials for the lifetime of What IS covered: the original owner, so long as the device remains in the •... - Page 29 SERVICE/RETURNS maintenance of the equipment. Advanced Fitness Group • In-home service is available within 150 miles of the does not provide monetary or other compensation for nearest authorized Service Provider (Mileage beyond any such repairs or replacement parts costs, including 150 miles from an authorized service center is the but not limited to gym membership fees, work time lost, responsibility of the consumer).
- Page 32 Customer Tech Support. Additional product information is available on our website. TECH SUPPORT USA & CANADA: Advanced Fitness Group 1-855-396-2524 1600 Landmark Drive, support@advancedfitnessgroup.com Cottage Grove WI, 53527 www.afgfitness.com AFG Sport 2.7AT 0615 | © 2015 Advanced Fitness Group Designed & Engineered in the U.S.A. • Made in China...
Need help?
Do you have a question about the 2.7AT and is the answer not in the manual?
Questions and answers